In Part 1 of this three-part series of musings on double mid side (DMS), I went through the three rigging options; in Part 2 I tested the options; but in this final part, as the title says, I do something rather different, which is compare DMS to horizontal B-format (i.e. native B-format with no vertical component).
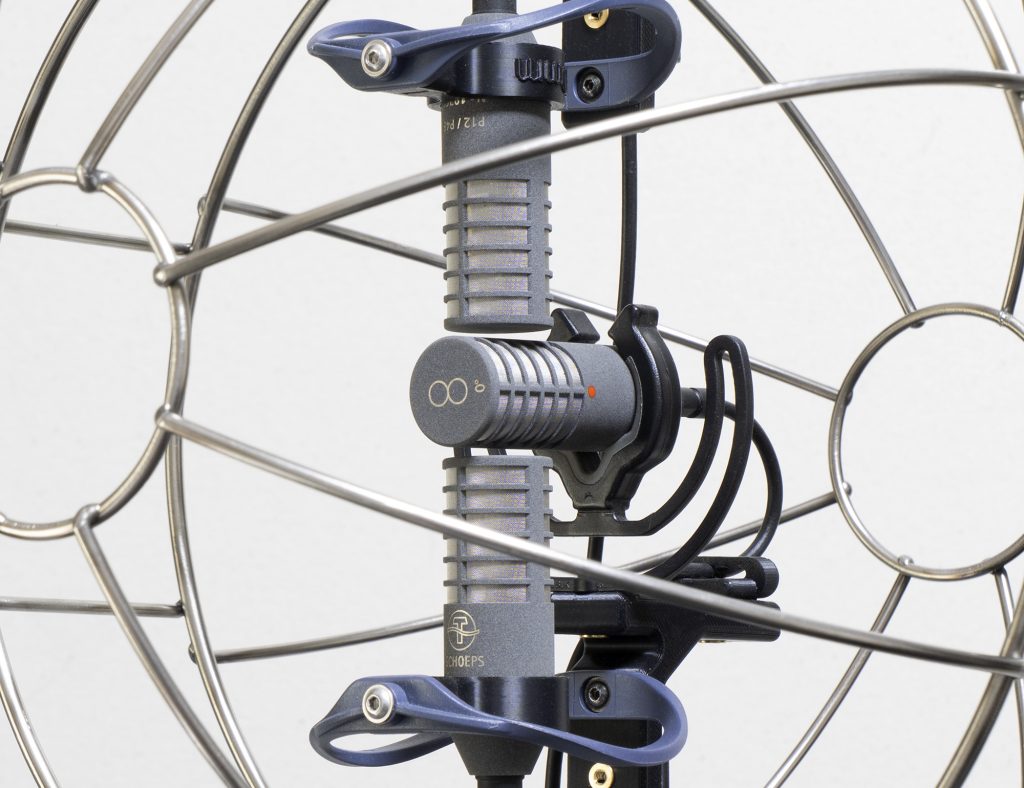
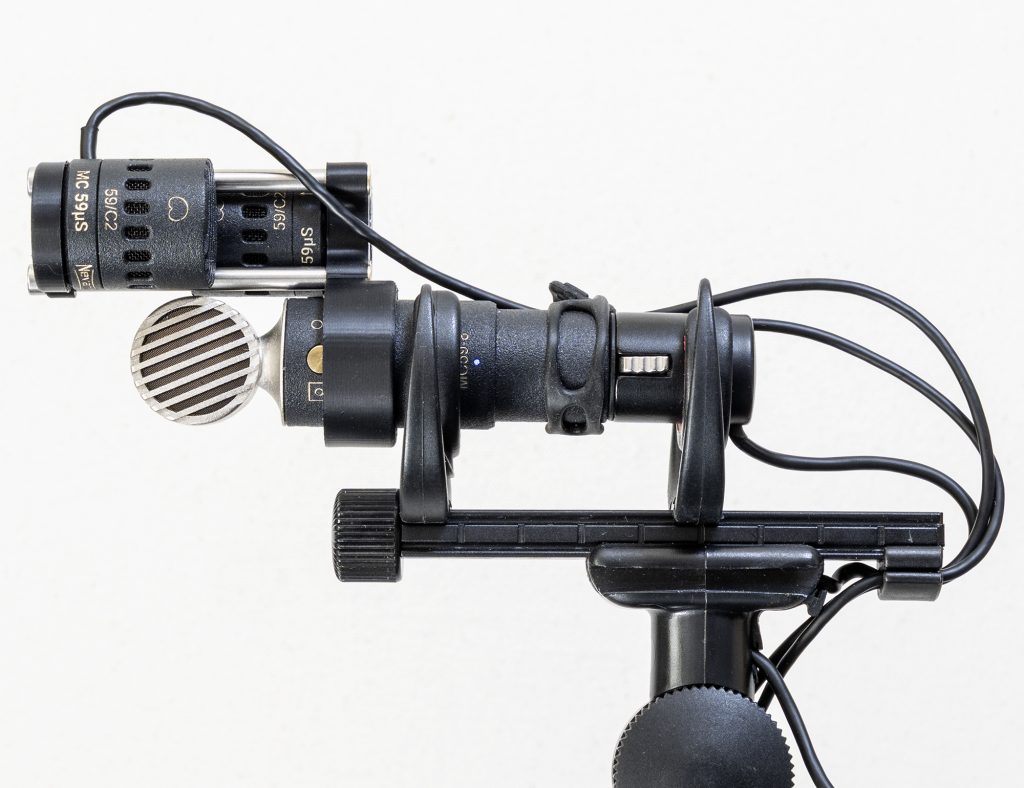
As we have seen in the previous posts, setting up DMS with side-address mid mics produces an array that looks very similar to a horizontal native B-format, or Nimbus-Halliday, array. In that case, a horizontally-oriented omni mic is flanked by vertically oriented fig 8s, one aimed forwards-backwards and one aimed sideways. In a variation of this, which I have used too, the omni can be set vertically as is one fig 8, with the second fig 8 set horizontally between the two: this variation is designed to address the directionality of the omni mic at higher frequencies in the plane of the mic body (a consequence of the mic body itself). I described and illustrated the two different horizontal B-format arrays in my pipe band recording blog posts last year. The similarity between horizontal B-format and DMS is not just that the two rigs look so alike, but also how they perform since, as Wittek et al (Wittek, H., Haut, C., and Keinath, D., Double M/S – a Surround recording technique put to test (Schoeps paper, 10.03.2010) note:
In principle, Double-M/S signals can also be converted to “horizontal B-format” by addition and subtraction:
W = Mfront+ Mrear;
X = Mfront- Mrear;
Y = S;
In this formula, the W (omni mic) is formed by combining the front and rear cardioids, and the X (forward-rearward facing fig 8) by again using the two cardioids, albeit subtracting one from the other. In that limited sense, deriving B-format from DMS is akin to deriving it from ambisonic (A-format) arrays of cardioids.
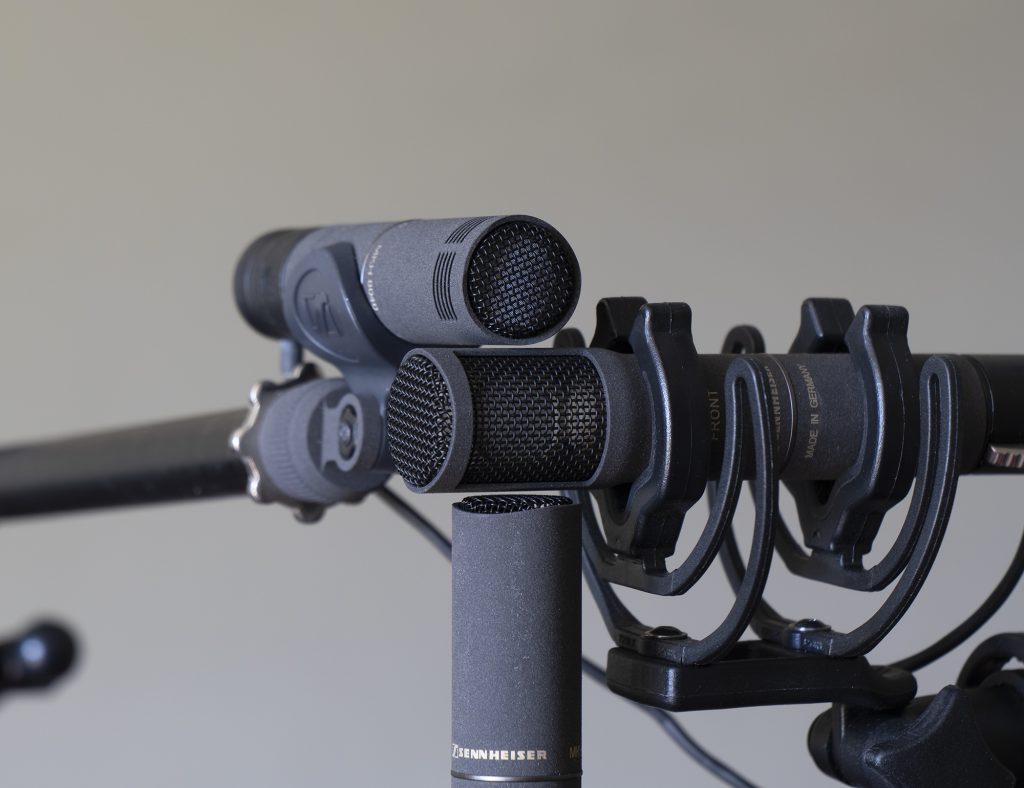
So the questions remain: if DMS and horizontal B-format are mathematically equivalent, do they sound the same and, either way, are there pros and cons for selecting either array? This, needless to say, is more complex than you might think, as it rather depends on the use of the array. For example, even if not ideal and demanding care when decoding, DMS can be used with a shotgun microphone, typically when such a narrow polar pattern is required principally as a mono mic (say for dialogue in production sound), but giving scope for flexible stereo or surround sound when needed, without changing the rig. The shotgun can be a mono mic with a fig 8 and a rear-facing cardioid clipped to it, or a stereo shotgun (i.e. with a integrated fig 8 capsule, such as the Sennheiser MKH 8018) with a rear-facing cardioid clipped to it. In this regard DMS has no equivalent in horizontal B-format in any practical sense.
Both arrays can and often are used for stereo recording: both allow mid-side recording with a variable polar pattern for the mid mic, and, indeed, steering of the stereo sound after the event. With DMS the mid mic polar pattern is created by mixing the two back-to-back cardioids, in the same way that a variable-pattern mid mic works: only the cardioid pattern is native to the mid mic. With horizontal B-format the mid mic polar pattern is created by mixing the omni mic and forward-rearward facing fig 8: this also gives you, natively (i.e. without mixing), a fig 8 mid mic and an omni mid mic. I use all three native mid mic polar patterns for MS, so wouldn’t choose between the two approaches on these grounds: besides, you may recall my previous test comparing a cardioid to a virtual cardioid created by my mixing a fig 8 and an omni, which showed little to no difference in the sound other than the more extended bass of the virtual cardioid arising from the use of the pure pressure omni. Well, at least the sound was very similar, but I do wonder, in the light of my DMS and horizontal B-format comparisons (below) whether the polar pattern was quite the same.
It is this extended low-frequency response that is perhaps the most distinctive difference between horizontal B-format and DMS when used for stereo. This difference is acknowledged in the Schoeps DMS plugin, however, which, as the user guide makes clear, ‘normalizes the sensitivity of the CCM 8 to match the CCM 2’s and compensates for the low frequency loss of the figure-of-eight microphone’: the CCM 8 being the fig 8, of course, and the CCM 2 being Schoeps’s flat (free-field) omni in the same CCM range.
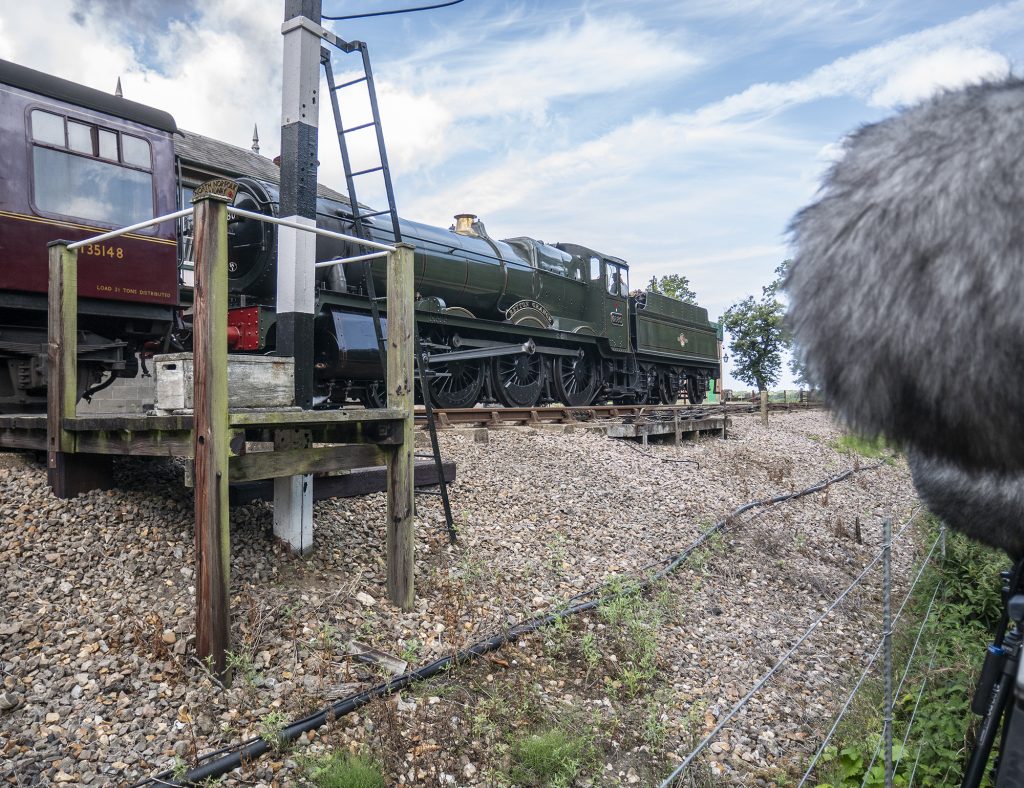
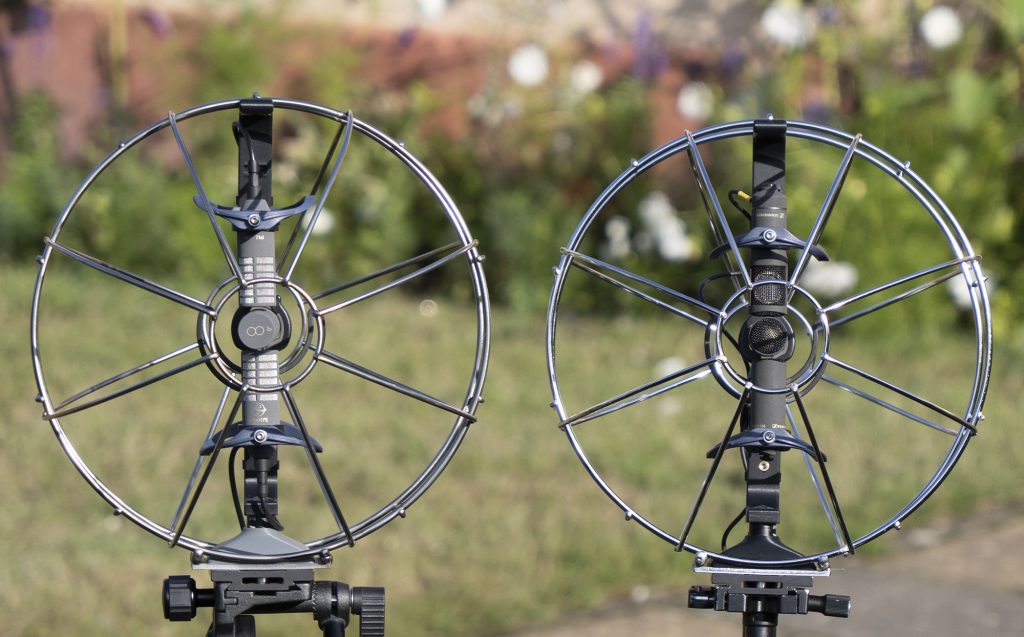
Although rigging DMS with side-address cardioids provides the most obvious physical similarity with horizontal B-format, for my test purposes comparing these two rigs isn’t ideal: the Schoeps mics for the DMS rig are quite different from my Sennheiser mics for the horizontal B-format set-up. In my initial tests with these two rigs, I felt I was more demonstrating the difference between the mics than comparing the different configurations. Using end-address cardioids opens up more options, but, without three MKH 8030 fig 8s here (yet!), the best I can manage is DMS with two MKH 8040s and one MKH 30 vs horizontal B-format with two MKH 8030s and one MKH 8020. The MKH 8030 and MKH 30 are not identical, but, as we have seen before, they are fairly close. So with these two rigs in Mega-Blimps, I headed off to the local steam railway, hacking my way through the brambles and bracken to get to a point just beyond the station platform.
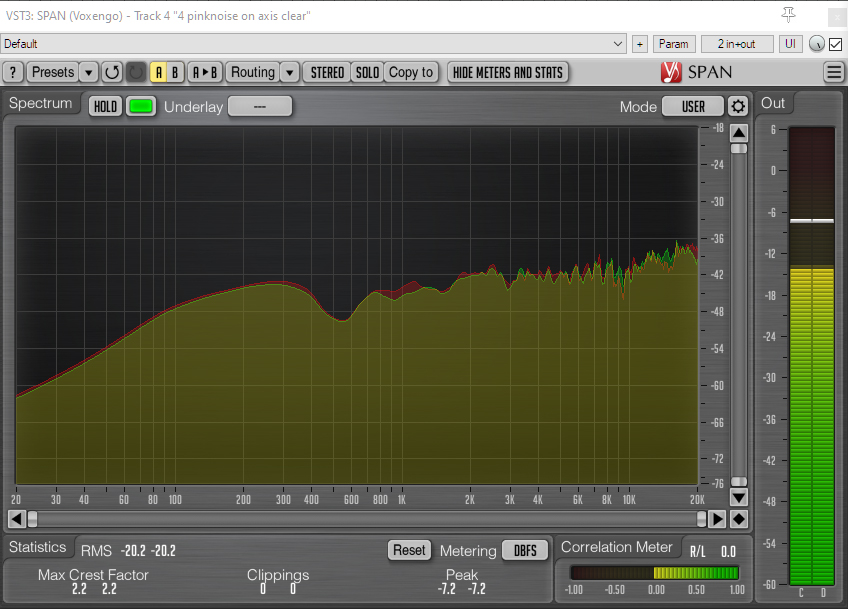
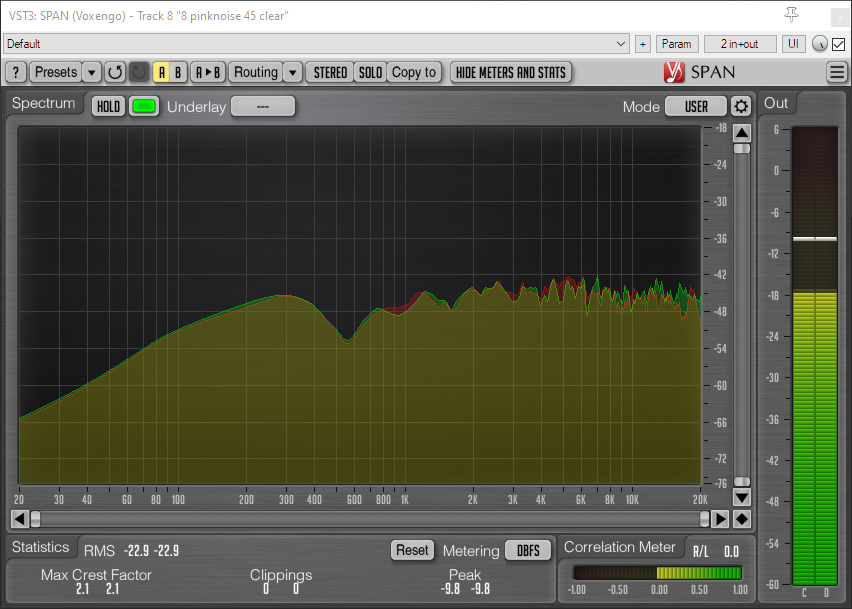
First up, we have the individual files for each of the three mics in each array. The files can be downloaded, and have been level-matched using the published sensitivities:
And here we have the files identically processed using the Harpex-X plug-in to stereo files as a coincident pair of hypercardioids at 127 degrees (i.e. equivalent to cardioid MS with a 50:50 balance between mid and side mics):
For some deeper bass, I then compared the two arrays back at home, starting the car to get some nice low-frequency content and, while at it, the usual Foley-like footsteps, gate openings etc. Again, here are the individual files for each of the three mics in each array:
And, again, here we have the files identically processed in Harpex-X to stereo files as a coincident pair of hypercardioids at 127 degrees (i.e. equivalent to cardioid MS with a 50:50 balance between mid and side mics):
The increased bass of the horizontal B-format array is more noticeable with the car engine than the steam locomotive, as you would expect, but both sets of recordings show broader differences between the two techniques. Some of these differences, mainly for the garden recording where there are close sounds, are an inevitable consequence of the spacing of the two rigs (about 1m apart), but there are very obvious differences that go beyond the fact that the two rigs could not be exactly coincidental. The localisation of even distant sounds is quite different. With the uncertainty of what is going on in the various DMS and B-format plug-ins, it is worth looking at a manual MS decode for the two pairs. For the DMS rig, standard MS was simply derived by using the fig 8 MKH 30 and the forward-facing cardioid MKH 8040 (i.e. ignoring the rear-facing cardioid). With the horizontal B-format all three mics were required, first creating a virtual cardioid from a 50:50 mix of the forward-rearward facing fig 8 MKH 8030 and the omni MKH 8020, and then using this as an MS pair with the sidewards-facing fig 8 MKH 8030. Here are the resultant two files for the steam locomotive departing recording:
These two MS pairs, decoded to LR, show very similar results to the DMS and horizontal B-format recordings output to stereo. In both cases the stereo field is rather different, with the B-format derived stereo having less stereo spread. You can hear this in the sample files, but, for a visualization, here are the goniometer plots showing the steam locomotive whistle at the beginning of the railway recording for both the DMS/horizontal B-format recordings output to stereo via Harpex-X and for the two MS equivalents that were derived manually. I chose the whistle as a short clear sound located well off to one side (the left).
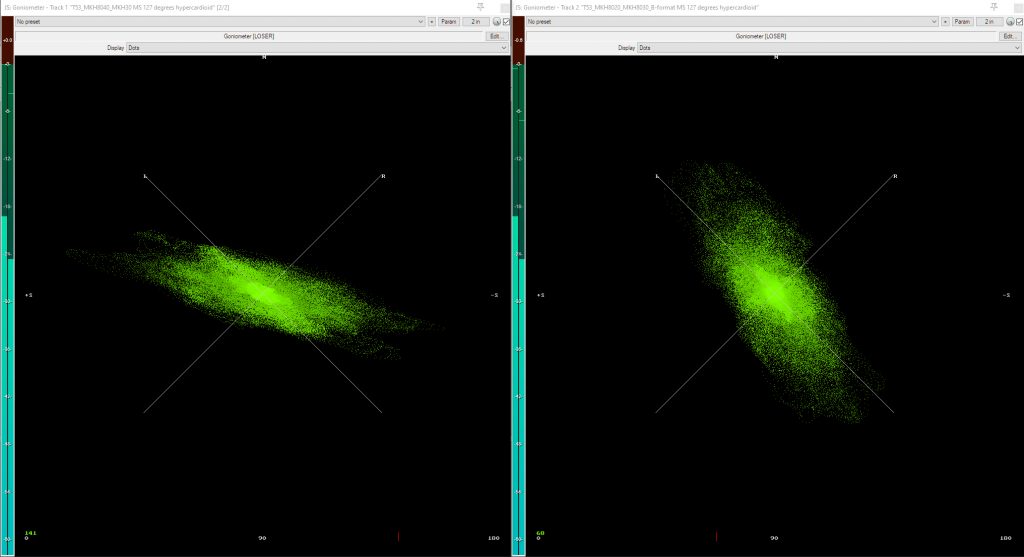
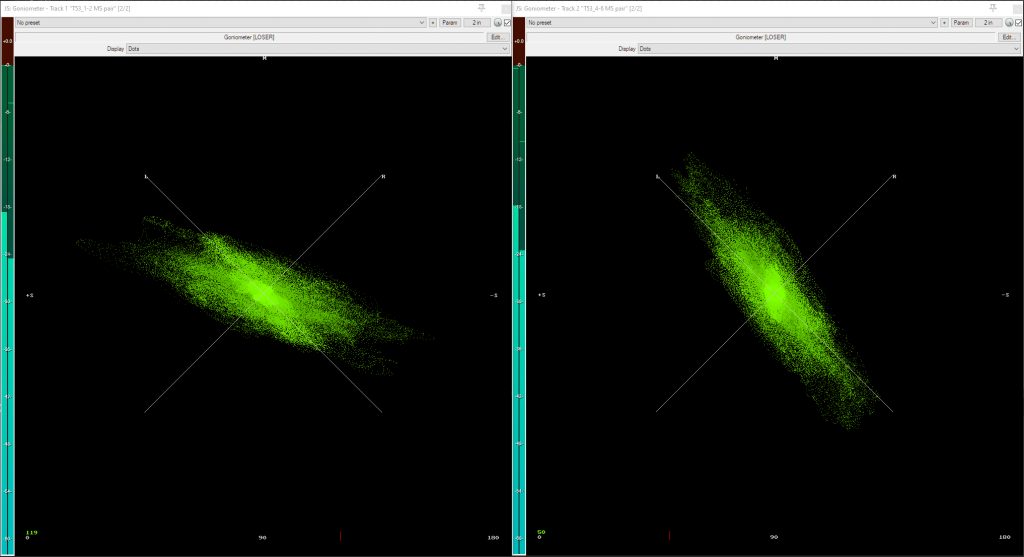
In both instances the whistle in the B-format example (or MS derived from combining the omni and forward-facing fig 8 in the B-format rig to create a virtual cardioid, then used with the side-facing fig 8) is rendered a little more centrally. Of course, this is very easy to adjust with DMS or B-format recordings, so, in some sense, is not a practical issue, but the point is that there is a difference and it isn’t simply the result of the behind-scenes mechanics of the conversion plug-in. This suggests that the mathematical combination of an omni and fig 8 to make a cardioid and the practical implementation of this don’t quite match, which is not entirely surprising: factoring in the different sensitivities of the two mics is an obvious source of possible error, changing the resultant polar pattern, although the audible differences suggest – at least to my ears – that perhaps there is more to this than that factor only.
Conclusions
If ever there was a misleading subheading, then this is it: ‘conclusions’ suggests something far more, er, conclusive than I can offer. First up among caveats, my end-use of either DMS or horizontal B-format is primarily for stereo output. Testing the different rigs with a decent, say, 5.1 system would be an interesting exercise, but at least the files above for individual mics will allow others to do that and see if they can draw any conclusions: indeed, that is the primary purpose of the blog post. The second significant caveat is the evident difficult in getting parity between rigs: using an all Sennheiser MKH approach helped, rather than the Schoeps to Sennhesier comparison, but the MKH 30 is not absolutely identical to an MKH 8030, and, of course, it meant that I had to use end-address cardioids for the DMS rig. I could have used an all Rycote mic approach (I have enough BD-10 fig 8s to achieve this), but the longer mic bodies would not have worked for horizontal B-format in the Mega-Blimp (even that has limits!). However, the previous tests comparing DMS with end-address vs side-address cardioids made me much more sanguine about such an approach. Hopefully something is left that, at the very least, provides readers with food for thought: perhaps even to compare horizontal B-format with DMS themselves.
From my own perspective, the ground I have covered in the tests, many necessarily not included here for reasons of space, for these three DMS blog-posts, along with the practicalities of rigging, the key conclusions I have drawn are:
i) use of end-address cardioids (or, at least, very small SDCs, such as MKH 8000 mics with MZLs or the diminutive Nevatons) for DMS has negligible impact on sound resulting from shadowing and, even, off-centre cardioids, especially compared to the impact of most windshields (OK, that’s not relevant to much indoor recording);
ii) there is, therefore, little reason in most circumstances to go for the more transparent approach of using side-address cardioids for DMS, although, of course, no reason to not do so if the mics are available (suitable windshield permitting if outdoors);
iii) unless the low-frequency response of an omni is critical, then there seems no advantage – at least with the mics and usage I have – of horizontal B-format over DMS.
So, going forward, although I plan to utilize both three-mic rigs in the future, I suspect that I will be using DMS more than horizontal B-format, not least as it allows a wider range of my mics to be used: most obviously, the Nevatons I have acquired recently. But equally, and with my predominantly stereo-focused approach in mind, I will continue to use MS far more (or, indeed, other stereo pairs). Certainly the flexibility of horizontal B-format or DMS in terms of selecting polar pattern or, less of an issue, steering the array in post, are insufficient grounds to merit their use for most cases where a stereo end-product is required. I’m very happy with knowing which way to point the mics (!) and happy enough, with MS, to select the mid-mic polar pattern that will suit the job best be that an omni, wide-cardioid, cardioid, supercardioid or fig 8. That said, I occasionally need to produce surround sound field recordings (e.g. recently a recording of the sea for the intro to a pipe-organ SACD – Organ Fantasy by Jean-Paul Imbert and his students) so horizontal B-format and DMS will continue to be part of my recording life.