Mid-side clip for 19mm Ø mics
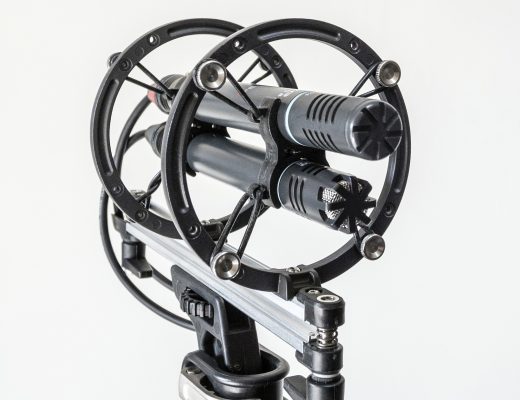
When Radius Windshields launched and produced their RAD shock-mounts one of the unique features was that the mic clips could be unscrewed from the hoops and switched to something different. A radical difference from, say, the Rycote Invision series shock-mounts, where the mic clips and lyres are all one moulding. This has provided scope for Radius to produce dedicated clips for the older MKH 50 etc. mics and, ultimately, to produce dedicated MS clips, doing away with the need to use clips to fix a mic to the shock-mount then a pair of back-to-back clips to attach the second mic to the first. A fiddly faff and also bedeviled by the lack of back-to-back clips with a close spacing, which is preferable for mid-side recording. I have been encouraging Simon Davies at Radius to produce MS clips, and this is now in train using some of the ideas I have proposed. While their nice injection-moulded version is awaited, here is my version for a MS clip to fit their RAD-1 and RAD-2 hoops, and designed for 19mm Ø mics such as the MKH 8000 series and the Rycote SDC series. I should add that Simon Davies at Radius Windshields has supported me in putting this design out into the public domain, which follows similar release of their first prototype for others to 3d print (their initial design was rather different to mine, and their upcoming production version, with a central bolt and a consequently wider spacing as this is tightened). The approach I have taken with this clip is very much a product of many discussions with Simon – via email – on MS clips and other Radius items in development, but also reflective of the company’s refreshingly open engagement with sound recordists.


In designing this MS clip I have gone for a spacing of 2.5mm between the mics, which is nice and close but still provides just enough room to allow two MKH 8030 mics to be inserted for a Blumlein pair of two fig 8 mics(the MKH 8030 having a wider front part to the mic). The mics are given enough grip by the springiness of the clips, and this took quite a bit of work to get right: in particular, the internal seemingly circular clips are made up of several different radii so that they hold the 19mm Ø mics properly as the necessarily undersized opening is enlarged by insertion of the mic to give sufficient grip. I have printed them in both PLA and PETG filament (with solid infill) so nothing fancy is required: the PETG filament gives a bit more flexibility and is what I have been using for them mainly. If you are determined you can break them, but, of course, that applies to many a commercial-produced back-to-back clip!
There are two bits of metal hardware that you will need for each clip, which comprise an M3 thin square nut (standard size 5.5mm x 1.8mm), and one of the same M3 socket head button flange screws that Radius use, in this case 12mm long. Of course, you can just use the existing screws that come with your RAD-1 and RAD-2 shock-mounts, so strictly the only extra part you need is the square nut. Stainless steel A2 is best. I got both the nuts and some of the extra screws from Westfield Fasteners (in the UK).
You can go to the file here in Onshape and export in STL, STEP, 3mf etc. file format as required. Note that the clip looks a little skewed or angled when printed: this is deliberate since loading it with two mics opens up the two clips elements a little and consequently, with this built-in angling of the lower circle, the MS clip sits properly square and central (i.e. with the mic centres exactly one above the other) when in use.

And, yes, with the MS pair nicely in the Radius Windshield hoops, you can not only retrofit them to InVision shock-mounts or, say, a Rycote Modular windshield, but even, with a bit of ingenuity, get them into a Rycote Nano Shield: with the rather high-set mount for the lyres in the Nano Shield there is not a lot of height to play with (which makes back-to-back clips a very imperfect solution: the top mic ends up right by the basket), so a 3d-printed mounting bar (here’s a link to this too) and mounting the Radius hoops on the underside gives a good workable solution.


Triple mic clip for 19mm Ø mics
For something a little more esoteric, I have also created a triple-mic mount to fit the Radius RAD-1 and RAD-2 hoops. Such a triple configuration of mics is something I have used from time to time for MMS (i.e. mid-side but with two different mid mics with different polar patterns – say omni and supercardioid – facing forward so that the polar pattern of the mid mic can be chosen in post) or side-by-side Blumlein with, say, a single supercardioid for recording a singing guitarist, as I demonstrated recently here. Previously I have had to use two pairs of back-to-back clips to connect three mics, which is a fiddle. As I said, a bit esoteric, but that’s the fun with 3d printing: making the commercially unviable possible.
In terms of design, this drew on the mid-side clip, but the loading of the three mics had an impact on the form of the different near circular forms, so even more complex curves were necessary to ensure a snug fit for each mic. I also chose to beef up the thickness of the clip a little, to 3mm, due to fear of the additional forces involved getting three mics into a single clip; and then angled the top interface/mating part by 3 degrees to allow for the change in angle arising from the necessary expansion of the individual clips due to inserting all three mics. In all, nine iterations were required, and doubtless there is room for improvement still: things like best thickness vary a little with filament used. I used a slightly different approach to the fillets, but that is a subtle change. The solid modelling takes a few minutes only, but the printing at finest quality takes an age! The interface, or mating, with the Radius hoops is the same as for the mid-slide clip, so the same size nut and screw are needed. I suspect not many will want to print this model – it is largely presented as showing the potential for very specific mic clips (inc. DIY) offered by the interchangeable design of the Radius hoops – but if you do want to use it, then you can download it (again freely) here from Onshape and choose which file format suits you for export.

EDIT (6.1.2025) More triple mic clips: double mid side (DMS)
I’ve also spent some time playing around with mic clips for double mid side (DMS), and, spurred on by receiving a Mini-ALTO 115 from Radius Windshields for field testing, I revisited this. DMS always feels a bit clunky (it’s that rearward-facing mid mic out front that seems so odd) and, though I’m never overly concerned about it, shadowing does seem more obvious than in, say, side-by-side Blumlein of MS. But using MKH 8000 mics with MZL connectors at least goes some way to reducing the bulk of the mics. With the size of the Radius hoops there is no scope for three mics in a vertical line so, as with, say, the Rycote Cyclone DMS kits, I have gone for the two mid mics set side-by-side (although facing opposite directions, of course) with the fig 8 centrally above. The wider front part of the MKH 8030 means that this needs to be taken into account by the front clip that holds it too: the fig 8 provides the only common mic spanning between the two mic clips, and there isn’t much to grab onto at the front, so I decided – like many a DMS rig – to include a couple of metal rods (these are chopped down ones, 2mm in diameter, that were redundant from a Rycote MS stereo Cyclone kit 5 – where they are superfluous and, indeed, prevent better rigging). Anyway, here are a few images of the model (you can download the front and rear clips from Onshape) and the resultant rig.


EDIT (8.5.2025) A 19-20mm variant of the MS clip
I have been asked whether I could make a version of the MS clip that allows a combination of Schoeps (20mm diameter) and MKH 8000 (19mm) mics, so have modeled this and you can download from/view in Onshape here. There is a caveat: at the time of writing I have no Schoeps mics, so the fit of the 20mm hoop is my best estimate for the right amount of grip. And here’s an image of the 3d model.


27 Comments
Going to give these both a try! Other than those mentioned above, have you tested any other filaments? Are there any other benefits/ drawbacks from those which you have tested?
Great. No, early days for me with a 3d printer, and have only used PLA and PETG so far. I’m sure there are better filaments (something more flexible perhaps?). Good luck!
Cheers,
Roland
The print came out well– now searching the appropriate hardware. Could you also make the pieces necessary to attach to the nano shield available?
Glad the 3d-print came out well Conrad. The only additional hardware should be the thin M3 nut. I’ve added a link to the single piece (the replacement bar/mount) for the Nano Shield, to allow Radius hoops to be used in it: you may well be able to come up with a better design. Cheers, Roland
Thanks Roland! Giving the bar a try now. It would also be interesting to lengthen it and add another 2 mounts to allow you to pair the Blumlein pair of figure 8’s inside a nano shield. I’ve found that trying to use that setup without wind protection for field recording is almost impossible. I don’t have 3D modeling experience, but I’ll see if I can find someone who does!
You’re welcome, Conrad! I think if trying Blumlein in the Nano Shield, I wouldn’t go end-to-end, but would use the two fig 8s side-by-side. Ex-BBC highly respected recording engineer Roger Long usually records classical music indoors with a pair of MKH30s so configured, and I have learnt from him (and my ears) that it works fine. You can see I have used this approach in my recent recording of Greg Brice (https://drbadphil.com/mkh-8030-pair-a-blumlein-variation-for-singer-songwriter-greg-brice). Moreover, in the Nano Shield, or any similar small windshield, the effect of the basket etc. is going to hugely exceed any (largely theoretical) effect of shadowing from adjacent fig 8 mics.
Cheers,
Roland
Thanks, as always for the reply! Can you make your nano- bar exportable so it can be printed? It looks like the permissions were not open to 3rd parties as you shared the link earlier.
Sorry about that Conrad. I’ve just had another go at sharing via Onshape, and have updated the link in my blog post, so hopefully it will work this time! Not easy to test as, of course, I have access anyway.
Cheers,
Roland
Hello! I am looking to do a similar thing with the 8040/8030 MS rig. Would you be open to either sharing your 3d print design file or printing a set for me? Great work!
Thanks Chris. The 3d-models have been shared via the blog from the outset, so the links are already there!
Cheers,
Roland
[…] to get away from clunky back-to-back clips and to be able to get the two mics closely spaced. I have posted previously about how the hoops lend themselves to such customization, and here’s a couple of examples of how this now translates to the diminutive […]
[…] latter, my first thought was to stick a mid-side (MS) pair inside it and then, for a bit of fun, a double mid-side array. Well, the slightly mad schemes – at the opposite end of the spectrum size-wise from my DIY […]
Thanks for making these available Roland, would it be a big task in the onshape working file to allow for a schoeps cmc1 in one position and an 8030 in the other? Thanks!
Hi Kieran. OK I have modeled a clip for a combination of 20mm and 19mm diameter mics, and have added an image and link to the Onshape file at the end of the blog post.
Cheers,
Roland
wow sorry missed this, thanks Roland, very much appreciate that 🙂
Kieran
No problem Kieran: I was hoping you had got the new clip model OK!
Cheers,
Roland
Hi, Roland- I’m curious if it’s my browser view or if there’s a missing Export function in the floating toolbar for the MS Clip with 19 mm and 20 mm hoops? (Onshape/MS clip v9 – 19 and 20mm/Part Studio 1 tab)
I successfully downloaded an STL export for the dual 19 mm MS clip (v8) and printed a pair of excellent workable parts from it. However, I’m stuck looking for the download options with this modified version.
You’re correct that the 19 mm hoop is a bit too tight for a Schoeps CMC6 body. Even though it can be snapped into place with some effort, it’s liable to leave some scrape marks.
By the way I’ve been thoroughly enjoying your blog since discovering it last year. Thanks for sharing your curiosity and rigorous experiments so generously!
Best regards from the U.S.
Michael
Hi Michael. Thanks – I’m not sure if the problem was at my end or not, but I have re-shared the file in Onshape and updated the link. And thanks for the positive feedback on the blog: much appreciated!
Cheers,
Roland
Successful export link (19 mm+20 mm MS clip). Many thanks again!
Cheers,
Michael
Hi Michael. Glad it worked this time.
Cheers,
Roland
Hi Roland,
thanks for the files and work you put in.
I have used these to build a double MS rig for my Rycote Mics (BD-10 + 2x CA-08)
Once i finish the cables for this setup I will give it a try.
What I was wondering is how you process your double MS recordings? Do you use a dedicated Plugin?
There is not realy much on this out on the web, since I have the impression, that double MS is very niche.
Cheers
Clemens
Hi Clemens,
Good to hear that the files have been useful, even if the DMS models were designed for MKH 8000 mics! DMS processing rather depends on use (stereo or surround), but, irrespective, the Schoeps (free) plugin is very useful.
Cheers,
Roland
Thank you for kindly sharing the results of your labours here.
Much appreciated.
I am hoping to combine an NTG-5 with a BD-10 and your clips will be very helpful.
No problem, Neal. Don’t forget that Radius Windshields now have their injection-moulded version of the MS clips: not up on their website just yet, but worth getting in touch with them perhaps.
Cheers,
Roland
Thanks very much Roland.
I have successfully printed the parts in your article and they look good. If they don’t work out I will definitely look out for the official ones.
I have sourced a used Nano Shield of the right basket length as well and printed your low profile bar, so almost there.
Just one question, when you made up the Nano Shield setup in your picture which firmness of Radius shock mount did you use?
It looks like they do 3 levels.
My NTG5 mid will obviously be bigger and possibly heavier than the Rycote so I’m guessing I need Rad-2 loops of either standard or firm strength.
Very new to all this as you can tell but really enjoying the learning journey as they say.
Thanks again
Sounds great Neal. You definitely need RAD-2 hoops. In the photo of my Nano Shield set up I show the dark blue (actually fairly purple) hoops, which are the firmest (82 shore). Not sure why I used those, rather than something softer, such as the black (72 shore) or even light blue (62 shore). Radius also make a softer still 55 shore hoop (green: though all my ones at 55 are in ‘evil red’ – they were a test run, of which I have all the stock). I’d have thought RAD-2 82 shore or 72 shore would be best for your set up, but worth trying different ones: get at least both of these. Also, you can mix and match if, for example, you need something stiffer on the front for a shotgun mic.
Cheers,
Roland
Thanks again Roland. Very much appreciated!