
Introduction
The long-awaited Mini-ALTO windshields are rolling off the production line as fast as Radius Windshield’s small team can manage and are evidently going down a storm. As readers of this blog know, I’ve been playing with the Radius hoops since introduced and, more latterly, the pre-production Mini-ALTO 115 windshield (which I tested here). With the latter, my first thought was to stick a mid-side (MS) pair inside it and then, for a bit of fun, a double mid-side array. Well, the slightly mad schemes – at the opposite end of the spectrum size-wise from my DIY Mega-Blimp project – continue. In this case, the project began when John and Simon at Radius asked if I could squeeze an ORTF rig into a Mini-ALTO: not as a commercial commission, I must hasten to add, but just knowing I like a challenge and am always up for esoteric mic-mounting solutions. My first reaction was no, but thinking on it more – and having been rather immersed in ORTF lately (or, rather, an eight-mic ORTF-3D rig using Nevaton mics) – I decided to have a go.
The design problems
Straight off the bat there seemed two main issues. First, there was the common problem for anybody trying to fit ORTF pairs in a windshield: mic length means the capsules end up too near the basket edge for effective wind protection. Not for nothing did Rycote make a larger diameter windshield specifically for ORTF, and a much larger diameter for ORTF was one of the reasons behind my Mega-Blimp. With the diminutive 80mm diameter of the Mini-ALTO the problem is even greater than with a more standard 100mm diameter windshield. Second, the Mini-ALTOs have small rear pods and various – all longer – front pods, none of which are swappable from front to rear due to the polarity of the magnets that hold them in place: what would be needed is a longer rear pod and, ideally, matching pods front and rear. A third, more minor issue, is that the Mini-ALTOs are designed to be aimed at the subject on the longitudinal axis, so the base pivots the wrong way.
The design solutions
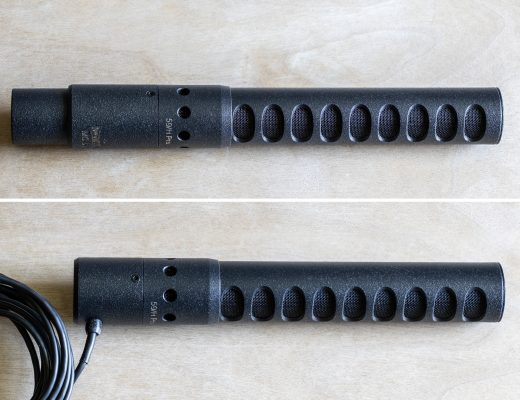
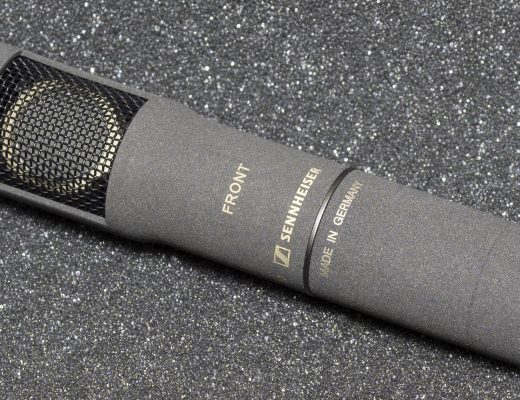
The solution to the small diameter of the Mini-ALTO – insofar as there could be one – was to use short mics and to offset the mic mounts from the centre-line of the windshield as far as possible. Most of the familiar small SDC mics are still too long, not least as connectors and, even when hard wired, projecting cables come into play: even the small Schoeps CCM4s seem too long once cables (and, for the popular Lemo version, connectors) are factored in, although the diminutive Schoeps CMC 1 KV preamp (with its side-exit cable) and an MK 4 capsule should fit. The Sennheiser MKH 8040, of which I own a pair, also seemed feasible, if only the short MZL connector (which can be used instead of the XLR module) didn’t have such a long rubber boot (itself over a long brass nipple) and then a cable projecting from this. Realizing I didn’t know what was inside an MZL, I worked out how to open one (OK, I just crudely levered the innards out with a penknife: but, no, it wasn’t one my precious Sennheiser MZL 8003 remote cables that I butchered!), and saw that there was scope to have a side-exit. A quick slice with a Dremel blade removed the brass nipple, and it was equally easy to drill a hole in the brass casing: 10 minutes and I had my proof of concept. I wasn’t convinced about my skills to take apart an MZL properly or to wire them up, so, in exchange for doing the slicing and drilling of a batch of forty (that was a fun lunchtime activity!), Ed Kelland at ETK Cables made up some cables for me: I suspect his right-angled custom MZLs might sell like proverbial hot cakes, if I don’t grab them all myself (the super-short MKH 8000 mics that result are really useful for all sorts of other arrays, not just ORTF)!


With mic length sorted – or minimized as far as I could achieve using a mic commonly used for field recording and production sound – it was time to move on to the second problem. The key to mounting the mics was, of course, to keep the hoops where they normally sit in a Mini-ALTO, but have them hold a bar to which the mics are clipped. I had been doing the same for the ORTF-3D rig, so it was an obvious choice. Then it was just a matter of making various iterations of the design (thanks to the 3d-printer) until I got the right balance between keeping the capsules away from the basket edge on one side, and the keeping the back of the mics (or the customized MZLs) away from the other side. It was really satisfying that by the time I got to the sixth version (there were other changes along the way) I got the centre of the diaphragms on the centre-line of the windshield: there’s nothing magical about that (getting it back from the centre-line would have been better in such a small windshield), but at least it doesn’t feel as if the design leaves the mic capsules right up close to the basket. And clearance at the rear is enough that the mics don’t knock against the basket in normal use: I assumed that an ORTF-equipped windshield would not be handheld by a circus acrobat recording themselves in action…


As for the short rear pod and unequal length of pods, Radius sorted that by getting a couple of pairs of symmetrical pods made up for these tests. That was easy – at least for me. The reason I wanted a couple of pairs is that I was concerned about the impact of the plastic ring that marks the division between the end-cap and cylindrical body of the basket. The large thick plastic ring (bigger at one end) of the dedicated Rycote ORTF windshield has an impact on the sound, and I have been concerned with the impact of large plastic elements in other designs when using mid-side pairs: for example, the chunky ring on a Cyclone has a measurable impact on the sideways-facing fig 8 mic (which may or may not matter for a recording). The Mini-ALTO end-cap rings are nothing like as chunky and such plastic elements don’t worry many a recordist, but I think it will be instructive to test the difference between a pair of shorter 90mm pods (where the end-cap rings sit inside the 110 degree angle between the mics) and longer 136mm pods (where the end-cap rings sit outside the 110 degree angle between the mics). I will cover these tests and, also, some field recording tests in part 2 of this blog post (by which time, I hope, Radius may have made a fur to fit the new windshield lengths: it will be good to compare how it performs in wind against, say, an MS pair in a Mini-ALTO 115).

And, finally, to the problem of the mic base pivot being oriented 90 degrees from what would suit ORTF. Well, for that I just 3d-printed a new base for the Mini-ALTO that has a 3/8″ thread and fitted it to a Gravity MS QT 1 BQuick-Tilt Microphone Adapter. A slightly clunky and chunky solution for now, but I know that Simon and Tim at Radius have been working on a small ball-joint mount anyway that will work with the Mini-ALTOs.
What is less certain is whether they will take my ORTF design and refine it into an actual injection-moulded product. I guess that will depend partly on the testing (do come back for part 2 of this blog post) and partly on practicalities and whether they think there is a market. But, even if not, just as with the other parts I have designed to fit Radius hoops (e.g. the MS clips), I will make the parts shown freely available for 3d printing: of course, this would be rather dependent on the matching pods becoming available!
12 Comments
Genius!
Those low-profile mzl’s are very cool.
Are there no 3d printers that print rubbery/durable materials?
One thing that seems potentially promising: this contraption in the larger Alto when it arrives.
When you test, will you compare the rig to other ORTF blimps??? I currently use 2 MKH40s on Radius field mounts with Bubblebee Spacerbubbles and it works well…up to a certain point.
This would be much more packable/portable and quick to set up.
Thanks for all this. As always a pleasure to read about your process.
Thanks Chris! I think more rubbery materials are possible with 3d printing, but am not sure to what your question relates! Yes, the larger ALTO will offer a lot more room and, of course, I could move the mics further backwards. By that same token, the ORTF set up could be retro-fitted to existing 100mm or larger windshields, or the NanoShield. With testing, I’m not going to get caught up in a mass of comparative tests, and certainly not with slip-on covers: my main focus will be on comparing the two sizes of custom Mini-ALTO pod pairs; comparing the Mini-ALTO ORTF with MS in a Mini-ALTO 115; and, probably, just one other ORTF blimp windshield comparison (either a Mega-Blimp or, fairer, an ORTF-fitted Rycote). And don’t forget I am interested in transparency as well as wind reduction, so that makes testing fiddly and time-consuming enough.
Cheers,
Roland
I should have explained my “rubbery” comment: I was thinking of the MS clips I printed from your files. Several have broken, and I thought a more pliable material would work better…this doesn’t apply to your ORTF rig. I was mixing things up in my addled mind.
Ah, that makes more sense. Well you can get more flexible filaments, but also the settings matter at lot (wall thickness, solidity etc. and nauseam): certainly I have no problems with my MS clips printed with Bambu’s PETG HF, which is not a fancy filament at all.
Cheers,
Roland
[…] on from part 1, where the design of fitting an ORTF pair into the diminutive Mini-ALTO was covered (using a pair […]
[…] part 1 of this three-part blog-post series, I described the challenge of getting an ORTF pair into the new […]
Hello! This has been very interesting to me since I didn’t think it’d be possible to re-build the interior of these blimps to make them work better and I think it’s an amazing solution to have more compact systems.
I have the 8040’s and I have my mini alto on the way as well as the mzl side modified cables, but now I can’t find the Onshape models you used so I can print the bar as well as the mix holders for the modified MZL cables. Can you please help me with that? I can’t wait to print those!
Thank you for your work!
Hi Nicolas,
Glad to hear that this project was of interest. All the Onshape models are public by definition, but, I suspect, very hard to find, not least the names I give the various versions. I was waiting until Radius had the 2 x 90mm pods and furs to fit kits ready (a few weeks apparently) – which you will need for the ORTF set up – before I adding links to the various 3d print files, but I will email the files to you now as so keen! I am not certain what Mini-ALTO pods you will be using in the meantime.
Cheers,
Roland
Dear Roland, are the files available now? The design looks very promising.
Hi Martin,
Yes, the 3d-print files are freely available for the various different mics I tested at the bottom of the third part of the blog-posts on the ORTF in a Mini-ALTO project: https://drbadphil.com/ortf-in-a-mini-alto-part-3-which-mics-fit
Cheers,
Roland
Dear Roland,
Inspired by your works, I want to remake the MZL 8003 to right angle. Could you please advise how to disassemble the MZL ? Do you have any photos ? Thank you in advance for your answer.
I wish you success.
Best regards, Vidmantas
Hi Vidmantas,
Thanks!
Doubtless there’s a proper tool, but I’ve just rotated the plastic pin insert that sits inside the brass housing. That said, I’ve only butchered one MZL cable, and none of my expensive MZL 8003 cables: I’ve done the butchery on many an MZL, but these have been on the brass shells sans inserts, which are then assembled. And, after my initial test example, Ed at ETK has wired up the modified MZLs: any doubts on your side, get Ed to sort you out.
Hope all goes well!
Cheers,
Roland