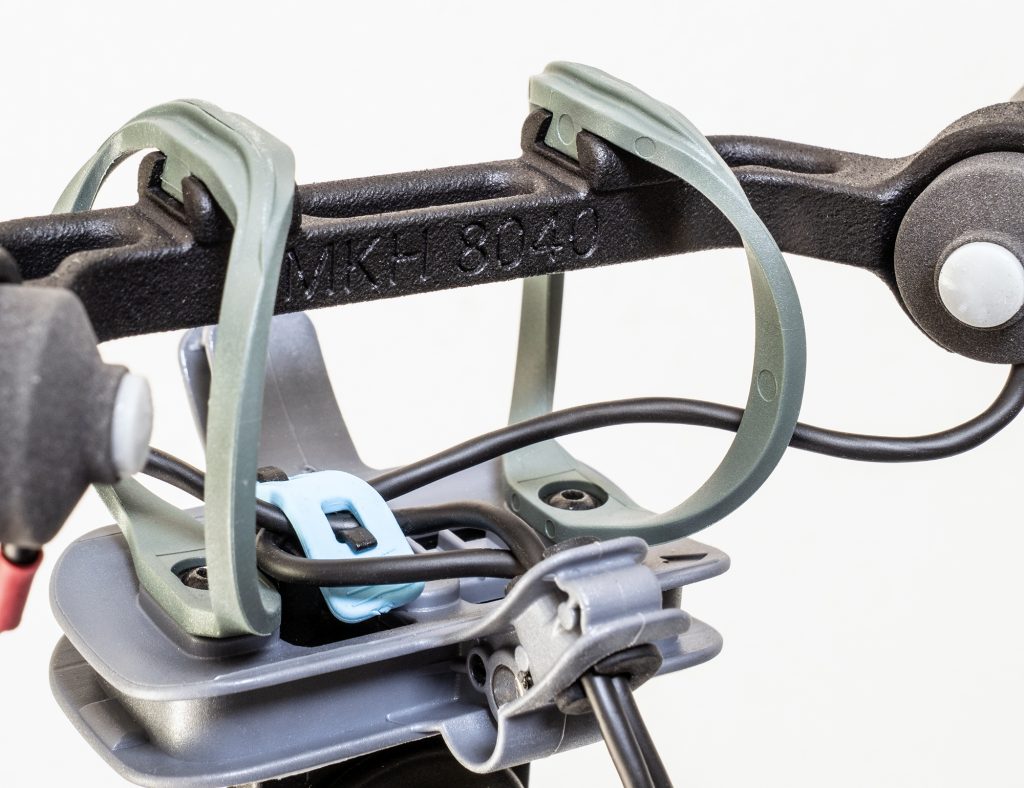
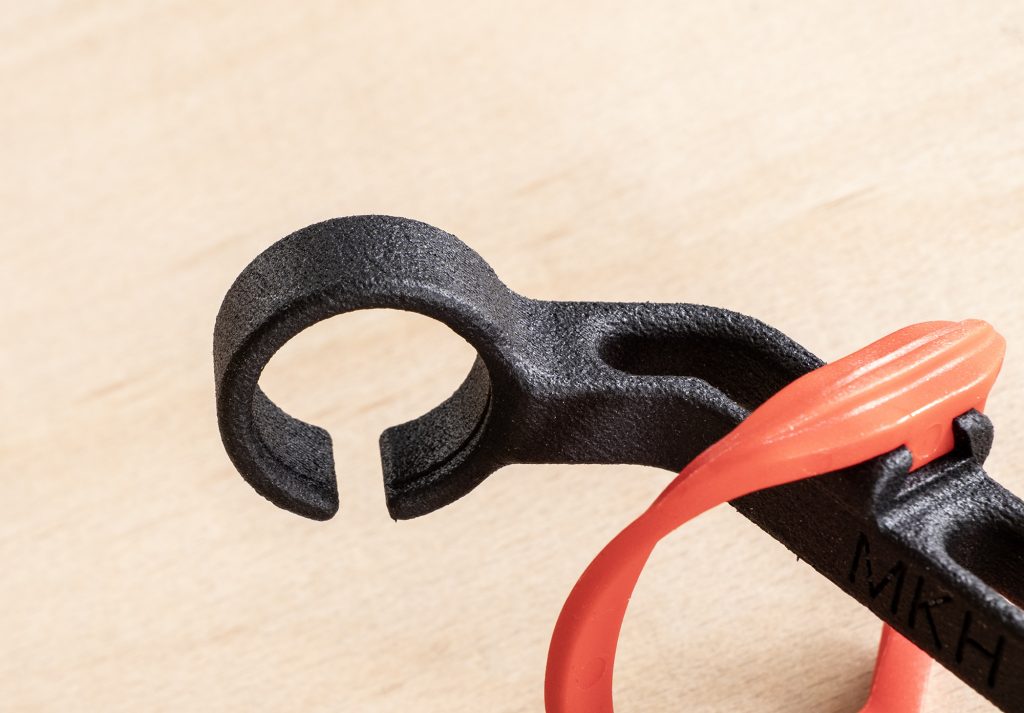
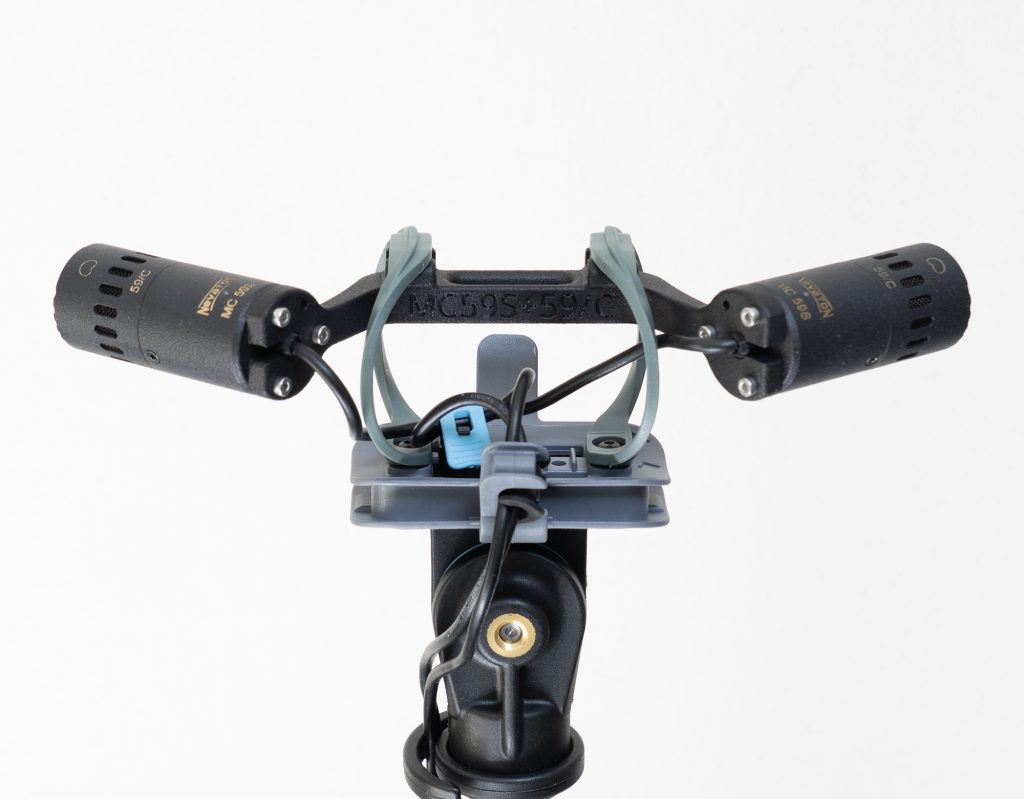
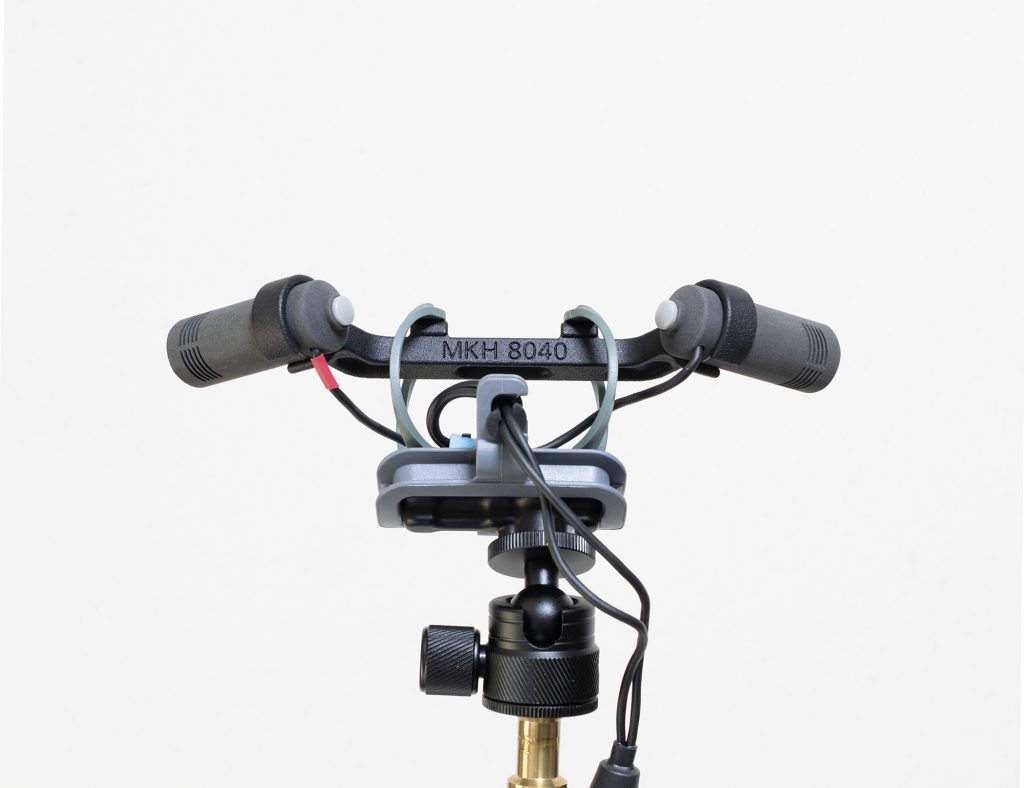
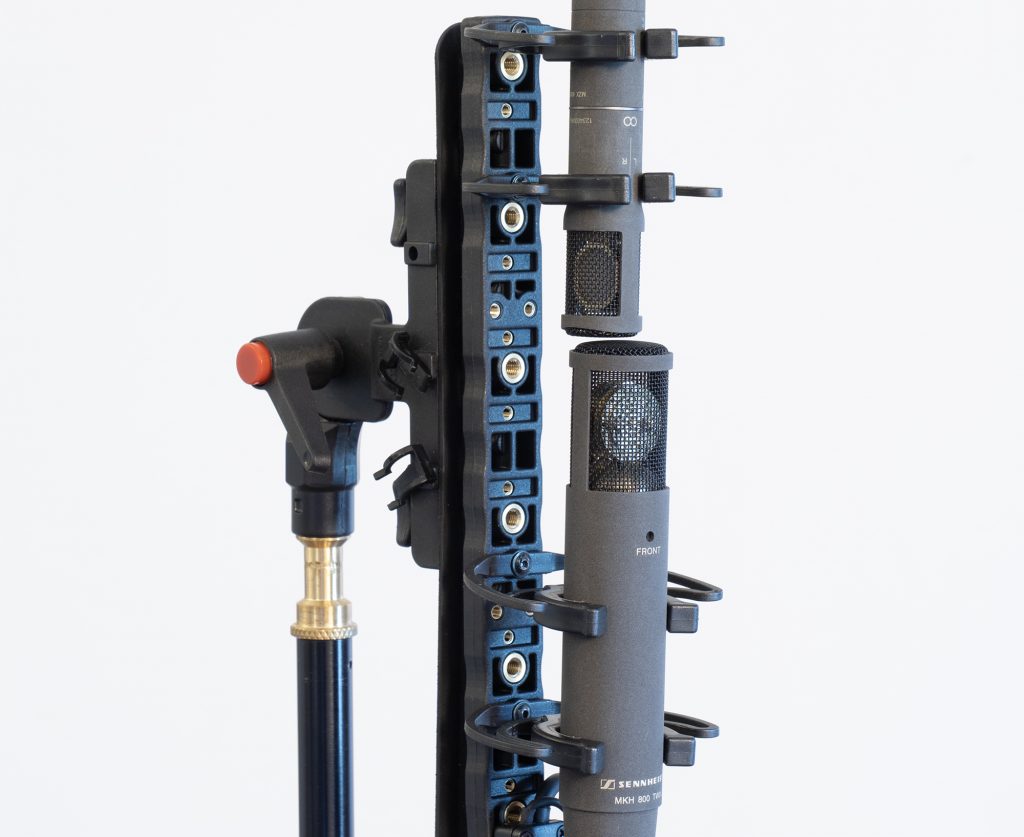
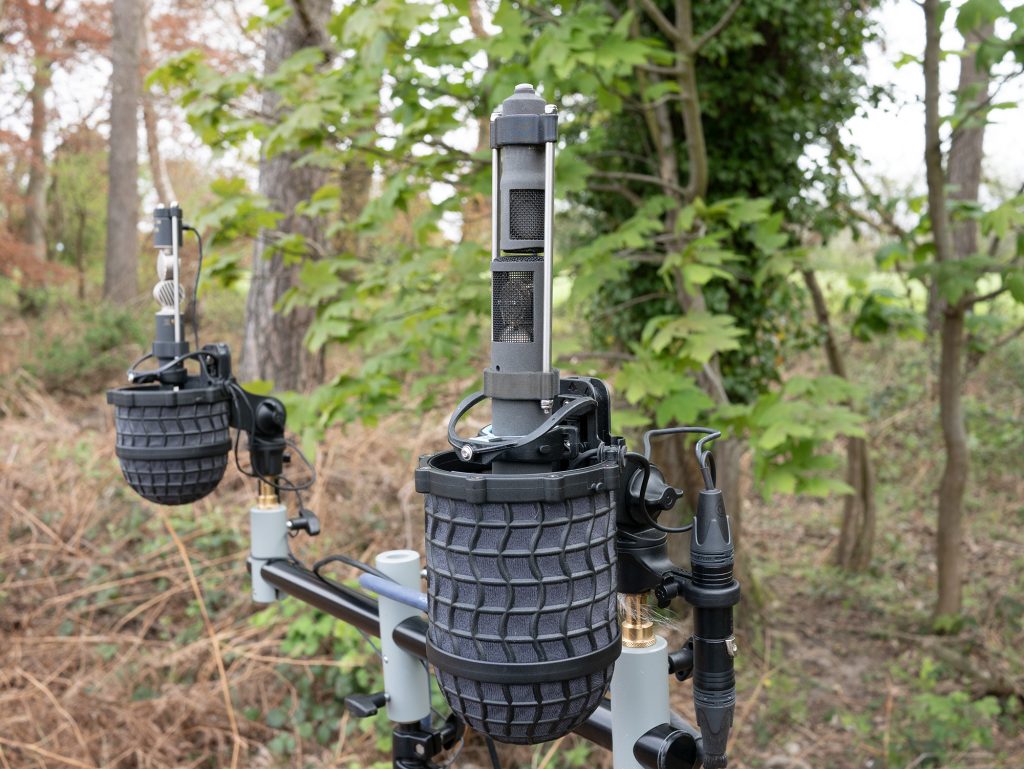
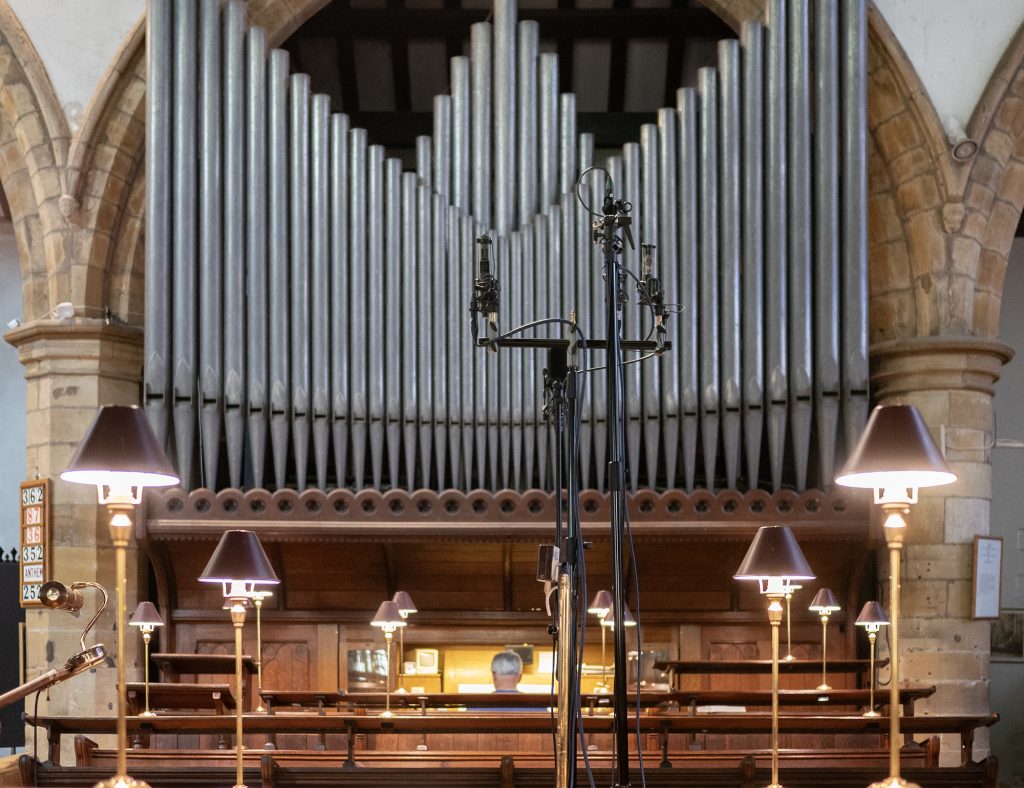
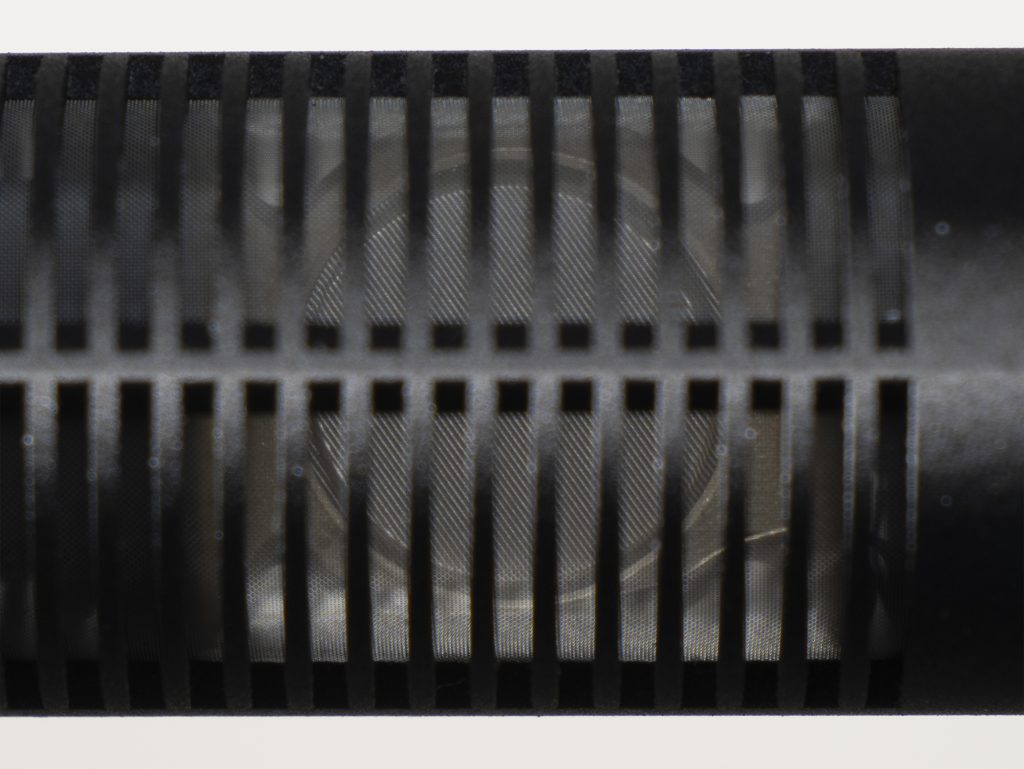
Close-up of the new Radius Mini-RAD hoops showing dovetail connection to a new MJF-printed ORTF bar for the Mini-ALTO (in this case for the MKH 8040).
Introduction
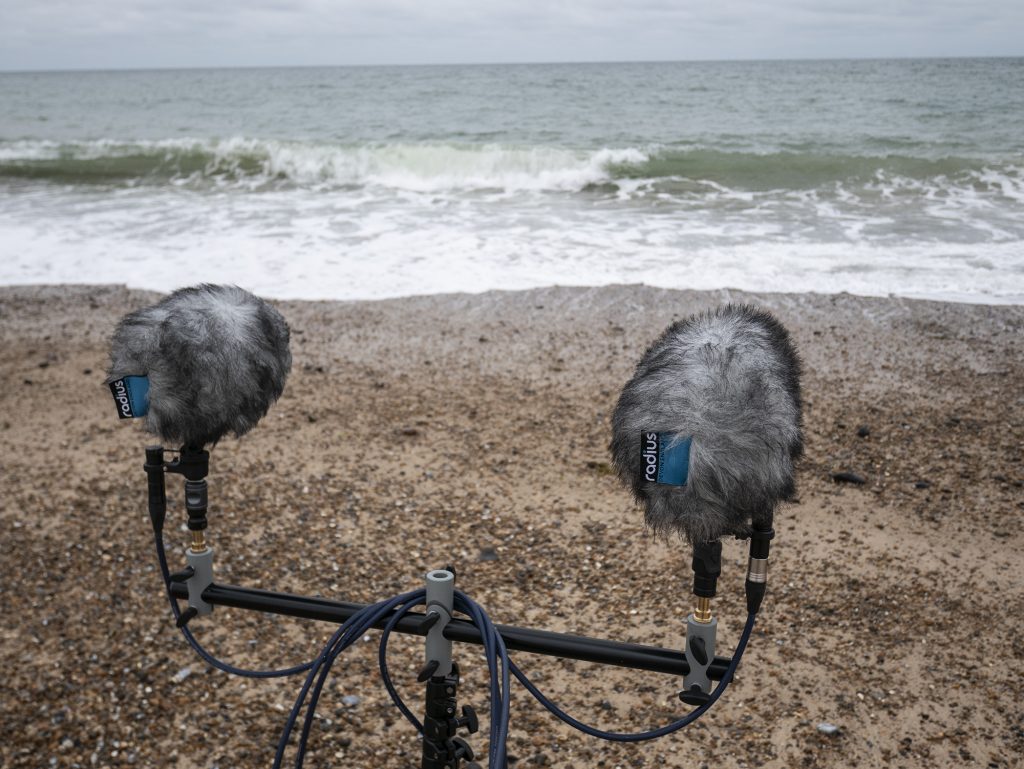
Last year I wrote a three-part series on fitting an ORTF pair in the diminutive 80mm diameter Mini-ALTO from Radius Windshields. This was, as I described, a (non-commercial) challenge from John and Simon at Radius, and I made the task a little trickier for myself by keeping the capsules of the mics on the centre-line of the windshield: too often people squeeze ORTF pairs into windshields with the capsules right against the basket, with consequent impact on wind protection. The result, as readers may recall, was a series of designs for some suitably short mics: the small cardioids I found that fitted properly were limited to the Schoeps CMC 1 KV + MK4, the DPA 4011 + MMP-GS or MMP-ES preamp, the Nevaton MC 59S + 59/C, and the Sennheiser MKH 8040. The first three are hard-wired and, crucially, avoid the projection of connectors, while the Sennheiser needs a custom MZL connector to become short enough to fit. Since then, I have added the new Nevaton MC59uS + C2 combination, which, with a length of 23.5mm, is unbelievably short for a cardioid mic.
In an update to part 3 of the original series on the ORTF in a Mini-ALTO project, I added that Radius Windshields had introduced an ORTF add-on kit with the necessary symmetrical pods (each 90mm) and fur to fit, and that Ed at ETK Cables was producing Y-cables with the customized MZLs necessary for the MKH 8040 version. I also posted links to (freely available) parts for 3d printing so that readers could make their own mounts, and I have had some feedback from those that have done this. Obviously, refinement of the mounts and turning them from homely 3d prints to injection-moulded parts would have been great, but, needless to say, ORTF in a Mini-ALTO is a tiny potential market for Radius Windshields – not least given that the necessary mics are, for the most part, relatively unusual: only the MKH 8040 is what one might call a ‘mainstream’ cardioid used in field recording and, indeed, it is this for which I have seen most interest (as gathered from feedback by those DIY-ing their mounts from my 3d files).
So the project could well have rested there, except for two things: first, I have been experimenting with getting Multi Jet Fusion (MJF) 3d prints made for me; and, second, the advent of the new Mini-RAD hoops got me thinking about revision of the ORTF in a Mini-ALTO design. This post, therefore, is about how those two aspects have come together and nudged the project on.
Detail showing the dovetail joint on the top of one of the MJF bars to fit the Mini-RAD hoops: the dimple mates with the pip on the underside of the Mini-RAD’s dovetail to ensure that nothing slips out. They are a tight fit anyway.
The revised design
The attraction of MJF printing for me, vs my modest 3d printing at home, has been that it liberates the designs from a flat bed. I know that people use supports, that are then removed, in their prints, but I have had little joy with this and invariably end up with a pile of spaghetti. So, getting one-piece prints of complex pieces instead of having to make them up piecemeal, with brass inserts and screws holding them together, seemed a real advantage: in short, for much I am doing nowadays I am using the little printer I have here (a Bambu Lab A1 Mini) to test things, then get them printed commercially using MJF technology.
I had just begun refining the ORTF bar designs for MJF printing – essentially combining the mic clips/mounts with the bar that holds the mics at the right angle and spacings, when I realized that the pre-production Mini-RAD hoops from Radius were imminent and that by using these I could simplify the designs. All the mounts for the ORTF pairs for the Mini-ALTOs had a common feature in that two posts or connectors linking the ORTF bar to the top of the hoops, so that the bar and the mics sat centrally in the windshield. With the much smaller Mini-RAD hoops (they are c.19mm shorter internally) it was clear that the posts/connectors could be removed from the design, and, instead, the ORTF bar could be fixed directly to the hoops. Also, the Mini-RAD hoops do not have a screw fitting at the top, as found in the standard hoops, but, rather, use a dovetail joint to connect: the dovetail includes a pip, which fits into a dimple in the Radius clips to ensure that the two parts don’t slip.
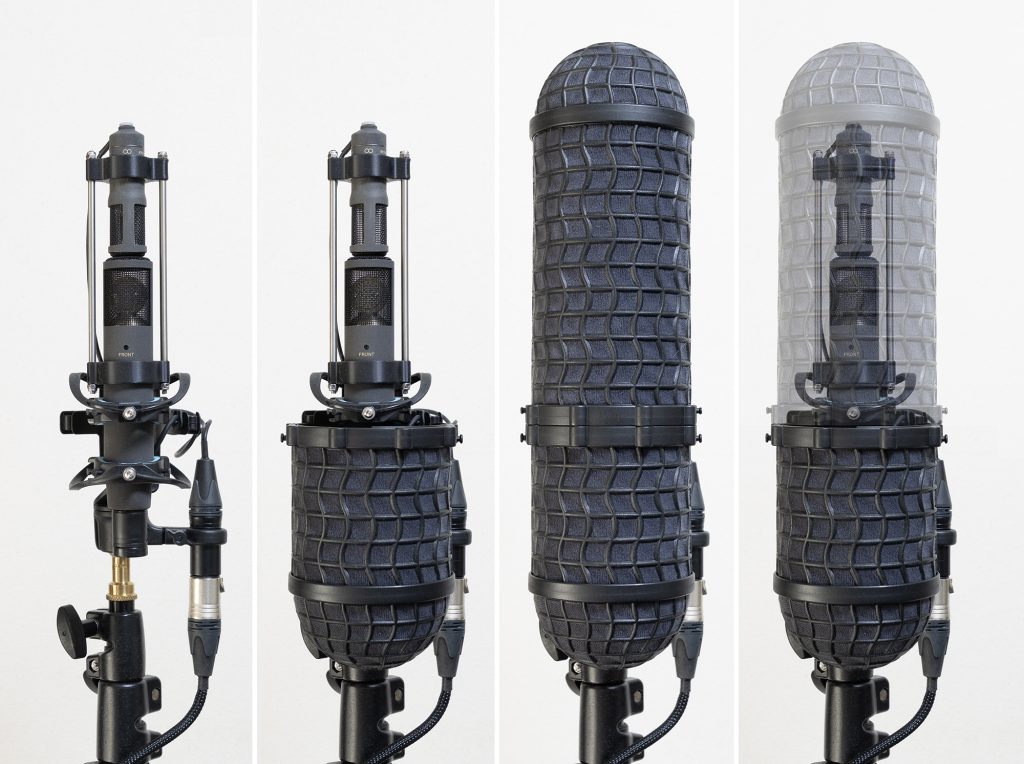
OK, a picture is worth a thousand words, so here are a few that, I hope, clarify how the new designs work and compare to the previous approach. In these examples, the updated designs are for the two Nevaton variations and for the Sennheiser MKH 8040, for the simple reason that I own these mics: I had to borrow the Schoeps and DPA short cardioids for the designs and tests last year.
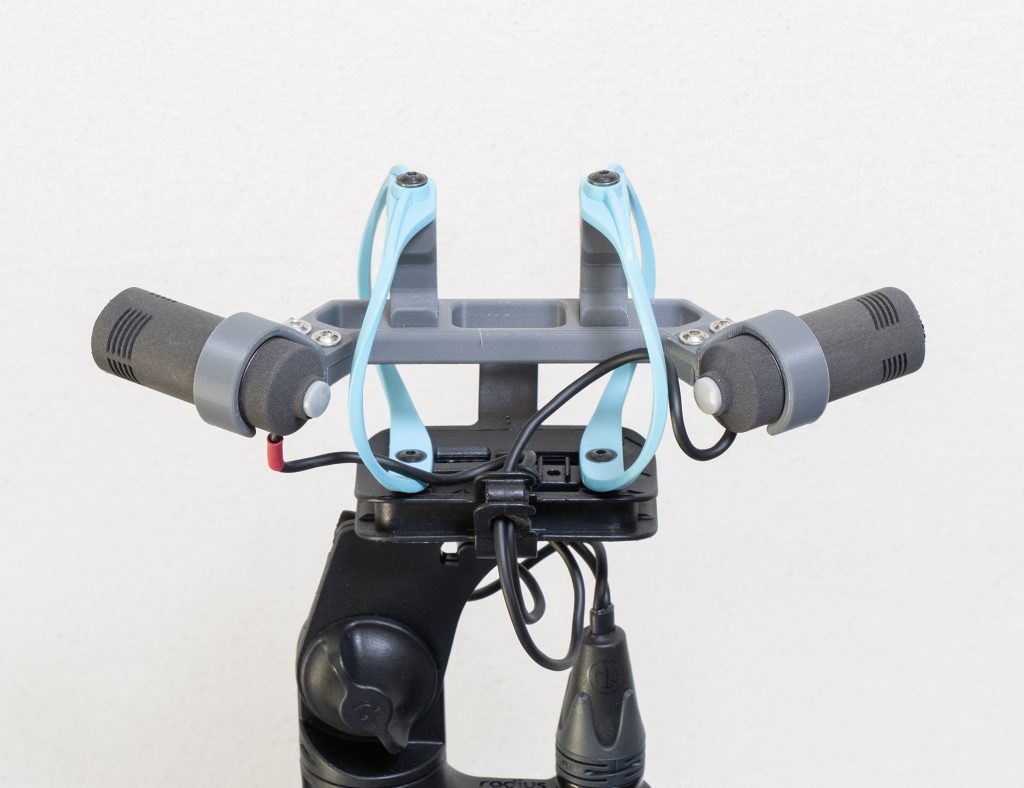
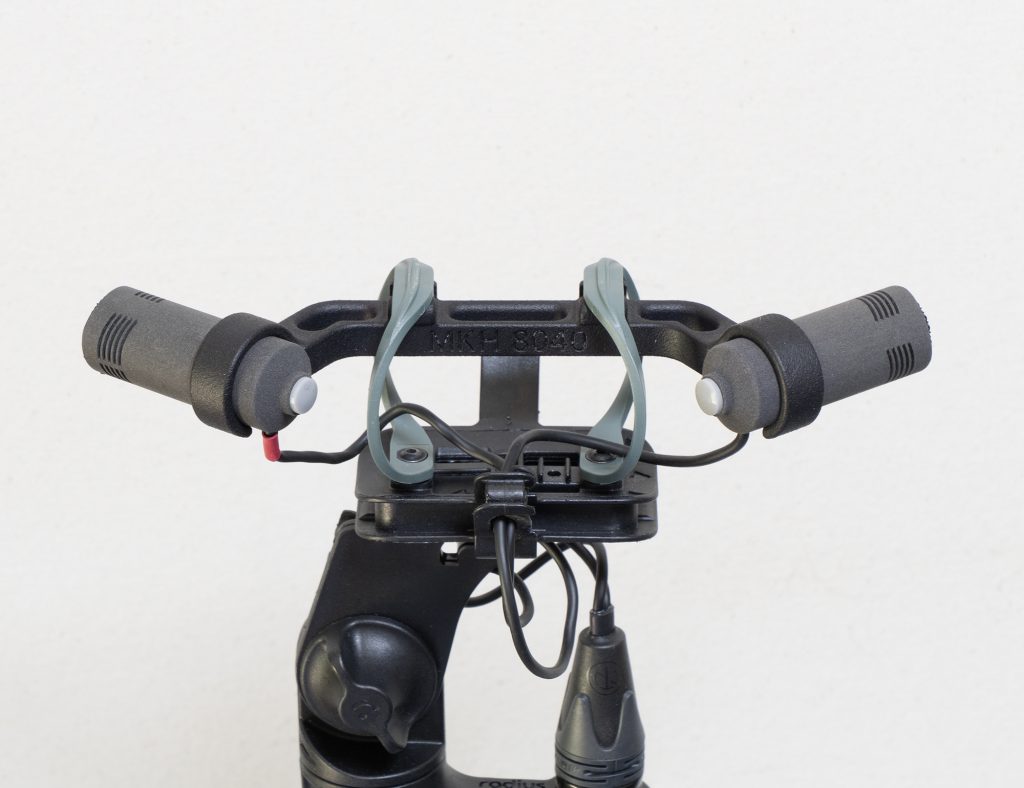
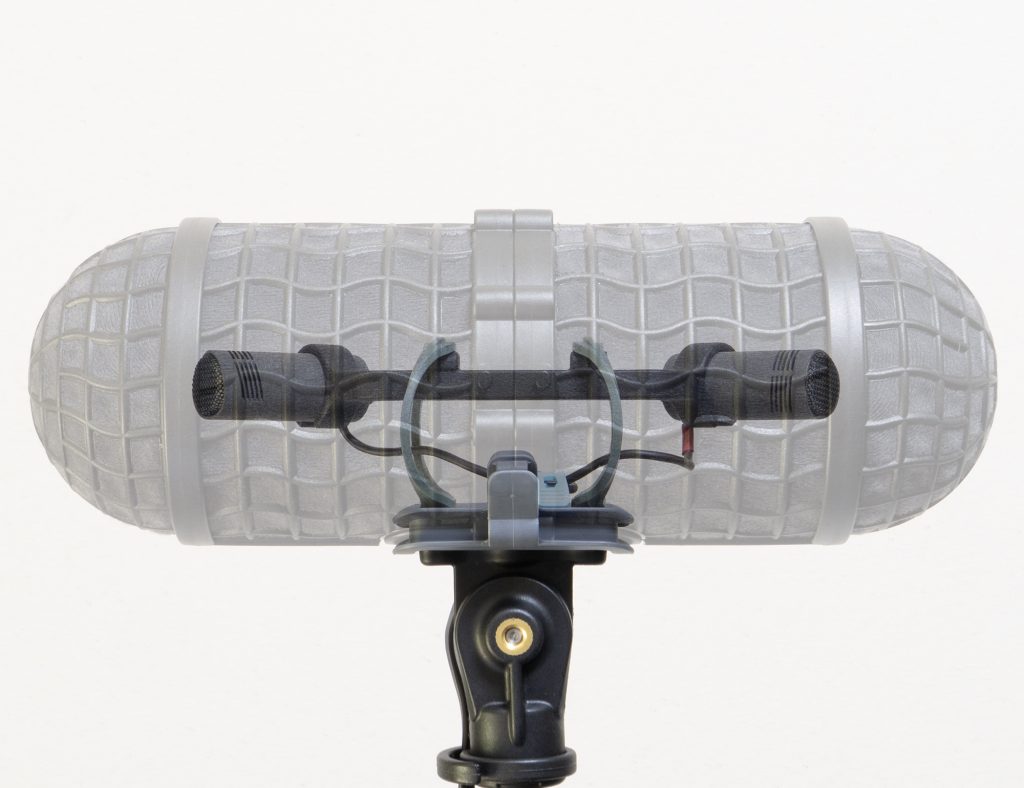
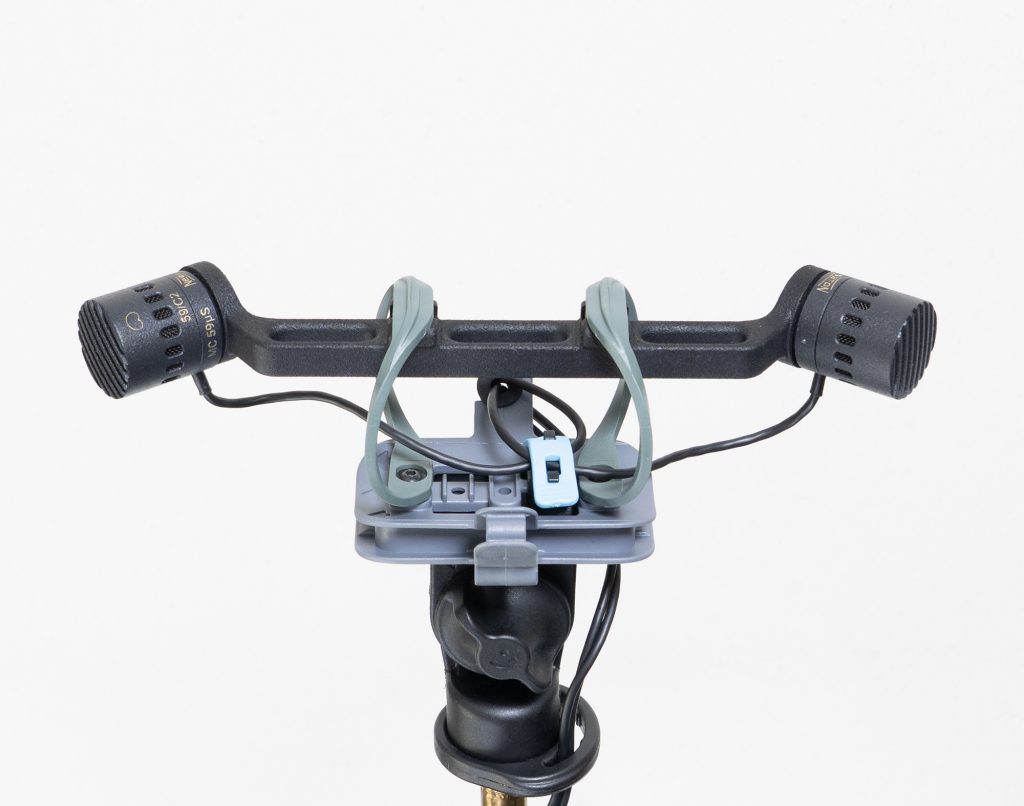
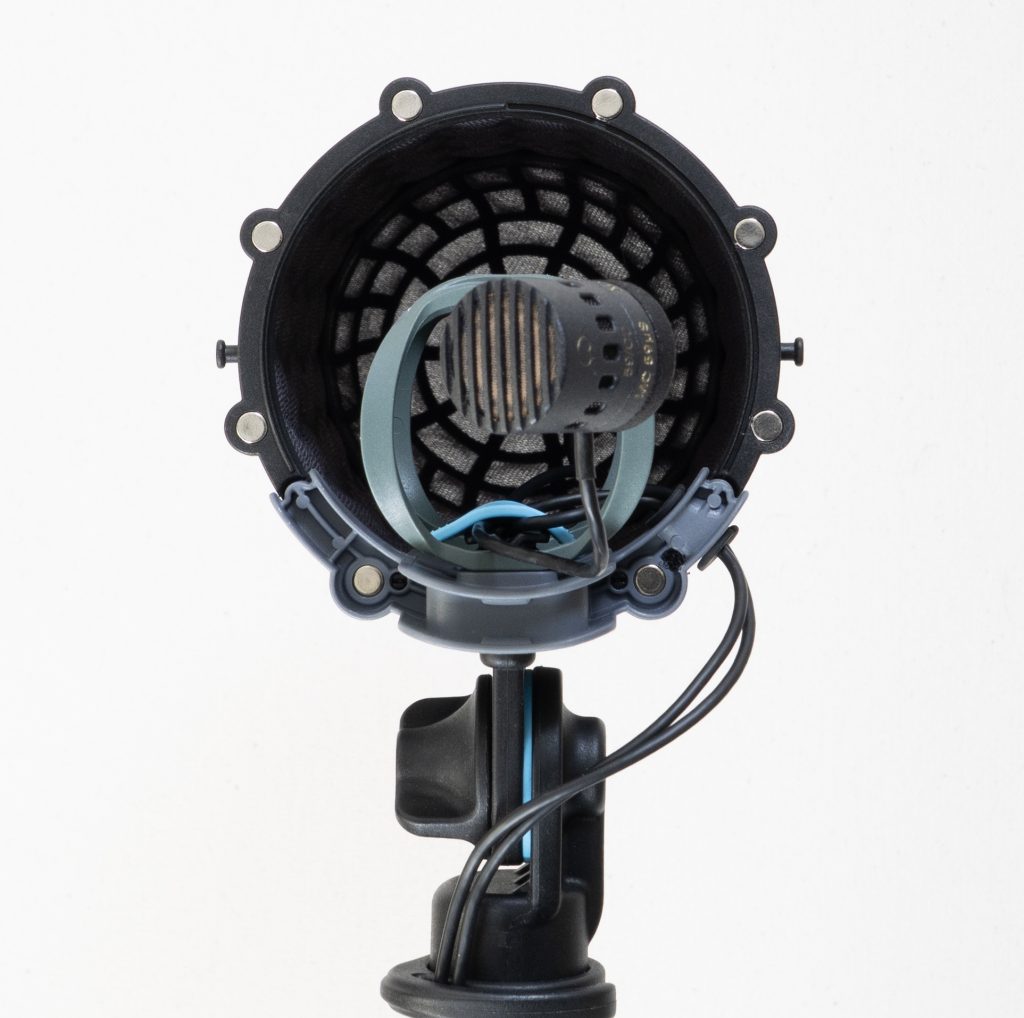
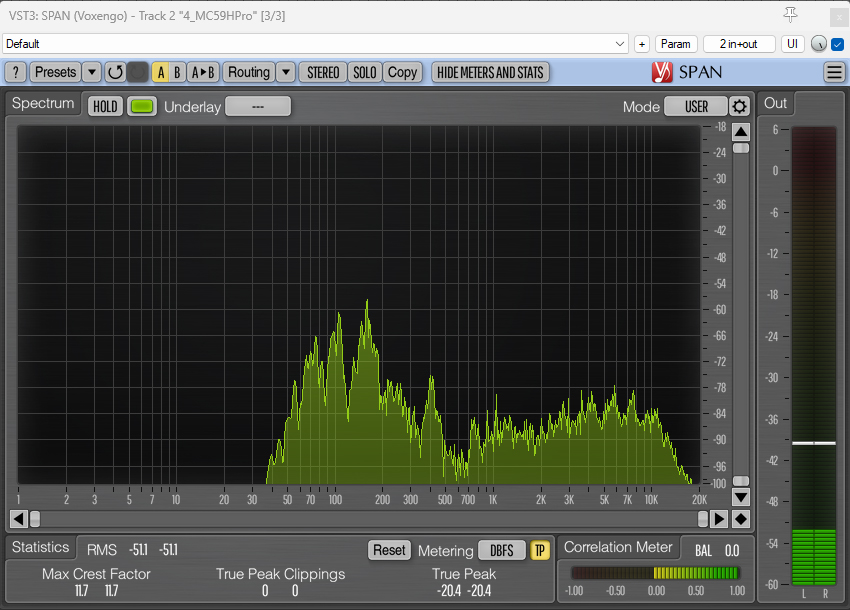
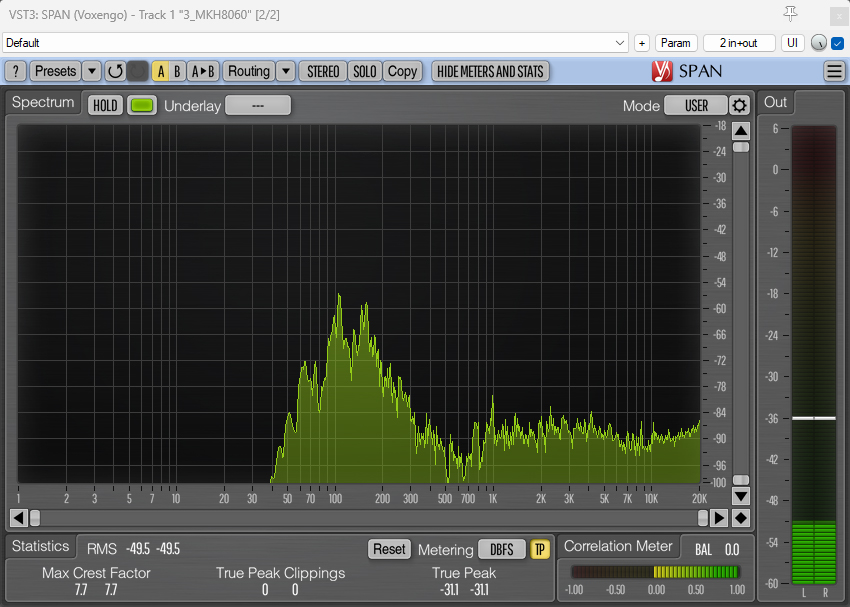
Here – as a recap – is the previous design with the standard RAD-2 hoops, showing the posts that connect the hoops to the ORTF bar and the separate clips for the mics themselves (in this case, MKH 8040): so a five-part assembly.And here is the revised design, with the one-piece MJF printed ORTF bar with integrated clips and no posts necessary to connect to the hoops. Again the mics are MKH 8040.Close-up of the new ORTF bar for the MKH 8040 showing the small groove inside the mic clips that ensures correct positioning of the mics (there is a slight projection where MZL meets the body of the mic).Composite image showing the ORTF bar with Mini-RAD hoops within the Mini-ALTO ORTF edition (i.e. with two 90mm pods), showing how the bar and the mics sit centrally in terms of height within the windshield.A single-piece MJF ORTF bar with the new Mini-RAD hoops, with the very short Nevaton MC59uS + C2 combination.Rear view of the bar for the Nevaton MC59uS + C2, showing the magnetic mounting of the mics.Side view of the Nevaton MC59uS + C2 ORTF pair, showing that the capsules remain central to the windshield basket: essential to maximize wind reduction.Mini-RAD ORTF bar for the Nevaton MC59S + 59/C combination: the preamps in this case are attached to the bar with M2 screws.
Conclusions
So there we go. From tests, there is no difference in performance and, indeed, you wouldn’t expect there to be, as long as the right compliance hoops are used (and the smaller hoops need a softer Hytrel to match the compliance of the larger hoops: for example, 45D shore in the Mini-RAD is roughly equal to 55D shore in the standard hoops; 55D = 62D etc.). But the new designs are useful simplifications of the previous versions, a lot further on from proof-of-concept designs, and as near as possible to the slick and robust injection-moulded versions that would be the ultimate, but which I think are not commercially viable. I hope this postscript to the original series on the ORTF in a Mini-ALTO project inspires others to venture along the route of bespoke shockmounts. And let it serve as a warning: the Mini-RAD hoops will doubtless feature in more elaborate and esoteric shockmount designs here!
Update: 22.7.2026
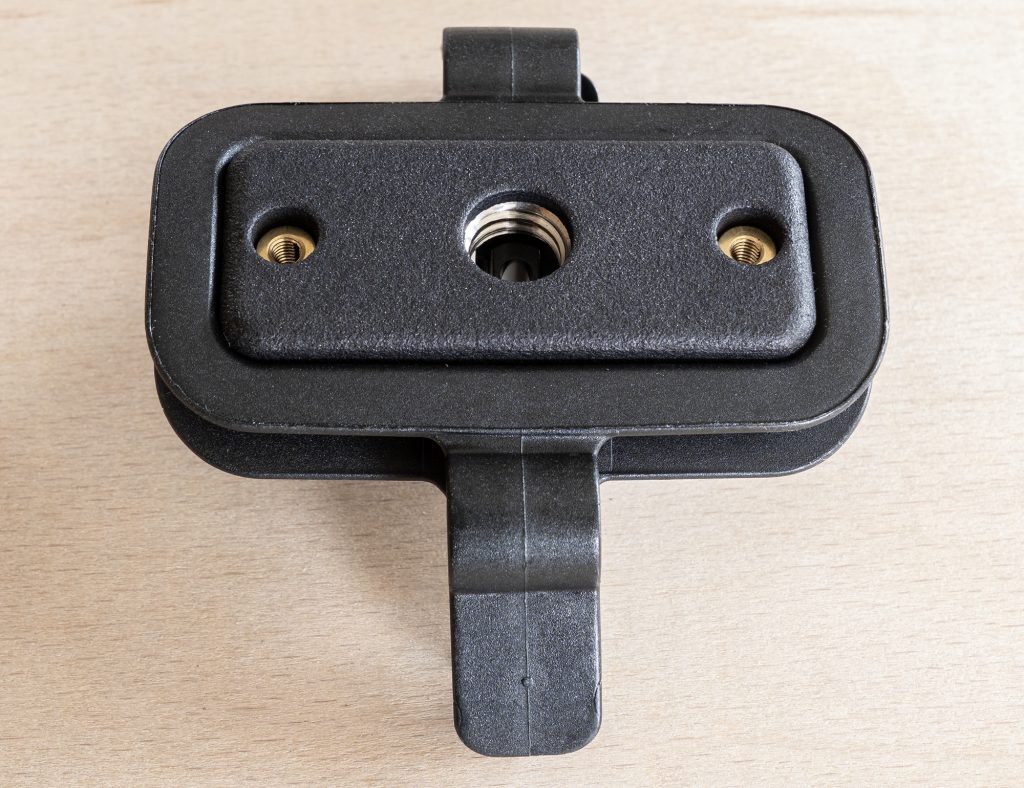
A postscript to a postscript? Hmm. Anyway, just thought I should add a short piece on base adapters. Obviously, the pivoting bases for RAD-2 and Mini-ALTO connections to boom poles, stands etc. pivot up and down the way expected for a mono mic or, indeed, an MS pair, but not for an ORTF pair where the windshields is used side-on to the sound source. In my original development of a 3d-printed solution I came up with a very simple base that allowed a 3/8″ connection to a ball head, and I have very slightly tweaked that basic design for MJF printing, retaining the captive 3/8″ UNC nut (a nice tight fit into the MJF base) and M3 brass inserts:
Simple base adapter in MJF with and without the 3/8″ UNC stainless-steel nut and M3 brass inserts.Simple base adapter in MJF inserted in the bottom of the ‘smiley face’ of the Mini-ALTO.Simple base adapter in MJF inserted in the bottom of the ‘smiley face’ of the Mini-ALTO, with a 3/8″ ball-joint attached (in this case the Gravity MSQT1B).
In due course I am sure Radius will produce something rather better and, indeed, their upcoming 1/4″ adapter bar is not at all bad and, with it’s 1/4″ female thread, allows use of some well-machined small ball joints that are rather nicer than the 3/8″ one from Gravity pictured above.
ORTF pair with upcoming Radius Windshields 1/4″ adapter bar – printed in MJF prior to the injection-moulded version being made – connecting the ‘smiley face’ to the ball joint (in this case one branded ‘Innorel’, but seemingly sold under several names: but nicely made nonetheless).
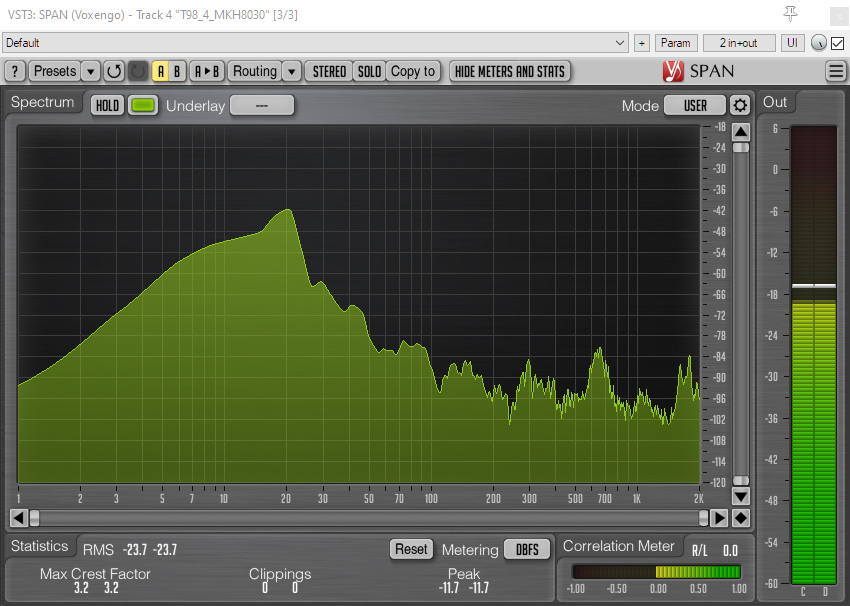
A Sennheiser MKH 800 Twin and MKH 8030 DMS rig (right) in a compact windshield (Mini-ALTO 250), along with a Nevaton DMS rig (left), and a Sennheiser MKH 8090 and MKH 8030 MS pair (centre) in the field…or village street. And, yes, there was no traffic at 5 a.m. on a Saturday morning.
Introduction
The Sennheiser MKH 800 Twin was launched back in 2008, and was based on the MKH 800 of 2000 (itself the successor to the MKH 80 of 1993), so is far from a new microphone. But, during my recent testing of the Nevaton MC59 Twin, I began to wonder more and more why, given the reputation of the Sennheiser MKH mics – with their humidity-resistant RF technology – for outdoor use in all conditions, I had seen no examples of this mic being used for such purposes, whether that be for field recording, sound effects, production sound ambiences or outside broadcast. I’m sure there have been recordists putting the mic to such use, but certainly it is nothing like as popular as the older MKH 30 etc. and the newer MKH 8000 series mics. Above all, I was puzzled why it seems to see such little use for double mid-side (DMS) recording in the field.
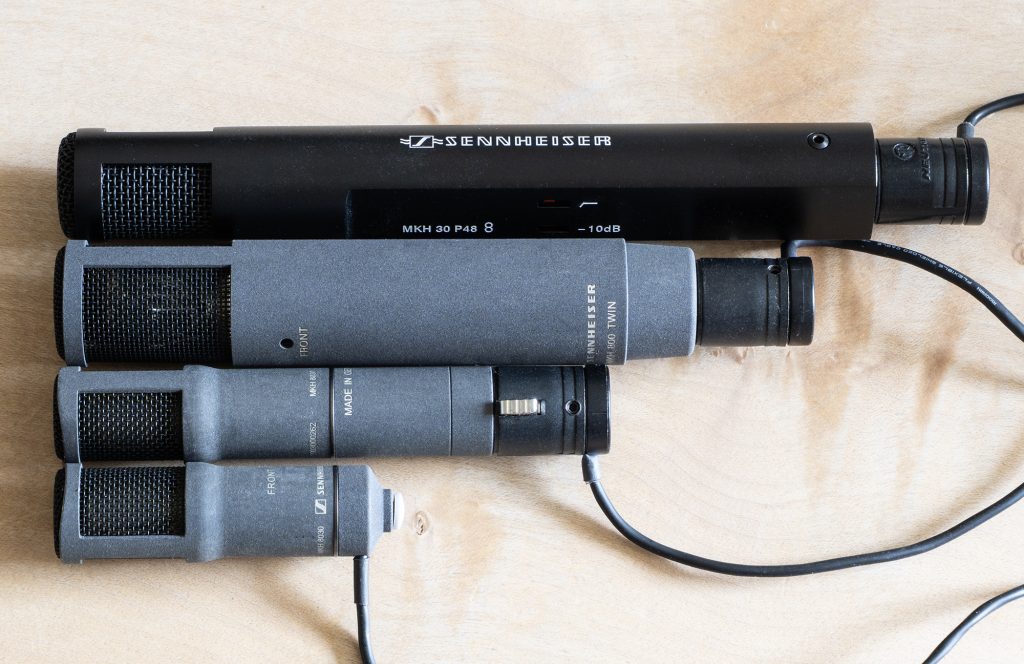
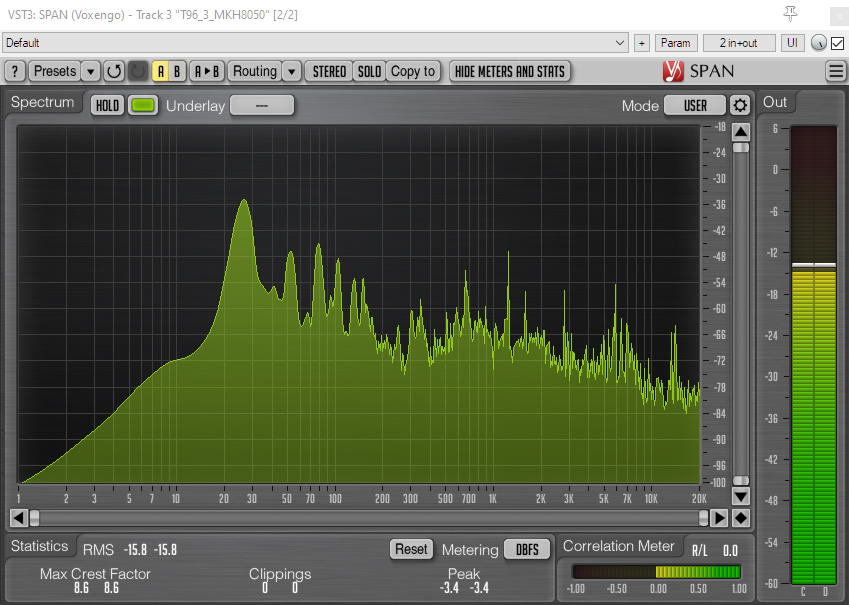
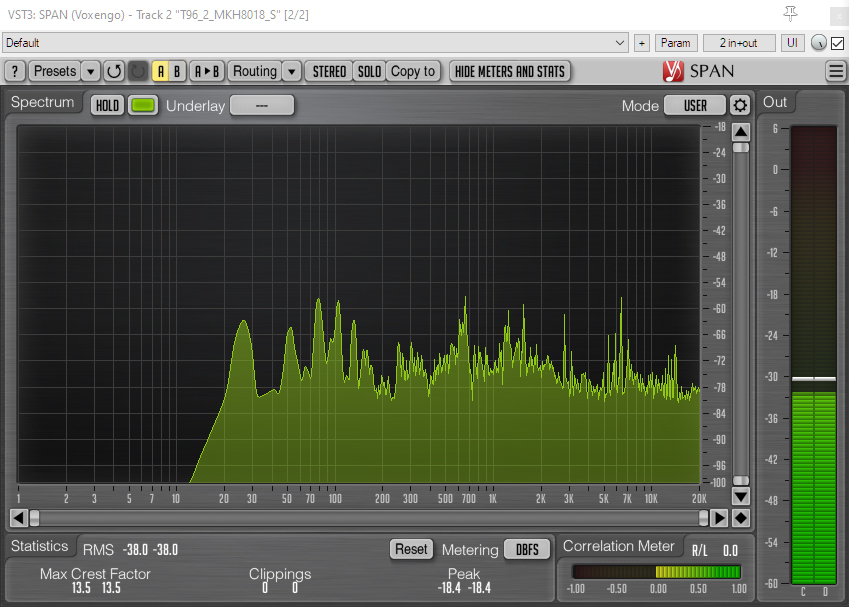
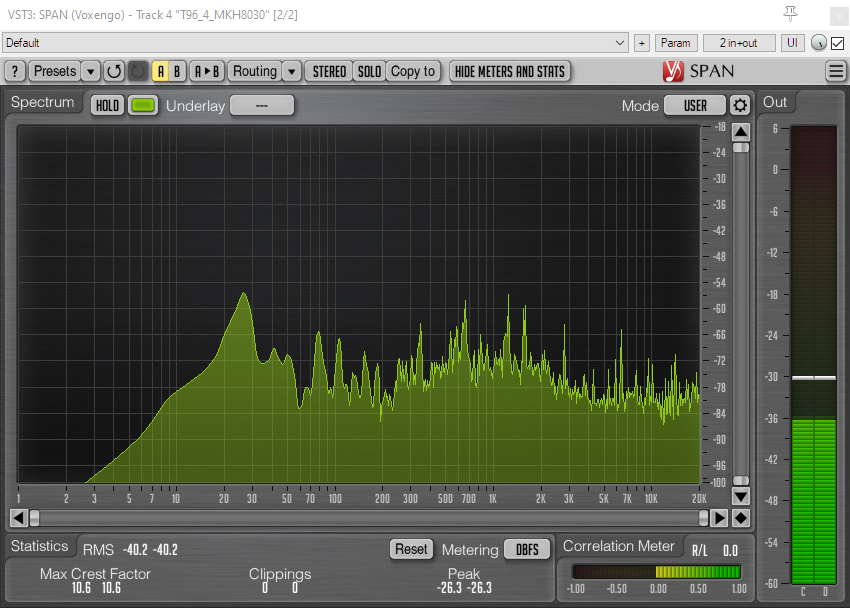
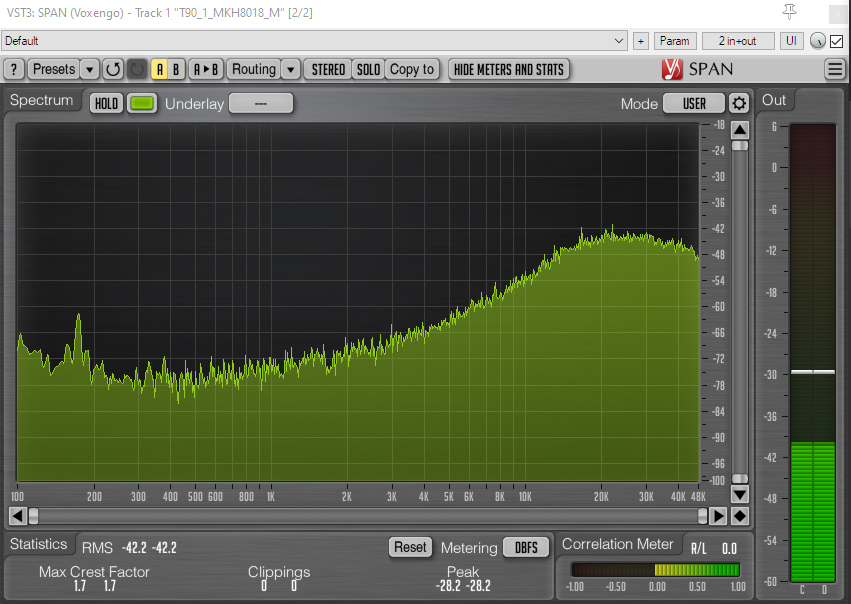
Size comparisons of selected Sennheiser MKH mics with connectors, top to bottom: MKH 30 (fig 8), MKH 800 Twin, MKH 8030 (fig 8) and MKH 8030 with custom side-exit MZL connector.
OK, the MKH 800 Twin is expensive (with a street price in the UK usually above £2,500 inc. VAT), but not (well, at least for some!) frighteningly so: that’s around double the price of a single MKH 30 etc. or an MKH 8000 mic, for what is, arguably, double the mic or more. And it is by no means a small mic: measuring ø27mm x 136mm, and with a weight of 172g, the mic is certainly chunkier and heavier than, say, the MKH 30 fig 8 (ø25 x 174mm, and 110g), but is noticeably shorter. I wonder, therefore, whether it is a combination of weight, size and the rigging options – and with this I am thinking especially of windshields – that has resulted in low use outdoors. For field recording, using a near-coincident or spaced pair of MKH 800 Twins is, perhaps, less desirable than for music recording, although this would be easy to rig with each MKH 800 Twin in a separate windshield, and would be very flexible in post. Rigging a coincident pair of MKH 800 Twins or one MKH 800 Twin and a fig 8 seems more suited to field recording, given its suitability for MS (with the mid mic polar pattern decided in post) or for DMS, yet this might seem challenging to house in a windshield. Even if placing two mics side-by-side (a viable approach: there is often too much concern about the shadowing effects of such a configuration) the overall width and shock-mounting arrangement can be problematic. Certainly there are no off-the-peg options for this. And, equally, going for the preferable end-to-end rigging makes for a long mic pair, again with some trickiness to the mounting inside a windshield. With two MKH 800 Twins or one MKH 800 Twin plus an MKH 30 I can see why such rigs might be daunting, but my recent rigging of the new and diminutive Nevaton MC59 Twin for DMS got me thinking: surely the comparatively small MKH 8030, especially if used with an MZL connector, opens up opportunities for something acceptably compact? The MKH 8030 has been in production since 2024, but, as yet, I haven’t seen it rigged with the MKH 800 Twin in this way, let alone for field use.
So that, in short, is the purpose of this blog-post: to test the MKH 800 Twin + MKH 8030 combination as a practical and supremely flexible field-recording option. Does the new MKH 8030 provide a means to make the MKH 800 Twin a more practical tool for use outdoors? Well, let’s see!
NB I am grateful to the good folks at Sennheiser for sending me an MKH 800 Twin so that I could explore this.
A quick recap: the advantage of a twin
The MKH 800 Twin is closely based on its predecessor, the MKH 800, but while the latter combines its two cardioid capsules internally to allow different polar patterns (just like any multi-pattern LDC mic), the later Twin outputs the two diaphragms separately, allowing any polar pattern to be created in post, from fig 8 to omni, and, of course, two different mics to be created simultaneously: for example, the output can be used to create both a forward-facing cardioid and a rear facing cardioid, or indeed the same with other polar patterns (which need not be the same front and back). Added to this flexibility, a twin mic like the MKH 800 Twin also has a distinctive form, being a side-address mic: this means that if used to generate forward and rear-facing direction mics, as required in DMS, the capsules are both coincident and are not obstructed by the mic bodies (as would be the case when using two end-fire cardioids for the mid mics). As we have seen in my various blog-posts, a twin mic opens up scope for the cleanest (as in least obstructed) DMS, and with near-perfect coincidence of the two mid mics in all planes.
A brief introduction to the MKH 800 Twin
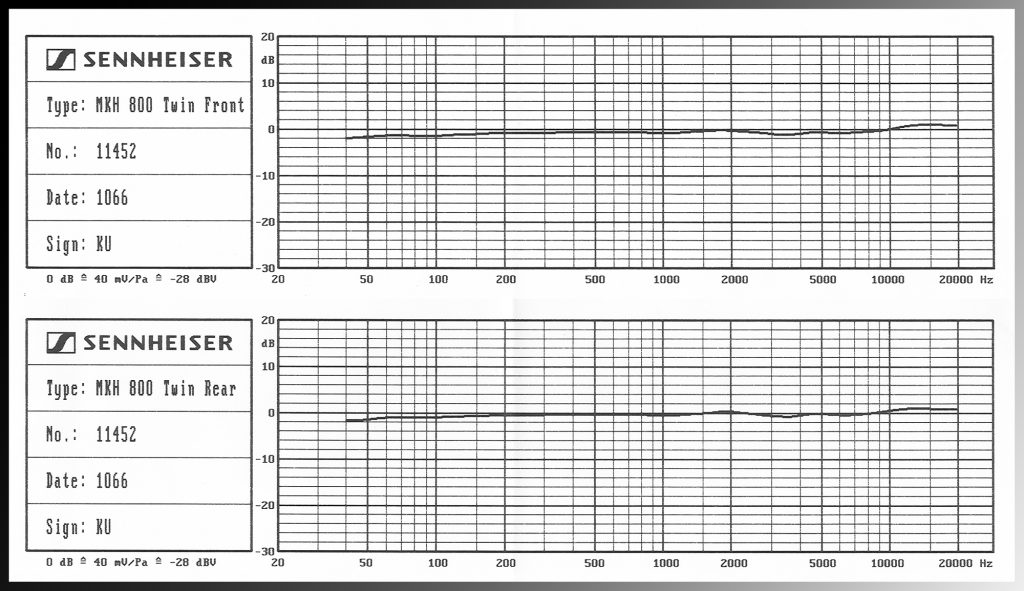
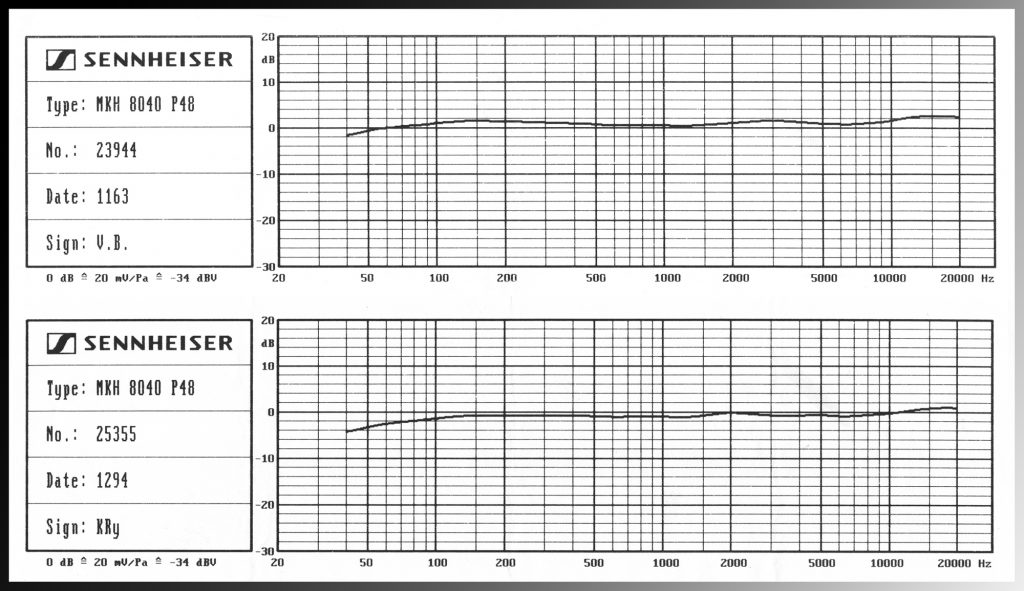
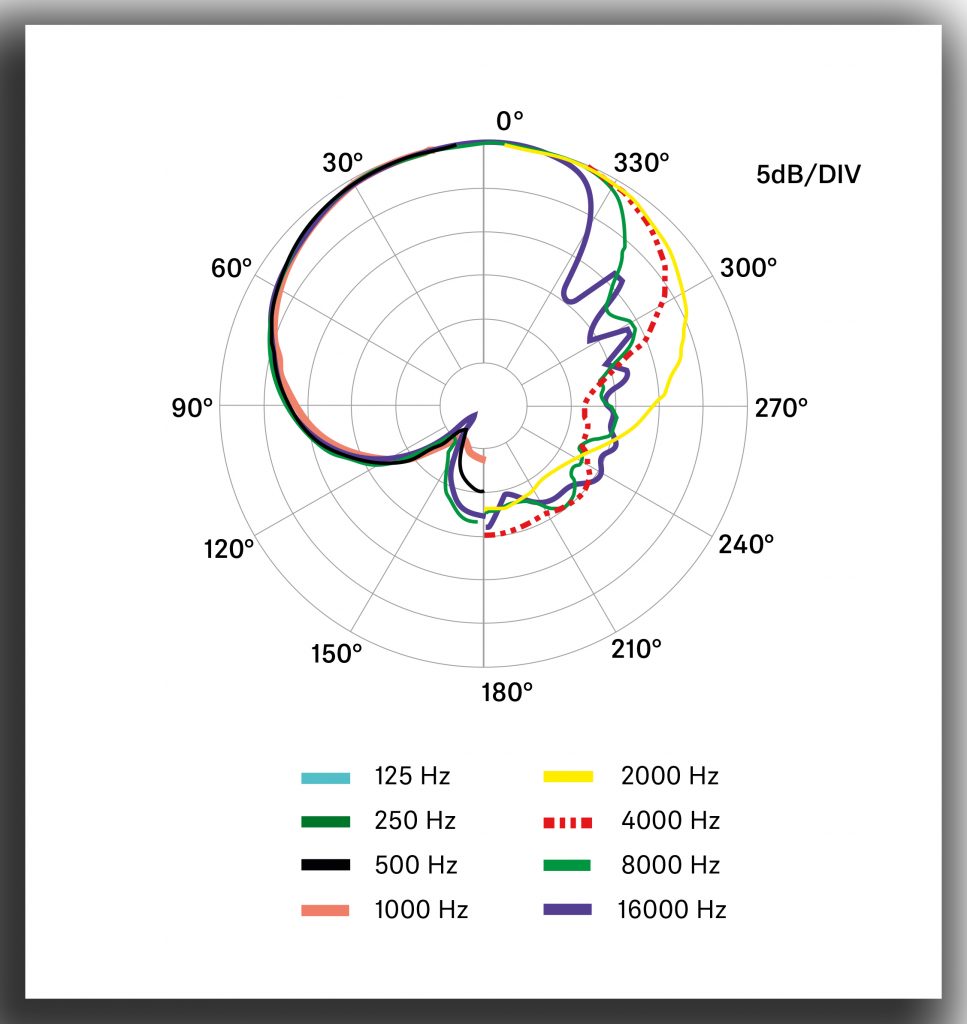
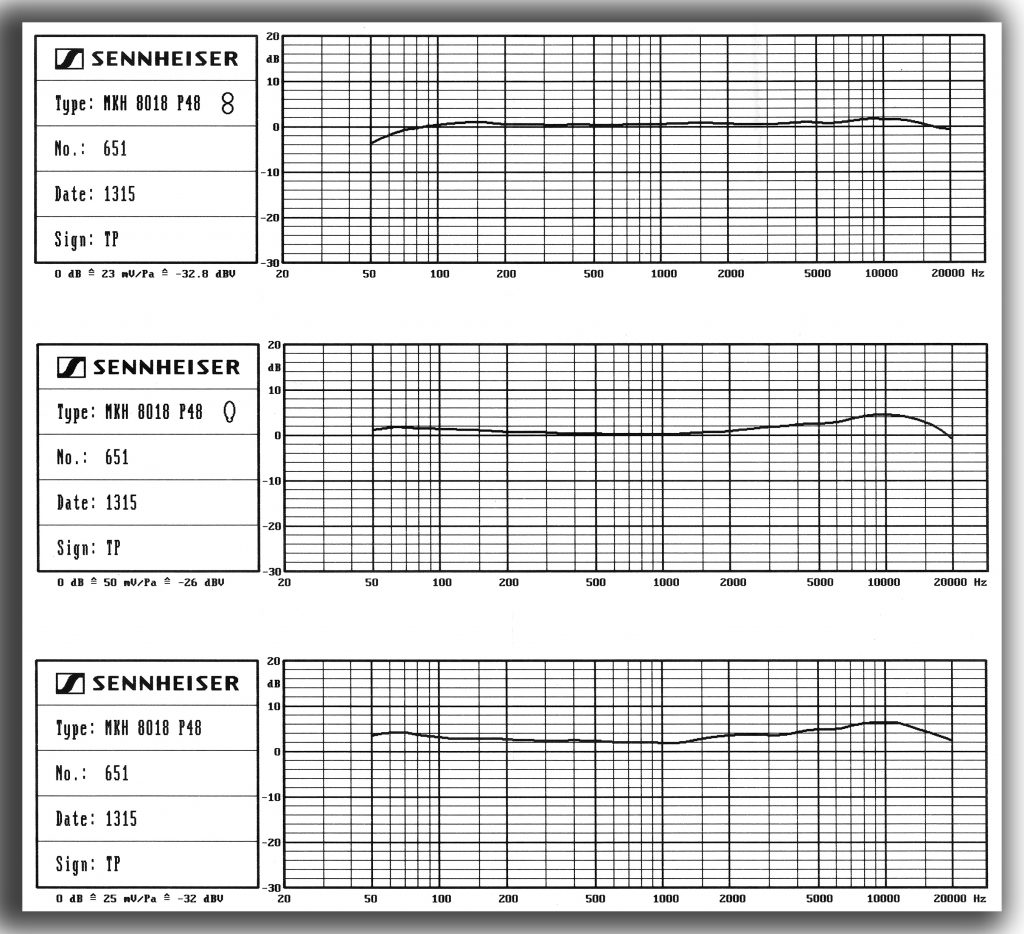
There’s no great value in repeating the specifications of a mic that has been on the market for 18 years, and for which the technical details have long been available on the Sennheiser website. But a few salient points and comparisons are useful. We have covered the physical nature of the mic above, but moving on to the sound of the mics it is perhaps worth considering the frequency response. Below are frequency response graphs for the two cardioid capsules in my MKH 800 Twin, which, as you would expect, are well matched and which, also, are broadly comparable to the cardioid MKH 8040. I include the frequency response graphs for two different MKH 8040s below, which, as unmatched, provide a useful indication of the variation across the model.
Frequency response graph for the two cardioid capsules in my MKH 800 Twin.Frequency response graph for my two (unmatched) MKH 8040 cardioids.
Looking at the self-noise profile, the MKH 800 Twin has the same sharply rising self-noise towards 20kHz and continuing to increase above this as found in the MKH 8000 mics. This isn’t at all surprising, since the mic has the same transducer as in the MKH 800, which, when introduced in 2000, was the first Sennheiser MKH mic to have the extended high-frequency range, then seen in the MKH 8000 mics, for which this self-noise at high frequencies is the quid pro quo. Not a problem per se, unless recording very quiet ultrasonic sounds, but a reminder that the mic has more in common with the MKH 8000 range (and, therefore, the MKH 8030) than the older MKH 20, 30, 40 etc. series. And I should hasten to add that the MKH 800 Twin has self-noise in the audible spectrum of 12dBA (as per the specs), which is very respectable and consistent with the other MKH mics.
Self-noise of the MKH 800 Twin, showing the high-frequency rise typical of the MKH 8000 series mics, and a consequence of the extended high-frequency range – above 50kHz – of these mics vs the older MKH series.
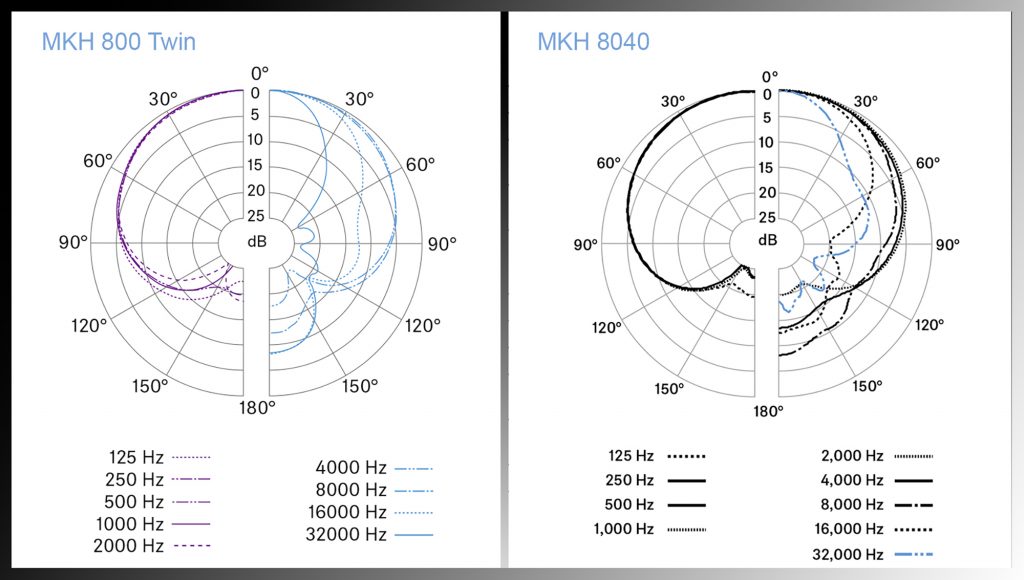
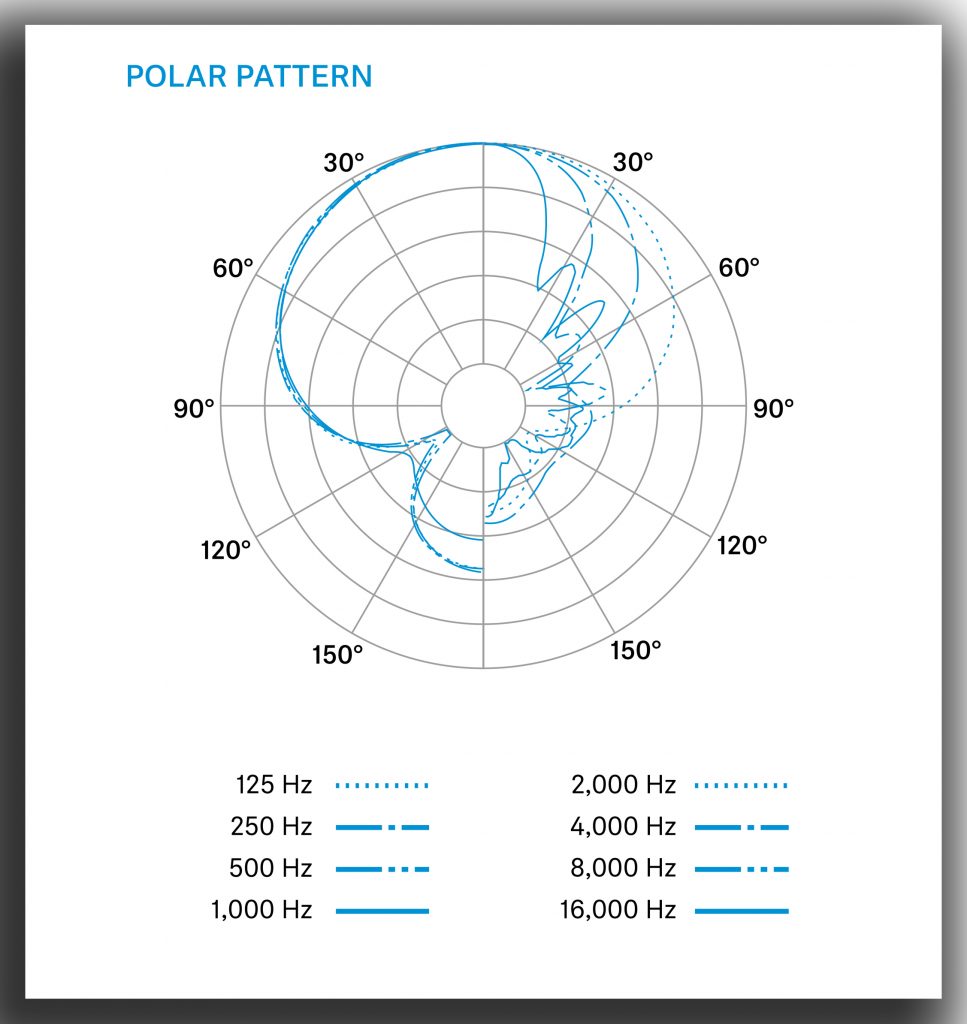
Comparing polar patterns between the MKH 800 Twin for a single cardioid capsule only vs that of the MKH 8040 shows consistency, as you might expect, although the differences in the approach to the published graphics below make that a little tricky. In short, there are some differences from 4kHz upwards, but they aren’t huge. Sadly, Sennheiser don’t publish the polar patterns for the combined capsules (especially for omni and fig 8), where the differences will inevitably be more marked vs their single diaphragm counterparts in the MKH 8000 or older MKH 20, 30, 40 etc. series.
Polar pattern of a single cardioid capsule in the MKH 800 Twin compared to that of the MKH 8040 cardioid mic.
As discussed in previous posts, whereas most SDC omni mics are also imperfect, typically becoming more directional from, say, around 8kHz (I am thinking here of the polar pattern of the MKH 8020 mic), the frequency response on-axis remains consistent, while the omni polar pattern of a dual-diaphragm mic is best at the front and rear (i.e. on-axis to the individual diaphragms), but sees significant high-frequency fall off at 90 degrees. We saw this with the Nevaton MC59 Twin, and I repeated the measurements with the MKH 800 Twin to see how it compared. For this, I placed the MKH 800 Twin on-axis to pinknoise played back via a single nearfield monitor in my studio, then carefully and precisely rotated it so that it was then at 90 degrees, adding the two capsule outputs together in post to compare the on-axis and off-axis omni responses. As expected there is a significant fall off in the high-frequency response of the off-axis omni, in this case from around 14kHz, and corresponding with the progressively greater fall off of such higher frequencies at 90 degrees with any cardioid mic: it is, therefore, an inherent feature of the omni mode in similar dual-diaphragm mics. Aimed on-axis the mic in omni mode will sound fine, but aimed off-access (in effect used as an end-fire mic) it is less likely to be so successful. Again, as discussed in the MC59 Twin blog-post, this last use might seem an unlikely one, but in the past I have come across those advocating the use of the Sennheiser MKH 800 Twin as a single mic solution to omni MS (i.e. using the same capsule for the fig 8 and the mid mic): more experienced voices counter this, of course, noting that the omni mid mic (made of sideways-facing cardioids) will have significant loss of high frequency facing forward. I mention it here as a cautionary note: there is much to love about the flexibility of a twin mic, but best not get carried away (and, if your ears are old, forget that frequencies beyond your hearing might be rather curtailed)!
MKH 800 Twin in omni mode off axis (red) overlaid on the mic in omni mode on axis (green).
Rigging the MKH 800 Twin and the MKH 8030 for the field
Mounting an MKH 800 Twin as part of an MS or DMS pair in one of my Mega-Blimps, as shown for the Nevaton DMS rig, gives the most transparent set up in part due to the sparse structure of the TIG-welded basket, but also due to the fact that the upper mic – in this case the fig 8 – can be suspended from the top of the basket, obviating the need for any linking support. These large windshields also, and rather obviously, can easily cope with larger mics: indeed, as readers will know, the origins of the Mega-Blimps lie in the first TIG-welded windshield I designed back in 2017 for a pair of LDC mics. But that is rather besides the point of this blog-post: the aim here is to explore the use of the MKH 800 Twin in a DMS set up that is a viable everyday alternative to other rigs and, for that, this means compact and using more commercially available windshields.
The DMS pair in the mount of a Rycote WS4 modular windshield: easy to mount the mics (even if rather crudely aligned here!), but that chunky plastic mount or rail normally along the bottom of the windshield – out of harms way – is a real impediment to the rear-facing cardioid when used vertically for DMS.
Many a windshield – such as the Rycote modular series, or the Rode Blimp – has a long mount or rail that, when the windshield is rotated vertically (as necessary for end-to-end DMS rigging with a twin mic), offers a significant acoustic obstacle (see photo above). With that in mind, I returned to my compact DMS rig for the Nevaton MC59 Twin + MC59/8 in a Radius Windshields Mini-ALTO, and created a very similar version for the MKH 800 Twin and MKH 8030. To keep things super compact I asked Ed Kelland at ETK Cables to make a custom cable for the rig, with a low-profile XLRF for the twin mic and a custom side-exit MZL for the fig 8, which he has now made available for others. For reference the cable is configured as follows: channels 1 and 3 have a low-profile XLR 5-pin female (with 29cm cable) from the MKH 800 Twin, and channel 2 has a low-profile/custom MZL (with 36cm cable), with both cables ending in a single 7-pin XLR male. It’s handy to have a single cable for the rig with lightweight flexible cable, to reduce cable-borne noise, and it’s great to have the channels in the correct order for DMS. With the customized MZL the MKH 8030 is very dinky and sits neatly above the larger MKH 800 Twin: with a low-profile XLR for the MKH 800 Twin, this gives a 235mm total length for the pair and their connectors. As with the Nevaton version of this vertical rig, two 4mm rods (actually stainless-steel tubes with M3 stainless-steel threaded bar inside) pass by the sides of the fig 8, but offer little acoustic impact. These connect two simple 3d-printed clips for the two very different sized mics.
The DMS pair mounted with a DIY clip in a Mini-ALTO 250.
There is one downside to using a Mini-ALTO vertically for such a purpose and this is that the basket has a thicker plastic element running longitudinally, which would normally be along the bottom of the windshield, but which here is placed in front of the rear-facing cardioid. Not as chunky as the long mount in a Rycote modular windshield that we have seen (above), but, it must be admitted, not ideal. Which led me to another similarly compact alternative in the form of the Rycote Nano Shield. I haven’t been using either of my two sizes of this windshield recently since the Mini-ALTO is so much more practical for most usage, but the basket of the Nano Shield has one useful difference for this DMS application: its basket has no rail or seam along what would normally be the bottom and that, when used vertically, becomes the rear.
The DMS pair mounted with the same DIY clip as before, but in a Rycote Nano Shield NS4-DB. The two right-hand photos (from front and rear) show the 3D-Tex material removed to expose the seamless basket.
I must admit that the Nano Shield is rather clunkier to use, the lyres are less suited to vertical use than Radius’s hoops (though I have managed to retrofit the latter to a Nano Shield in the past, with a 3d-printed adapter), and routing the two cables is a serious squeeze. Also, I could do with a cable better suited to this mounting option (shorter to the 5-pin XLR and longer to the MZL). But there is no denying it is a more transparent option for this usage than the other compact windshields. Others, I am sure, will – perhaps already have – come up with similar or more effective mounts and windshield options: the Mini-ALTO and Nano Shield examples demonstrate how compact such a rig can be.
A custom cable (an XLR7M Y-cable to custom MZL and an XLR5F) makes life easier for this rig, courtesy of Ed at ETK Cables: this one was tailored to use of the DMS pair in the Mini-ALTO 250.
Naturally, with a larger twin mic, this DMS rig is not as diminutive as that for the Nevaton equivalent, but requiring a Mini-ALTO 250 only (vs the Mini-ALTO 180) or a Nano Shield NS4-DB, the windshield is still of modest size and quite happily fits in a shoulder bag for a compact rig. For stand or tripod mounted use, in the Mini-ALTO, which is the option I used in the field tests, the black 72D-shore hoops are fine on the shockmount, although for anything handheld you might want to step up to 82D-shore hoops and, in extremis (or, perhaps, in transit), there’s always the foam insert Radius make to stop long shotgun mics hitting the windshield basket. But, to be honest, I fail to see the point of handheld stereo or surround rigs moving around to the detriment of the image and introducing handling noise.
Sennheiser and Nevaton DMS rigs using twin mics, in Mini-ALTOs, with the top pods removed to show the mics.
Field testing
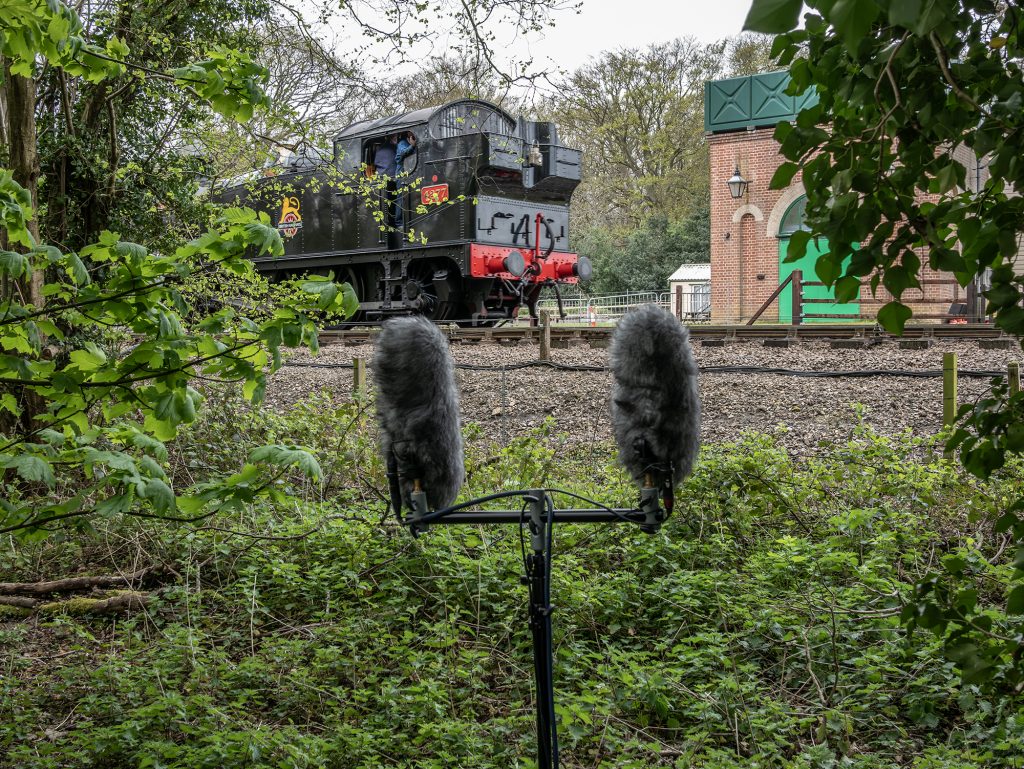
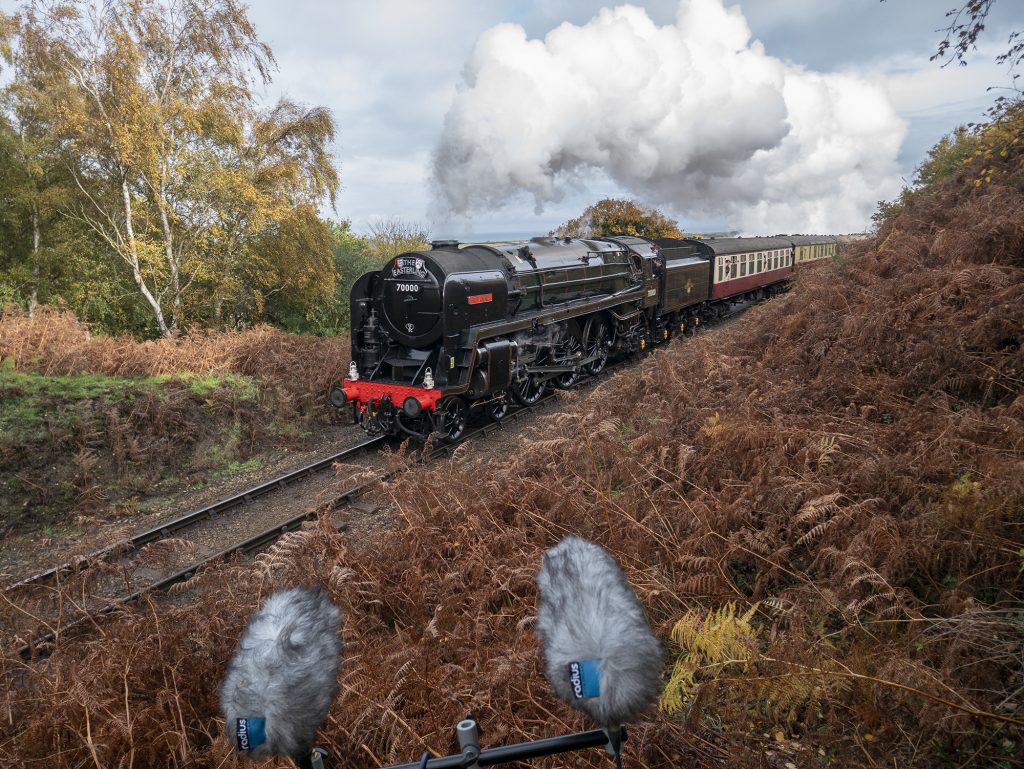
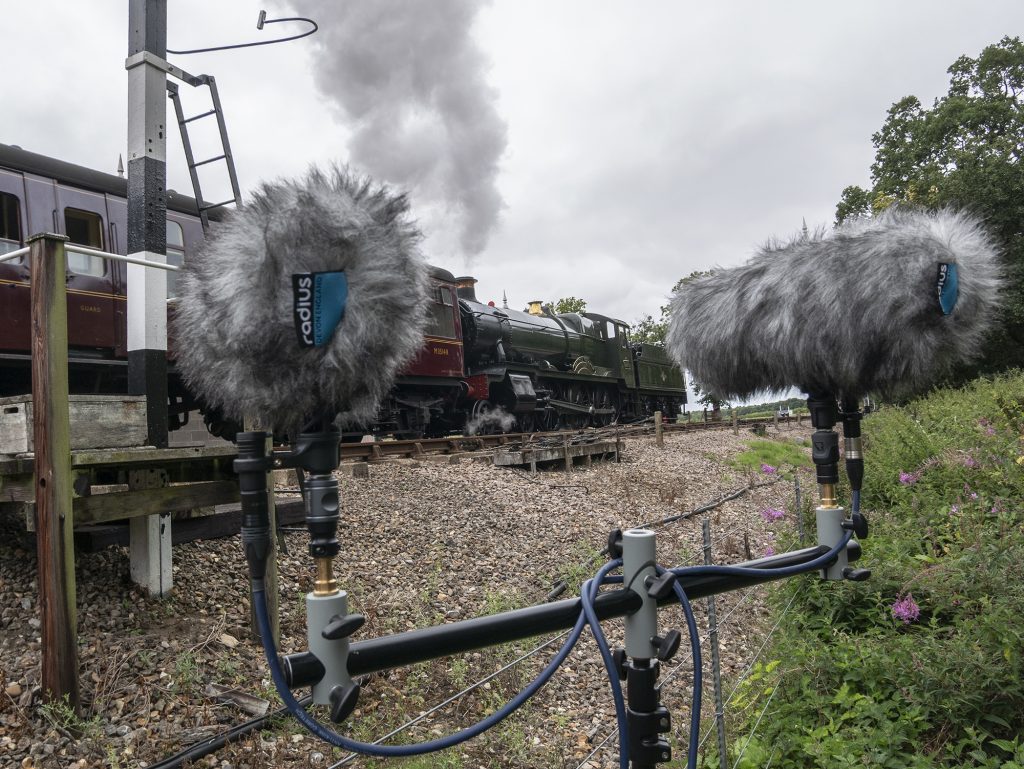
To me, it’s a virtue that the same or similar sound sources feature regularly in my tests, but perhaps that’s just a defense of my laziness! Anyway, here we go again with a passing steam train recording down at the North Norfolk Railway. This time, conscious of the DMS perspective, I set myself a bit further back from the track into a little bit of scraggy lineside woodland: not sure this makes much difference or indeed was necessary, but at least I wasn’t as visible to all and sundry for once! The DMS files have been rendered to XY stereo in Harpex-X,
Recording a loco pulling a train backwards out of Holt station on the North Norfolk Railway with the two DMS rigs.
First up here is the Sennheiser MKH 800 Twin + MKH 8030 DMS recording:
Next we have the Nevaton MC59 Twin + MC59/8 DMS recording:
Recording around dawn in rural Norfolk, with the Sennheiser MKH 800 Twin + MKH 8030 (DMS), the Nevaton MC59 Twin + MC59/8 (DMS) and the Sennheiser MKH 8090 + MKH 8030 (MS).
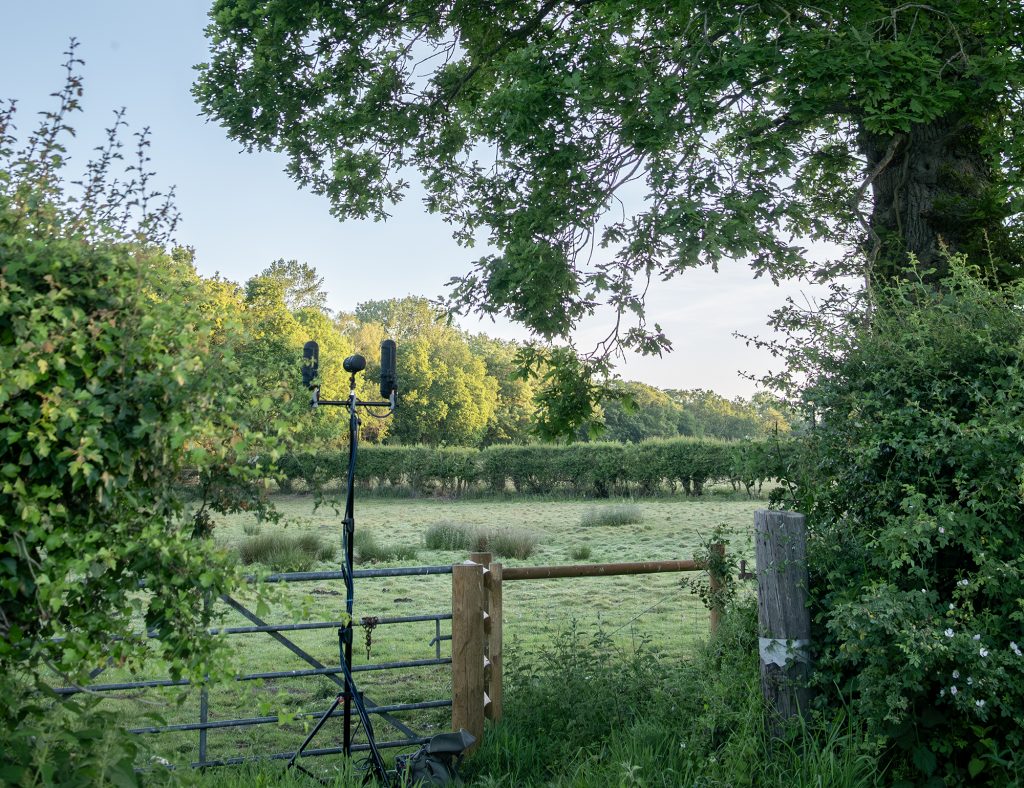
For a more subtle field recording, I got up at 3.45 a.m. (not my forte!) on the 30th of May, which was well before sunrise, did a little recording in the garden in this quiet Norfolk village, then wandered down the road, popping off into fields along my way. For this I took the Sennheiser MKH 800 Twin + MKH 8030 DMS rig, again along with the Nevaton equivalent (MC59 Twin + MC59/8), and, for a bit of fun (and I had two spare channels on the Sound Devices 788T) an MS pair: for this I chose one of my favourites – the Sennheiser MKH 8090 (wide cardioid) + MKH 8030 combination. It was a near windless morning, so I left the furs for the Mini-ALTOs at home and even, at a couple of points, recorded with the naked mics to no ill effect. In post I rolled of the lower frequencies with an 80Hz high-pass filter to remove a little bit of very distant and almost constant aeroplane noise. Here are some short clips of the recordings. For the two DMS ones I rendered to Blumlein stereo in Harpex-X, as this sounded nicest, although, needless to say, the rear lobes become reversed. Of course, the MS render to LR stereo with the wide-cardioid mid mic sounds rather different, but that is rather the point: it is instructive to compare the DMS setups to an alternative approach that one could well take – indeed, I would be very likely to – to a stereo end product. The three files each are a combination of five brief clips, separated by very short silences, and comprise:
i) in the village garden 15 minutes before sunrise (4:21 a.m.);
ii) in a field with the distant sound of a bird scarer firing twice, and a pheasant breaking cover nearby (4:46 a.m.);
iii) by a stream (actually, the exit of the stream from where it goes under a lane in a round pipe) (4:56 a.m.);
iv) the same as above, but with the windshields removed (5:02 a.m.);
v) in the middle of the traffic-free village street, with someone running past (OK, I will confess, it was me, but I was inspired by an early-morning runner who came past moments before, but, needless to say, chatted about what I was up to, so a rather literal re-run seemed better!) (5:28 a.m.).
First up, here is the Sennheiser MKH 800 Twin + MKH 8030 DMS recording:
Next we have the Nevaton MC59 Twin + MC59/8 DMS recording:
And finally, here is the Sennheiser MKH 8090 + MKH 8030 MS recording:
One of those very still mornings where you can chance it removing the windshields….Set up for DMS tests by the Willis organ in St Mary’s Church, Horsham (West Sussex).
A little bit of music
Well, I am conscious that this isn’t a field test sensu stricto with the MKH 800 Twin, but I thought that for some a bit of music would provide an informative test of the MKH 800 Twin and MKH 8030 combination. Added to which, an indoor music test provides some scope for comparing the pair vs others that are not so easy to take outdoors. So, in the midst of the May heatwave here, I popped along to the church of St Mary in Horsham (West Sussex) with my old pal Jake Purches. Instead of recording the organ, as he does for his organ-centric Base2 Music label, he played the organ for me (his love of organ recording has led him to start learning the instrument in his later 50s: a braver person than me, but, aside from the pleasure, without doubt it helps with his recording and editing work) and, also, brought along an additional pair of MKH 800 Twins and a Soundfield ST250 so that we could broaden the comparisons. Rather than bung all the mics up at once – and have a very wide spread of mic positions – I recorded three rigs at a time. The rather nice Willis organ is about to undergo restoration, so, needless to say, the instrument is significantly hissy at present (doubtless the air leaks will disappear during the restoration): so, for those unfamiliar with pipe organs, don’t think it is mic self-noise!
Left to right: Nevaton MC59 Twin + MC59/8; Sennheiser MKH 800 Twin + MKH 30; Soundfield ST250; and Sennheiser MKH 800 Twin + MKH8030.
First up, is a comparison of DMS with an MKH 800 Twin + MKH 8030 vs an MKH 800 Twin + MKH 30. Here, I have rendered them to a stereo Blumlein pair using Harpex X:
As you would expect the difference is subtle, since only the fig 8s differ. But, from the same take, the rendering to a Blumlein pair of the Soundfield ST250 (thanks to Jake: I am not familiar with use or processing of the ST250) is rather different, again as – indeed perhaps more than – you would expect. There’s certainly a lot more high-frequency emphasis than was actually the case with the organ (i.e. the Sennheisers and Nevatons are not oddly muffled!).
Reverting to comparing the Sennheiser and Nevaton twins, next up is a different take, which is a DMS comparison of the MKH 800 Twin + MKH 8030 vs the Nevation MC59 Twin + MC59/8, rendered to a Blumlein stereo pair:
Left to right: Nevaton MC59 Twin + MC59/8; Soundfield ST250; Sennheiser MKH 800 Twin pair; and Sennheiser MKH 800 Twin + MKH8030.
And, finally, and in another take, as we had multiple MKH 800 Twins, here is a DMS comparison of two MKH 800 Twins vs the Nevation MC59 Twin + MC59/8, again rendered to a Blumlein stereo pair:
Obviously it is a bit tricky for anyone not there to compare the mics, especially with regard to the rather different frequency responses, and with different mic comparisons across the three rather different sounding takes: the comparisons are really valid only within the same take (so I have left the take number prefixes – T173, T174 and T175 – in the file names for the avoidance of doubt). But, nonetheless, they may be useful to some: they were to me!
Conclusions
Above all, these tests demonstrate that it is entirely practical to use an MKH 800 Twin in the field and, with some very basic adaptations, it can be utilized as part of a DMS rig within a modest-sized commercially available windshield: in this demonstration, the fairly compact Radius Windshields Mini-ALTO 250 and the Rycote Nano Shield NS4-DB. The key to this is the relatively new MKH 8030 fig 8 mic which, when used with an MZL connector (especially a customized version of this), is so much smaller than the older MKH 30 or, indeed, a second MKH 800 Twin. The pairing not only means the rig is sufficiently compact for most forms of field recording, but also gives a DMS set up where the forward and rearward-facing mid mics are not opposing end-fire SDCs: the cardioids are not heavily shadowed by mic bodies and suspensions. Perhaps because the MKH 8030 is so new compared to most of its MKH 8000 siblings, and perhaps since it takes a (very modest) bit of ingenuity to rig it with the MKH 800 Twin for DMS, the combination seems to have been little utilized: added to that, DMS is, of course, a less-used technique than MS or other – stereo – approaches. Of course, vertical rigging of a twin mic for DMS isn’t suited to all outdoor use: for example, those using DMS for production sound, where it is often used as an adjunct to a forward-facing shotgun mic (for, say, capturing pristine mono dialogue), would find this impractical. But that still leaves considerable scope for field recording, including sound effects recording, where the MKH 800 Twin + MKH 8030 would be very effective.
While for some the MKH 30 fig 8 remains preferable to the MKH 8030, the reality is that they are not hugely different and, consequently, the differences between them when combined with the MKH 800 Twin for DMS are subtle to say the least. Moreover, the design of the MKH 800 Twin – with its extended high-frequency range – is more consistent with the MKH 8030 than the MKH 30. I certainly don’t think I am losing anything by using the MKH 8030 within the DMS rig vs the MKH 30, and, of course, the shorter mic is so much more practical for this usage. Both Sennheiser fig 8s appear preferable (sound-wise) to using a second MKH 800 Twin for DMS: this should not be a surprise, perhaps, given the single diaphragms of the MKH 8030 and MKH 30 vs the double-capsule design of the MKH 800 Twin. Which, of course, brings us to the comparison with the Nevatons, where the MC59 Twin, obviously, has a dual-capsule design, but so also does the MC59/8 fig 8: and yet they hold up so well in the comparisons. Ultimately, however, whatever the pros and cons of these two twin-based DMS rigs – and such things are often a matter of taste and practical requirements – both are excellent options, and, while not achieving something quite as compact, even diehard Sennheiser MKH aficionados should be grateful to the Nevatons for inspiring me to rig and test something very similar for a DMS field-recording rig with the MKH 800 Twin! And talking of inspiration, let’s hope that more manage to get the MKH 800 Twin out into the field.
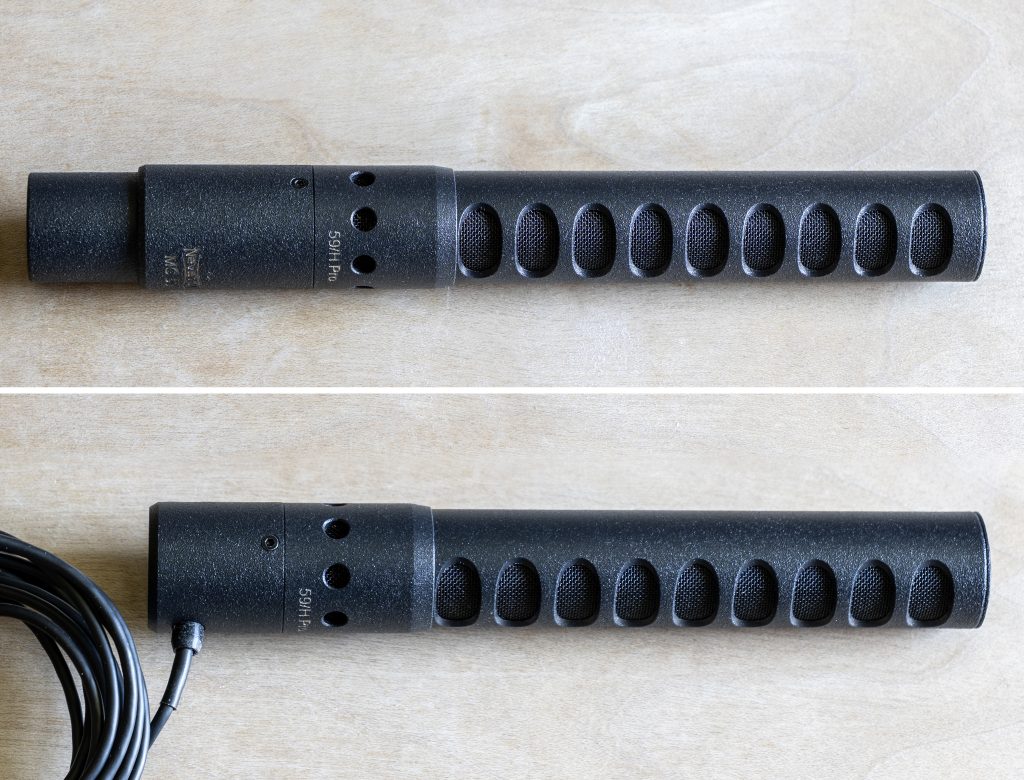
MC59/H Pro capsule shown fitted with the MC59 standard preamplifier with its XLR connector (top) and the more compact MC59M preamplifier with its side-exit hard-wired connection (bottom).
Introduction
As I have noted previously, Nevaton’s MC59 mics – that is, its SDC range – are skewed towards the wider polar patterns, with no hypercardioid or supercardioid models available at present (though I hear one is coming!), yet a variety of omni, wide omni and cardioid options. The MC59/H is an exception to that, being a shotgun model: the MC59/H Pro is a new variation of that mic and is what I am testing here. The mic should be available soon, but the copy lent to me by the engineers is the only one in existence – hence the loan and the fact that, as I type, it is winging its way back to Austria!
Physical form
The capsule part of the mic is 120mm long with the 95mm-long interference tube having a diameter of 20mm, which broadens out to the 22mm diameter that is common to the MC59 mics for the part of the mic that contains the capsule itself. The overall length (and, of course, weight) of the mic depends on which preamplifier is used: ranging from the 49mm XLR-equipped MC59 down to the 5.5mm-long MC59uS. I suspect for practical usage – i.e. allowing for a more balanced mic and providing space for shockmount clips – that most will choose the standard MC59 or the 25mm-long hard-wired MC59S. Certainly with the various preamp options to hand here, I have been using the standard MC59 for the shotgun capsule.
In its physical appearance the mic looks identical to the existing MC59/H, so all the changes in the new ‘pro’ model are under the hood. I understand from the engineers that the main difference is that it has a double-membrane acoustic transducer like most of other capsules in the series (i.e. excepting the MC59/OW, open-wide cardioid, and the omnidirectional mics in the series – i.e. MC59/O, MC59/O+ and MC59/O2, which are pure pressure transducers with single membranes). The second membrane, or diaphragm, has no gold plating and is passive – as, indeed, seen in the Shure KSM42 cardioid LDC mic. The interference tube itself looks unusual in that it has oval openings rather than the more familiar close-spaced slots of most designs, although, of course, many a slotted interference tube covers internal circular openings as, indeed, they do with the Sennheiser MKH 8060 and MKH 8018 mics used in the comparisons for this post.
Self-noise
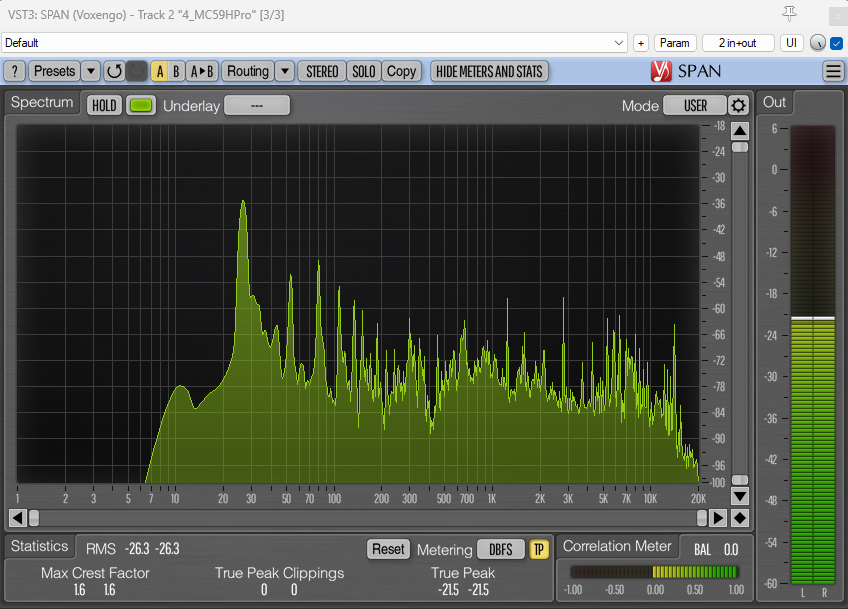
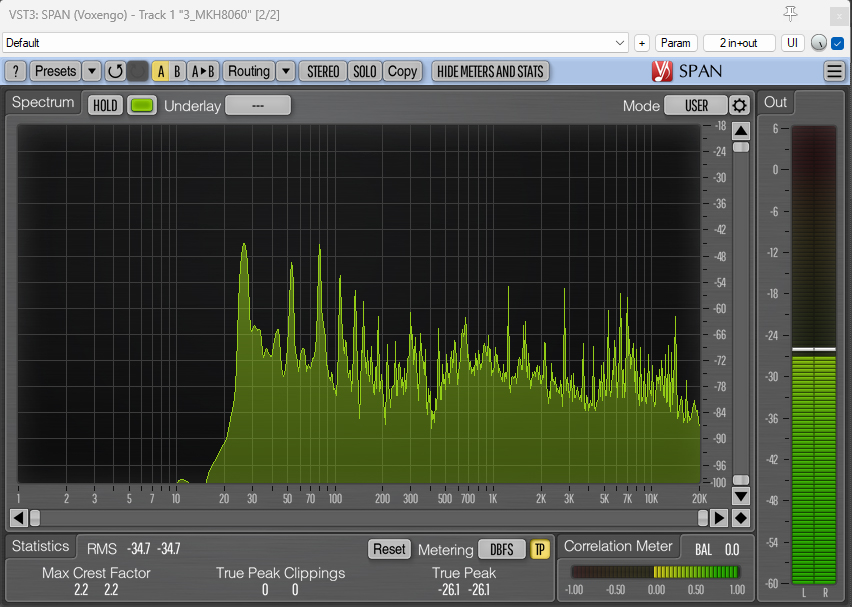
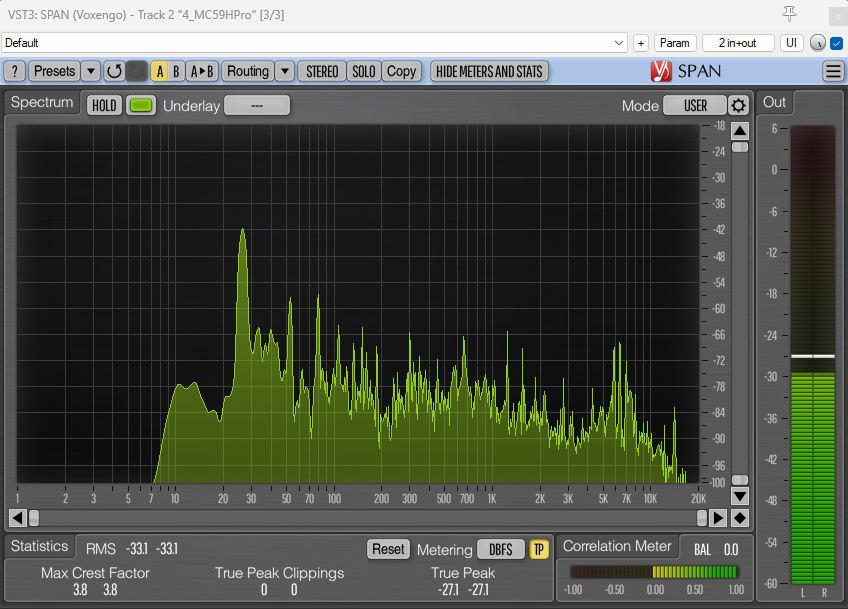
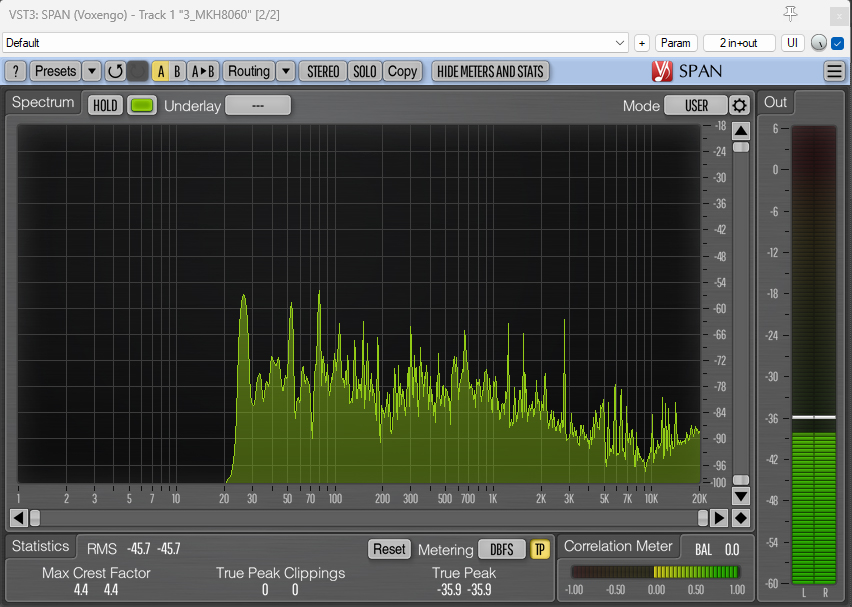
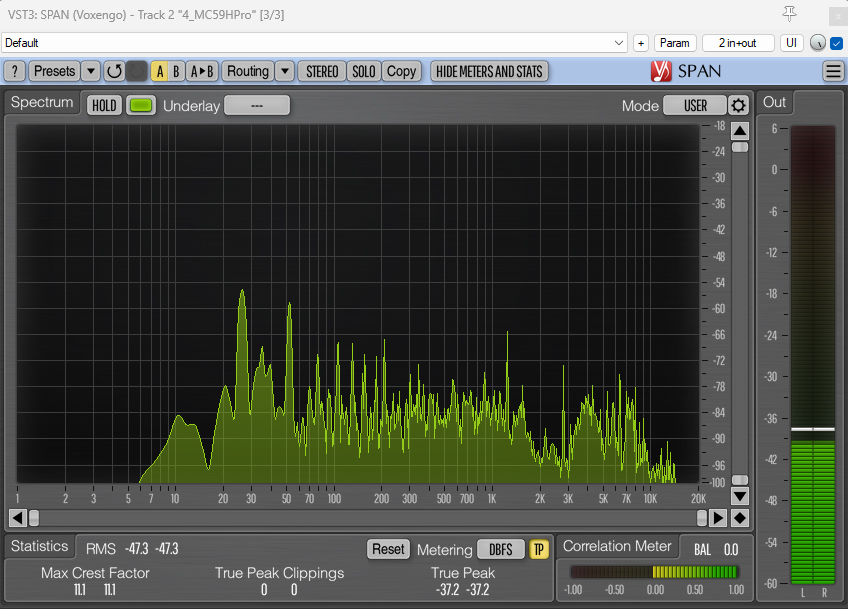
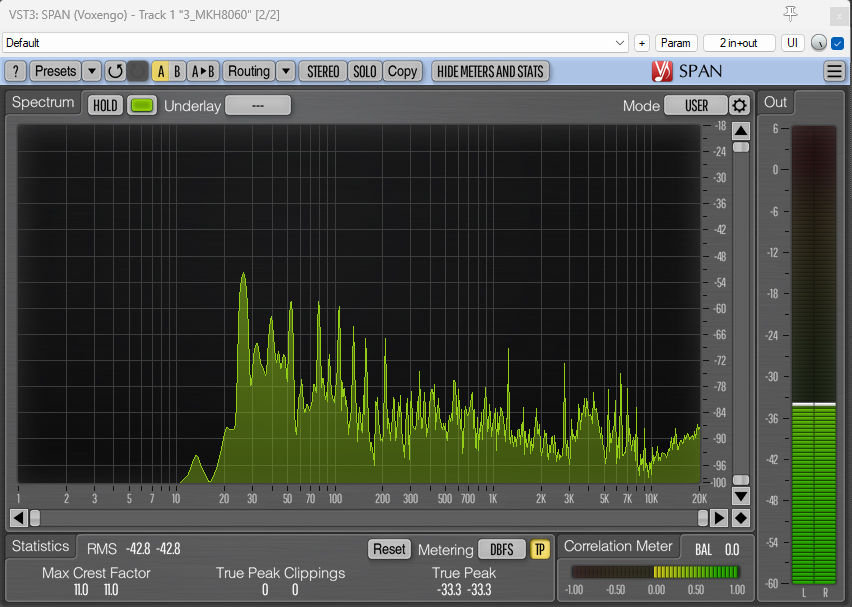
One of the stand out features of Nevaton mics is their low self-noise, and the MC59/H Pro is similar to the standard MC59/H and the other MC59-series mics in this regard. Nevaton themselves suggest -5 to -6 dBA, but, as ever, it is good to test rather than just repeat the specs, not least since self-noise of two mics with the same value can sound quite different due to different frequencies in the composition of the hiss. In this case, I compared the self-noise of the MC59/H Pro to two mics I have been using a fair amount and which I have tested previously: the Sennheiser MKH 8060, which has a very respectable published self-noise of 11dBA, and the Rycote HC-22, which has a still lower published self-noise of 8.5dBA. Both these published specs seem about right from my previous tests.
As usual with such tests, to start with I measured sensitivity rather than just going with the manufacturers’ figures. For this I set up each mic in turn in my studio using a jig so that the centre of the front of the actual diaphragm was in exactly the same place, then played a 1kHz tone through a Vivid S12 speaker, and compared levels using a narrow band-pass filter centred on 1kHz. Obviously there were no absolute figures from this, but relative sensitivity was measurable. I then recorded the three mics using a Sound Devices MixPre-3 recorder at 96kHz in the quietest space I could find in the house (under the usual great pile of duvets etc.) at full gain (76dB), brought the files into Reaper and applied the small gain adjustments to match levels based on my sensitivity measurements. I applied a 24dB/octave high-pass filter at 200Hz to remove any residual distant rumbles of traffic, tractors etc. Here are the recordings:
And here are the spectrum analyzer visualizations:
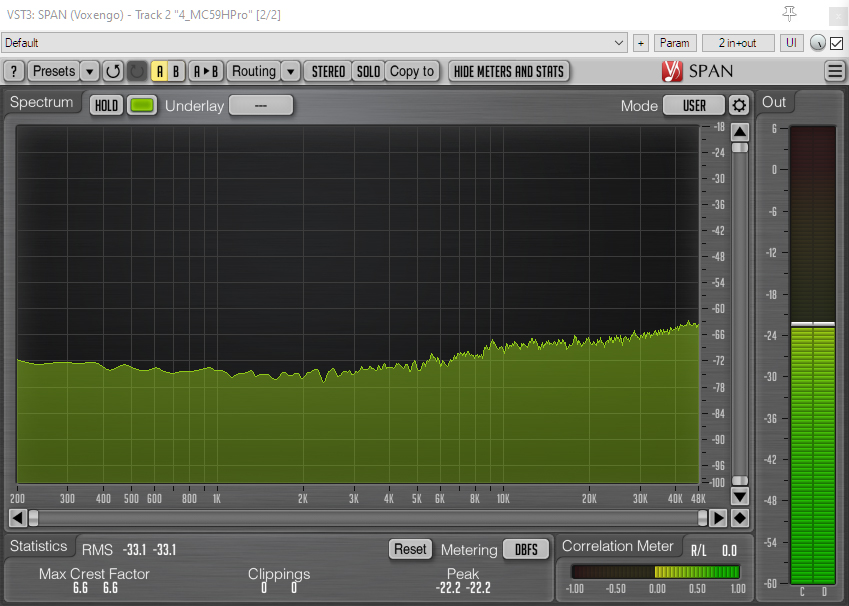
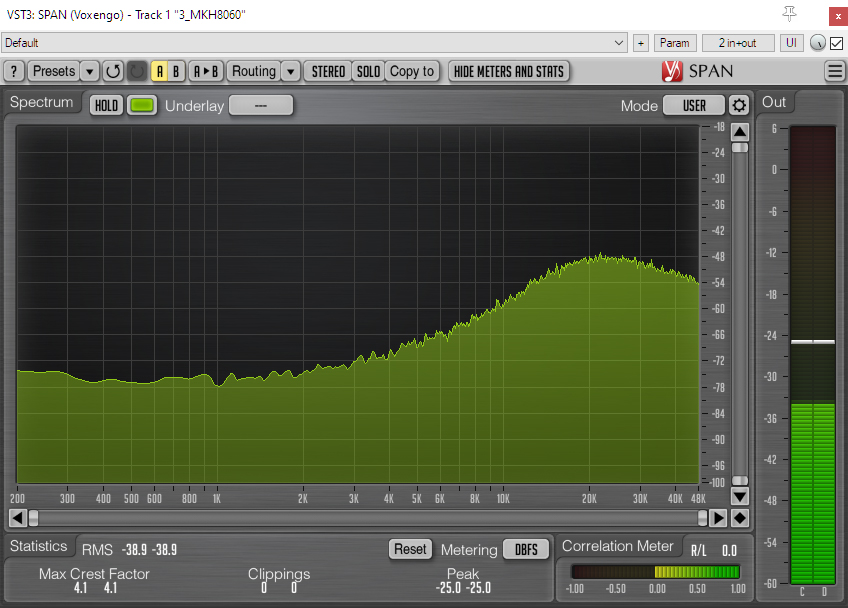
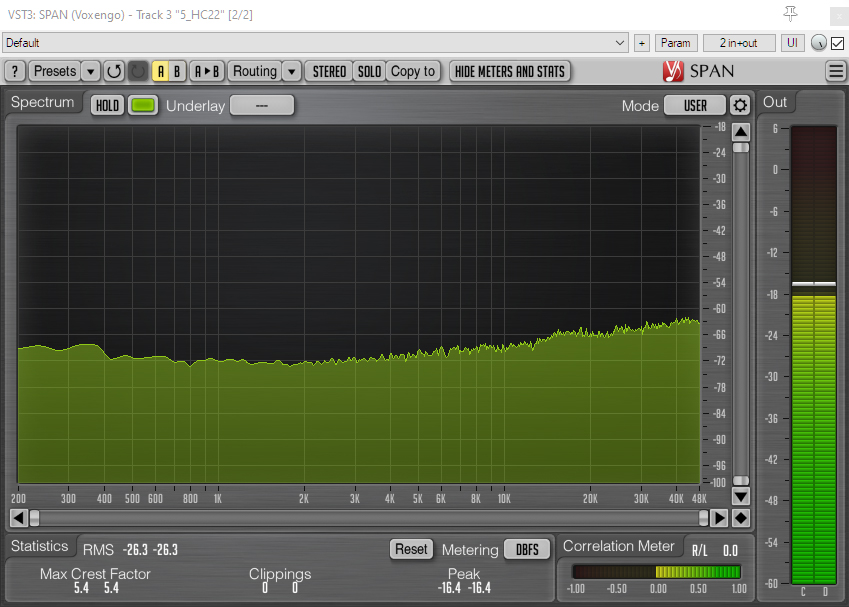
Nevaton MC59/H Pro self-noise.Sennheiser MKH 8060 self-noise.Rycote HC-22 self-noise.
The sound files and the spectrum analyzer visualizations show that the MC59/H Pro is indeed the quietest of the three mics, which takes some doing given the low self-noise of the MKH 8060 and, especially, the HC-22. The two Rycote and Nevaton mics have a broadly similar hiss, albeit at different levels, while the Sennheiser has a more noticeable high-frequency hiss: as with the more recent MKH 8018, the MKH 8060 is not tuned like its first-order siblings, where steeply rising self-noise towards 20kHz continues to rise to 48kHz, but, rather, sees the rise in self-noise start lower and is less steep, and then flattens off after 20kHz, resulting in the self-noise being characterized by more of a high-frequency hiss (say in the 6-12kHz region). In practical terms, these massively cranked-up self-noise tests will be largely immaterial for most recordings, as all the mics are quiet in normal use: but for some, say recording extremely quiet sounds in quiet locations (think effects recordings), there is no denying that the Nevaton has a significant edge in this regard.
Frequency response
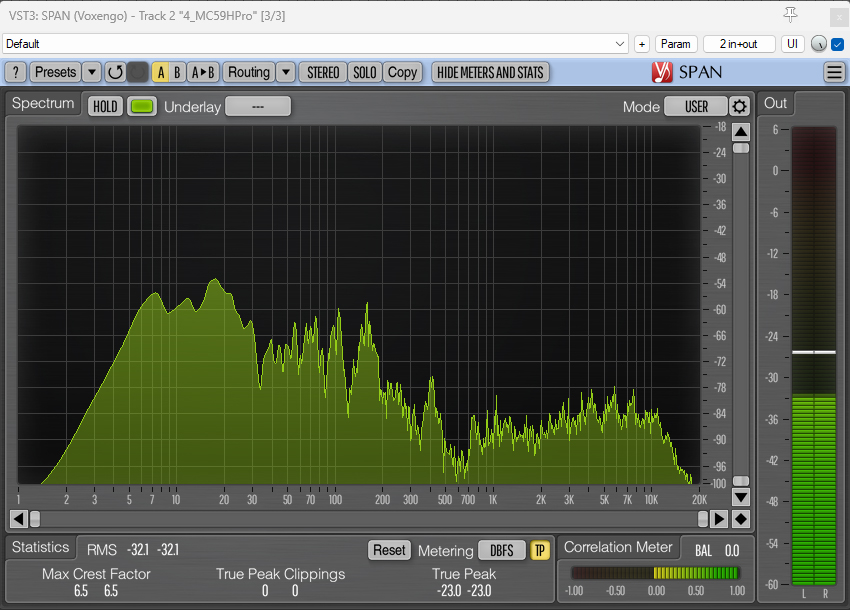
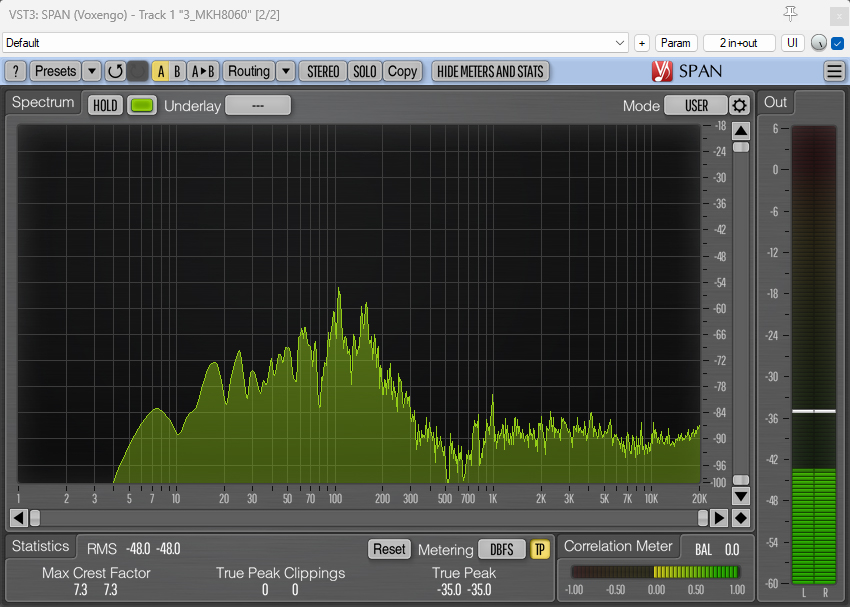
Prospective purchasers of Nevaton mics are not aided by the lack of published polar and frequency plots, although, as with the MC59 Twin, the engineers at Nevaton have provided me with specific frequency response measurements of the actual mic I am testing (with none of the smoothing of published graphs):
Nevaton’s frequency plot (unsmoothed, measured in large workshop) for the MC59/H Pro pre-production model tested here.For reference: frequency plot for the MKH 8060 mic used for most of the comparisons in this blog post.
The two frequency plots show broadly similar responses for the MC59/H Pro (at 0 degrees) and for the MKH 8060, with a significant bump in the high frequency response. That latter is typical of many shotgun mics and I assume is there in both cases to counter typical use with windshields with attendant loss of high frequencies, and for clarity with dialogue. Anyway, let’s leave the graphs and do some real world tests!
Yet again, back to the massive early 12th-century cathedral belfry, for some loud and high-frequency tests: the windshield fur was removed for the photo, but replaced for the tests.
Kicking off with high frequencies, I returned to one of my old haunts in the belfry of Norwich Cathedral where the overtones of the bells provide an interesting sound source. Sticking with the MKH 8060 comparison (as I do for most of this blog post), I rigged this and the MC59/H Pro in a Mega-Blimp (as usual, there was a bit of a breeze blowing through the belfry), and recorded the mics into a Sound Devices MixPre-3. Here are the resultant recordings:
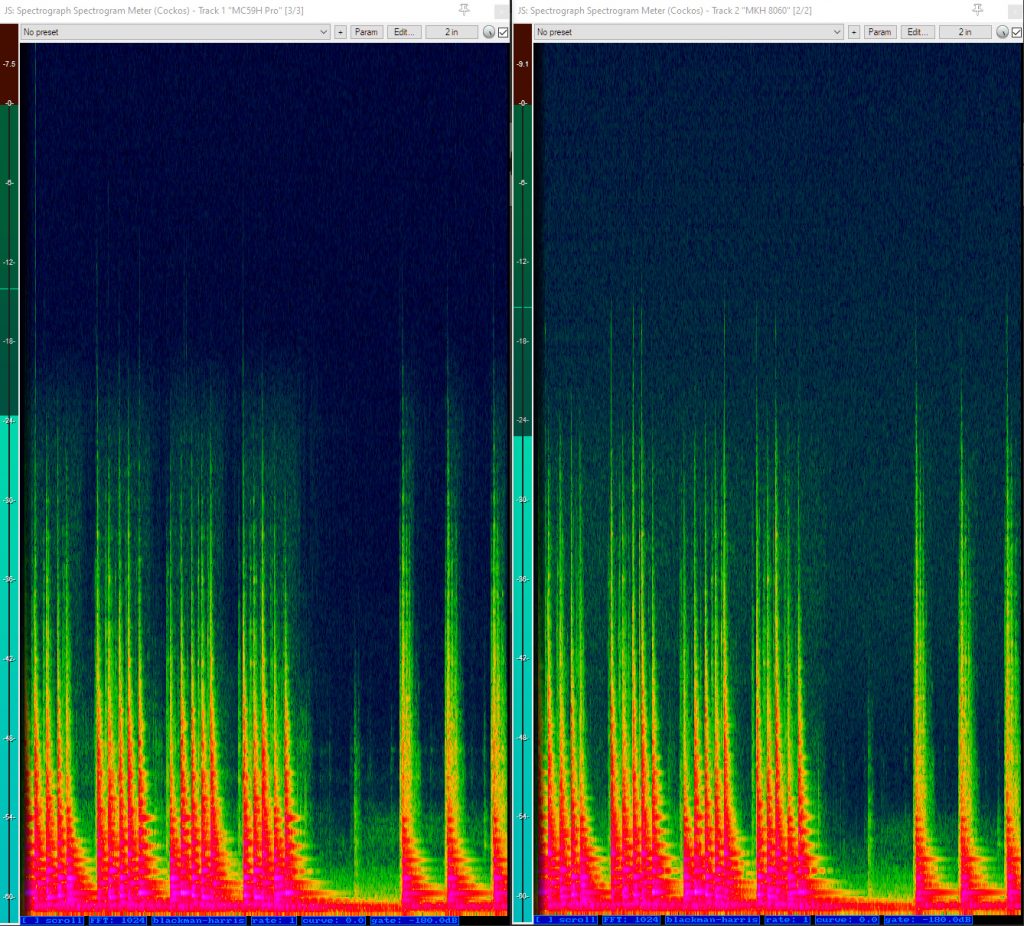
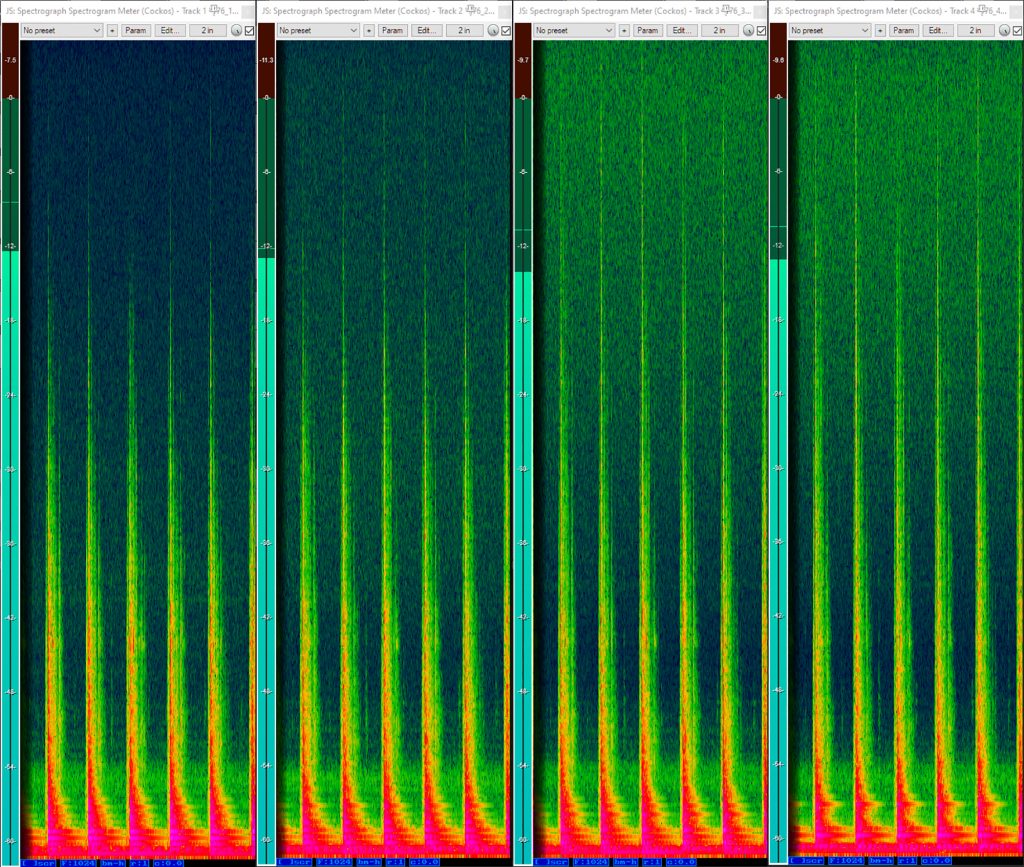
And here is a spectrogram of the recording, showing the chimes. There isn’t a great deal of difference between the two mics in terms of high-frequency response, although the MKH 8060 shows a little more signal above 20kHz, albeit with more self-noise.
Spectrogram of the bells tolling 3 p.m. On the left: MC59/H Pro. On the right: MKH 8060. The vertical axis extends to 48kHz.
I’ve used the cathedral bells for some time for such tests, but recently discovered a more homely and controllable – but, yes, more boring – source of high-frequency sound, useful for exploring mic response in the form of the humble shaker (that simplest of percussion instruments). Here are simultaneous recordings made using the two mics, adding to the exploration by recording on axis, at 90 degrees and 180 degrees, all at the same distance (1.5m). The recordings, which were made outside to reduce reflections, at the three different angles are separated by brief silences.
Listening to these recordings, you can hear the different side and rear rejection of these two mics at the frequencies produced by the shaker (i.e. above 400Hz).
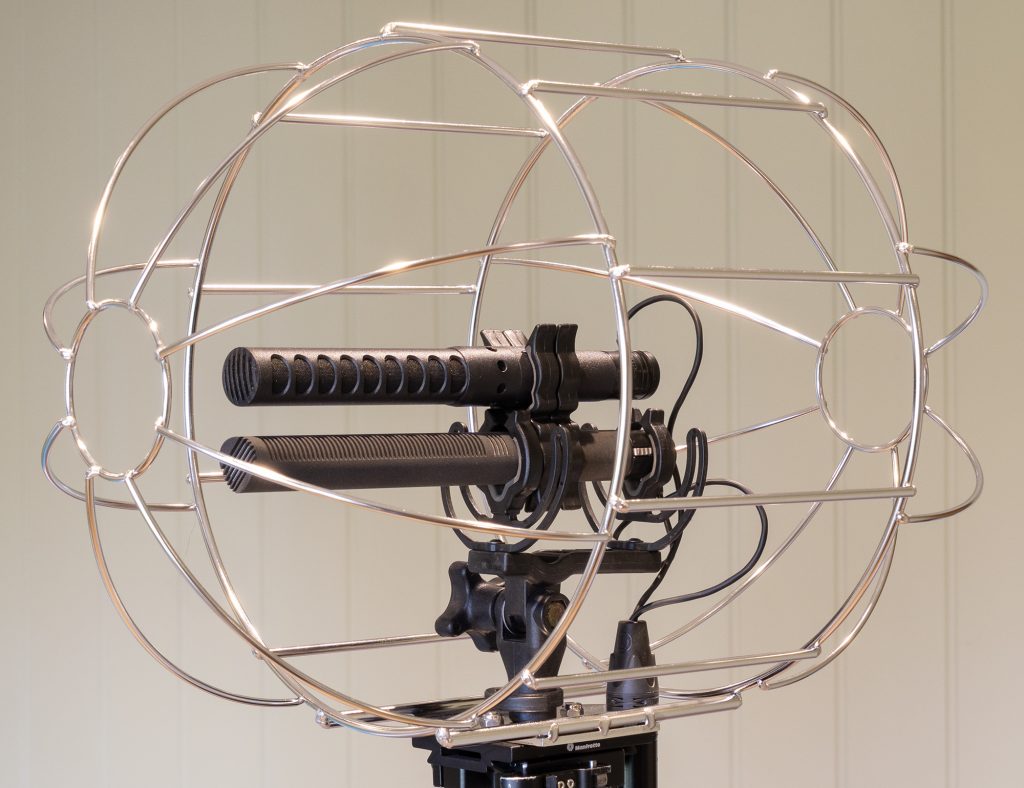
The MC59/H Pro and MKH 8060 rigged for testing in a Mega-Blimp.
Turning to the other end of the spectrum, I set up a Sennheiser MKH 8060 and the MC59/H Pro pair in a single windshield aimed at the exhaust pipe of the rear of a parked car (with the engine idling, of course). Then the mics were rotated side-on to the exhaust and, finally, angled 180 degrees to the sound source. Here are short clips from the recordings, each having the on-axis recording followed, after a very short silence, by the 90 degree recording and, then, the 180 degree recording:
And here are the spectrum analyzer visualizations:
Car exhaust recorded on axis with the MC59/H Pro.Car exhaust recorded on axis with the MKH 8060.Car exhaust recorded at 90 degrees with the MC59/H Pro.Car exhaust recorded at 90 degrees with the MKH 8060.Car exhaust recorded at 180 degrees with the MC59/H Pro.Car exhaust recorded at 180 degrees with the MKH 8060.
In the two recordings you can hear and (from the spectrum analyzer visualizations) see that the fundamental at 26Hz is much more pronounced with the MC59/H Pro than with MKH 8060, by around 10dB, reflecting the reduced bass roll-off in the Nevaton mic. At ninety degrees, even this low frequency is attenuated in both mics, as you would expect: by around 11dB in the case of the MKH 8060 and by around 7dB with the MC59/H Pro. At 180 degrees, however, the two mics are quite different in the case of low frequencies: with the MKH 8060 the 26Hz fundamental is louder than at ninety degrees, and only 6.5dB down compared to the on-axis sound, while the 26Hz fundamental in the MC59/H Pro recording is down 21.5dB compared to the on-axis recording. There’s nothing very unusual about the MKH 8060 in this regard: it is a shotgun mic with a good low-frequency response on axis and with low frequencies also quite evident in the rear lobe, which is an inevitable feature of most conventional shotgun mic designs. The MC59/H Pro has a stronger bass response on axis, but also, and much more unusually, its double-membrane acoustic transducer means that it doesn’t have a back lobe at low frequencies, and the effect is both noticeable and dramatic. Of course, this may or may not be useful for any given recordist or situation. In many uses of a shotgun mic, especially if mounted on a boom pole, then a high-pass filter is almost certain to be required anyway, obscuring much of the effect of the different design. In that case, if rear rejection is wanted, a mic such as the Sanken CSR-2 might be more useful (its rear rejection isn’t for very low bass, but rather above this in the 80Hz to 1kHz range) or the Schoeps SuperCMIT (though Schoeps caution that much care is needed using the latter’s preset 2, which gives maximum reduction of the rear lobe). However, there are many situations where a shotgun mic might be mounted statically and where on-axis bass response is wanted (e.g. music recording, or a sound effect recording where the low-frequency content is significant), but where the absence of low frequencies (e.g. traffic rumble, the sound of distant aircraft or even, and this is especially relevant to indoor recording, reflections of the source sound) in the rear lobe will be a significant advantage. Obviously, if choosing a shotgun mic with rear lobe reduction – be it one such as the Sanken CSR-2 or Schoeps SuperCMIT models with active second transducers, or the Nevaton MC59/H Pro with its passive second diaphragm – the application and, of course, the sound of the mic need to be considered carefully.
Handling noise
More so than in the case of condenser mics with other polar patterns, a shotgun mic is likely to be handheld, be that in a pistol grip or at the end of a boom pole, so handling noise merits consideration. For this, as with other comparative tests, I mounted the MC59/H Pro alongside an MKH 8060, both on identical shock mounts (Radius Windshields RAD 2s) on a short stereo bar fixed at the end of a boom pole.
Here are the sound files, in which I describe how I am using (or, rather, abusing!) the boompole:
And here are the spectrum analyzer visualizations:
MC59/H Pro: handling noise (exaggerated twisting in bare hands). MKH 8060 handling noise (exaggerated twisting in bare hands).
With no high-pass filter applied, the MC59/H Pro has a much greater susceptibility to handling noise, especially below around 60Hz, than the MKH 8060. In part, this doubtless reflects its increased bass response. But, of course, handheld or boom pole mounted shotgun mics invariably require use of a high-pass filter to reduce both handling and wind noise, and applying a typical 80Hz (24dB per octave) high-pass filter to both mics levels things up considerably. In short, I wouldn’t be concerned about booming the MC59/H Pro.
Here are the sound files with the 80Hz HPF applied:
And here are the spectrum analyzer visualizations with the 80Hz HPF applied:
MC59/H Pro: handling noise (exaggerated twisting in bare hands) with 80Hz high-pass filter applied.MKH 8060: handling noise (exaggerated twisting in bare hands) with 80Hz high-pass filter applied.
Voice/dialogue
Moving to voice, again I compared the MC59/H Pro to the MKH 8060. First, here is a test with the two mics mounted with back-to-back clips in a single Mega-Blimp, which was statically mounted outside:
And here is a test that combines indoor recording, with the mics mounted together (with back-to-back clips) on a boom pole: in this case the speaker/talent is moving forward the whole time and the boom is never stationary. Sorry about the less than ideal boom swinging: I could blame my current tendonitis, but I think that is just me searching for an excuse! Anyway, the indoor space selected was chosen to be a worst case scenario, being a small reverberant room (4.4m x 4.6m) with a low ceiling (2.14m) with a wooden floor and no soft furnishings, to expose any comb filtering arising from the interference tubes of the two mics.
These short snippets are doubtless a poor demonstration of the efficacy of the two mics – and their differences – when used for dialogue (and my booming for the second pair of recordings does leave a lot to be desired), but I am conscious that production sound recordists really do need to spend time themselves with a shotgun mic to see if the nuances of one versus another suits their purposes or taste better. At a crude level, however, my experience from use of the two mics is that I would be very happy with either for dialogue recording, and I must confess I expected much worse of the two mics in that difficult reverberant interior.
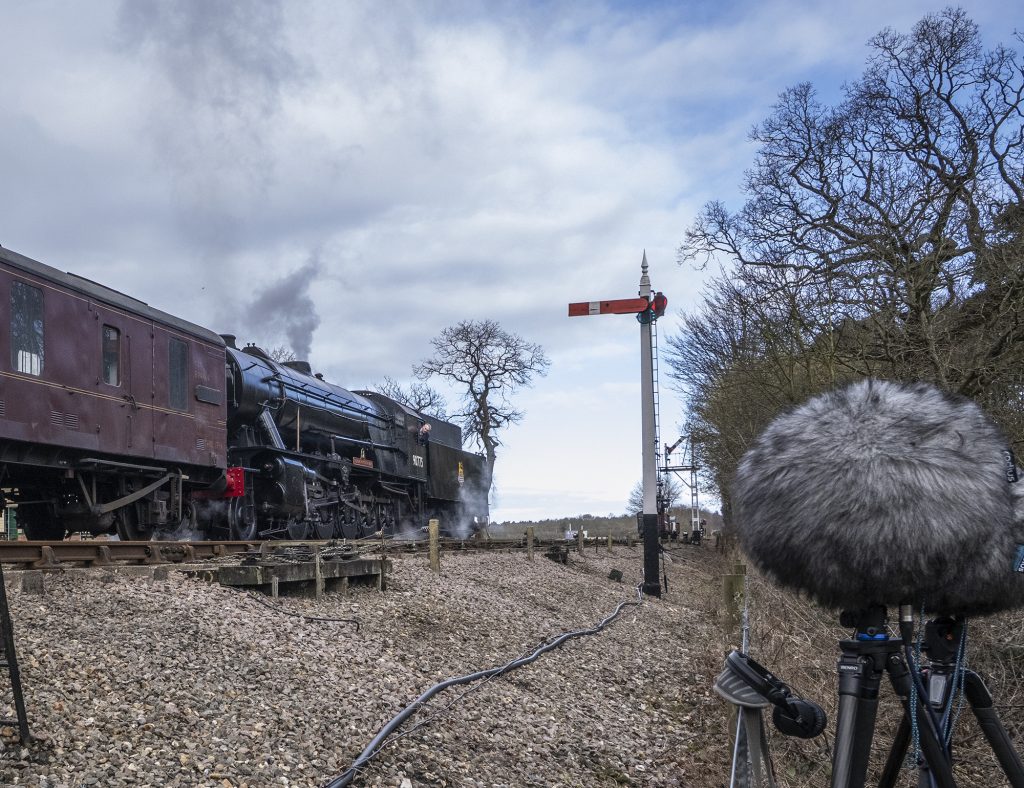
Train leaving Holt station on the North Norfolk Railway, pulled by WD 2-10-0 – 90775 ‘The Royal Norfolk Regiment’ and – I have no idea why – also pushed by a British Rail Class 31 diesel (5631). Don’t be deceived by the two Mega-Blimps in the photo: the two shotgun mics were in the same windshield, with the other one being used for a test recording of the MC59 Twin – for which see my separate post.
Effects/location recording
As so often featured in these blog posts (too often now perhaps?!), I went down to the local steam railway again for a recording test. It might be getting a bit repetitious, but, nonetheless, as a sound source it seems to have a good bit of variety in terms of frequency (from steam hissing, to low-frequency rumbling and engine noises, the latter especially evident in this case with the diesel locomotive pushing the train too), as well as movement. And, as ever, the larger furry windshields gave the chaps in the signal box a good laugh: it’s always good to brighten someone’s day! Anyway, here we go with the two recordings:
A bit of music: something bluesy down in the woodshed…
Well, with apologies to Stella Gibbons for the subheading, but not really a woodshed: rather, the nice and spacious workshop of woodcarver Luke Chapman, who will be familiar by now to readers of this blog for his long-suffering of my mic tests, putting down his chisels and chainsaws to pick up a guitar. In this case he provided a bit of impromptu blues slide guitar playing in front of a test rig comprising the MC59/H Pro, the MC58/8 fig 8 (so you can hear the shotgun mic used in an MS pair), the MC59 Twin (so you can hear how the MC59/H Pro MS pair sounds compared to other MS pairs with different mid mic polar patterns – wide cardioid, cardioid and supercardioid), and the Sennheiser MKH 8018, which is, of course, a stereo (MS) shotgun mic. All plugged into a Sound Devices 788T. Here is a video, where the mic set ups keep switching (with the current mic set up clearly shown on the screen):
And here are the individual tracks in full, which you can download and scrutinize should you so wish. First off, here are the MC59/H Pro and MKH 8018 mono shotgun recordings:
And here are the stereo recordings using the the two shotguns – the MC59/H Pro paired with the MC59/8 fig 8, and the MKH 8018 used in its stereo MS mode:
And, finally, here are the comparative MS recordings used in the video above, made using the MC59 Twin to create wide cardioid, cardioid and supercardioid mid mics, combined with the MC59/8 fig 8:
Conclusions
As ever, it is largely for readers to draw their own conclusions from the tests above, insofar as the recordings and comparisons allow. As with any mics, especially when you are talking higher-end mics suited to professional use, choosing a particular mic often comes down to taste and, of course, usage. With regard to the latter, I would undoubtedly be keener to take an RF mic (such as the MKH 8060) if heading off to the extreme humidity of the tropics for some recording than a true condenser mic (even if with some heating of the capsules from the preamps as in the Nevaton mics), and, conversely, would prefer to use an MC59/H Pro either where self-noise was a critical matter (e.g. for very quiet effects recording) or where the low-frequency rejection of the rear lobe was useful. As I said, the latter has applications for music recording and, in this context, it is interesting to learn that Nevaton’s existing standard MC59/H capsule is often used for classical music recordings: I suspect the new capsule will appeal all the more to such users.
As a final note, of course, I must return to the fact that the MC59/H Pro is a pre-production or prototype model. This might suggest that this blog-post has no relevance to other sound recordists, but, evidently (by the fact I have written it!), I don’t think this is the case: on the one hand the MC59/H Pro has much in common with its currently available sibling (the MC59/H), and, on the other, it flags up what Nevaton are developing in terms of their shotguns (and doubtless they might be persuaded to accelerate development of this model if there is interest) and, also, (as with my other pre-production model tests, such as that for the Sennheiser MKH 8030) there is value in having independent tests and reviews available for when a microphone becomes available. When that day comes, I do hope that I can manage to get hold of an MC59/H Pro again, and just not as a loan: it is certainly an impressive mic and I can see applications where it might be uniquely useful. So, crossing fingers here that it won’t be too long!
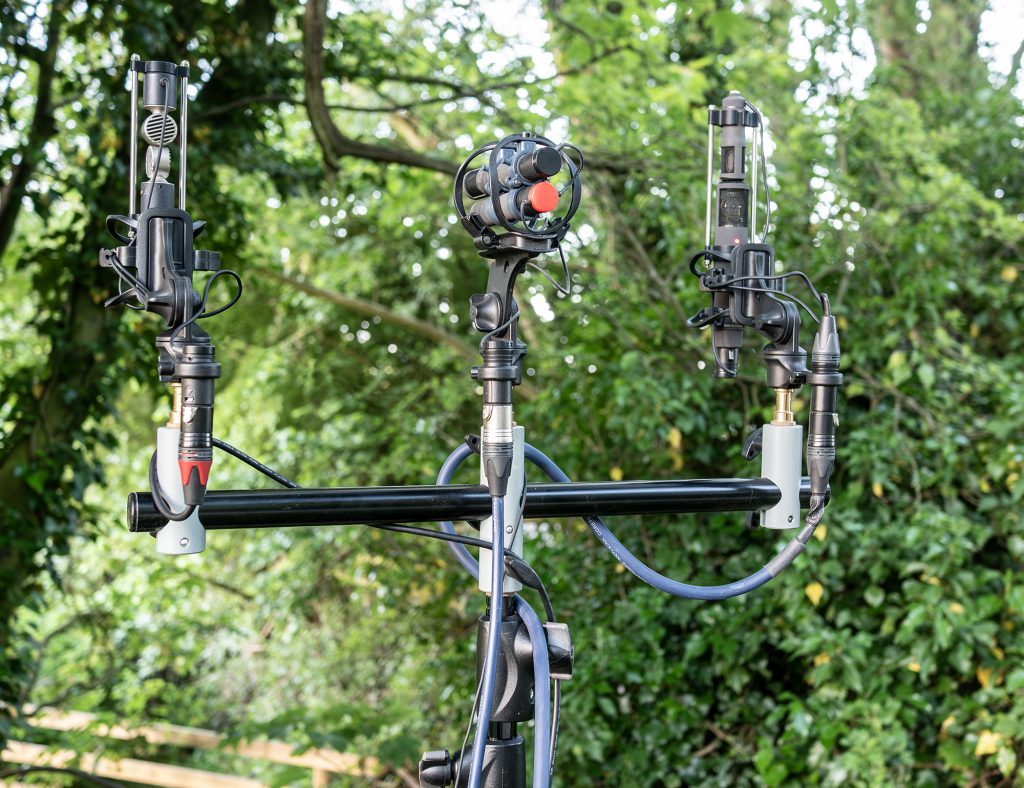
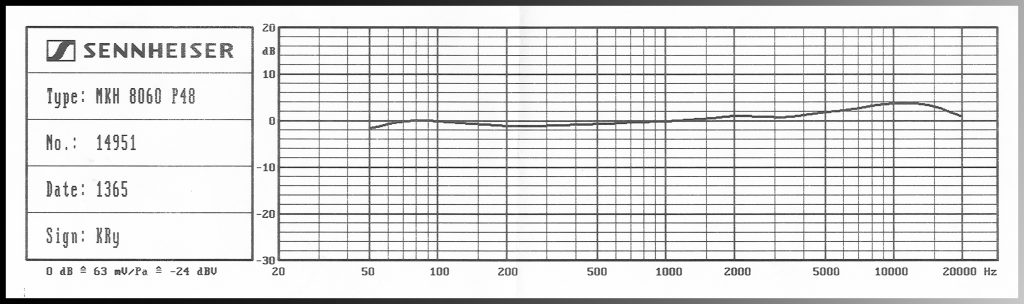
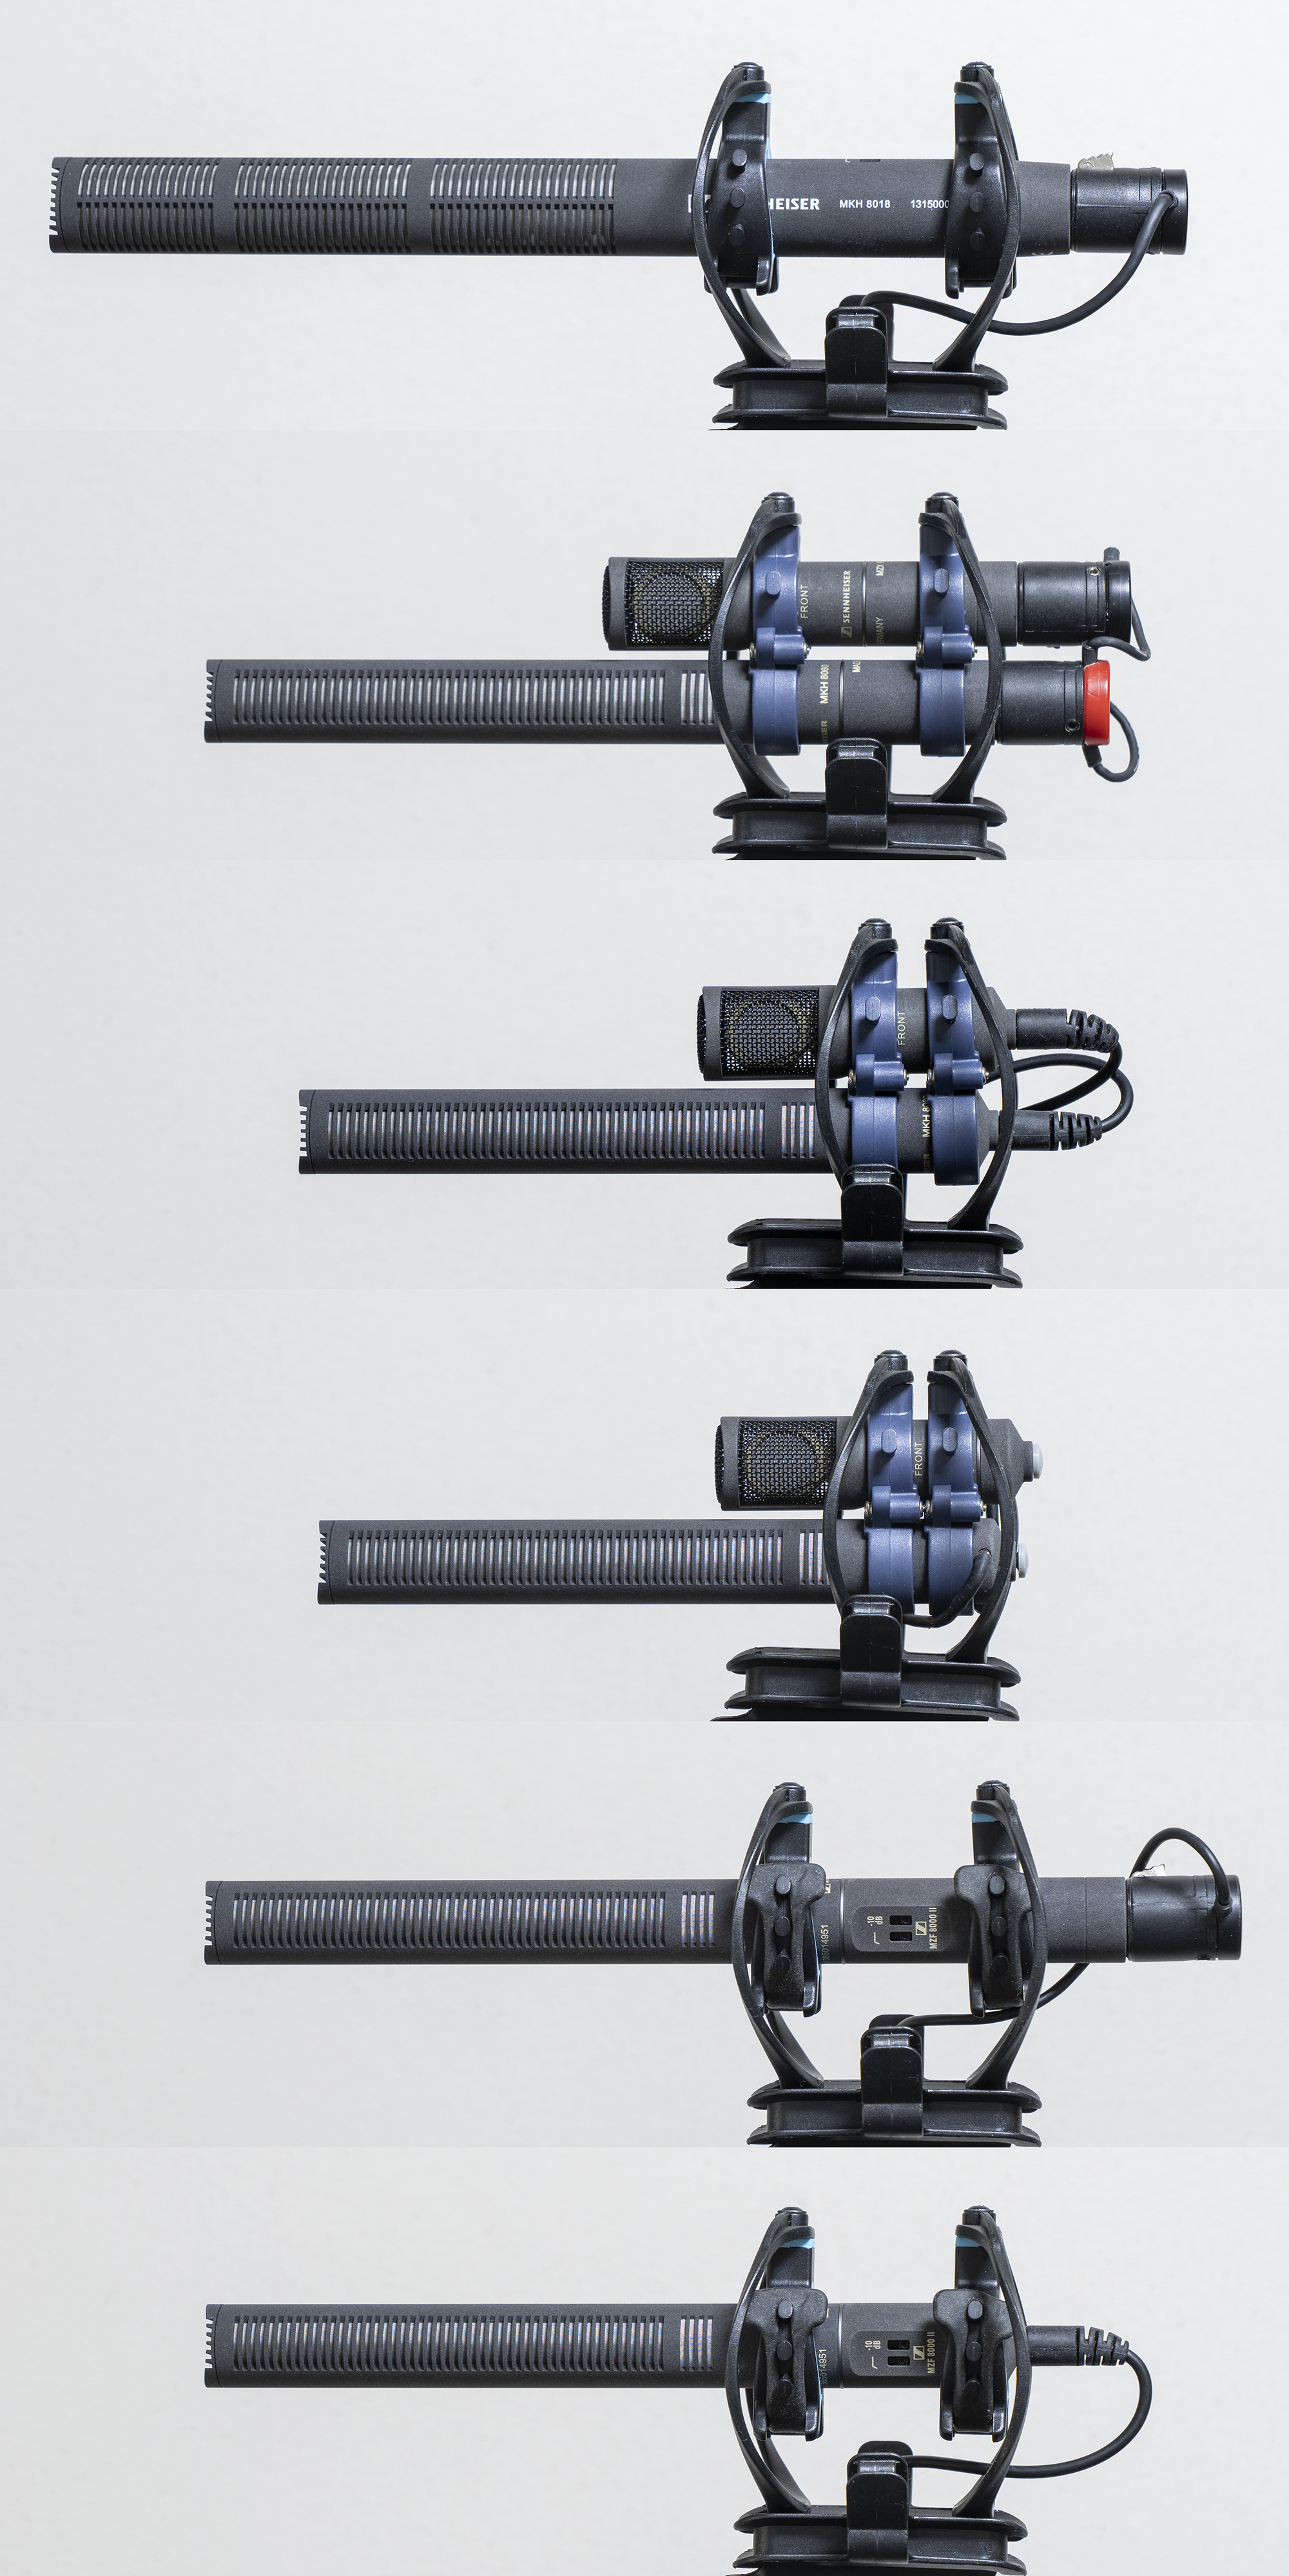
Sizes and rigging options. Top to bottom: MKH 8018 with low-profile XLR; MKH 8060 + MKH 8030 with low-profile XLR; MKH 8060 + MKH 8030 with MZL; MKH 8060 + MKH 8030 with custom MZL; MKH 8060 with MZF 8000ii filter module and low-profile XLR; and MKH 8060 with MZF 8000ii filter module and MZL. All XLR and custom MZL cables from ETK Cables, and mounts (including those great MS clips) from Radius Windshields Mini-ALTOs.
Introduction
In my first blog post on the new Sennheiser MKH 8018 stereo shotgun I concentrated on a short review of the salient specs and then on tests considering the basics (self-noise, susceptibility to RFI, handling noise and wind noise) and its use in the field as a stereo mic. To give a reference for the latter, I mostly tested the MKH 8018 against a mid-side (MS) stereo pair of its siblings, comprising the MKH 8050 (supercardioid) and the MKH 8030 (fig 8). Given the better polar pattern and placement (i.e. above, not behind the mid mic capsule) of the MKH 8030, and the more consistent off-axis performance of the MKH 8050 supercardioid, the better stereo imaging of the two-mic MS pair was entirely expected and is evident in the various recordings I posted previously. As I noted, however, these sonic differences may be too subtle for many users or uses, and for some recordists and situations will be outweighed by other features of the MKH 8018. One aspect I didn’t address (and flagged up that this was the case) is how the MKH 8018 compares to alternatives as a mono shotgun. For some this may well be a determining consideration for buying the mic: in other words, would the MKH 8018 meet their main needs as a mono shotgun mic, whilst providing a stereo option, without the need to swap out mics, for those occasions where it might prove useful? As I said in the previous post, there is a vast array of short shotgun mics out there, but there is some merit, I think, in comparing the MKH 8018 as a mono shotgun to its MKH 8060 sibling. And, while doing this, some merit too – as it has the same functionality – in comparing the MKH 8018 as a stereo mic vs the MKH 8060 as part of an MS pair with the separate MKH 8030 fig 8.
PS I should add, again, that the good folks at Sennheiser, having sent the MKH 8018 gratis for my unfiltered scrutiny, have since sent the MKH 8060 too for this comparison.
Size , weight and rigging
It’s hardly surprising that the MKH 8018 stereo mic is larger than the MKH 8060 shotgun: it measures 230mm long and 22mm diameter vs 178mm and 19mm diameter for the MKH 8060. And, of course, the MKH 8060 can be shortened by 33mm by removing the MZX 8000 XLR module and using MZL connectors instead of XLRs. In terms weight, however, the two mics are almost the same (115g for the MKH 8018 vs 112g for the MKH 8060, but again this can be reduced for the latter by removing the MZX 8000 XLR module, shaving 32g off the weight.
The use of MZLs with the MKH 8060 is particularly interesting since by using them in preference to XLR modules sees the combined weight of the MKH 8060 and MKH 8030 MS pair and MZL connectors weigh in at 148g, while the MKH 8018 plus low-profile XLR weighs in at 146g: using MZLs, there is essentially nothing to choose between them weight wise. And with MZLs in place the MKH 8060 and MKH 8030 MS pair ends up significantly shorter: 180mm (or 155mm if the custom side-entry MZL is used) vs 253mm for the MKH 8018 plus low-profile XLR. That shorter length can translate to a different windshield, reducing overall size and weight: for example, using the Radius Windshields Mini-ALTOs for a compact rig (as I have been doing), that can mean the difference between a Mini-ALTO 180 for the MKH 8060 + MKH 8030 pair vs a Mini-ALTO 250 for the MKH 8018. But, as the saying goes, there’s no such thing as a free lunch: using MZLs for the MS pair doesn’t leave a lot of body barrel left for the mic clips (which you can see in the composite image above), so many might well prefer using the MZX 8000 XLR modules and low-profile XLR connectors for more stability: I certainly prefer this even if – sticking with Radius Windshields – it pushes up the windshield size to the Mini-ALTO 210. And, then, to add complexity, the MKH 8060 lacks the built in high-pass and pad switches of the MKH 8018, so if you want to add these, you will need to add an MZF 8000 ii filter module, which adds another 29mm in length and 26g in weight. Of course, the impact of this can be mitigated by use of an MZL connector, which, in this scenario, doesn’t result in too short a barrel for the mic clips to offer effective support. All these variables are getting complex, I know, so the image I have made (above), with various options photographed at the same scale, should help.
So where does this leave us? Well, connector choice will come down to use and the individual recordist, but the reality is that there’s not a lot in it in terms of weight and overall size of the MKH 8018 vs the pairing of the MKH 8060 + MKH 8030, and, certainly, the latter is shorter and can – if MZLs are used – be no heavier than the new stereo mic. Obviously if the MKH 8060 is to be used alone – as a mono mic – and with MZLs then the difference becomes a lot more evident. Whatever the case, it’s clear that the MKH 8018’s primary selling point – from a rigging perspective – is one of convenience rather than compactness, although the vertical centrality of the MKH 8018 vs an MS pair does mean, of course, that the capsules are further from the windshield basket, with a consequent slight increase in windshield performance: this last is relevant if wanting a compact MS rig in a Mini-ALTO, Rycote Nano Shield or Cinela Cosi.
Polar pattern
In my previous tests and review of the MKH 8018 I looked at some of the key specs of the mic, so do refer back to the earlier post for that: I’ll try to keep any repetition here to a minimum. The mics are almost identical in terms of sensitivity (-24dBV or 63mV/Pa for the MKH 8060 vs -25dBV or 56mV/Pa for the MKH 8018 mid mic) and self-noise (at 11dBA the MKH 8060 has a modest 1dBA advantage over the MKH 8018’s mid mic). The frequency responses are pretty similar too, as you would expect, although the MKH 8060 has a little bit more low end (which you can just about detect in the recordings below). Although the MKH 8018 is significantly longer, as we have seen, much of this results from the fig 8 capsule, which sits behind the mid mic shotgun capsule, and the much more substantial barrel that contains the electronics (mic preamps, pads and filters), so this rather obscures the fact that the MKH 8060 has the longer interference tube (105mm compared to 83mm for the MKH 8018). As you would expect, given this, the two shotgun mics have significantly different polar patterns, which can be seen below:
The polar pattern plots show that at lower frequencies, up to 1kHz, the MKH 8018 mid mic has a very slightly wider pattern than the MKH 8060, but with a much smaller rear lobe. Above that there is more divergence: by 2kHz the MKH 8060 has a significantly tighter pattern and this increases with frequency, along with a less noticeable rear lobe. The MKH 8018 remains more like a supercardioid up to 4kHz (and in my previous post on the MKH 8018 I drew the comparison with the MKH 8050), but, thereafter, the MKH 8018 gets more directional, as you would expect, although it remains less directional than the MKH 8060 at all frequencies. As with all polar plots for interference tube mics, by 8kHz those for both mic show erratic, or lobar, form, but the response from a sine wave at a specific frequency is very hard to translate to use: this is where listening to the mic is critical. Moreover, it is in listening that you can hear that the difference between these two short shotgun mics isn’t that vast: indeed, the effectiveness of such short interference tubes means that such mics are not chalk and cheese compared to a supercardioid (sometimes I do wonder if some over-estimate the directionality of a short shotgun mic vs a supercardioid or hypercardioid, but perhaps that’s being uncharitable!).
Field testing – mono and stereo
Picking up on the polar pattern aspect of the two mics in practical use, here are a couple of crude tests of the two mics as mono shotguns outdoors, with on and off-axis sounds, spoken and clapping, around 15ft (5m) from the mics.
Nothing radically different, although for some – say experienced production-sound recordists capturing dialogue – hands-on experience with both will be essential to explore the nuanced differences of the polar patterns of the two shotgun mics.
These clips were taken from recordings in my nominally quiet village garden (becoming all too familiar to readers of this blog), and here are some stereo clips (50:50 balance M to S) from the same session, naturally with the MKH 8060 paired with the MKH 8030. It’s a collection of sounds with autumnal birdsong and passing cars interspersed with some deliberate sound effects (using the garden like an oversize Foley stage!) of distant shoveling, a ringing and dragged spade (I rather like the bell-like sound) and the loud rumble of a wheelie bin. A bit odd, I know, but roll with it, please, as it gives a wide range of outdoor sounds and at different angles to the mics:
Steam loco ‘Britannia’ (a 4-6-2 BR Standard Class 7) entering the cutting at Kelling Heath, and – apart from two furry windshields in the foreground! – making for a nice autumnal scene.
Then it was down to one of my regular mic-testing haunts at the nearby North Norfolk Railway, to the cutting at the east end of Kelling Heath where locos have to work hard up the incline (so a good noise). Actually it wasn’t that tough for the visiting loco – the powerful Pacific ‘Britannia’ – which used to work the main line expresses from Norwich to London in the 1950s , and it fairly flashed past.
First up, here is the sound from the two mono shotgun mics. It’s quite instructive repeatedly comparing brief sections of the recordings (not least those way off-axis – such as the final whistle – once the whole train has passed):
And here are the two stereo files, again with the M and S capsules mixed 50:50 (allowing for their different sensitivities, of course):
OK I wouldn’t choose a shotgun mid mic for an MS pair for this type of recording in this location normally, but both do a pretty reasonable job, without a great deal to choose between them.
Conclusions
Having previously focused on comparing the MKH 8018 to an MKH 8050 + MKH 8030 MS pair, it’s been an interesting exercise now comparing the new mic to the MKH 8060 (both with and without the MKH 8030). Doubtless those who really tune into the subtle differences between short shotgun mics will find the nuances such that they will prefer one of the two mics for its mono shotgun performance, perhaps differently for different uses, but for many the on-paper differences of the two shotgun capsule polar patterns – and the very slightly greater directionality of the MKH 8060 – will be rather too subtle. This will become more the case, of course, when the two mics are considered when used for MS recordings, when the merest tweak of the ratio of M to S will outweigh the impact of the different mid mic polar patterns. Likewise the differences in sensitivity, self-noise and frequency response are very minor and unlikely to influence choice between the mics. So for most – especially those using the mics for field recording or, dare one say it, camera mounted (and Sennheiser describe it as ideal for both) – the choice of MKH 8018 or MKH 8060 + MKH 8030 (or, indeed, any other MS pair) will come down to practicalities.
Of those practicalities, foremost, perhaps is cost: the MKH 8018 (£1675) is significantly cheaper than an MKH 8060 and MKH 8030 (£2321 in total), and even more so when you add a pair of MZF 8000 ii filter modules to the latter (which brings the total to £2981: all these prices are current at the time of writing from Pinknoise Systems in the UK). But, conversely, the recordist may already own an MKH 8060 or an MKH 8030, and, equally, the individual mics – especially the MKH 8030 – will have other uses, so the cost question is more complex.
The second main practicality is that of rigging. Some will find the simplicity of the single stereo mic overwhelmingly compelling (and for them the decoded LR stereo outputs, rather than the M and S outputs, might be attractive too). Others will be only too happy to rig an MS pair with one mic above the other (especially if made easier with those new Radius MS clips!) and, in so doing, have scope for a more compact (shotgun) MS pair, and the option of using the MKH 8060 on its own (say for dialogue), and the MKH 8030 for other purposes, especially including MS with different (non-shotgun) mid mics. As we have seen, such flexibility might be relevant to the cost comparison.
The MKH 418-S stereo shotgun mic was introduced in 2003, creating – by addition of a fig 8 capsule – what was essentially a mid-side (MS) version of the popular mono MKH 416 shotgun mic. The new MKH 8018 does something similar for the MKH 8000 family of mics, although its mid mic is less directional than the MKH 8060 short shotgun and, of course, a lot less so than the longer MKH 8070. While the specs are significantly improved on the MKH 418-S, the MKH 8018 is aimed squarely at a similar market – most obviously outside sports broadcast. A few reviews have begun to appear on the mic and, rather than repeat ground covered in them, the focus on the tests for this blog post is a bit different: as usual I explore the basics (self-noise, handling noise, frequency response, resistance to RFI etc.), but the field tests focus on the performance of the MKH 8018 as a stereo mic. Above all, I am interested in how this latest take on a stereo shotgun compares to a non-shotgun mid-side pair and, for this, it seems most appropriate to test it in parallel to an MS pair of its MKH 8050 (supercardioid) and MKH 8030 (fig 8) siblings. How can the useful side rejection of a mono shotgun be reconciled with the addition of a fig 8 to create a stereo signal? Likewise, the tight focus of a shotgun mic for some sound effects can be useful, but how does a stereo version work for this? Does the inevitably more erratic (lobar) polar pattern of the shotgun mic at higher frequencies render it very much a poor cousin, or is it eminently usable? Is this mic about having that tight mono shotgun perspective, but with instant flexibility (without changing rig, or, even, making the call in the field) to have that stereo image when useful? If any of these or related questions are of interest to you too, then read on!
PS I should add that the good folks at Sennheiser sent me this MKH 8018 gratis for my unfiltered scrutiny. As usual, I play a straight bat and do my best to be objective (and, if anything, my starting point is a little scepticism about MS and, consequently, DMS with shotguns, as readers may have noticed!), and, with plenty of test WAV files to download, you can pore over my tests and draw your own conclusions. Right: onwards!
PPS It’s not the shortest blog post ever, so if you are after sound samples, stick with it: mostly they are further down.
A look at the mic and its specifications
Well, first to the mic itself. There is no great value in repeating the specifications provided on the Sennheiser website, but a few key ones jump out and merit some discussion. First, of course, is the self-noise, for which figures of 12 dBA are given for the mid (shotgun) mic capsule and 14.5 dBA for the side (fig 8) capsule. These are lower than for the MKH 418-S, for which the mid channel is 14 dBA and the side channel 22 dBA. The fig 8 self-noise improvement is very substantial, but, interestingly, the value is not the same as that for the recently introduced MKH 8030 (13 dBA). The polar pattern of the MKH 8018’s fig 8 is also much less regular than that of the MKH 8030 above 4kHz, which, with the self-noise difference, suggests a different capsule, which Sennheiser have confirmed. The shotgun mic capsule appears to be different from the MKH 8060, and, again, I have had this confirmed…
The MKH 8018 is also a lot more sensitive than the MKH 418-S: for the mid (shotgun) capsule -25 dBV vs -32 dBV; and for the fig 8 capsule -32 dBV vs -40dBV. In both cases, in actual use the substantial difference between the sensitivity of the mid and side channels is then amplified by the fact that the side channel usually gets a much lower signal. In practice I have run 7dB more gain on the side channel in the field with the MKH 8018, to get the capsules up to matching sensitivity, but that’s not always easy with some mixer/recorders with MS linking. And while the MKH 8018 shotgun capsule has quite a hot output, it isn’t unusually so: for example, the MKH 8060 is 1 dBV hotter at -24 dBV.
Thinking about the sensititivies of the two channels leads to another key difference between the MKH 8018 and the MKH 418-S: while the latter outputs the M and S signals only, the MKH 8018 can switch between this option, ‘narrow-XY’ and ‘wide-XY’. No information is given as to the ratio of M to S in the two decoded LR stereo outputs and, while I am sure that they will prove useful to some not familiar or unable to work with the M and S outputs, for all my testing and use I have had the mic set in its MS output mode: I like to know what I am doing!
Turning to the physical appearance of the mic itself, all is exactly described and illustrated on the Sennheiser website. The one thing that wasn’t clear from that was the position of the capsules within the mic, so the first thing I did on opening the box was to hold the mic up to the light to try to see what is going on.
Back-lit view of the slotted tube part of the MKH 8018, showing the three sections: that on the right (i.e. rear) contains the fig 8 capsule with the mid mic capsule then adjoining (to its left); and the two left-hand slotted sections are the actual interference tube of the (shotgun) mid mic, which measures 82mm in length. The internal circular openings can be seen – along with the tight mesh – behind the slots.
Capsules and polar patterns
Polar patterns vary much more across the broad category of shotgun mics than across the individual types of first-order mics (omni, cardioid, supercardioid, hypercardioid, fig 8 etc.). Shotgun mics also have a much more variable polar plot at different frequencies than mics with no interference tube. For example, a shotgun mic might have a similar acceptance angle (signal no more than 3dB down on the on-axis signal) as a hypercardioid (i.e. 105°) up until 1-2kHz, before narrowing (i.e. getting more directional) above that to, say, 25° at 16kHz. So the simple distance factor (i.e. the distance at which the mics get the same direct-to-diffuse field ratio) that can be described for omni mics through to fig 8s has no immediate application to shotgun mics: you will read of ‘typical’ distance factors for shotgun mics of 2 to 3 (with an omni being 1.00, a cardioid being 1.73 and a supercardioid being 1.90), but, clearly, this is a crude approximation given the change in directivity with frequency. Adding to the variables in design (inc. length) of the interference tube and capsule, multi-capsule shotguns also change how the mics reject off-axis sound. The polar pattern (with its particular frequency dependent variation), therefore, has a much more significant role in determining which model of shotgun mic a sound recordist will choose for any given type of recording situation. That doesn’t mean, of course, that the published polar patterns are what a recordist uses to make such choices: an experienced sound recordist will usually base that on how they have heard different microphones perform in use in a range of situations.
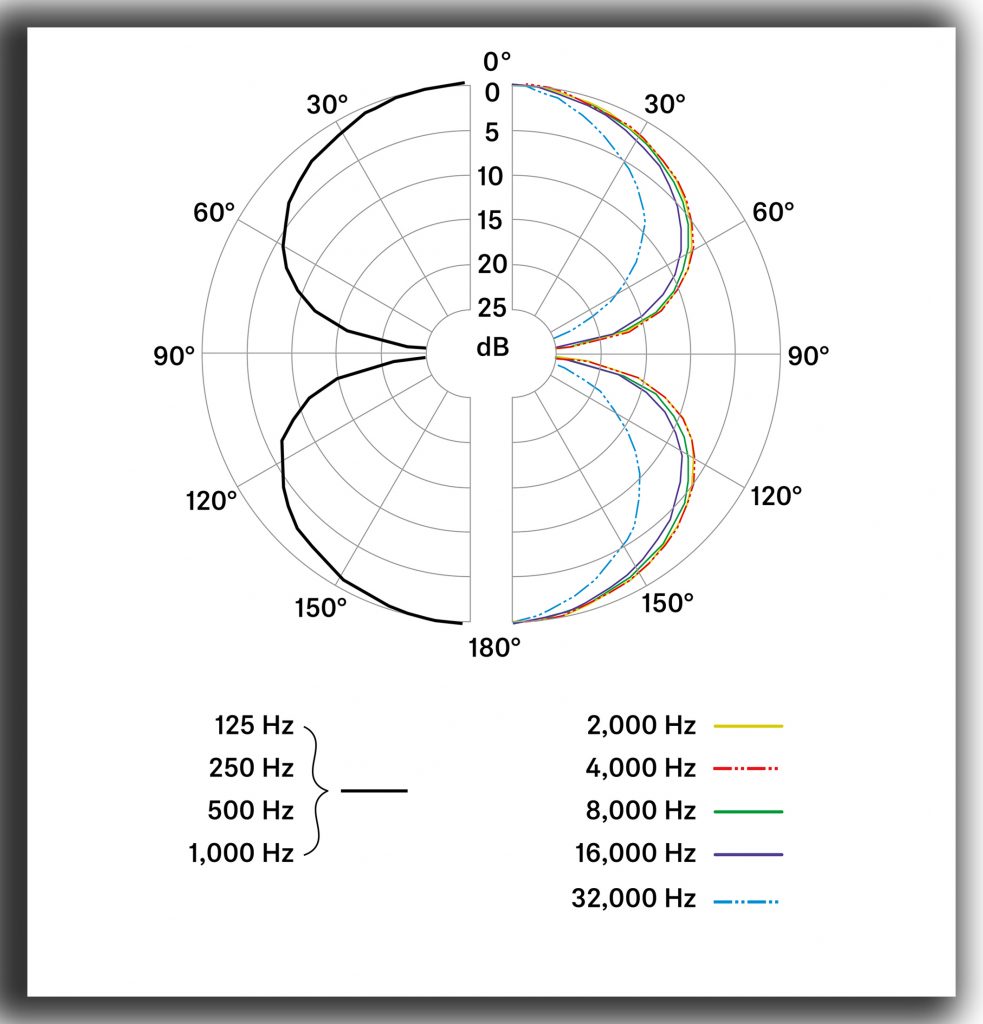
Nonetheless, a polar plot, especially if not overly smoothed, contains useful information for a shotgun mic, and it certainly gives an immediate insight into the MKH 8018. This shows that at lower frequencies, up to 1kHz, the MKH 8018 mid mic has a very slightly wider pattern than the MKH 8060, and, indeed, fractionally more so than the supercardioid MKH 8050, but with a much smaller rear lobe than either. Above that there is more divergence: by 2kHz the MKH 8060 has a significantly tighter pattern and this increases with frequency, along with a less noticeable rear lobe. The MKH 8018 and MKH 8050 remain very similar up to 4kHz, but, thereafter, the MKH 8018 gets more directional, as you would expect. As with all polar plots for interference tube mics, by 8kHz that for the MKH 8018 shows erratic, or lobar, form, but the response from a sine wave at a specific frequency is very hard to translate to use: this is where listening to the mic is critical. Hopefully the various test files in this blog post will help, but there’s no substitute to testing for yourself, especially when comparing to a mic known to you.
Composite image to show the MKH 8018’s fig 8 capsule behind the fairly opaque fine mesh: it was a little tricky, but some lighting from above and then below, coupled with careful focusing, reveals something of the fig 8 capsule within the mic.
Turning to the fig 8 capsule, as I said in the introduction, its specs are similar but not identical to that of the new MKH 8030. I am loathe to take the new MKH 8018 apart, but, despite the fine mesh of the mic, careful lighting shows the position and appearance of the capsule. It is positioned (to the rear of the shotgun mid mic capsule, obviously) so that it is centred on the seventh slot from the end of the interference tube (so 12.5mm from the solid part of the mic body), and its appearance is very close to that of the MKH 8030, with a similar stainless-steel filter over the usual MKH symmetrical push-pull single diaphragm, and a brass tensioning ring around it that looks identical to that of the MKH 8030 apart from the mount detail, which, in this case, widens for the fixings at both ends (one end joining to the mid mic capsule). Unlike the MKH 418-S the fig 8 capsule (KS-16-3) does not sit in an oblong block, but, rather, has a rounded tension ring. It appears that, like the MKH 8030, the fig 8 in the MKH 8018 has a16mm-diameter diaphragm, but that is based on a visual estimate compared to the overall mic diameter (22mm). It is a little surprising, given the visual similarity of the MKH 8030 and MKH 8018 fig 8 capsules, that they don’t have identical specs, although in the case of the difference in polar patterns it is unclear whether this relates at all to, in the case of the MKH 8018, the mounting between the preamp and the mid mic capsule (given the nulls it is hard to imagine why this should be so), or indeed the less open slotted tube and close mesh that continues across the fig 8 part of the MKH 8018 vs the more open design and open weave mesh of the MKH 8030. Here are the comparative polar patterns:
The different presentation (90-degree rotation and split vs continuous circles) of the two polar patterns doesn’t disguise the fact that they are quite different, with significant irregularities from 2-4kHz upward in the MKH 8018.
Frequency response
The frequency response curves and sensitivity measurements supplied with (and for) the MKH 8018 example tested here.
Like the MKH 8060 and MKH 8070 shotgun mics the MKH 8018 also has a more limited frequency range than the rest of the MKH 8000 mics. The published figures for the latter are all 30 Hz to 50 kHz, apart from the omni MKH 8020, which has a published range of 10 Hz to 60 kHz. The frequency range given for the MKH 8018 is 40 Hz to 20 kHz, but looking at the plots above you can see that the fig 8 side mic is shown as having much less low end: fig 8 mics are often a little bass-shy compared to other polar patterns, although this shows a steeper fall-off than with the MKH 8030. As discussed in previous posts, an extended high-frequency response might seem entirely academic outside those recording at high sample rates and pitching down in post (e.g. for bat recordings, or for sound effects), but there are those that argue frequency response over 20kHz is important for high-resolution recording (such as David Blackmer of Earthworks mics in this article). But quoted figures of themselves do not tell the whole story (for example the extended high-frequency capabilities of the first-order MKH 8000 mics comes with a sharp rise in self-noise, which can be problematic for very quiet sounds), so for a field test, I again thought the overtones of some church bells would be an interesting sample, so up I clambered to the belfry at Norwich Cathedral.
Up in the massive early 12th-century cathedral belfry, where the the bells and bell frame seem small by comparison.
For the recording I set up the MKH 8018 and an MKH 8050 + MKH 8030 MS pair in separate Mini-ALTO windshields (there was a breeze inside the belfry) facing the bell-frame. Such a loud sound really brings home the sensitivity of the mid (shotgun) capsule: 20 dB gain was pushing my luck! Here are the 96 kHz sound files:
And here is a spectrogram of part of the recording, showing the chimes. The higher-frequency capability of the MKH 8030 and MKH 8050 are evident with much stronger signals up to 48kHz (the limit on this spectrogram), but, equally, so is the much greater self-noise of these mics from just below 20 kHz and upwards compared to the MKH 8018 (see below for more on self-noise). And while the latter might only be quoted as having a frequency-range up to 20 kHz, like many similarly specified mics there is no abrupt cut-off at this point and there is plenty of signal above this frequency.
Spectrogram of the bells tolling midday, from left to right: MKH 8018 mid mic, MKH 8018 side mic, MKH 8050 mid mic, and MKH 8030 side mic. The vertical axis extends to 48kHz.
Turning to the other end of the spectrum, I set up the MKH 8018 and the MKH 8050 + MKH 8030 pair aimed at the exhaust pipe of the rear of a parked car (with the engine running needless to say!). Here are short clips from the recording, which include a little gentle revving:
And here are the spectrum analyzer visualizations:
MKH 8018 mid (shotgun) mic capsule.MKH 8050 supercardioid.MKH 8018 side (fig 8) mic capsule.MKH 8030 fig 8.
The tracks show all four capsules capable of rendering the lowest fundamental, which was around 26.5Hz, although, of course, the fig 8s show a lot less of the low-end of the engine: this is partly since the exhaust pipe itself was centred on their nulls and partly since fig 8s inherently have a poorer low-frequency response. What is more interesting is that, compared to their MKH 8050 + MKH 8030 counterparts, both MKH 8018 capsules have a greater low-frequency output down to around 50Hz, but a lower output at the 26.5Hz fundamental and then fall away quickly below that. It is comparable to using an MZF 8000 ii filter module on the modular MKH 8000 mics, with its permanent low-cut filter of –3 dB @ 16 Hz, 18 dB/oct: indeed, the comparison is especially valid (and I assume a design intention) since both the MZF 8000 ii filter module and the MKH 8018 have a switchable low-cut filter of -3 dB @ 70 Hz. So without use of the switchable low-cut filter, the MKH 8018 seems to have a steep roll-off of the very low frequencies likely to arise from handling noise (and the inevitable resonant frequency of a mic suspension); and then the option to roll-off more (often not optional in many shotgun mics) at a higher frequency to reduce wind noise, traffic rumble and, even, higher-frequency handling issues. In short, the design allows the MKH 8018 to be used where many a shotgun mic would struggle for lack of low-frequency response, yet is designed with handling in mind and has the option to roll off more low-end in keeping with many a shotgun mic: and the response of the two capsules is consistent in this regard.
Self-noise
The 12 dB-A self-noise figure for the MKH 8018 shotgun mic capsule is respectable for a shotgun mic and as we have seen it is an improvement on the mid mic in the MKH 418-S stereo shotgun (14 dB-A), and only a little higher than the figure for the MKH 8060 shotgun mic (11 db-A). And, while the side mic capsule of the MKH 8018 might have a little more self -noise than the MKH 8030 fig 8 (14.5 dB-A vs 13 dB-A) that is still very good for an SDC fig 8 and radically better than that in the MKH 418-S. But specs of self-noise are one thing and how they sound can be quite another: a single figure doesn’t tell the whole story. So on to some tests…
First off, I checked that the manufacturer’s sensitivity figures were broadly correct, recording a 1kHz tone and measuring that with a tight band-pass filter applied at 1kHz: all was evidently in order at least in relative terms (I compared the two MKH 8018 capsules to an MKH 8030 and an MKH 8050 [also 13dB-A], getting a maximum deviation of 0.8 dBV from the published specs). So, in the absence of an anechoic chamber, I then did my usual recording the sound of nothing with the mics buried deep in duvets in the airing cupboard, with all doors and windows closed and the mains electricity turned off, recording with each mic at 76dB gain (the max of a Sound Devices 788T). Also as usual, to remove any low-frequency sound still permeating, I applied a 100Hz high-pass filter, and, in my DAW, added further gain to match the three less sensitive capsules with the sensitivity of the MKH 8018’s mid mic (the hottest of the four capsules). Normally, I wouldn’t bother including the sound of madly cranked-up mic hiss in a test/review (total gain for the MKH 8050, for example, being 85 dB), but in this case it is quite interesting to compare the different capsules. And, as I have cautioned in the past, don’t panic: all the mics are very quiet in normal use!
And here are the spectrum analyzer visualizations of the noise:
MKH 8018 mid (shotgun) mic capsule.MKH 8050 supercardioid.MKH 8018 side (fig 8) mic capsule.MKH 8030 fig 8.
The sound files and the spectrum analyzer visualizations show that the two MKH 8018 capsules are quite different in terms of self-noise from the MKH 8050 and MKH 8030. The more limited ultra-sonic capabilities mean that the MKH 8018 is not tuned like its first-order siblings, where steeply rising self-noise towards 20kHz continues to rise to 48kHz. With the MKH 8018, the rise in self-noise in both capsules starts lower and is less steep, and then flattens off after 20kHz. This lower and more gradual rise in self-noise means that the character of the self-noise is quite different in the audible spectrum: self-noise in the MKH 8018 capsules is characterized by more of a high-frequency hiss (say in the 6-12kHz region) very evident to my ageing ears and, obviously, much more so to younger ears. Thinking of younger ears, extreme high-frequency hiss in the MKH 8030 and MKH 8050 will become more discernible to them in the 12-20kHz region as the self-noise in these mics rises to match or exceed that of the MKH 8018 capsules. But, I must reiterate, while interesting to compare and to note for reference, these tests are at extreme gains and so unless recording a watch ticking or other very quiet sound effects, self-noise will not be an issue with any of these mics in most use case. And for an extreme example – relevant to sound design and effects – I slowed down the cathedral bells recording included above to a quarter of its speed, bringing down the pitch accordingly (i.e. by two octaves), and yet no hiss is discernible even in the quiet sections unless gain is cranked up to levels that mean the chimes would destroy your speakers and ears! If interested, do have a play with the downloadable files yourself.
RFI
Looking at radio frequency interference (RFI) on the MKH 8018 is nothing to do with its RF design (which, in the words of the MKH designer Manfred Hibbing in his The MKH Story white paper), means the mic essentially has ‘a transmitter and receiver that are directly wired together’), but is about its resistance to external RFI. As I’ve said in posts on other tests, I am interested in the impact of RFI on mics since, as living in rural Norfolk, much of my life is outside or on the edge of mobile phone reception, where some models of phones transmitting at full power can cause notable interference on mics at up to, say 1m/3ft: not a problem with mics on a stand, but I’ve had this become a real issue with handheld shotgun mics and a phone in my jacket pocket (on those rare occasions when I forget to turn my phone off). And this could be a problem with ENG work too (not least from the phone of an interviewee). So I was glad to find that in testing, as before, with several different phones on the absolute fringe of reception (i.e. working at highest power) the MKH 8018, like its MKH 8000 siblings, showed no sign of RFI even at close distances (100mm): for control I recorded the mic alongside a known problem mic (to check that the intermittent issue was occurring: it was) .
Handling noise
While the MKH 8018 might well see much use mounted on stands (e.g. for line-side recording of sports), it will become a regular fixture in windshields on boom poles or on a pistol grip, whether being used as a mono mic for dialogue or ENG, or in stereo for those times when a bit of ambience is required during production sound recording, or perhaps to get closer to a difficult to access source during field recording. So with that in mind, I put the mic through some boom-pole handling tests, mounting them in Radius Windhsields RAD-2 mounts on a short stereo bar on the end of the boom pole to allow comparison. Gain levels were adjusted for relative sensitivities.
When holding the boom pole statically (extended and horizontally) all four capsules mics showed some handling noise, with the MKH 8050 and MKH 8030 being the most significant, both peaking around 24dB higher than the two MKH 8018 capsules: admittedly the MKH 8050 and MKH 8030 were peaking below 20Hz. This pattern applied across other boom-pole handling tests: rough handling and tapping/thumping the end. To a significant degree – not least given the apparent similarity of the two fig 8 capsule designs – this is doubtless a consequence of the EQ built into the different mics with, as we have seen, the MKH 8018 bass response being very much rolled-off below, say, 50Hz and, especially, below 25Hz. But, equally, there is no denying that the MKH 8018 has handling noise extremely well controlled even without the use of its switchable 70Hz high-pass filter or any such additional, or alternative, filtering in the recorder/mixer or in post.
MKH 8018 mid (shotgun) mic capsule: handling noise test. Note 2kHz upper limit for the spectrum analyzer visualizations showing handling noise.MKH 8018 side (fig 8) mic capsule: handling noise test.MKH 8050 supercardioid: handling noise test.MKH 8030 fig 8: handling noise test.
Wind noise
To get a base line I used a double rig of the MKH 8018 and MKH 8050 + MKH 8030 on a stereo bar and boom pole. Fast boom swings were made to generate wind noise in a controlled fashion. Swinging the bare mics produced overwhelming rumble, as would be expected. The two fig 8s were fairly similar, although the MKH 8030 naturally showed a little more noise at low frequencies (say, below 30Hz). The shotgun mid mic was by far the least susceptible to what was a laminar stream of wind, and the MKH 8050, perhaps surprisingly for some, was by far the most susceptible to wind noise in these conditions. Of course, such use is unrealistic: even with a modest amount of boom movement indoors (or the gentlest air movement around a static mic indoors) at the very least a foam windshield would be used. Matching foams between the mics isn’t that easy, so for the next test I stepped up to bare windshields (i.e. sans fur), using Radius Windshields Mini-ALTOs for both. In tests with the windshields side on and into the wind (again, wide arcs from a boom swing), both capsules in the MKH 8018 performed about 3dB better than their MKH 8050 and MKH 8030 counterparts, and, as expected, lacked the very low-end (sub 30Hz) component: given the testing with a boom, this may well have been as much to do with handling noise as wind. I think another round of spectrum analyzer visualization or even WAV files wouldn’t add anything much to this description, so I will spare you those. Suffice it to say, such limited bare and windshield tests, show that the MKH 8018 is not oddly susceptible to wind (and, goodness, you wouldn’t expect it to be!) and, as you will hear from the samples below, this is further borne out by use in the field.
The MKH 8018 and an MKH 8050 + MKH 8030 MS pair on the beach on a grey English summer’s day in a pair of Mini-ALTOs.
Out in the field
A shotgun mic, of course, is primarily designed for outdoor use (OK, for large movie sound stages too), given that reflections are the enemy of interference tube designs. So to test the mic in its natural habitat, I put it through its paces recording a fairly wide range of sources outside. Many of these require it to be compared to something else, naturally, or we have no reference, and for most of the tests I have compared the MKH 8018 to an MKH 8050 and MKH 8030 MS pair: the supercardioid MKH 8050 being the most directional MKH 8000 non-shotgun mic (i.e. without an interference tube). Of course a supercardioid mid mic might well not be ideal for MS either in many situations, but you can refer to my recent tests of the MS pairs with the whole range of MKH 8000 SDC mics (i.e. MKH 8020 omni, MKH 8090 wide cardioid, MKH 8040 cardioid and the MKH 8050) if you are unsure of the differences.
First off, I headed to the beach on what I thought was a calm August day, but which turned out to be a brisk on-shore wind. Here are the two recordings facing straight out to sea:
Retreating a bit from the shoreline and the incoming tide to shelter behind the fishermen’s gear, I recorded myself walking on the shingle in a 360 circle around the mics, starting and finishing directly on axis:
Finally, for the seaside recordings, here’s a closer-up effect, recording the scooping up and dropping of shingle right by the mics:
Back to the same spot I have often been for test recordings, lineside at Holt station, as, yet again, a visiting Grange class locomotive pulls the train towards Sheringham.
Moving inland, I headed for one of my old test haunts at the North Norfolk Railway. Sadly, both the stationmaster and the signalmen recognized me so I had to take the assumption that I am an uber trainspotter on the chin: to deny it would have seemed as if I doth protest too much and, besides, testing mics is arguably an even more suspect activity! Next thing I will be calling a drink a ‘beverage’: it’s a slippery slope… Anyway, here is a three-clip recording of a steam train pulling into Holt station, then after a momentary gap, the signal box bell ringing and then, after another brief silence, the train pulling out. No editing other than the obvious cutting to produce the three parts to the recording:
Scything a rather overgrown field. Easier watching the hard work…
Back outside again, I popped over to my friend Rob’s new field (yes. that’s the same Rob who TIG welds the Mega-Blimps!), where he was sycthing or, as he put it, hacking away with a scythe to return the meadow to some order. Doubtless he will crack and get a tractor on it, but in the meantime here’s a pair of recordings of him sharpening the scythe:
And then a bit of scything/hacking at the nettles. I stood rather behind Rob and to the right so as to avoid him slicing through my rather nice and expensive MS cables.
A little bit of music
After all that fresh air I thought I would head inside for an indoor music test, slightly inspired by the well-known use of the Sennheiser MKH 4018-S for the NPR Tiny Desk concerts (although it has been increasingly supplemented by other mics over the years). So I popped down to woodcarver Luke Chapman’s workshop, which I often use: it has a surprisingly good acoustic. Luke obliged yet again (he must be sick of all these tests!) with guitar, working away on a new composition. Here is a video showing the recording with the MKH 8018 compared to an MS pair (again the MKH 8050 and MKH 8030):
Conclusions
This brief introduction to stereo use of the MKH 8018 has covered a bit of ground, from some discussion and tests of the salient aspects of interest from the specs to some tests in use. There are many uses I haven’t included here, partly reflecting my own interests (for example, I’m not in the business of recording sports events, so that’s for someone else to test!) and partly what is practical within a single blog post. One aspect I haven’t addressed is how the MKH 8018 compares to alternatives as a mono shotgun. For some this may well be a determining consideration for buying the mic: in other words, would the MKH 8018 meet their main needs as a mono shotgun mic, whilst providing a stereo option at all times for those occasions where it might prove useful? That is really hard to address, since comparing mono shotguns is not easy, as different sound recordists – especially experienced production sound mixers – will usually need to compare mics directly in use to see whether the nuances of any particular mic means that it suits their use. And, of course, there are many shotgun mics out there. But, that said, I may return to the MKH 8018 to explore the mono shotgun capability in a comparison with its nearest sibling – the MKH 8060: but don’t hold me to it! At the other end of the spectrum, I did think of including results of testing the MKH 8018 as part of a DMS rig here, but haven’t done so for reasons of not wanting to make an overly long post any longer and, also, since the efficacy of any mid mic in a DMS rig is very much apparent from its use in an MS pair. But, again, I may well return to this in a specific post: not least it might be helpful for some to hear the results of using different polar patterns for the rear-facing mid mic (e.g. just what balances a shotgun mic forward facing mid mic best: an MKH 8090 wide cardioid or an MKH 8040 cardioid?).
Anyway, returning to the ground that is covered in this post, drawing conclusions is as much something for the reader as it is for me: my aim was to explore the different in performance between the MKH 8018 in stereo use and an MS pair comprising its most directional non-shotgun sibling – the MKH 8050 supercardioid – and the MKH 8030. Given the better polar pattern and placement (i.e. above, not behind the mid mic capsule) of the fig 8 in the latter, and the more consistent off-axis performance of the supercardioid, its better performance for stereo is entirely expected and is evident in the various recordings. My aim wasn’t to demonstrate this and, as Basil Fawlty would say, get myself on Mastermind with the ‘special subject of the bleedin’ obvious’, but, rather to try and get a sense of the degree of difference. For some users and, indeed, for some uses, it may be vast: for others, and for other uses, the sonic differences may be too subtle and outweighed by other features of the MKH 8018: its usefulness as a mono-shotgun, its simplicity as a single mic vs rigging an MS pair, its ability to be both a shotgun mic and, say, an ambient pair without changing to (let alone buying) a second MS pair, its resilience to handling noise, its inbuilt pad and high-pass filters, and, even, its cost (less than the combined cost of an MKH 8050 supercardioid, or other mid mic, and the MKH 8030). Hopefully this blog post will help some when balancing all these factors. One major obstacle – the significant self-noise of the MKH 418-S – has been removed with Sennheiser’s new stereo mic, and this is hugely welcome. And if you have been humming and hawing about a stereo shotgun mic (including, the slightly noisier and sans RF technology, Sanken CSM 50, Neumann RSM 191, and the Audio Technica BP4027 and BP4029, as well as Sennheiser’s own MKH 418-S), the MKH 8018 is definitely one to get hold of (if you can!) and test for yourself. I’ve been very pleasantly surprised!
Postscript: wind protection for the MKH 8018
There’s nothing difficult in terms of rigging the MKH 8018 for outdoors (the supplied foam, of course, only being suitable for indoor use): it will fit many a windshield from the usual suspects. I note that Cinela have already got a Pianissimo model to fit (and do remember that the Cinela mono models can often be less expensive than you might expect), and a Rycote Modular 4 or a Rode Blimp would work fine. Here, I have tested the mic in a Rycote Cyclone medium, and much of my concern about using the Cyclones for MS rigs is allayed in this instance: the side lobes of the fig 8 capsule do not aim squarely at the thick plastic ring of this windshield, with evident colouration problems, as I have found with MKH 8030-based MS and DMS rigs in the small Cyclone. But the result is far from compact, so for my field tests with the mic I used the new Mini-ALTO 250 from Radius Windshields: they have been expanding their range of Mini-ALTO sizes and this fits perfectly, and I had no problems with wind noise in the admittedly not overly windy conditions of this English summer. And when not lugging two rigs for comparative purposes, I’ve enjoyed the fact that I can fit the MKH 8018 in the Mini-ALTO 250 in its fur, along with a field recorder, headphones, cable, camera etc. all in my little Think Tank Retrospective 7 bag that I like to use for field recording (yes, I know, I know: this is ironic from the creator of the Mega-Blimp!). For the cable I used an excellent low-profile XLR5F to XLR5M stereo cable, made with super-light and flexible Mogami 2739, which really keeps cable-borne noise to a minimum: critical if booming or use the mic on a pistol grip. This was made by Ed at ETK Cables.