
Introduction
It’s a funny thing, sound-recording equipment. The products out there are often designed with very particular types of recordists in mind and may not be optimal for all users: and yet many of us use such gear for quite unintended purposes either unthinkingly or because we have no alternatives. Nowhere, perhaps with the exception of sound bags, is this more obvious than with windshields. As Philippe Chenevez of windshield-maker Cinela put it ‘commercialized units are always compromises with hard choices’ (Chenevez 2009, 1). When buying commercial windshields sound recordists have very little control over those unavoidable compromises, other than selecting from the available models one that offers, for them, the best balance between price, size, weight, ruggedness, ease of use, flexibility, acoustic transparency, effectiveness at reducing handling noise, and wind-noise reduction.
Most of the fundamental aspects of windshield design (which lead to the compromises) have been long established, and there are a good number of research papers stretching back over 60 years that cover the physics and that demonstrate, through tests, how different aspects of design affect performance: I list the research papers I have found most useful at the bottom of this post. Of all the aspects of design, there is no doubt that the most important is that size is the key factor in basket windshield performance: bigger really is better. Many have failed to grasp this fundamental point and desire the smallest windshields as if, somehow, the laws of physics can be miniaturized!
Practicalities come into play, of course: any sound recordist is going to struggle with a massive windshield on the end of an 18ft-long boom-pole. He or she won’t be able to hold the boom-pole, will struggle to aim or cue the mic, and won’t be able to make rapid adjustments. So, of course, common sense dictates that windshields for such use tend to be elongated (if not cylindrical), of manageable size and of lightweight material – invariably plastic. Over the many years of developing such windshields, refinements have been made by manufacturers to reduce handling noise, not just via improvements to mic shock-mounts, but also in the form of independent basket suspensions, as pioneered by Cinela with the Zephyx (in 2005). While there remains scope for improvement, the compromises involved in making a windshield for production sound are well understood by the experienced designers, and today there are a range of good tools available from the likes of Cinela, Rycote, Rode, and, most recently, Radius Windshields. I’ve been lucky enough to have used, tested and compared many of these windshields: indeed, looking around the room where I am typing this at all the windshields and their furs, the uninitiated might think I am starting a wig shop!
But what has begun to interest me more lately is what about windshields for those who don’t have the specific requirements of production sound, outside broadcast or, even, those involved in some more unusual aspects of sound recording for film and TV where they too don’t have the same needs? Above all, how different could a windshield be if liberated from the considerable constraint of being designed to go on the end of a boom-pole? The point came more sharply into focus recently when I finally got around to testing my massive DIY blimp made several years ago, alongside commercially made windshields, with the same mics. The old DIY blimp is a behemoth: I designed it to house a mid-side pair of LDC mics, end-to-end, and, as it has a bespoke TIG-welded basket and was going to be cumbersome anyway, I thought I might was well give it a healthy volume to improve performance: that unavoidable physics again. I used it from time to time when LDC mics were of value to me outdoors, but increasingly it has gathered dust as my SDC mic collection has improved. Fishing it out recently – initially because it was big enough to fit a B-format Nimbus-Halliday array of SDC mics inside – I wondered how it would stack up against a top-end commercially-produced windshield. The better wind reduction from the behemoth blimp was entirely expected, given its size, but what was less expected was the audible difference in transparency. So when I came to do my pseudo-anechoic chamber transparency tests of the Rycote Cyclone, Cinela Pianissimo and Cinela Zephyx models, I included the huge blimp too. As expected this time, it performed rather better than the commercial offerings. Although having not thought about its transparency before, it doesn’t take a genius to work out why it should colour the sound less: the sparse array of 3mm-round stainless-steel rods that make up the basket offer little obstacle to sound waves compared to the larger and/or more closely-spaced plastic elements of the other windshields. Now, the difference was hardly going to be enough to get me lugging this huge blimp and its necessarily bulky stand into the field regularly, but what, I wondered, about making a shorter TIG-welded blimp, more suited to SDC mics that I could use easily for stand-mounted field recording? And what if, at the same time, it could tackle some of the other frustrating aspects of windshields I have noted over the years? Now there was an idea: nothing if not ambitious! And that is how this DIY project was born. Well, I say ‘DIY’ project: as you will see below, it has involved a couple of other very skilled people, even if the designs – for better or for worse – are very much my own!

The design
Using and, more recently testing, all sorts of windshields, plus the experience of my old LDC TIG-welded behemoth, gave me the basis of the main design requirements. The SDC blimp for field recording needed to maintain a large diameter, but should be much shorter than the old LDC behemoth, and able to fit in a backpack, and without being crazily heavy; it needed to be easy to use in the field, especially for accessing the mics; it needed to be rugged, but with a skeletonal structure to be as transparent as possible; the internal structure to support the microphones should be minimized, again to help with transparency; it needed to be stable and able to handle wind and structure-borne vibrations; and it needed to be adaptable, to be able to accommodate a range of mic arrays and to allow easy swapping between them. What follows is a description of how I have tackled each of these design requirements.

Size: While the diameter remains large – indeed it has increased slightly from the old LDC blimp from 231mm to 242mm – the new version is much shorter. At the design stage I played around with various lengths for the central section, balancing the need to keep the blimp manageable versus its ability to comfortably accommodate a range of set ups, including ORTF. In the end, I designed two sizes, which I am calling, with breathtaking originality, the Mega-Blimp ‘standard’ and the Mega-Blimp ‘large’. Both have much of their length formed by the hemispherical end caps, so seem vastly smaller than my old LDC blimp. For the ‘standard’ version the central cylindrical element was reduced from the old LDC blimp’s 421mm to 60mm, and for the ‘large’ version the central section is 140mm long: their respective overall lengths are 302mm and 382mm. Both sizes are able to fit in a backpack.


Ease of access: One of the constants of basket-type full windshields is the need to take them apart to fit, adjust or remove mics. This introduces functional issues (i.e. the faff often involved) and performance issues: the need to have windshields come apart often results in thick bits of plastic often where you don’t want them (e.g. where unscrewable end-caps join windshield bodies) – as we have seen very clearly with the massive ring around a Cyclone and its consequences for an MS pair. Unthinkingly, I took the need to take apart the windshield into the design of the old LDC behemoth blimp a few years ago, and the elements that relate to that are the most substantial parts of its basket. But with a sparse frame I found myself inserting and removing LDC mics and their shock-mounts without dismantling the windshield at all. With SDC mics this is even easier, so this time the two Mega-Blimps do not come apart, and, at one fell swoop, one of the biggest hassles of windshields, and the source of many of the lack of transparency issues is removed!
Tough, but skeletonal structure: As before, the Mega-Blimps are TIG-welded stainless-steel, to give maximum strength, durability and (though I suspect this won’t be needed) repairability, whilst minimizing the acoustic impact of the structure. I did consider other materials and even spent some time playing around with thin carbon-fibre rods (including testing them to destruction, which was unpleasant), but stainless steel won out easily. I wasn’t worried about weight since a) the Mega-Blimps aren’t for use on a boom-pole; b) a little bit more mass helps stability; and c) the weight is still fairly modest: for example, the basket (inc. baseplate) for the shorter ‘standard’ version weighs 510g, 710g with the fur, and around 960g with the large Arca plate, cable, mic shock-mount etc. (vs 744g for the small Cyclone Stereo Kit 5). Besides, when carrying the blimp it is nothing like the weight of a tripod or, even, my 788T field recorder. Now some of you may be thinking that steel will ring: well, of course, it resonates a bit if you ping the open basket with your fingernail (or a hammer!), but there is no use for a naked windshield basket, and the covering of fur completely dampens it. I was aware of this beforehand from the experience of the earlier LDC version. The open structure of the baskets ensures the transparency (and access), but might be seen as likely to cause flapping of the covering: again, from the previous experience, I knew that this was not an issue, and this has been further confirmed in my latest tests. This time around the stainless-steel rod is mainly 3mm diameter again except for the two main rings, which are beefed up to 4mm, and the two 6mm diameter rods to which the baseplate is welded: these slightly thicker elements have minimal acoustic effect, but strengthen the blimp hugely. And the longer central section (the ‘hamster wheel’) in the larger version also uses 4mm-diameter rod to maintain strength. Both sizes of the Mega-Blimp are, as a result, sparse but extremely tough: if they have no other attributes, they are at least far stronger than any commercially-produced windshields and will age much better than plastic!

Basket stability and shock-mounts: I have been intrigued by the independent basket suspensions pioneered by Cinela, and then followed, in quite different form, in the Rycote Cyclone. In his 2009 paper on the basket suspension, Philippe Chenevez (Cinela), describes how the ‘external skin [of the basket-type windshield] behaves as a drum excited by the vibrations of the support (boom or stand)’, but it is clear from his discussion and, indeed, from my own use of windshields (not least that of the earlier LDC DIY blimp), that the problem is predominantly one related to booming. It is one thing using a windshield on the end of a boom-pole or even a pistol-grip that is always moving (either unintentionally – through transmitted shaking of the muscles, or handling – or deliberately whilst cueing) and quite another using a windshield statically on a stand – as is the intention with the Mega-Blimp.
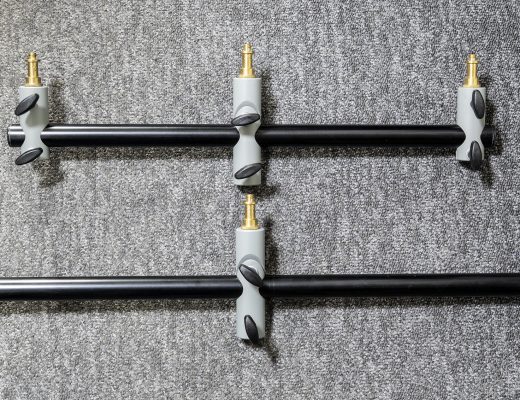
The approach here, therefore, is to welcome mass (within reason) and anything that could hold the basket steady and reduce vibrations reaching the windshield: so goodbye to a tiny 3/8″ connector and wobbly repurposed mini light stands, and hello to a larger connector in the form of the quick-release Arca plate, popular with photographers, to be coupled to a sturdy camera tripod (itself much better for rough terrain than a lighting stand). With a fixing point at the bottom of the basket only, even if quite large, I was concerned about wobbliness, which is the main reason why the two main rings are made of 4mm instead of 3mm stainless steel: this does the job perfectly, so that if you apply increasing pressure to the top of the blimp ultimately you tip the basket and the tripod on which it is mounted as if one rigid body, rather than simply flex the windshield. This was the part of the design that most concerned me before building, and I was relieved that it worked out so well, and that there was no need to resort to clunky internal bracing or, say, seriously chunky main rings.

With a stable basket and static use the windshield needs to protect the mics inside from structure-borne vibration coming from three main sources: vibration of the basket itself due to wind buffeting; vibration of the tripod due to wind; and vibration of the tripod transmitted from the ground. Aside from extreme winds or particularly shaking ground, these are much less problematic than handling noise from a boom-pole or pistol-grip, so, in this case, the Mega-Blimps rely on the mic shock-mount. I designed them to take both Rycote lyres and Radius Windshields hoops, though the latter are much more useful due to their modular design: they allow the use of integrated MS clips, doing away with back-to-back clips (apart from with my larger-diameter SDCs – the MKH 30 and MKH 50 MS pair). The support for the shock-mounts and, indeed, the form of the shock-mount bases has been minimized to keep the acoustic impact down: the amount of plastic internal structure in many a windshield is a real issue that I wanted to avoid. The laser-cut stainless-steel baseplate, at 74mm x 93mm, to which the Arca plate is bolted, obviously offers some scope for reflections, although it is some distance below the mics: nonetheless, I have mitigated any such effect by addition of a 3d-printed curvy cover or skirt.
Adaptability: The size and lack of internal structure make the two Mega-Blimps highly adaptable, so there was little extra to think about in this regard, beyond a central 3/8″ mount that could take a variety of off-the-peg or 3d-printed shock-mounts, and a simple cabling solution. Here, I eschewed the (puzzlingly always unshielded) conn boxes that manufacturers use on many higher-end models, but which then get the user stuck to particular numbers of mics (typically one, two or three). Rather I have gone for an easily removable XLR cable that fits, via the unscrewable end of the plug, firmly to the base. It is the same approach I (and manufacturers such as Ambient) have taken to mounting XLRs at the top of boom-poles. Simple, swappable and effective.
For the mounting of mics, the two Mega-Blimps each have a 3/8″ threaded bolt projecting upwards from the baseplate. This can be fitted with, say, a Rycote InVision 6 or 7 shock-mount, although my preferred solution is to use a length of 15mm rod with 3/8″ threads, as shown here, in turn supporting a small Field Edition mount by Radius Windshields or my various 3d-printed mounts. There is no need for pivot mounts (as found in the InVision 6 or 7) since angling of the mics is normally preferable by angling the whole windshield (i.e. at the tripod head), and the more minimalist approach clearly is to the acoustic benefit. Here are the current configurations I am using, although other mounts could be designed easily (for example, I haven’t yet made an XY mount as I almost never use such a pair):
ORTF
ORTF (for anyone unfamiliar, an acronym for the Office de Radiodiffusion Télévision Française, where this stereo technique was developed about 65 years ago) is popular for field recording despite its requirement (if conditions go beyond what slip-on or Baby Ball Gag type wind protection offer) for larger windshields and, often, very short mics (such as Sennheiser MKH 8000 mics with MZL connectors or Schoeps CCMs). And even then, the mic diaphragms can end up nearer the basket edge than ideal (i.e. with loss of wind-reduction). So having sufficient space for ORTF in the Mega-Blimp was important and the 242mm diameter means that it is easy to set the mic capsules on the centre-line of the windshield without the rear of the mics or their XLRs getting near the basket. In fact, there is enough room for a wide range of SDC mics, so short mics like the Sennheisers and Schoeps are not essential. Obviously longer SDCs used for ORTF have the problem of the rear of the mics or their XLRs clashing, so, as with XY pairs, they are offset vertically – one above the other. Whilst I have MKH 8040 cardioids with MZL cables – i.e. short enough not to need such offsetting – my Rycote CA-08 cardioids are just long enough that their XLRs do clash when set as an ORTF pair, so I have given them a vertical offset: there are different ways to do this, and I have chosen the simple route of keeping the ORTF mount untouched but using different length clips (3d-printed) in the Radius hoops. The length of the Mega-Blimp large is particularly suited to ORTF, with the mic capsules projecting just past the two main rings of the basket. The Mega-Blimp standard works fine with ORTF, although the capsules do project further into the end cap/hemispheres (which, of course, are very roomy anyway).


MID-SIDE (MS)
Mid-side recording is, as readers of this blog will know, perhaps my favourite approach to stereo, using a range of mid mic polar patterns that include omni, wide-cardioid, cardioid, super-cardioid and fig 8. Indeed, I am probably unusual in having more fig 8 SDC mics (essential for the side mic in an MS pair, of course) than any other polar pattern. Although smaller fig 8s (especially the new Sennheiser MKH 8030 and Rycote BD-10) feature heavily in my posts, it is nice at last to have a windshield that has plenty of room for my MKH 30 and MKH 50 MS pair: they sit particularly well in the Mega-Blimp large.


DOUBLE MID-SIDE (DMS)
I’m not a heavy user of double mid-side arrays, but occasionally use them: most recently I was required to use the technique for a surround-sound recording of the sea, to feature as the introduction to an organ music SACD (an unusual intro, I know). There are different ways to rig DMS, of which the most satisfactory is using side-address cardioid mics oriented vertically, above and below the horizontally-set fig 8 mic. The downside with this is that there are few side-address SDC cardioids, with the Schoeps Mk4V and CCM4V being the obvious examples. Cinela used to produce a DMS mount for the CCM4V and CCM8 (the X-SET-DMS-CCM), but that appears to have been discontinued (it is not on their website). Schoeps and Rycote also used to make the WRS DMS LU mount for such a DMS array, although this too has been discontinued, and if you go to the Schoeps website today you will see they show DMS rigs in Rycote and Cinela windshields with end-address mics. With end-address cardioids these can either be set above and below the fig 8, so that all are coincident on the horizontal plane, or set in a close triangle with the cardioids side by side (obviously facing different directions) and the pair above or below the fig 8. The latter arrangement is more compact, but, evidently, the three mics are not perfectly coincident on the horizontal plane. And, although I am not as concerned by mic shadowing as many (often from a largely theoretical stance), both configurations of the mics and the gubbins needed to support them do seem rather clunky and in the way of each other more than seems desirable and, indeed, much more than if using side-address cardioids. Lacking the latter (at least at present), I have simply used the DMS mount I created for Radius hoops (and, indeed, for the Mini-ALTO), using MZL connectors to minimize the bulk of the mics as much as possible. In due course (if I acquire the necessary Schoeps mics), I will develop a DMS mount for side-address cardioids along the lines of my native B-format mount below: I’m pretty confident that this would have less acoustic impact than the discontinued WRS DMS LU mount.


NIMBUS-HALLIDAY NATIVE B-FORMAT
I mentioned above the (sadly less popular) version of DMS with vertically oriented cardioids, and, of course, this looks strikingly like a Nimbus-Halliday native B-format array (the difference being that the latter has two vertical fig 8s above and below a horizontal omni mic). Particularly avid readers of this blog (are there any?!) may recall that I wrote about this array when using it to record a pipe band (and those that aren’t familiar with the technique can read about it – and download WAV files for a play – here), to give me a variety of options in post. Since then, I have reduced the size of the array by using MKH 8000 mics with MZLs, and worked hard to minimize the size of the mount and, while still using shock-mounts, avoid too much in the way of gubbins close to the mic capsules, to produce a compact version that fits in the Mega-Blimp, and does so with the windshield being oriented horizontally (I didn’t want to turn it vertically, as then the baseplate would have had some impact on the rearward sound capture). I must confess of all the rigs that I have made for the Mega-Blimps, the 3d-printed Nimbus-Halliday mount has been the most satisfying so far, and the design evidently has relevance to an improved approach to DMS rigging in windshields.


This is a pretty clean (i.e. low acoustic impact) shock-mount configuration for a native B-format array (or DMS with the mics swapped out), but, as always with such three-mic arrays, there are some elements that still lie within the polar patterns of the different mics. The tall vertical element is less than ideal: there is some inevitable impact in native B-format behind the omni middle mic, and if used for DMS behind what would be the rear-facing (side-address) cardioid top mic. The hoop and mic clip of the middle mic also get a bit in the way for both set ups. Fussy, I know! Sky-hooks would be one solution, but in the absence of mythical devices, I realized (belatedly) that the top mic could hang from the top of the Mega-Blimp basket (for once a windshield is an advantage other than for reducing wind!), doing away with the vertical element. And then, a more minor refinement, to get rid of the effect of the hoop and clip around the middle mic, perhaps the hoops could be dropped so that the mic sits on top of them…yes, not the design intention of Radius Windshields, but it works OK! Hoops and mic clips for the middle mic are then both placed neatly out of the way into the null of the bottom mic in either native b-format or DMS. And with the middle hoop out of the way, I thought I might as well revert to double hoops for each mic: this gives a little more stability and the mics stay in place more readily without such careful cable dressing as in the first Nimbus-Halliday native B-format rig. So there you have it: almost nothing in the way of the relevant polar patterns of the mics (note: for DMS the bottom mic would be the forward-facing cardioid, and the top mic the rearward-facing cardioid). If I can get some side-address cardioids (a pair of Schoeps CCM 4V mics would be ideal), then I’ll add a photo of the DMS version. Crumbs, I am enjoying the combination of a 3d-printer, Radius Windshield hoops and the Mega-Blimp!

These are but a few examples of the configurations of mics possible in the Mega-Blimps, but the scope is considerable – as intended. Funnily enough, while building the blimps I was asked whether a single LDC mic would fit. My first reaction was doubt, as, of course, the Mega-Blimp was very much designed as a much shorter version of the original LDC blimp from years ago, specifically for SDC mics, and I wasn’t quite certain how an LDC mic would sit within the basket, but nothing ventured, nothing gained. I only had the Mega-Blimp standard at that point, and this encouraged me to think more about the Mega-Blimp large (at the CAD design stage, the length of the central section – the ‘hamster wheel’ – changed on an almost daily basis), which has turned out rather better for ORTF pairs. But, anyway, here is the result of the LDC test:

Obviously the size of the basket would prevent close spacing of a pair of LDCs for, say, ORTF, but a NOS pair would work fine, or, indeed, any of the large surround or ambience arrays such as Hamasaki square.

The construction
There’s not a great deal additional that needs to be said about the construction as, by now, it should be pretty clear to the reader. The TIG-welding was again undertaken by my good friend Rob Moore, who lives in a nearby village. His normal work is building highly elaborate rolling-ball sculptures, and he has years of experience of bending and TIG-welding stainless-steel rod in complex geometries. Most of his sculptures are done freehand, but, for the blimps, he constructed some simple jigs to help achieve a regular appearance. Of course there is no acoustic benefit from things being absolutely perfectly regular (perhaps the reverse), and the Mega-Blimps are unashamedly hand-crafted. The welding leaves the stainless steel rather discoloured, and normally Rob takes his large sculptures to a specialist firm in Birmingham for electro-polishing. In this case, however, he just cleaned the baskets with a wire brush bit in a drill – a fiddly, messy and time-consuming business. Rob let me do one, I suspect just so I could experience how little fun it is and to convince me that, if there’s a next time, we go down the electro-polishing route. Powder-coating could be another, cheaper, option, though I much prefer the stainless-steel appearance. The 3mm-thick stainless-steel baseplates were welded to the baskets and, as mentioned above, during construction of the different versions (Rob made five in the end!), we moved from laboriously hand cutting and drilling to having a small batch of 10 plates laser-cut. The Arca quick-release plates that are fixed to the bottom of the baseplates are the Manfrotto MSQ6PL: I chose these for the wider than usual top part to the plate, which extends further across the width of the baseplate above and, thus, gives more rigidity. The Arca plates were drilled to allow stainless-steel M5 bolt fixings to the baseplate, with the nylock nuts on the upper face accommodated in the 3d-printed skirt designed to remove any possible sound reflections from the baseplate. The skirts have a few different designs to fit the two models and the different heights of the 15mm aluminium rods that hold the mic shock-mounts. The 15mm rods have 3/8″ male and female threads either end, and I found a supplier that makes sets of three with lengths of 1″, 2″ and 3″ (I do love mixed imperial and metric dimensions: it’s like buying 4.8m of 4″ x 2″ timber!), which have proved ideal. The various mic mounts for different arrays, which combine elements from Radius Windshields, Rycote and my own 3d-printed designs, I have covered and illustrated above. Doubtless, I will come up with more: I use Onshape for 3d modelling and output on a Bambu Labs printer. Last, but not least, the two sizes of lined fur were specially made by Radius Windshields: Donna, Kim and Megan, at their Stroud sewing workshop, have, I suspect, unrivalled experience of making windshield furs. Radius make plenty of replacement furs for other manufacturer’s windshields and are happy to make one-offs and small runs, which is good news for DIYers. As originally conceived, the Mega-Blimp was not intended to have any fabric covering to the basket below the fur, and that is how I am happily using it at present. However, I am exploring options for a stretchy fabric – which would need to be easily and quickly removable (as well as acoustically transparent) – to be used instead of the fur in very gentle conditions (to reduce the unavoidable high-frequency attenuation from fur) or in conjunction with the fur in extreme conditions: one might as well reap the full benefit of the large diameter of the Mega-Blimp in such high wind. More on that anon perhaps.

Conclusions
The two Mega-Blimps I have designed will not make my (unhealthily large) collection of commercial windshields redundant: like any sane sound recordist, I understand that these expertly designed and engineered plastic windshields are often the best tools for the job. But when that job doesn’t require booming or otherwise has weight and size as practical constraints, the Mega-Blimps will be a key tool for me: the robustness, ease of use and, above all, the transparency and adaptability for all sorts of arrays (including some hitherto not to my knowledge achieved in a windshield) they offer will be a real boon to recording sound effects, ambiences and music outdoors. Yes, they are a bit larger to carry, but as they fit in a small backpack that makes little difference for much of my usage. And they are far more resilient in transit, which rather compensates for size, even without considering the performance gains. I’m rather pleased at the end results and interested to see which of the two sizes of Mega-Blimps I find myself using more: time will tell. I also suspect that this won’t be the end of my dalliance with windshields. Not least, I have already begun to ponder the design of more specialized baskets for more complex arrays of SDC mics: there is little doubt that TIG-welded stainless-steel construction is unusually well suited to large, robust and transparent bespoke windshield designs. We will see. And in the meantime, I hope this account inspires readers to think more about windshield design, performance and the various compromises that are inevitable in any design; and, perhaps, even engage in their own elaborate projects to create something bespoke for their particular type of sound recording.
Further reading
Anyone really keen to understand windshield design and performance may find the following articles of interest: I certainly have. You may well have to join the AES to access them, as I did, but there’s not a lot I can do about that!
Bleazey, J.C., ‘Experimental Determination of the Effectiveness of Microphone Wind Screens’, Journal of the Audio Engineering Society (Jan 1961, vol. 9, no. 1), 48-54.
Brixen, E. B., ‘Microphones, High Wind and Rain’, Audio Engineering Society 119th convention paper 6624 (2005), 1-8.
Chenevez, P., ‘Handling noise analysis in large cavity microphone windshields. Improved solution,’ Audio Engineering Society 126th convention paper 7774 (2009), 1-7.
Wuttke, J., ‘Microphones and Wind’, Journal of the Audio Engineering Society (Oct 1992, vol. 40, no. 10), 809-17.


12 Comments
Glad to see that the native B-Format is getting some attention!
Indeed! I found your 2019 article very useful and, as you may have noticed, linked to it in my (pipe-band) blog-post on native B-format. Looking back at your article now, I had forgotten that you had identified the discontinued Schoeps/Rycote WRS DMS LU shock-mount as suitable for a native B-format array.
Cheers,
Roland
I looked up Rob Moore’s work. Very very cool. I wish I were the art-commissioning type (with a corresponding bank account) because I’d commission one of those sculptures for my yard. The Brain looks incredible.
Have you ever recorded the sculptures? It seems like a natural fit.
I look forward to a future post about a blimp 2 meters in diameter that you roll to recording locations…mount the mics on a gyroscopic gymbal inside so they can stay level while you roll…
Yep, Rob’s very talented. I have recorded his sculptures for some of the videos I have made of them such as this
Well, don’t forget I have had a more massive blimp, which I haven’t used a lot lately, hence the more modest size of the Mega-Blimps!
Cheers,
Roland
Excellent! I love watching the ball come out of the funnel–it’s like watching a stainless steel bird lay an egg. Beautifully shot and recorded and edited.
Thanks, Chris! Yes, the build-up to the funnel exit is great. I like the noise of the rolling-ball sculptures: oddly, some other makers put music over their videos, which takes away a significant part of the character of rolling-ball sculptures.
[…] my introduction to the Mega-Blimps I describe a nominally ‘DIY ‘ (would ‘self-build’ be a better term?) […]
Excellent Job!
Is The MZL Connector a Custom Cable I mean hand made?
Thanks Sule! There are two 3x MZL to 7-pin XLRM cables shown in the blog. Both are custom ones, made by Ed Kelland at ETK Cables: the one with the DMS setup has 18cm cable lengths, and the one for the native B-format setup has staggered lengths.
Cheers,
Roland
[…] Well, the slightly mad schemes – at the opposite end of the spectrum size-wise from my DIY Mega-Blimp project – continue. In this case, the project began when John and Simon at Radius asked if I […]
With Rob at the helm of the Tig welder, both of you are creating functional works of art! And, as I have just ordered the CA-08 stereo set from Rycote with the intention of an ORTF rig. AND not having access to a tig welder or a wizard to wield it, I am desperately interested in finding out how I could get something like the ORTF Mega-Blimp Standard (I know you’ve mentioned in other post that the intention is probably not to sell the Mega blimps). Otherwise it’ll be yet another Frankenstein’s monster contraption (Lewitt 540s ORTF double blimp hanging nightmare rig perks up in the corner).
In any case. Love your work!
Thanks Sam. I do discuss availability in another Mega-Blimp post (https://drbadphil.com/mega-blimp-any-availability), so if you are stuck with achieving something similar via DIY, we might be able to sort something out.
Cheers,
Roland