Introduction
The Sennheiser MKH 800 Twin was launched back in 2008, and was based on the MKH 800 of 2000 (itself the successor to the MKH 80 of 1993), so is far from a new microphone. But, during my recent testing of the Nevaton MC59 Twin, I began to wonder more and more why, given the reputation of the Sennheiser MKH mics – with their humidity-resistant RF technology – for outdoor use in all conditions, I had seen no examples of this mic being used for such purposes, whether that be for field recording, sound effects, production sound ambiences or outside broadcast. I’m sure there have been recordists putting the mic to such use, but certainly it is nothing like as popular as the older MKH 30 etc. and the newer MKH 8000 series mics. Above all, I was puzzled why it seems to see such little use for double mid-side (DMS) recording in the field.
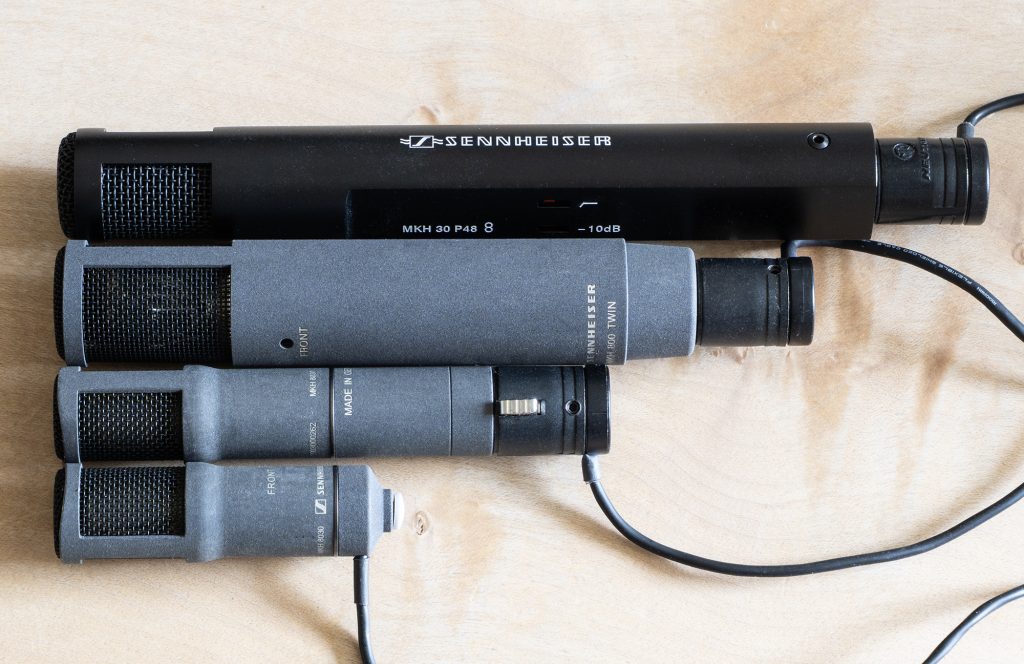
OK, the MKH 800 Twin is expensive (with a street price in the UK usually above £2,500 inc. VAT), but not (well, at least for some!) frighteningly so: that’s around double the price of a single MKH 30 etc. or an MKH 8000 mic, for what is, arguably, double the mic or more. And it is by no means a small mic: measuring ø27mm x 136mm, and with a weight of 172g, the mic is certainly chunkier and heavier than, say, the MKH 30 fig 8 (ø25 x 174mm, and 110g), but is noticeably shorter. I wonder, therefore, whether it is a combination of weight, size and the rigging options – and with this I am thinking especially of windshields – that has resulted in low use outdoors. For field recording, using a near-coincident or spaced pair of MKH 800 Twins is, perhaps, less desirable than for music recording, although this would be easy to rig with each MKH 800 Twin in a separate windshield, and would be very flexible in post. Rigging a coincident pair of MKH 800 Twins or one MKH 800 Twin and a fig 8 seems more suited to field recording, given its suitability for MS (with the mid mic polar pattern decided in post) or for DMS, yet this might seem challenging to house in a windshield. Even if placing two mics side-by-side (a viable approach: there is often too much concern about the shadowing effects of such a configuration) the overall width and shock-mounting arrangement can be problematic. Certainly there are no off-the-peg options for this. And, equally, going for the preferable end-to-end rigging makes for a long mic pair, again with some trickiness to the mounting inside a windshield. With two MKH 800 Twins or one MKH 800 Twin plus an MKH 30 I can see why such rigs might be daunting, but my recent rigging of the new and diminutive Nevaton MC59 Twin for DMS got me thinking: surely the comparatively small MKH 8030, especially if used with an MZL connector, opens up opportunities for something acceptably compact? The MKH 8030 has been in production since 2024, but, as yet, I haven’t seen it rigged with the MKH 800 Twin in this way, let alone for field use.
So that, in short, is the purpose of this blog-post: to test the MKH 800 Twin + MKH 8030 combination as a practical and supremely flexible field-recording option. Does the new MKH 8030 provide a means to make the MKH 800 Twin a more practical tool for use outdoors? Well, let’s see!
NB I am grateful to the good folks at Sennheiser for sending me an MKH 800 Twin so that I could explore this.
A quick recap: the advantage of a twin
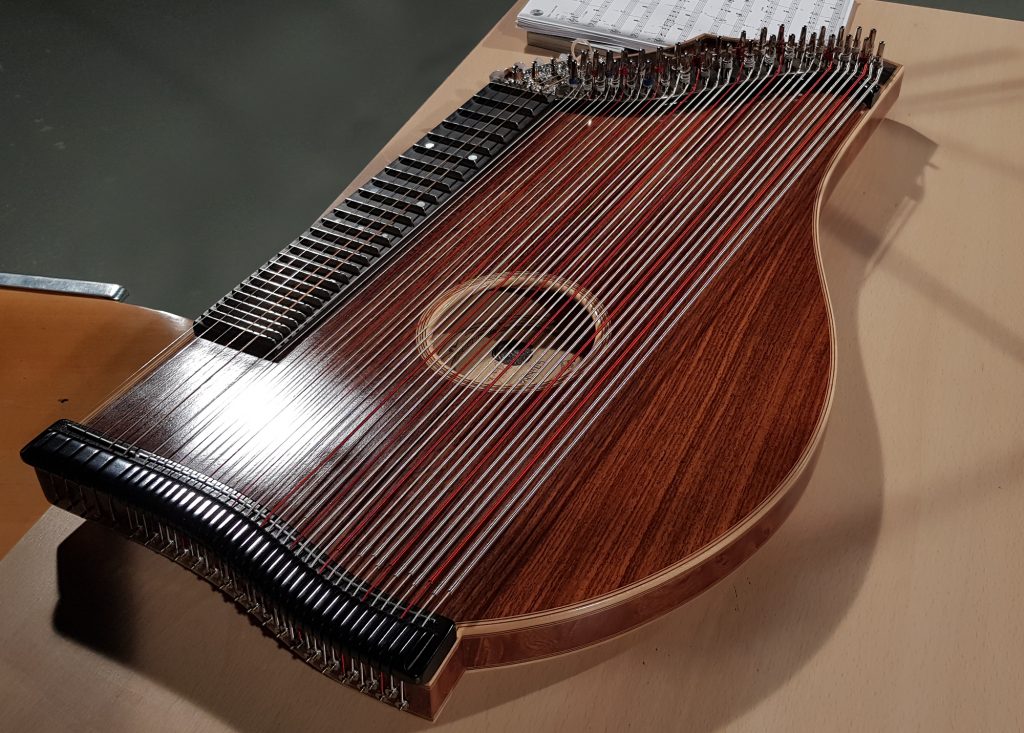
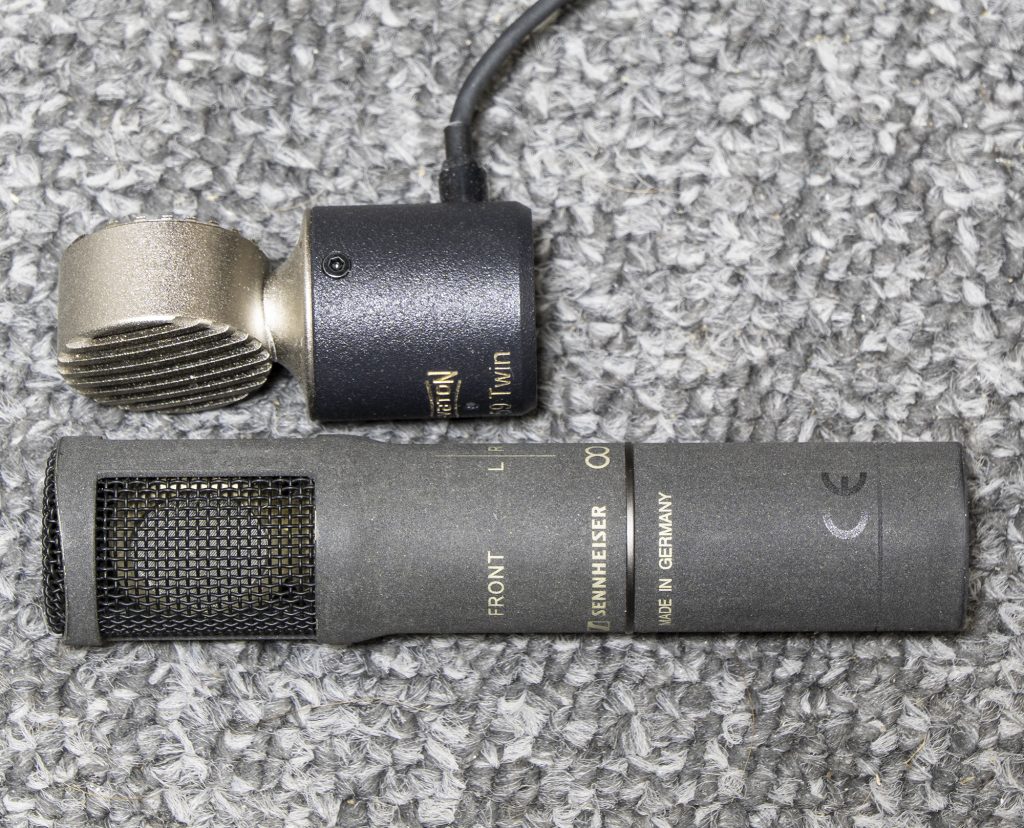
The MKH 800 Twin is closely based on its predecessor, the MKH 800, but while the latter combines its two cardioid capsules internally to allow different polar patterns (just like any multi-pattern LDC mic), the later Twin outputs the two diaphragms separately, allowing any polar pattern to be created in post, from fig 8 to omni, and, of course, two different mics to be created simultaneously: for example, the output can be used to create both a forward-facing cardioid and a rear facing cardioid, or indeed the same with other polar patterns (which need not be the same front and back). Added to this flexibility, a twin mic like the MKH 800 Twin also has a distinctive form, being a side-address mic: this means that if used to generate forward and rear-facing direction mics, as required in DMS, the capsules are both coincident and are not obstructed by the mic bodies (as would be the case when using two end-fire cardioids for the mid mics). As we have seen in my various blog-posts, a twin mic opens up scope for the cleanest (as in least obstructed) DMS, and with near-perfect coincidence of the two mid mics in all planes.
A brief introduction to the MKH 800 Twin
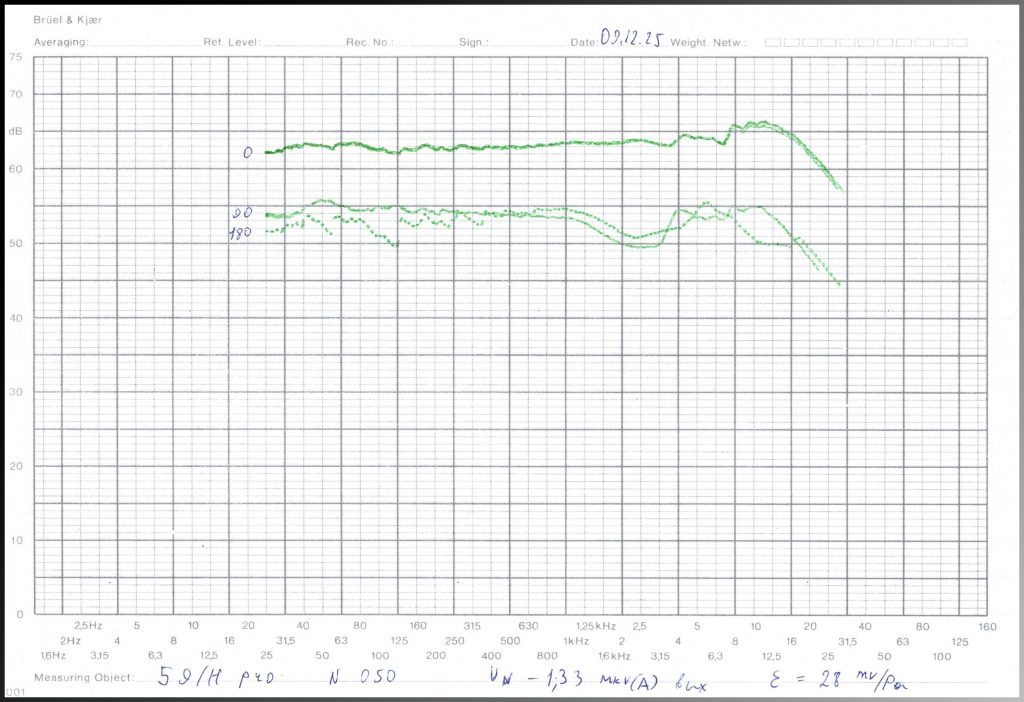
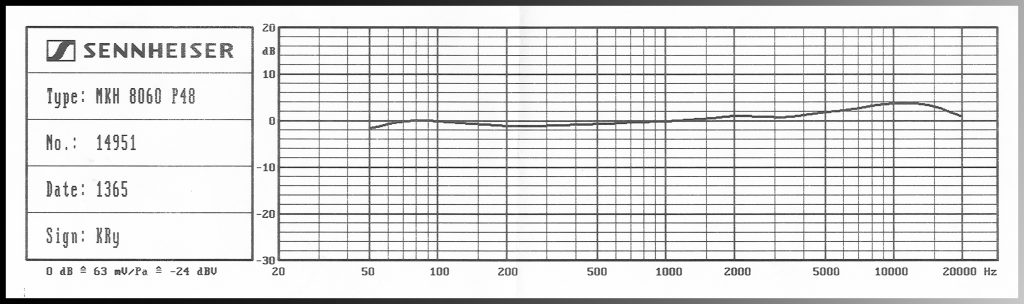
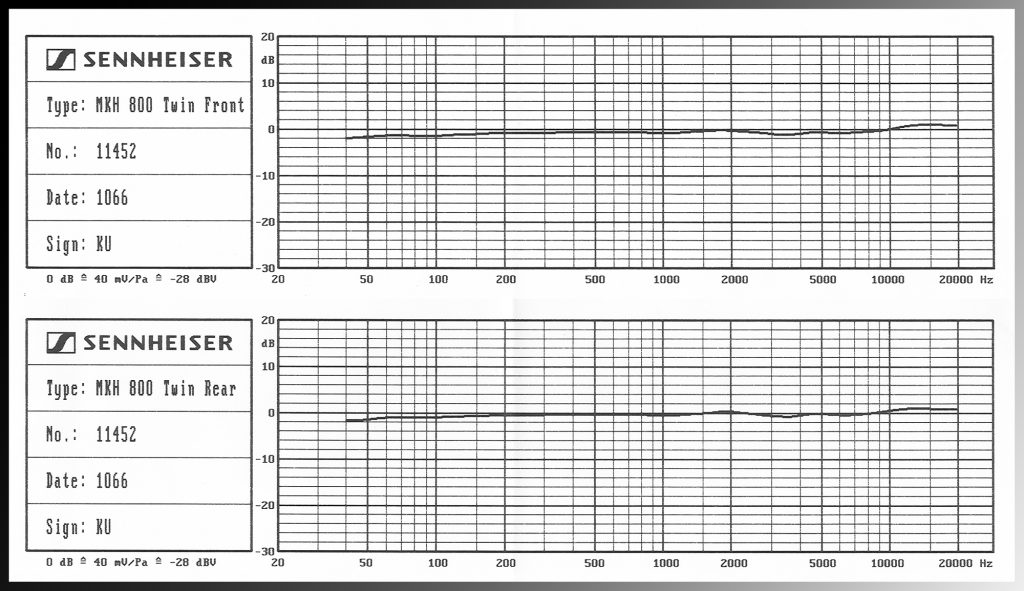
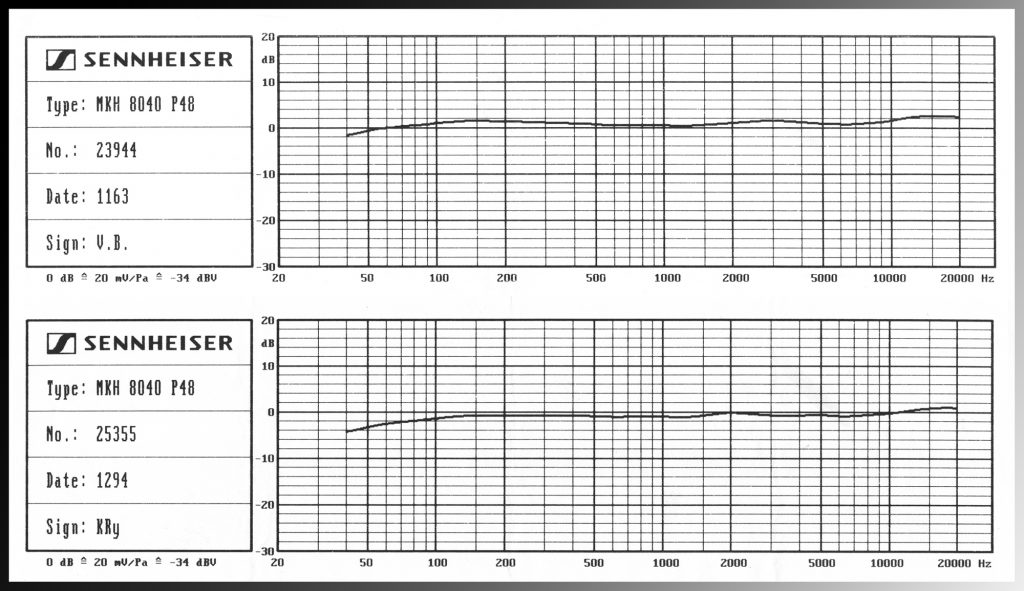
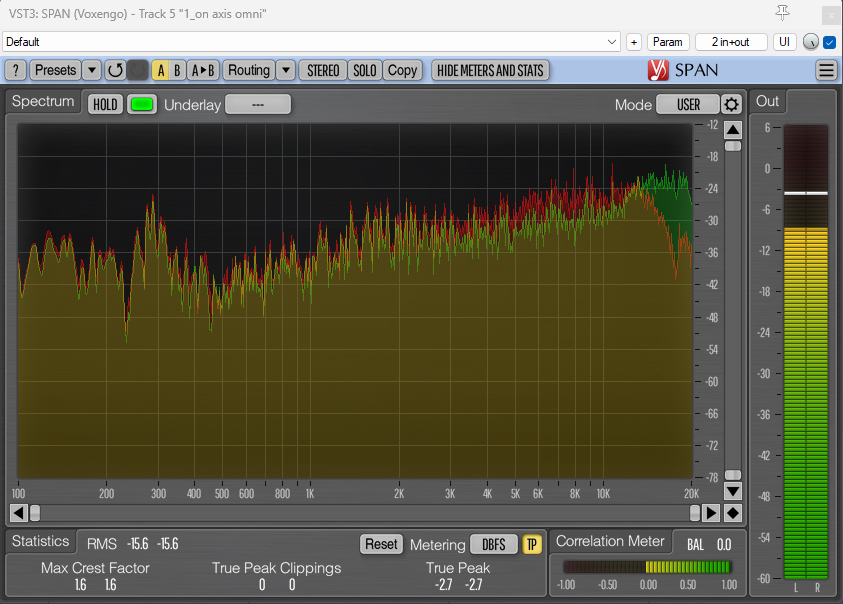
There’s no great value in repeating the specifications of a mic that has been on the market for 18 years, and for which the technical details have long been available on the Sennheiser website. But a few salient points and comparisons are useful. We have covered the physical nature of the mic above, but moving on to the sound of the mics it is perhaps worth considering the frequency response. Below are frequency response graphs for the two cardioid capsules in my MKH 800 Twin, which, as you would expect, are well matched and which, also, are broadly comparable to the cardioid MKH 8040. I include the frequency response graphs for two different MKH 8040s below, which, as unmatched, provide a useful indication of the variation across the model.
Looking at the self-noise profile, the MKH 800 Twin has the same sharply rising self-noise towards 20kHz and continuing to increase above this as found in the MKH 8000 mics. This isn’t at all surprising, since the mic has the same transducer as in the MKH 800, which, when introduced in 2000, was the first Sennheiser MKH mic to have the extended high-frequency range, then seen in the MKH 8000 mics, for which this self-noise at high frequencies is the quid pro quo. Not a problem per se, unless recording very quiet ultrasonic sounds, but a reminder that the mic has more in common with the MKH 8000 range (and, therefore, the MKH 8030) than the older MKH 20, 30, 40 etc. series. And I should hasten to add that the MKH 800 Twin has self-noise in the audible spectrum of 12dBA (as per the specs), which is very respectable and consistent with the other MKH mics.
Comparing polar patterns between the MKH 800 Twin for a single cardioid capsule only vs that of the MKH 8040 shows consistency, as you might expect, although the differences in the approach to the published graphics below make that a little tricky. In short, there are some differences from 4kHz upwards, but they aren’t huge. Sadly, Sennheiser don’t publish the polar patterns for the combined capsules (especially for omni and fig 8), where the differences will inevitably be more marked vs their single diaphragm counterparts in the MKH 8000 or older MKH 20, 30, 40 etc. series.
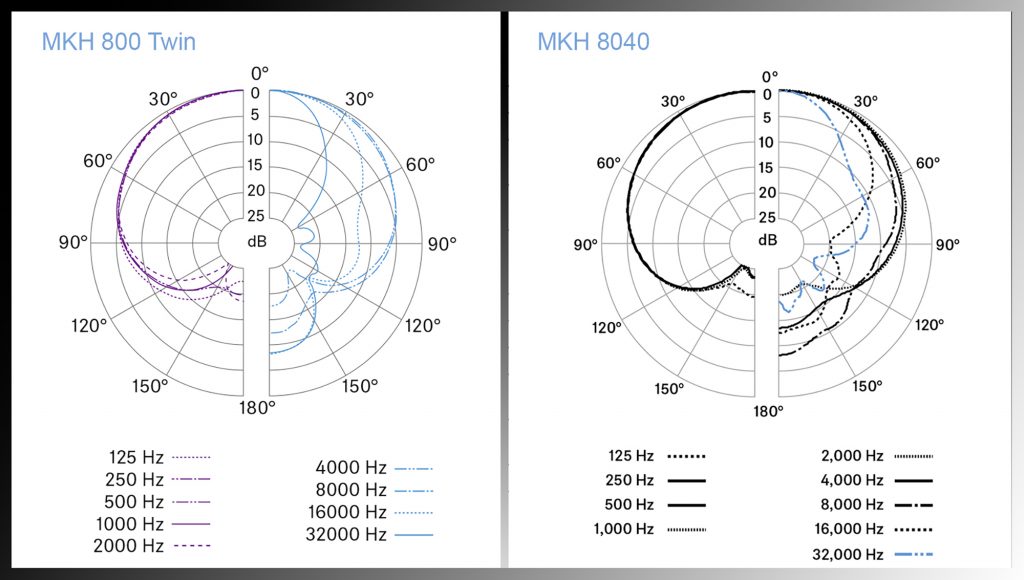
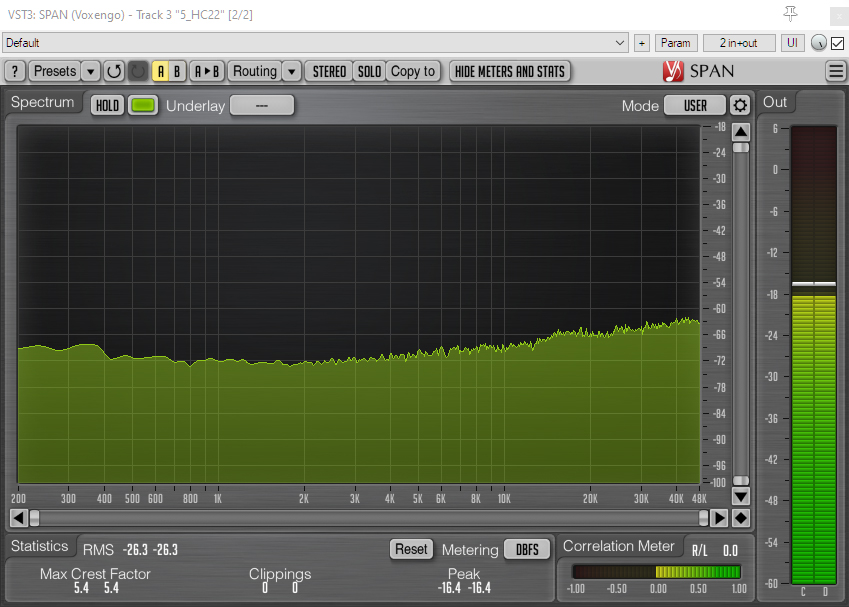
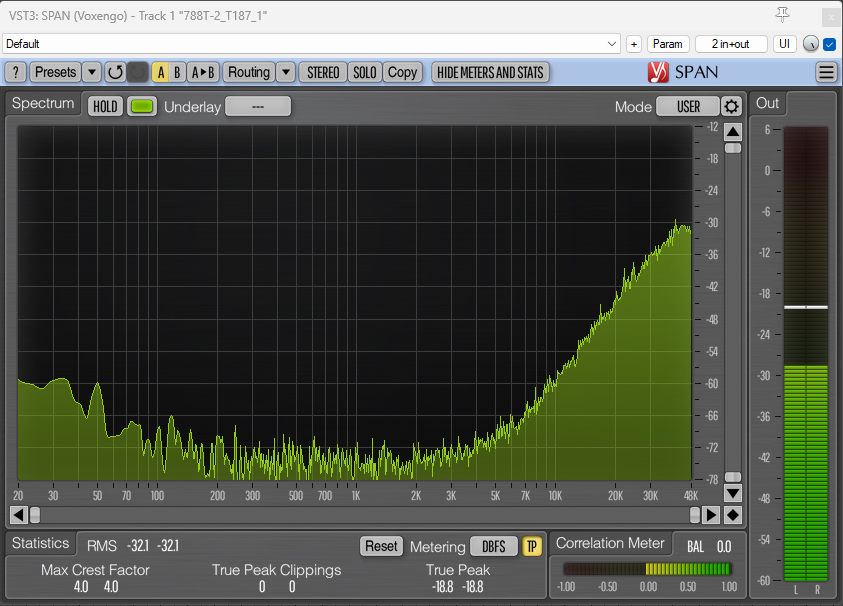
As discussed in previous posts, whereas most SDC omni mics are also imperfect, typically becoming more directional from, say, around 8kHz (I am thinking here of the polar pattern of the MKH 8020 mic), the frequency response on-axis remains consistent, while the omni polar pattern of a dual-diaphragm mic is best at the front and rear (i.e. on-axis to the individual diaphragms), but sees significant high-frequency fall off at 90 degrees. We saw this with the Nevaton MC59 Twin, and I repeated the measurements with the MKH 800 Twin to see how it compared. For this, I placed the MKH 800 Twin on-axis to pinknoise played back via a single nearfield monitor in my studio, then carefully and precisely rotated it so that it was then at 90 degrees, adding the two capsule outputs together in post to compare the on-axis and off-axis omni responses. As expected there is a significant fall off in the high-frequency response of the off-axis omni, in this case from around 14kHz, and corresponding with the progressively greater fall off of such higher frequencies at 90 degrees with any cardioid mic: it is, therefore, an inherent feature of the omni mode in similar dual-diaphragm mics. Aimed on-axis the mic in omni mode will sound fine, but aimed off-access (in effect used as an end-fire mic) it is less likely to be so successful. Again, as discussed in the MC59 Twin blog-post, this last use might seem an unlikely one, but in the past I have come across those advocating the use of the Sennheiser MKH 800 Twin as a single mic solution to omni MS (i.e. using the same capsule for the fig 8 and the mid mic): more experienced voices counter this, of course, noting that the omni mid mic (made of sideways-facing cardioids) will have significant loss of high frequency facing forward. I mention it here as a cautionary note: there is much to love about the flexibility of a twin mic, but best not get carried away (and, if your ears are old, forget that frequencies beyond your hearing might be rather curtailed)!
Rigging the MKH 800 Twin and the MKH 8030 for the field
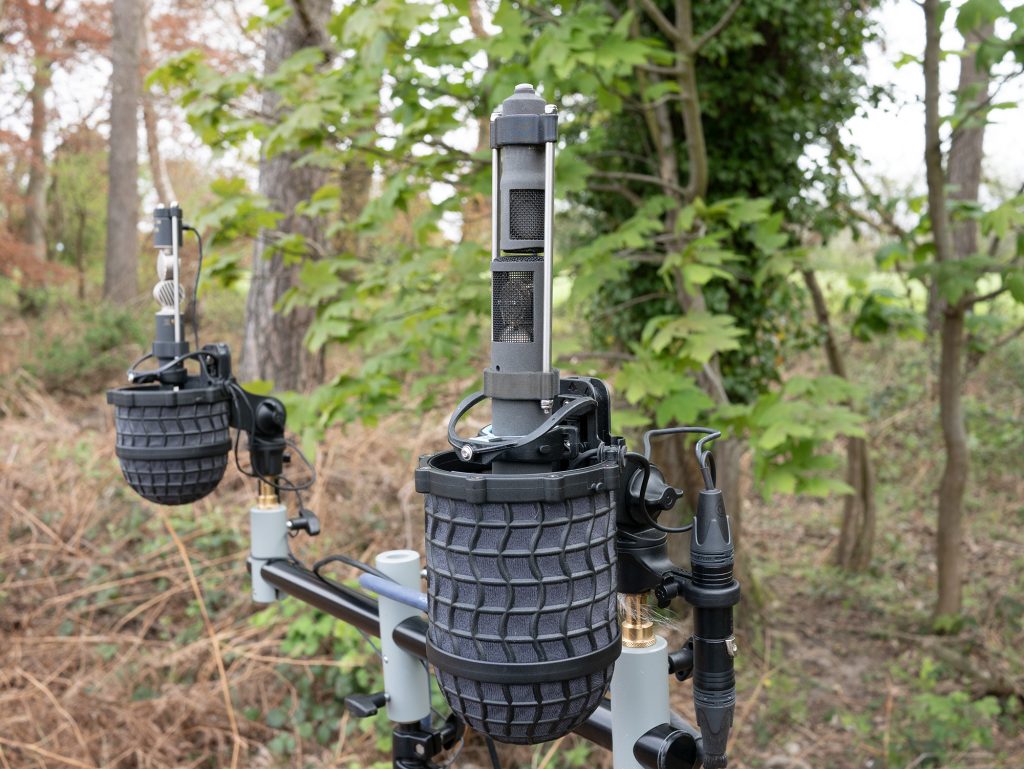
Mounting an MKH 800 Twin as part of an MS or DMS pair in one of my Mega-Blimps, as shown for the Nevaton DMS rig, gives the most transparent set up in part due to the sparse structure of the TIG-welded basket, but also due to the fact that the upper mic – in this case the fig 8 – can be suspended from the top of the basket, obviating the need for any linking support. These large windshields also, and rather obviously, can easily cope with larger mics: indeed, as readers will know, the origins of the Mega-Blimps lie in the first TIG-welded windshield I designed back in 2017 for a pair of LDC mics. But that is rather besides the point of this blog-post: the aim here is to explore the use of the MKH 800 Twin in a DMS set up that is a viable everyday alternative to other rigs and, for that, this means compact and using more commercially available windshields.
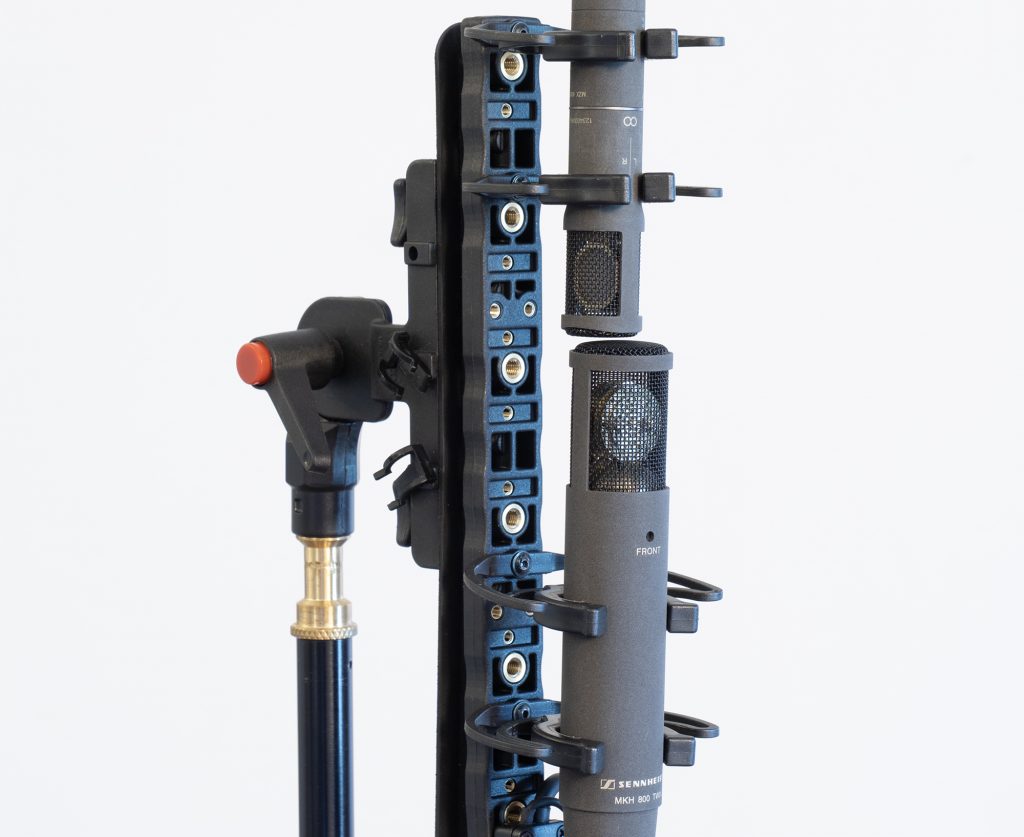
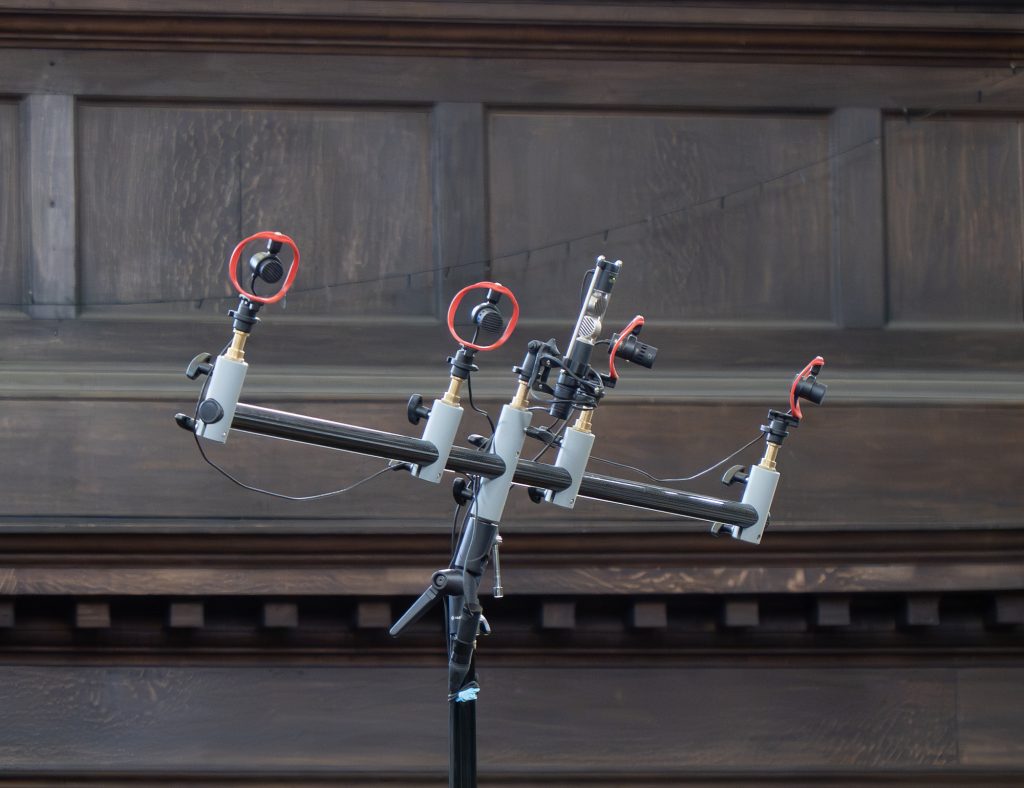
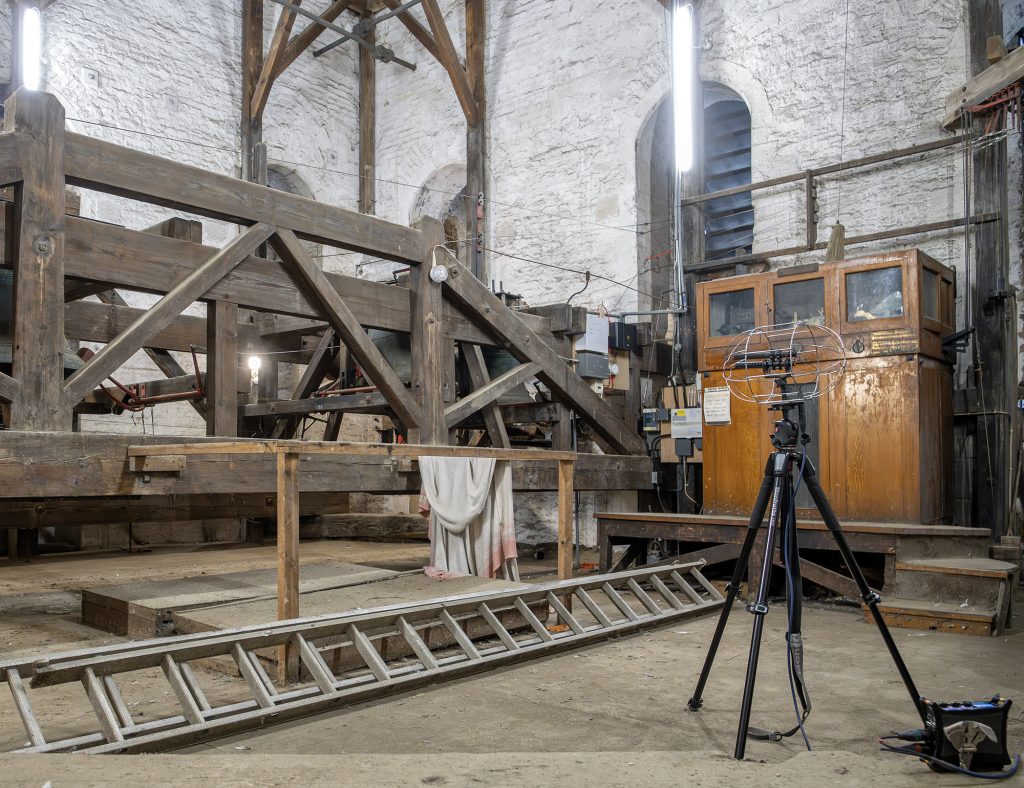
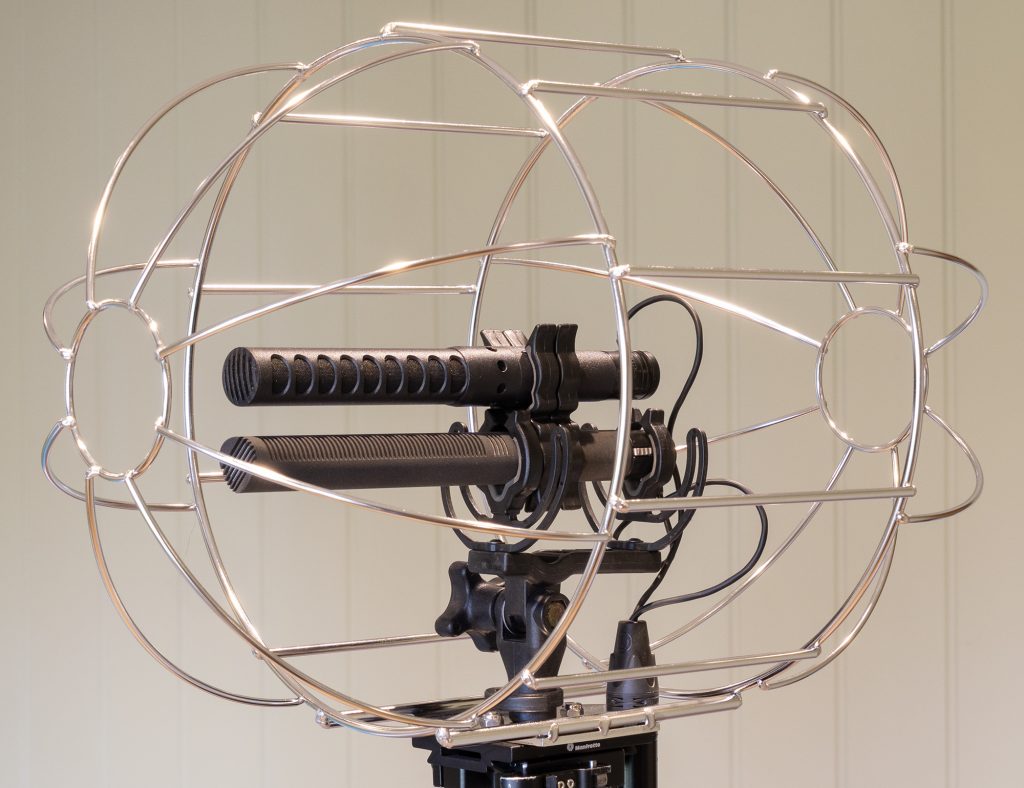
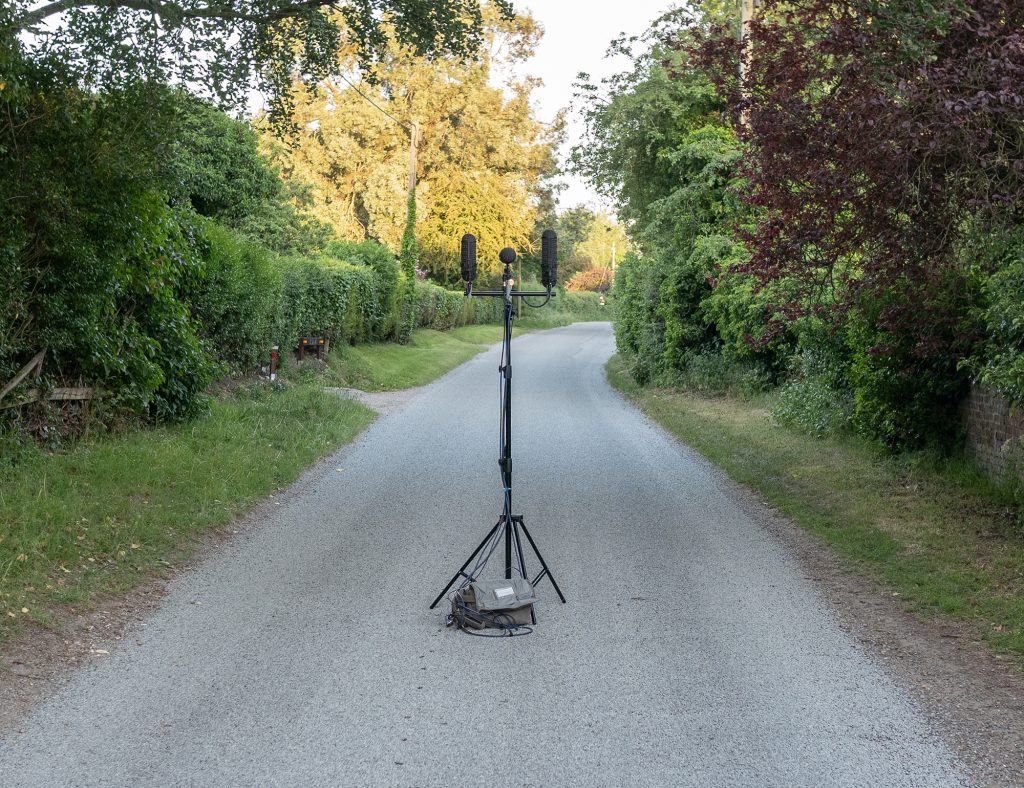
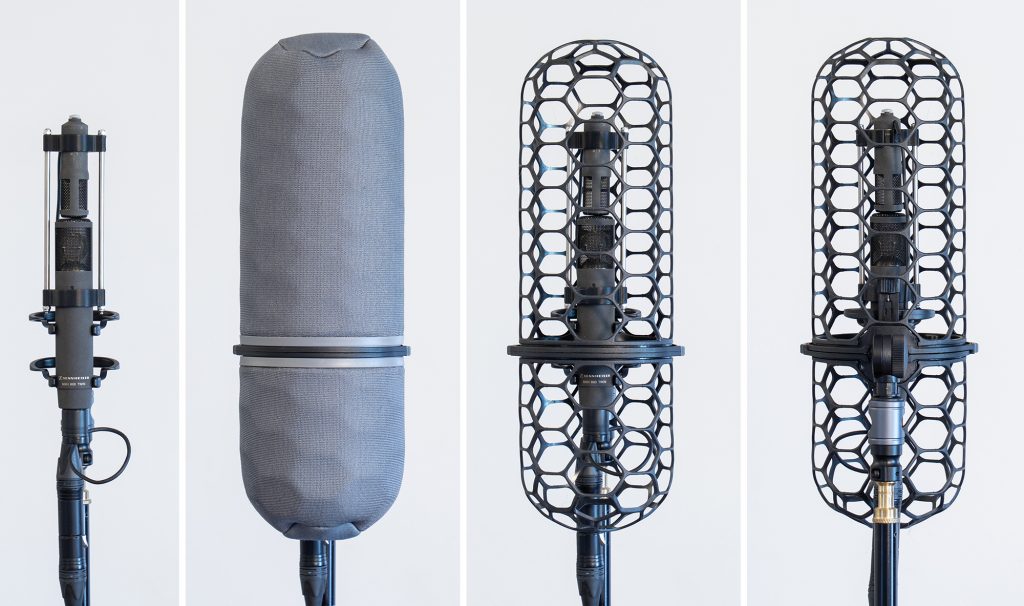
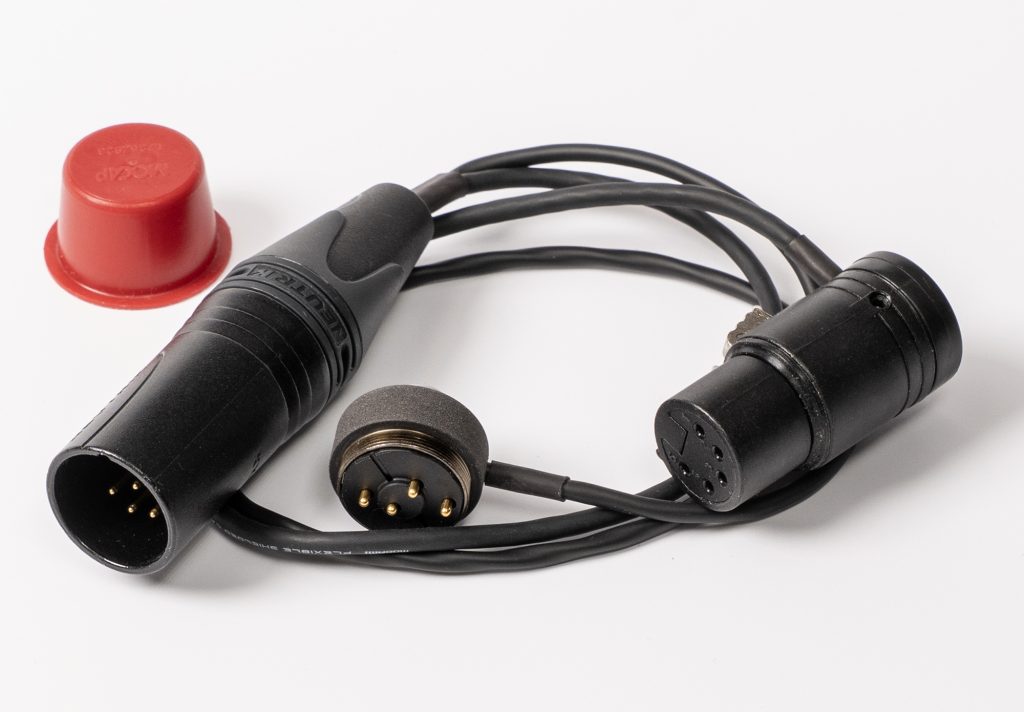
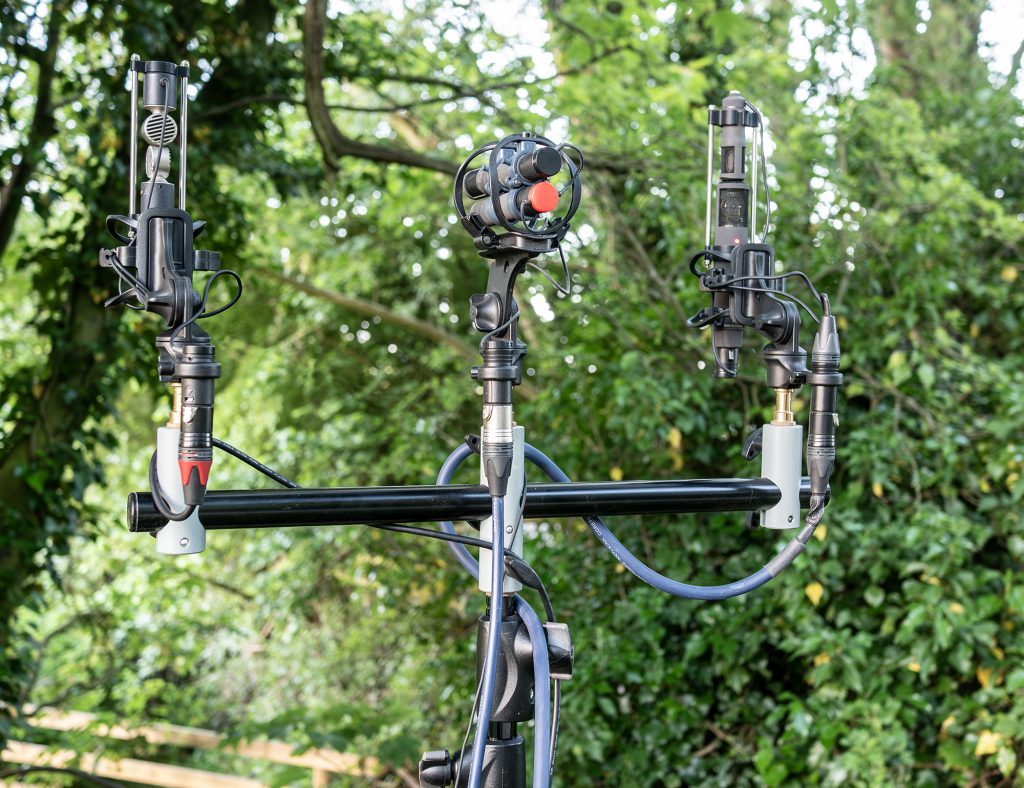
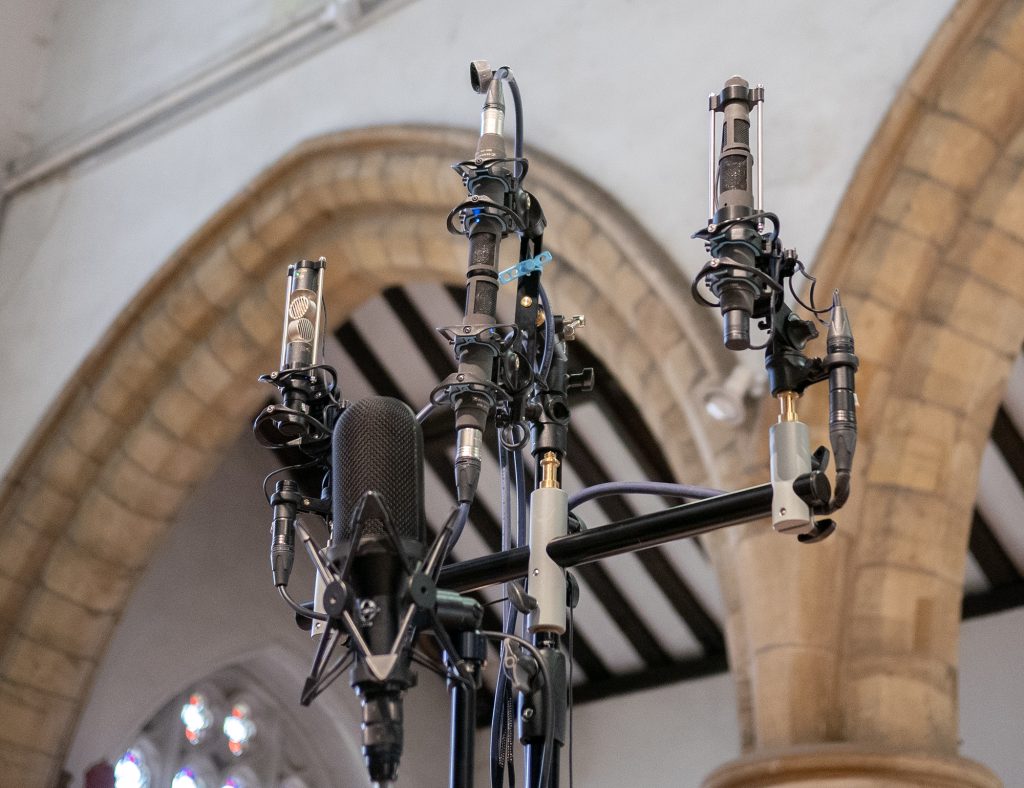
Many a windshield – such as the Rycote modular series, or the Rode Blimp – has a long mount or rail that, when the windshield is rotated vertically (as necessary for end-to-end DMS rigging with a twin mic), offers a significant acoustic obstacle (see photo above). With that in mind, I returned to my compact DMS rig for the Nevaton MC59 Twin + MC59/8 in a Radius Windshields Mini-ALTO, and created a very similar version for the MKH 800 Twin and MKH 8030. To keep things super compact I asked Ed Kelland at ETK Cables to make a custom cable for the rig, with a low-profile XLRF for the twin mic and a custom side-exit MZL for the fig 8, which he has now made available for others. For reference the cable is configured as follows: channels 1 and 3 have a low-profile XLR 5-pin female (with 29cm cable) from the MKH 800 Twin, and channel 2 has a low-profile/custom MZL (with 36cm cable), with both cables ending in a single 7-pin XLR male. It’s handy to have a single cable for the rig with lightweight flexible cable, to reduce cable-borne noise, and it’s great to have the channels in the correct order for DMS. With the customized MZL the MKH 8030 is very dinky and sits neatly above the larger MKH 800 Twin: with a low-profile XLR for the MKH 800 Twin, this gives a 235mm total length for the pair and their connectors. As with the Nevaton version of this vertical rig, two 4mm rods (actually stainless-steel tubes with M3 stainless-steel threaded bar inside) pass by the sides of the fig 8, but offer little acoustic impact. These connect two simple 3d-printed clips for the two very different sized mics.
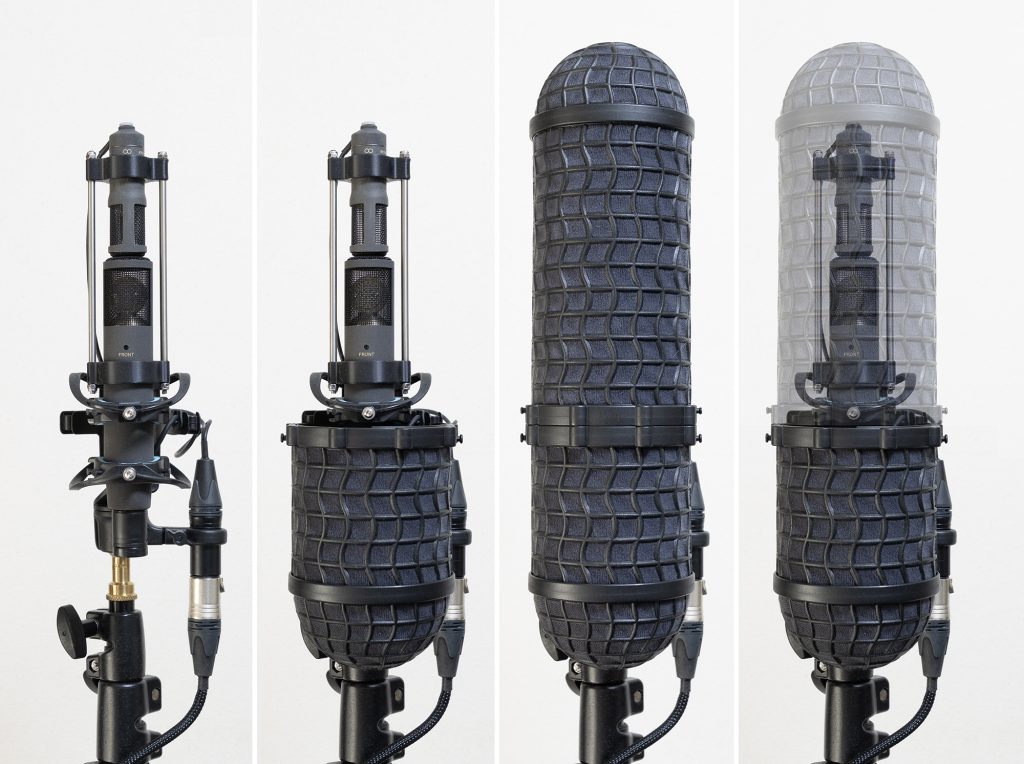
There is one downside to using a Mini-ALTO vertically for such a purpose and this is that the basket has a thicker plastic element running longitudinally, which would normally be along the bottom of the windshield, but which here is placed in front of the rear-facing cardioid. Not as chunky as the long mount in a Rycote modular windshield that we have seen (above), but, it must be admitted, not ideal. Which led me to another similarly compact alternative in the form of the Rycote Nano Shield. I haven’t been using either of my two sizes of this windshield recently since the Mini-ALTO is so much more practical for most usage, but the basket of the Nano Shield has one useful difference for this DMS application: its basket has no rail or seam along what would normally be the bottom and that, when used vertically, becomes the rear.
I must admit that the Nano Shield is rather clunkier to use, the lyres are less suited to vertical use than Radius’s hoops (though I have managed to retrofit the latter to a Nano Shield in the past, with a 3d-printed adapter), and routing the two cables is a serious squeeze. Also, I could do with a cable better suited to this mounting option (shorter to the 5-pin XLR and longer to the MZL). But there is no denying it is a more transparent option for this usage than the other compact windshields. Others, I am sure, will – perhaps already have – come up with similar or more effective mounts and windshield options: the Mini-ALTO and Nano Shield examples demonstrate how compact such a rig can be.
Naturally, with a larger twin mic, this DMS rig is not as diminutive as that for the Nevaton equivalent, but requiring a Mini-ALTO 250 only (vs the Mini-ALTO 180) or a Nano Shield NS4-DB, the windshield is still of modest size and quite happily fits in a shoulder bag for a compact rig. For stand or tripod mounted use, in the Mini-ALTO, which is the option I used in the field tests, the black 72D-shore hoops are fine on the shockmount, although for anything handheld you might want to step up to 82D-shore hoops and, in extremis (or, perhaps, in transit), there’s always the foam insert Radius make to stop long shotgun mics hitting the windshield basket. But, to be honest, I fail to see the point of handheld stereo or surround rigs moving around to the detriment of the image and introducing handling noise.
Field testing
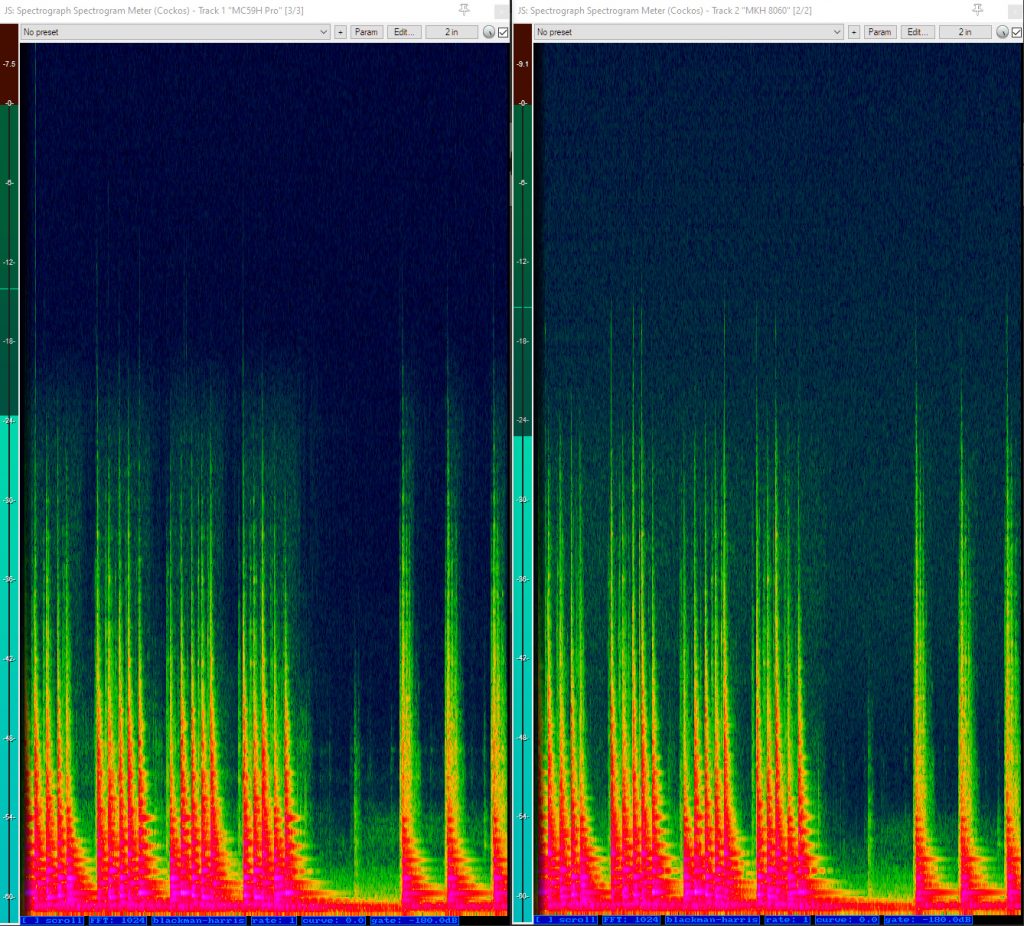
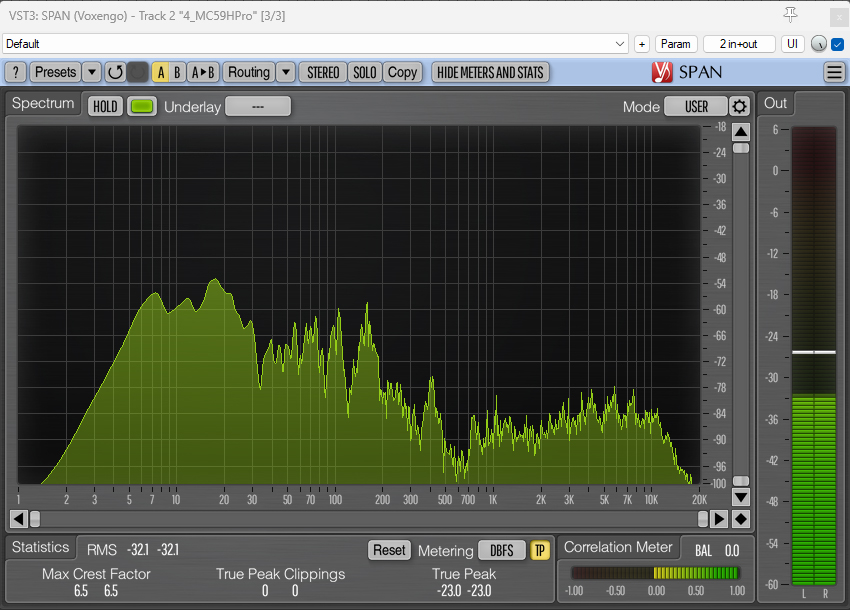
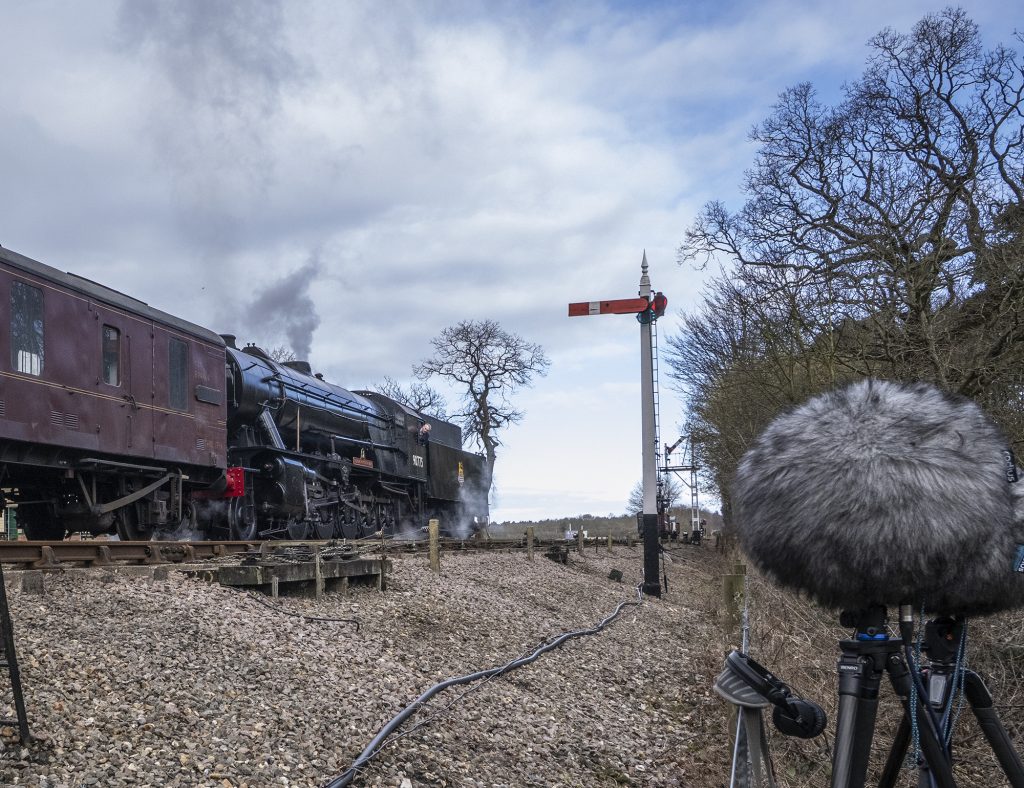
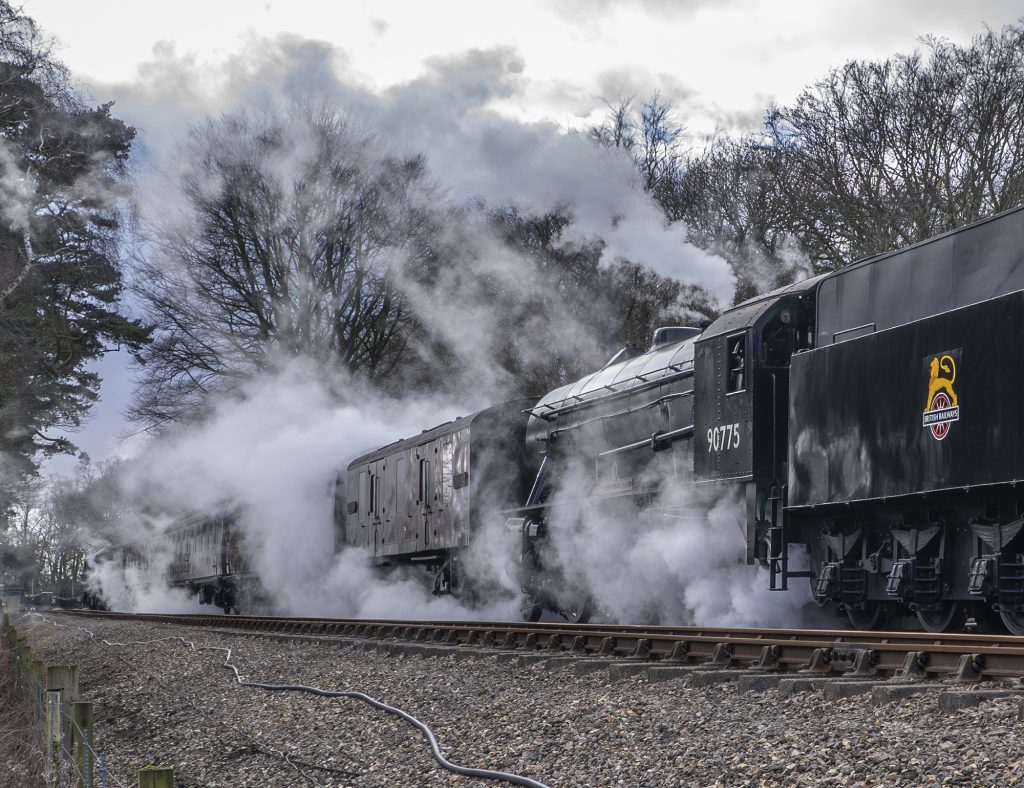
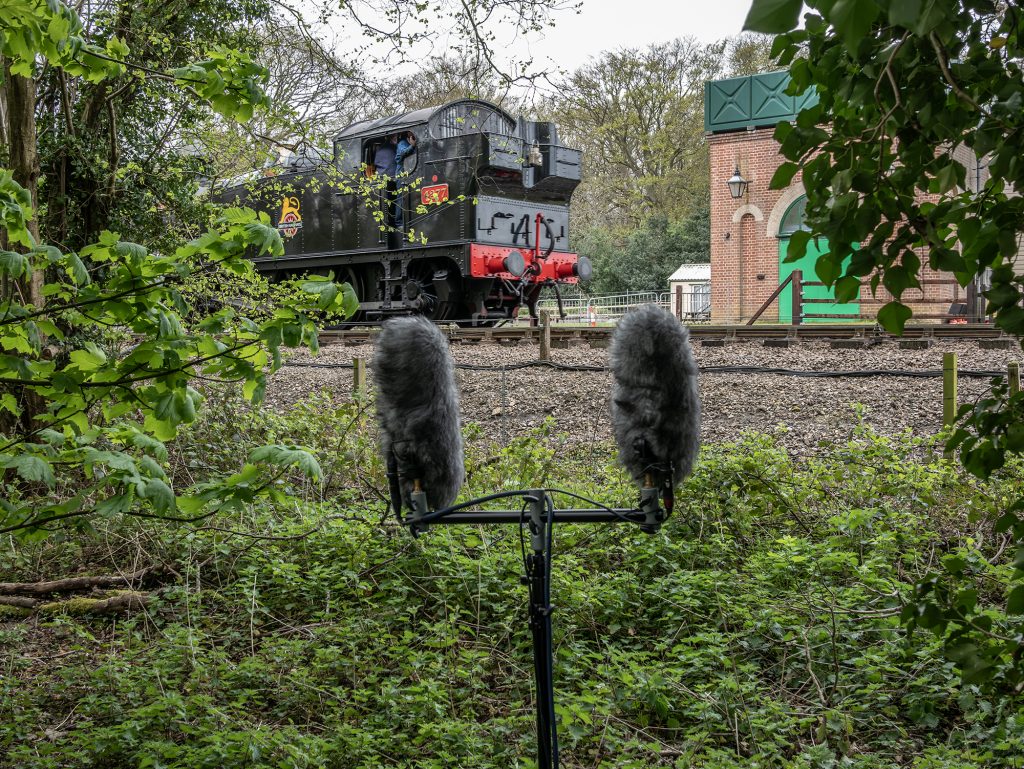
To me, it’s a virtue that the same or similar sound sources feature regularly in my tests, but perhaps that’s just a defense of my laziness! Anyway, here we go again with a passing steam train recording down at the North Norfolk Railway. This time, conscious of the DMS perspective, I set myself a bit further back from the track into a little bit of scraggy lineside woodland: not sure this makes much difference or indeed was necessary, but at least I wasn’t as visible to all and sundry for once! The DMS files have been rendered to XY stereo in Harpex-X,
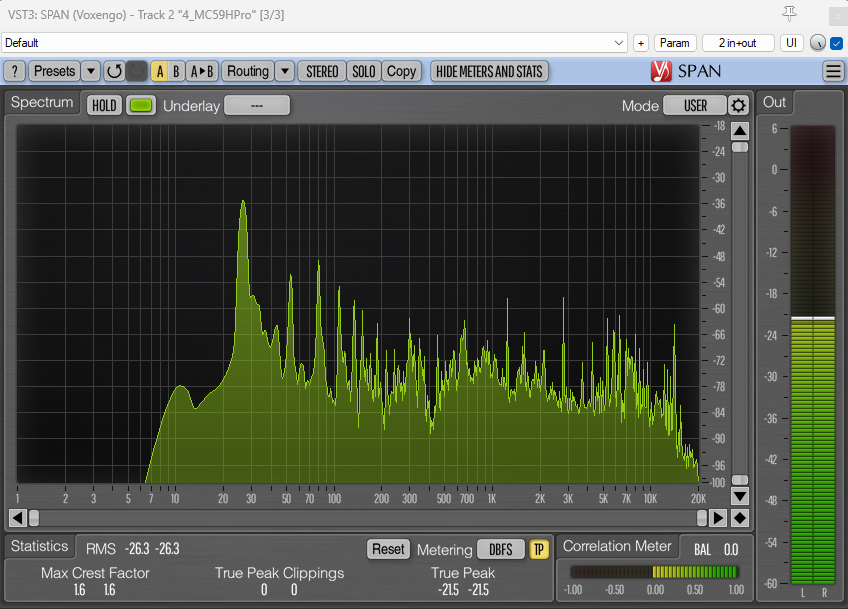
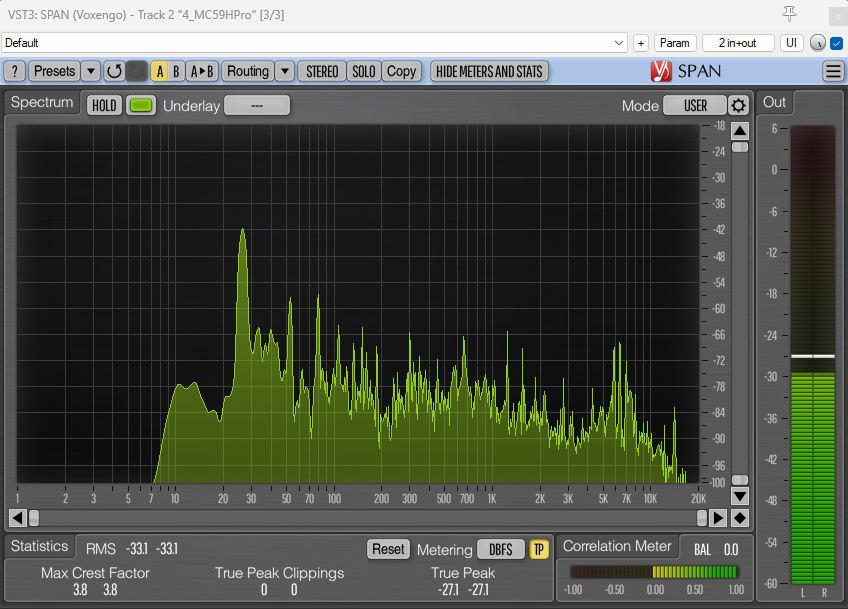
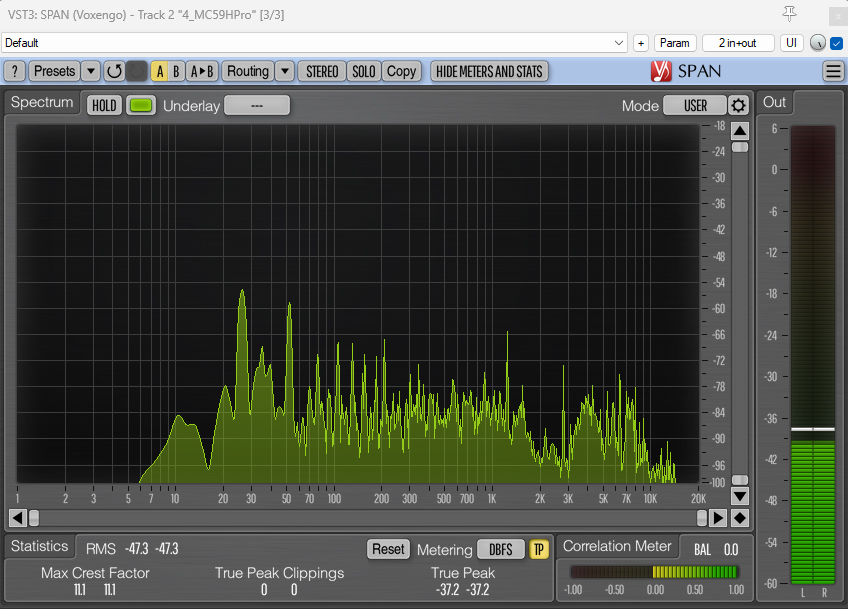
First up here is the Sennheiser MKH 800 Twin + MKH 8030 DMS recording:
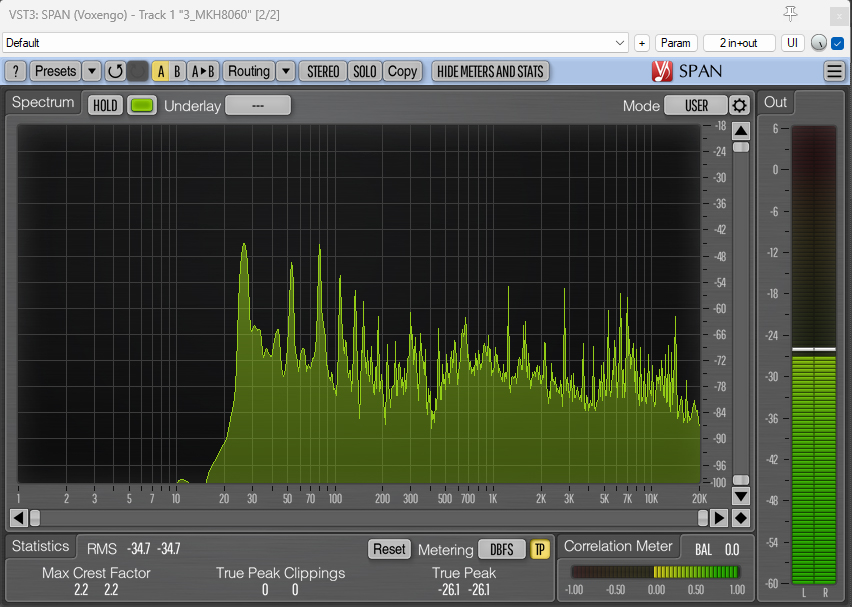
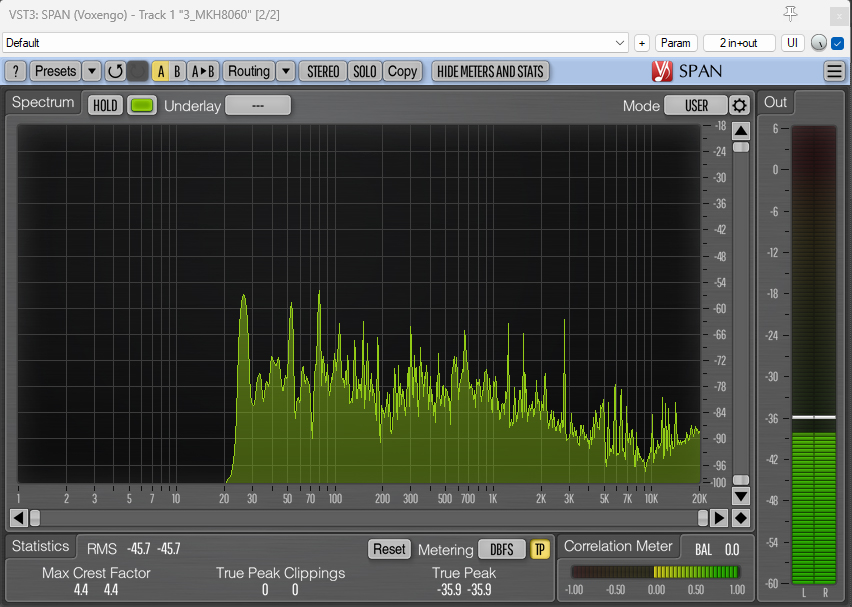
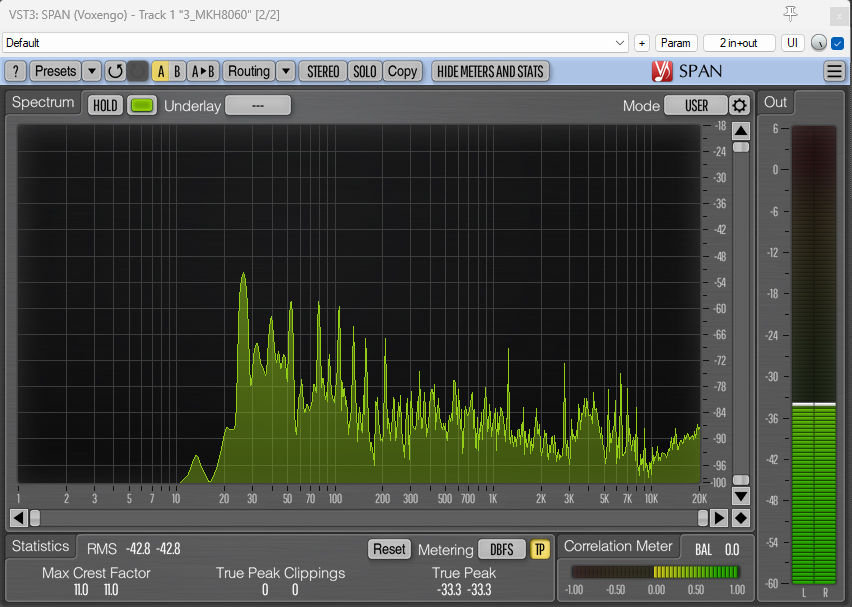
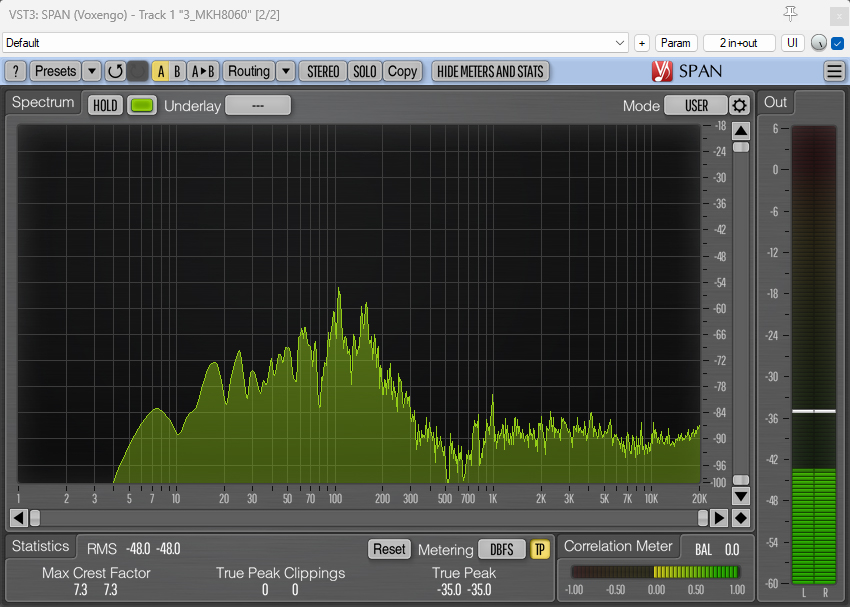
Next we have the Nevaton MC59 Twin + MC59/8 DMS recording:
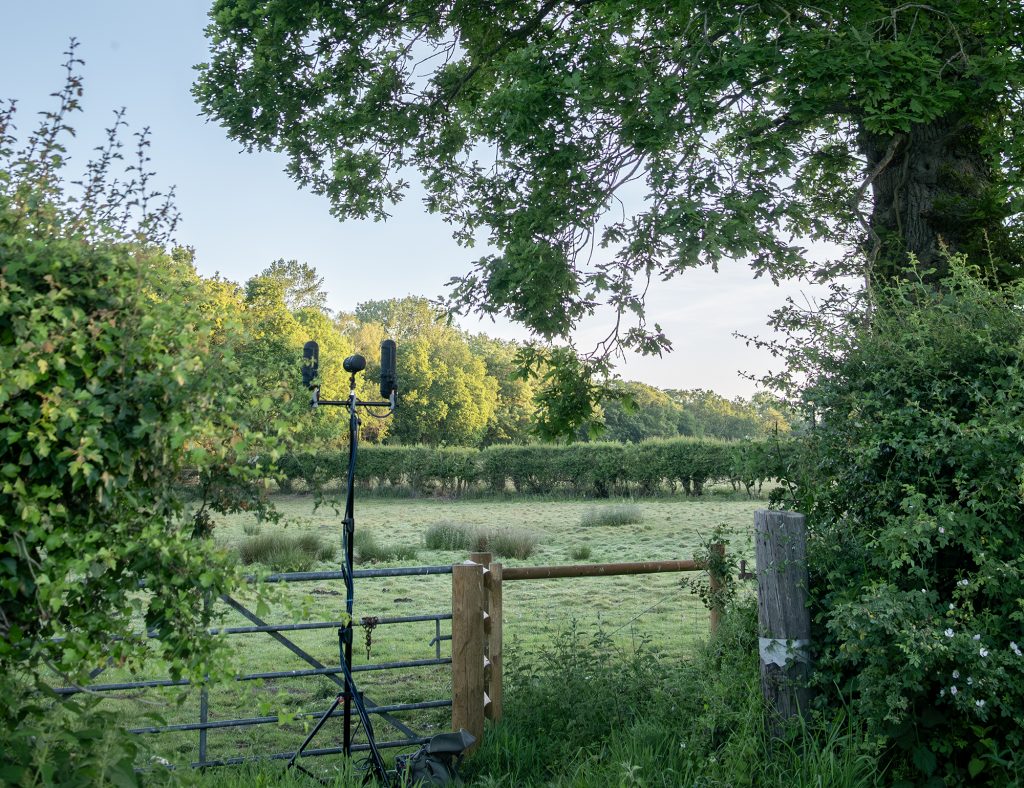
For a more subtle field recording, I got up at 3.45 a.m. (not my forte!) on the 30th of May, which was well before sunrise, did a little recording in the garden in this quiet Norfolk village, then wandered down the road, popping off into fields along my way. For this I took the Sennheiser MKH 800 Twin + MKH 8030 DMS rig, again along with the Nevaton equivalent (MC59 Twin + MC59/8), and, for a bit of fun (and I had two spare channels on the Sound Devices 788T) an MS pair: for this I chose one of my favourites – the Sennheiser MKH 8090 (wide cardioid) + MKH 8030 combination. It was a near windless morning, so I left the furs for the Mini-ALTOs at home and even, at a couple of points, recorded with the naked mics to no ill effect. In post I rolled of the lower frequencies with an 80Hz high-pass filter to remove a little bit of very distant and almost constant aeroplane noise. Here are some short clips of the recordings. For the two DMS ones I rendered to Blumlein stereo in Harpex-X, as this sounded nicest, although, needless to say, the rear lobes become reversed. Of course, the MS render to LR stereo with the wide-cardioid mid mic sounds rather different, but that is rather the point: it is instructive to compare the DMS setups to an alternative approach that one could well take – indeed, I would be very likely to – to a stereo end product. The three files each are a combination of five brief clips, separated by very short silences, and comprise:
i) in the village garden 15 minutes before sunrise (4:21 a.m.);
ii) in a field with the distant sound of a bird scarer firing twice, and a pheasant breaking cover nearby (4:46 a.m.);
iii) by a stream (actually, the exit of the stream from where it goes under a lane in a round pipe) (4:56 a.m.);
iv) the same as above, but with the windshields removed (5:02 a.m.);
v) in the middle of the traffic-free village street, with someone running past (OK, I will confess, it was me, but I was inspired by an early-morning runner who came past moments before, but, needless to say, chatted about what I was up to, so a rather literal re-run seemed better!) (5:28 a.m.).
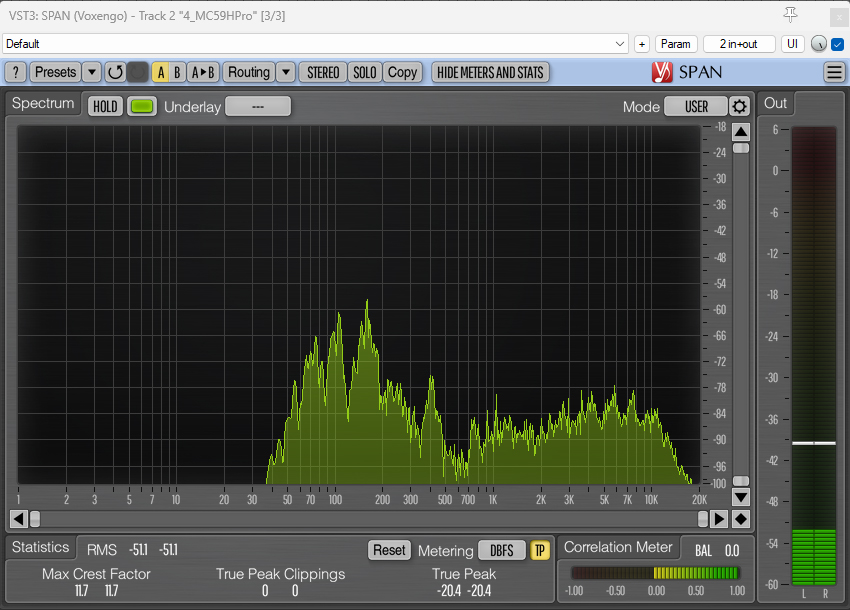
First up, here is the Sennheiser MKH 800 Twin + MKH 8030 DMS recording:
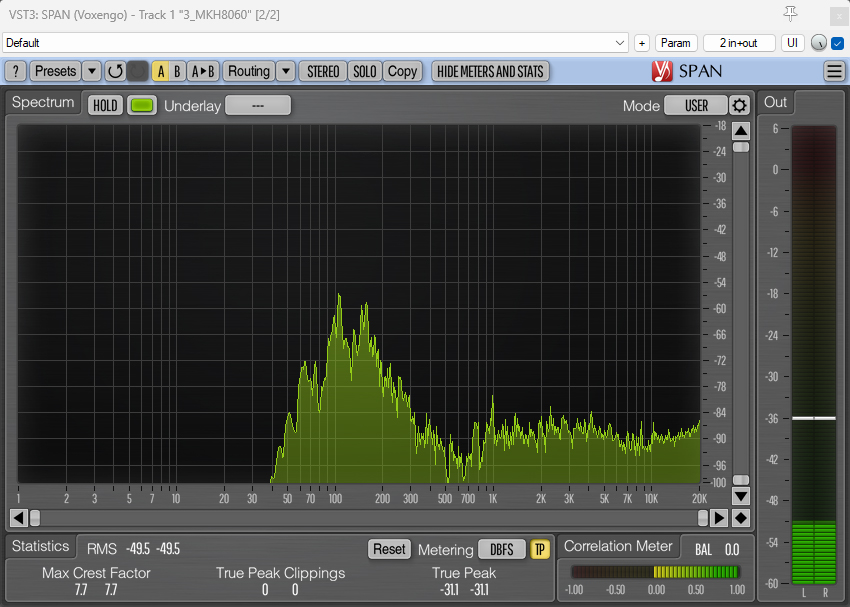
Next we have the Nevaton MC59 Twin + MC59/8 DMS recording:
And finally, here is the Sennheiser MKH 8090 + MKH 8030 MS recording:
A little bit of music
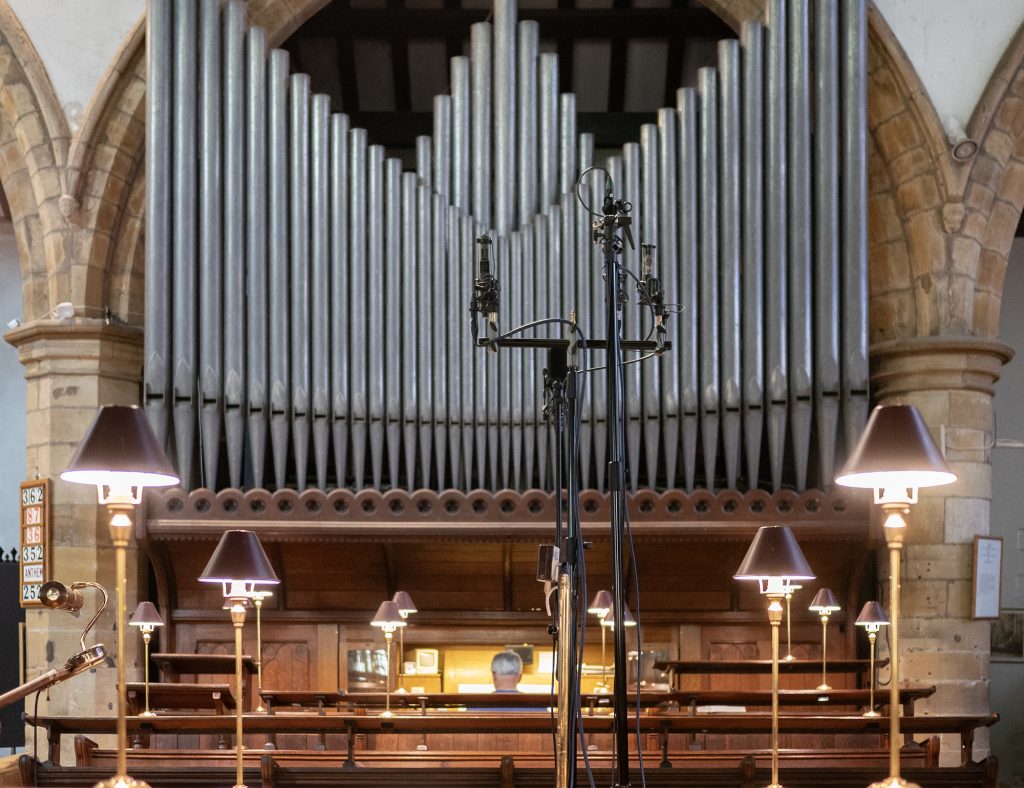
Well, I am conscious that this isn’t a field test sensu stricto with the MKH 800 Twin, but I thought that for some a bit of music would provide an informative test of the MKH 800 Twin and MKH 8030 combination. Added to which, an indoor music test provides some scope for comparing the pair vs others that are not so easy to take outdoors. So, in the midst of the May heatwave here, I popped along to the church of St Mary in Horsham (West Sussex) with my old pal Jake Purches. Instead of recording the organ, as he does for his organ-centric Base2 Music label, he played the organ for me (his love of organ recording has led him to start learning the instrument in his later 50s: a braver person than me, but, aside from the pleasure, without doubt it helps with his recording and editing work) and, also, brought along an additional pair of MKH 800 Twins and a Soundfield ST250 so that we could broaden the comparisons. Rather than bung all the mics up at once – and have a very wide spread of mic positions – I recorded three rigs at a time. The rather nice Willis organ is about to undergo restoration, so, needless to say, the instrument is significantly hissy at present (doubtless the air leaks will disappear during the restoration): so, for those unfamiliar with pipe organs, don’t think it is mic self-noise!
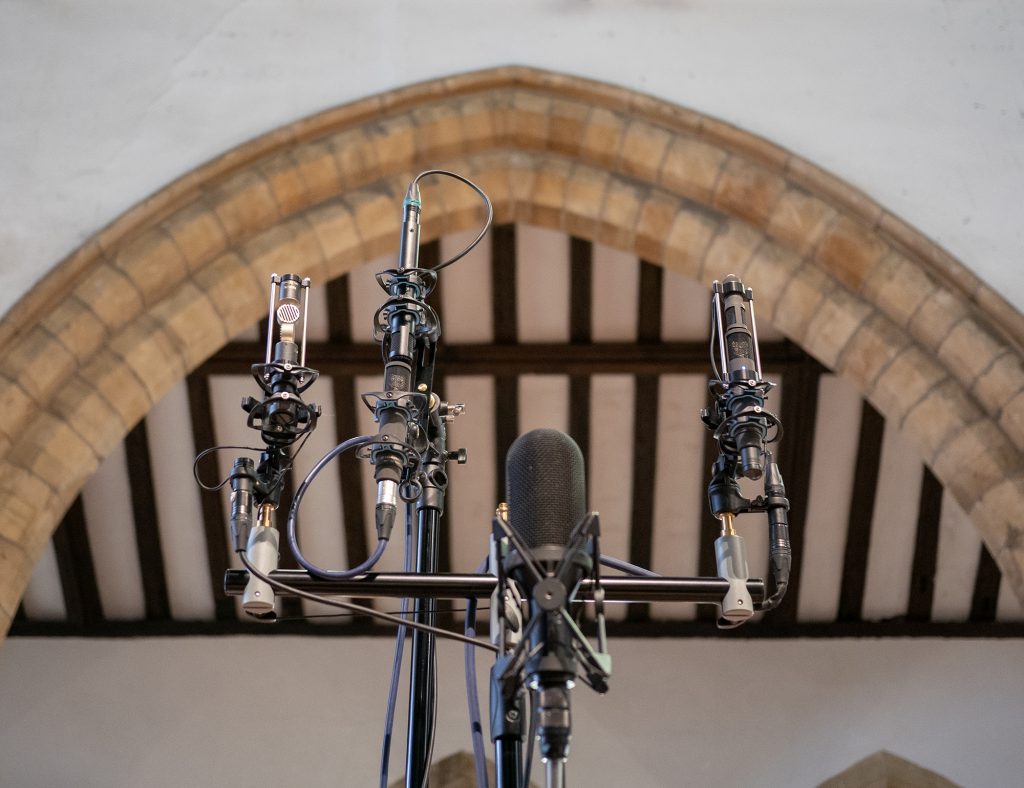
First up, is a comparison of DMS with an MKH 800 Twin + MKH 8030 vs an MKH 800 Twin + MKH 30. Here, I have rendered them to a stereo Blumlein pair using Harpex X:
As you would expect the difference is subtle, since only the fig 8s differ. But, from the same take, the rendering to a Blumlein pair of the Soundfield ST250 (thanks to Jake: I am not familiar with use or processing of the ST250) is rather different, again as – indeed perhaps more than – you would expect. There’s certainly a lot more high-frequency emphasis than was actually the case with the organ (i.e. the Sennheisers and Nevatons are not oddly muffled!).
Reverting to comparing the Sennheiser and Nevaton twins, next up is a different take, which is a DMS comparison of the MKH 800 Twin + MKH 8030 vs the Nevation MC59 Twin + MC59/8, rendered to a Blumlein stereo pair:
And, finally, and in another take, as we had multiple MKH 800 Twins, here is a DMS comparison of two MKH 800 Twins vs the Nevation MC59 Twin + MC59/8, again rendered to a Blumlein stereo pair:
Obviously it is a bit tricky for anyone not there to compare the mics, especially with regard to the rather different frequency responses, and with different mic comparisons across the three rather different sounding takes: the comparisons are really valid only within the same take (so I have left the take number prefixes – T173, T174 and T175 – in the file names for the avoidance of doubt). But, nonetheless, they may be useful to some: they were to me!
Conclusions
Above all, these tests demonstrate that it is entirely practical to use an MKH 800 Twin in the field and, with some very basic adaptations, it can be utilized as part of a DMS rig within a modest-sized commercially available windshield: in this demonstration, the fairly compact Radius Windshields Mini-ALTO 250 and the Rycote Nano Shield NS4-DB. The key to this is the relatively new MKH 8030 fig 8 mic which, when used with an MZL connector (especially a customized version of this), is so much smaller than the older MKH 30 or, indeed, a second MKH 800 Twin. The pairing not only means the rig is sufficiently compact for most forms of field recording, but also gives a DMS set up where the forward and rearward-facing mid mics are not opposing end-fire SDCs: the cardioids are not heavily shadowed by mic bodies and suspensions. Perhaps because the MKH 8030 is so new compared to most of its MKH 8000 siblings, and perhaps since it takes a (very modest) bit of ingenuity to rig it with the MKH 800 Twin for DMS, the combination seems to have been little utilized: added to that, DMS is, of course, a less-used technique than MS or other – stereo – approaches. Of course, vertical rigging of a twin mic for DMS isn’t suited to all outdoor use: for example, those using DMS for production sound, where it is often used as an adjunct to a forward-facing shotgun mic (for, say, capturing pristine mono dialogue), would find this impractical. But that still leaves considerable scope for field recording, including sound effects recording, where the MKH 800 Twin + MKH 8030 would be very effective.
While for some the MKH 30 fig 8 remains preferable to the MKH 8030, the reality is that they are not hugely different and, consequently, the differences between them when combined with the MKH 800 Twin for DMS are subtle to say the least. Moreover, the design of the MKH 800 Twin – with its extended high-frequency range – is more consistent with the MKH 8030 than the MKH 30. I certainly don’t think I am losing anything by using the MKH 8030 within the DMS rig vs the MKH 30, and, of course, the shorter mic is so much more practical for this usage. Both Sennheiser fig 8s appear preferable (sound-wise) to using a second MKH 800 Twin for DMS: this should not be a surprise, perhaps, given the single diaphragms of the MKH 8030 and MKH 30 vs the double-capsule design of the MKH 800 Twin. Which, of course, brings us to the comparison with the Nevatons, where the MC59 Twin, obviously, has a dual-capsule design, but so also does the MC59/8 fig 8: and yet they hold up so well in the comparisons. Ultimately, however, whatever the pros and cons of these two twin-based DMS rigs – and such things are often a matter of taste and practical requirements – both are excellent options, and, while not achieving something quite as compact, even diehard Sennheiser MKH aficionados should be grateful to the Nevatons for inspiring me to rig and test something very similar for a DMS field-recording rig with the MKH 800 Twin! And talking of inspiration, let’s hope that more manage to get the MKH 800 Twin out into the field.