Introduction
I’m not one normally obsessed by small sound recording kit, as my development of over-sized TIG-welded windshields attests. But just occasionally, I fancy some sound-recording kit that is ultra-compact and by that I mean even smaller than my Radius Windshields Mini-ALTO 115 and Sound Devices MixPre-3 combination: something that involves no tripod or stand or indeed anything as large as even this smallest of basket windshields. Now some use handheld recorders for such purposes, but since my Sony M10 died, I haven’t felt the urge to replace it with a recorder with inbuilt mics: I invariably used the Sony M10 with external mics (its internal mics being a pair of closely spaced omnis, which were of little use for stereo) and, doubtless unfairly, can’t get enthusiastic about the current crop of handheld recorders with inbuilt mics. Indeed, some of these are hardly that small – the Zoom H5 Studio and its ilk come to mind. Others will have different approaches and preferences, in many cases well-established and more thoroughly thought through: for them this blog-post will be a pointless read! But perhaps something here will resonate with the odd reader and, at least, give them food for thought for their own different and doubtless better solutions. Besides, it’s just a bit of fun!
Criteria
When putting together a mini travel sound-recording kit, it’s important to be clear as to what matters, especially if you have a stack of gear that is all crying out ‘take me’! My criteria for my latest travel kit – a trip from the UK by Eurostar/TGV to Avignon with my wife for a significant birthday – were as follows:
• small size of kit (obvious)
• discreet recording capability, for two reasons: a) to be able to make recordings without being obtrusive and b) not to turn a holiday into a sound-recording trip.
• simplicity: I didn’t want to be fiddling around with setting up etc., so that rather ties into the point above about being discreet, but also has to do with not holding things up.
• reasonable sound quality, a decent stereo field, no handling noise, wind protection, and low mic self-noise, so that the recordings are listenable.
• cheapness: when travelling for non-sound recording purposes, I don’t want to be worrying about expensive recorders and mics, any more than I want to be worrying about expensive cameras
Now looking at some of my kit, such as the well-used the MixPre-3, the new dinky little Nevaton MC59uS/C2 cardioids, or even a little MS rig in a Mini-ALTO 115, there are some appealing options that meet some, but far from all, of these criteria: it’s crucial to ignore such temptations! Well at least I thought so beforehand. Anyway, here’s what I chose:
Mics
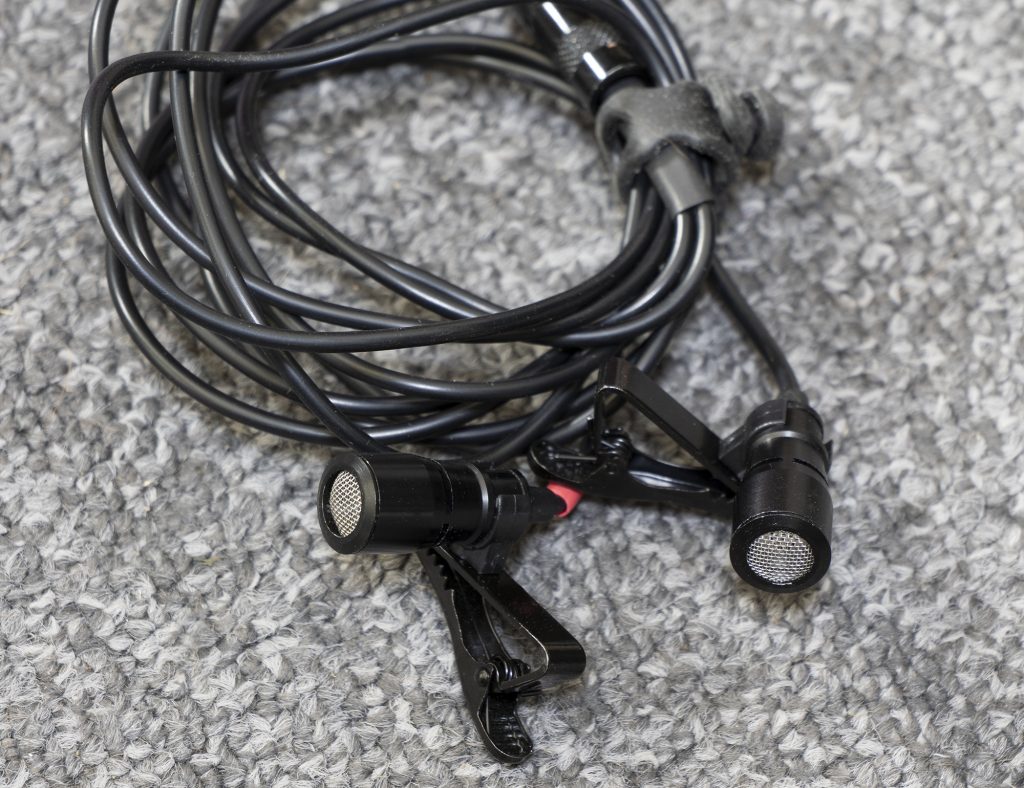
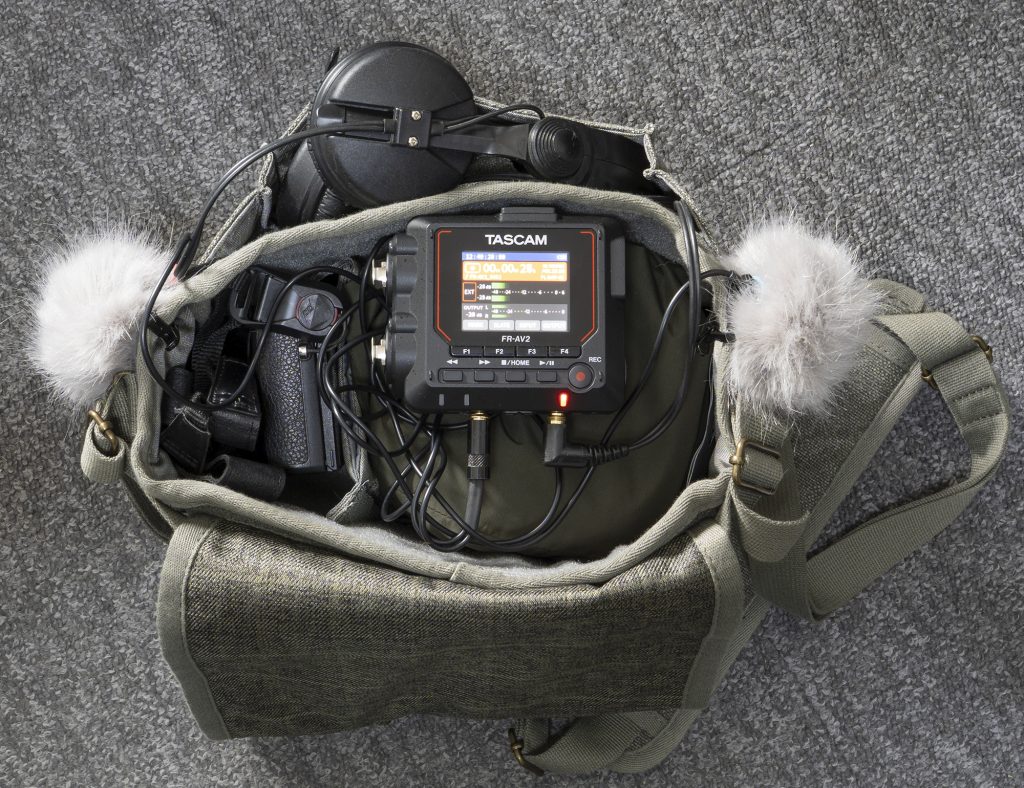
Small mics using the Primo EM172 and EM272 (or, even, AOM-5024L-HD-R) 10mm diameter omni capsules are much beloved by field recordists, either DIYing their own or buying them from the various small-scale manufacturers that assemble them ready made, such as FEL Communications Ltd (Micboosters) in the UK, LOM in Slovakia, Oaka Instruments in the UK, and Earsight in France (which I have tested previously). In my case, I chose a pair of the Clippy mics made by FEL/Micboosters, who also sell capsules and other parts for DIY, for the good reason that I have them. The Clippy mics are also the smallest of the options, though I am not certain that the recessed capsule position means that they are the best sounding: one to test perhaps? The Clippy mics I have are a pair with the earlier EM172 capsule, which I prefer (this capsule doesn’t have the RFI issues that affect the Primo EM272 capsules, although FEL/Micboosters (run by the extremely responsive and helpful Nick Roast, who has been a BBC sound engineer for over 30 years) now offer an EM272 option that apparently doesn’t have the issue. LOM, Oaka Instruments and Earsight are less explicit as to what capsules they use, which is disappointing and perplexing, and, of course, creates uncertainty as to exactly which model capsule is being used in the mics you are thinking of buying. I went for my 3.5mm PIP pair rather than an XLR P48 pair, in the interest of compactness. They are cheap as chips if you DIY (and you can make housings that best suit your usage), but are hardly expensive if you buy them ready assembled: a stereo pair of Clippy mics using the new low-RFI EM272M capsule costs £111.48.
Windshields
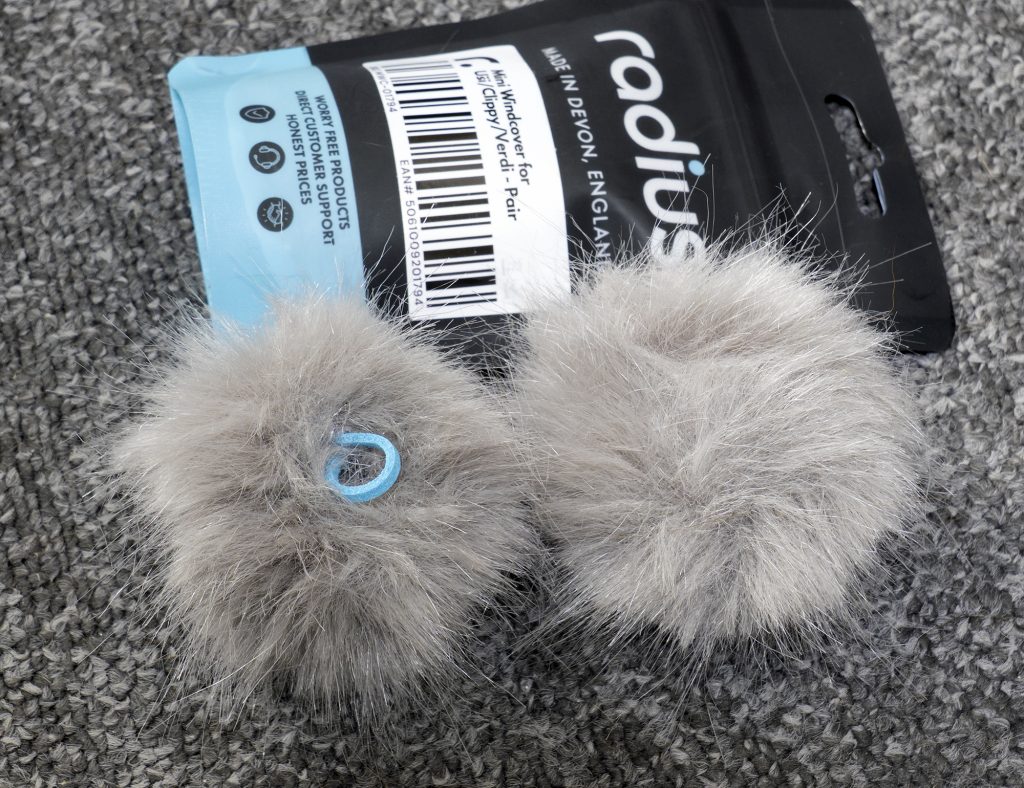
Getting furry windshields for such small mics is no trouble. In the past I have used Rycote ones made specifically for the Clippy mics, but these had separate foams inside which either got easily lost, or ended up rather squashed over time. So I have been pleased to see that Radius Windshields have made neat little fur windcovers with in-built foams and handy loops that stop the furs getting lost. Simon Davies kindly arranged for a couple of pairs to be sent in readiness for my trip, and they proved fine for modest breezes (naturally, there are limits to what such small windcovers can do, even for omni mics): I would heartily recommend the Mini Windcovers for EM172/272 capsuled mics.
Recorder
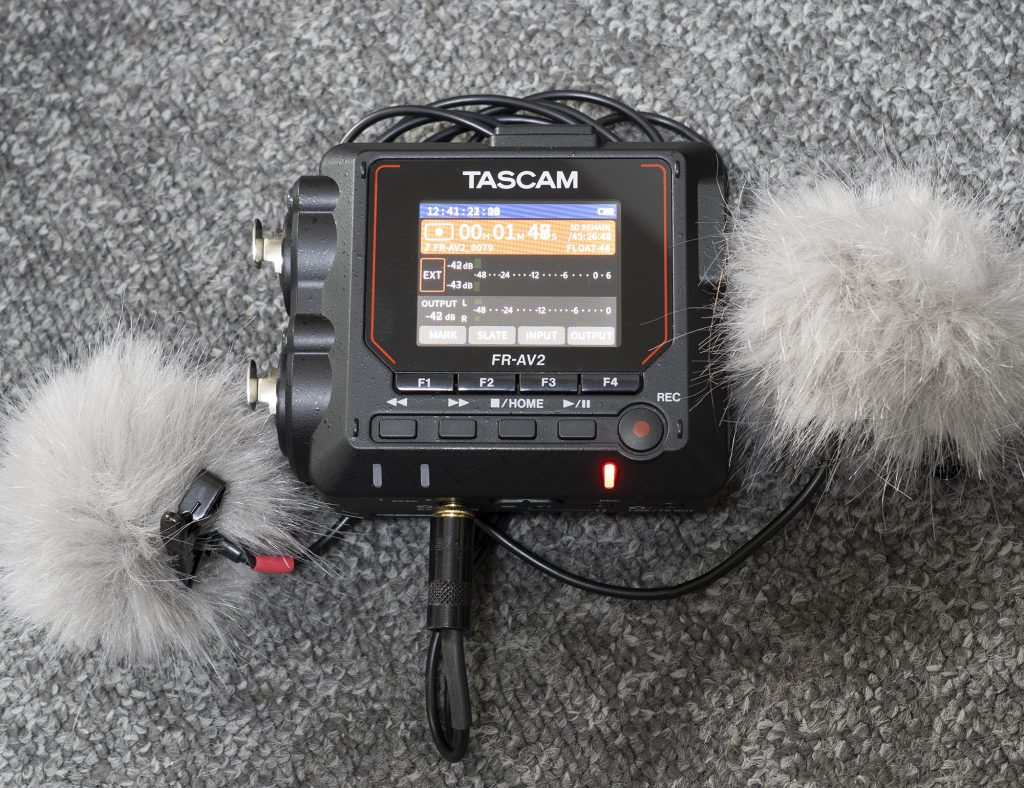
As per my recent post, I was intrigued by the little Tascam FR-AV2 for its potential for those rare occasions when I want to go ultra compact, so bought one a month or two ago for this very purpose. For my thoughts on the recorder and, more specifically, its functionality as an example of the current crop of 32-bit float dual-ADC recorders, then do look back at that blog post from last month. For this present post, the key factors are that it is significantly smaller than the already tiny MIxPre-3; it is frugal with power consumption (so reduces power supply related bulk: I just took a spare set of fully charged Eneloop Pro AAs, and didn’t even need them); has a decent PIP mic input (i.e. including a 5V option, which better suits the Primo capsules than a lower voltage: incidentally, the PIP preamps on the FR-AV2 sound better than the PIP inputs on the MixPre-3, which are not a great strength of these Sound Devices recorders); and is relatively cheap (I paid £318 at CVP).
Headphones
Normally headphones are fine for sound recording, but they don’t really fit into the criteria above too well. Obviously, more people wear full headphones in public for listening to music nowadays, but there is something very different about how you look when wearing headphones and recording: perhaps it’s the standing still and the evident concentration? Whatever, it certainly draws attention to the fact that you are recording. Or perhaps that is just unnecessary self-consciousness? Now earbuds would be more discreet, of course, but from time to time I buy a set and, yet again, discover that I really don’t get on with them (they refuse to stay in my ears!), and then pass them on very quickly to one of the offspring. Perhaps I have weird ears, or perhaps should just splash out and get some properly moulded bespoke ones to fit. Anyway, for this trip, I packed a pair of Sennheiser HD-25s (my standard cans for recording), and decided to mostly record – as nothing was remotely critical – without anything if in a public area. It goes against the grain, but needs must!
Bag
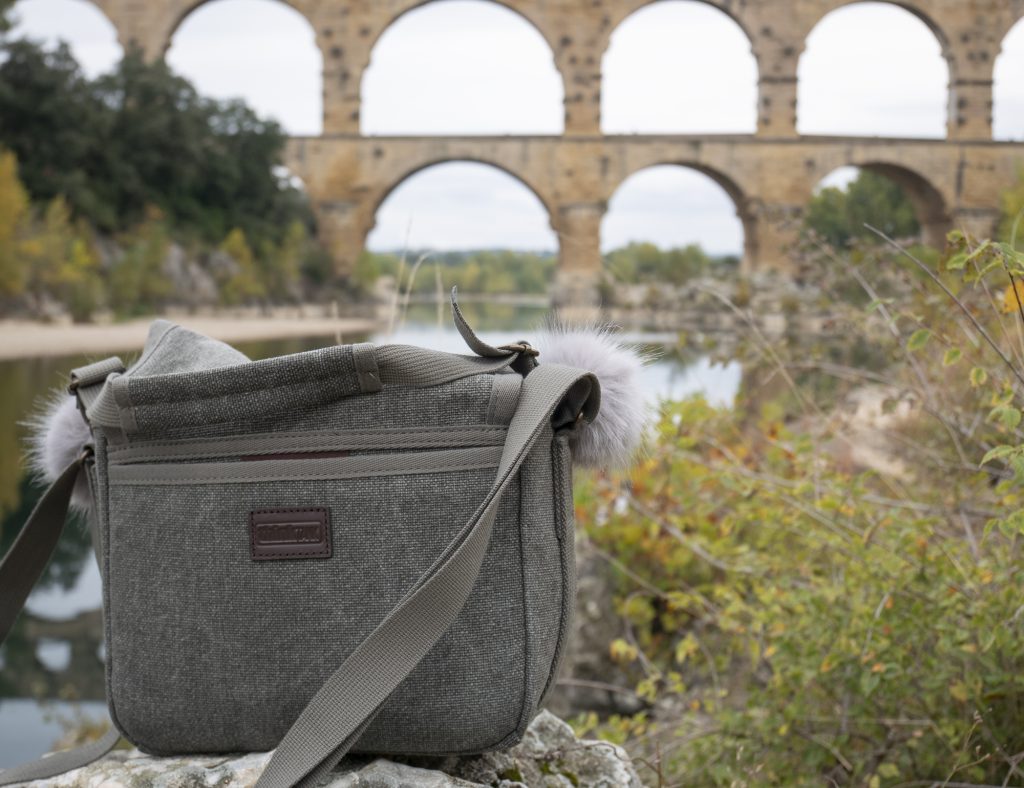
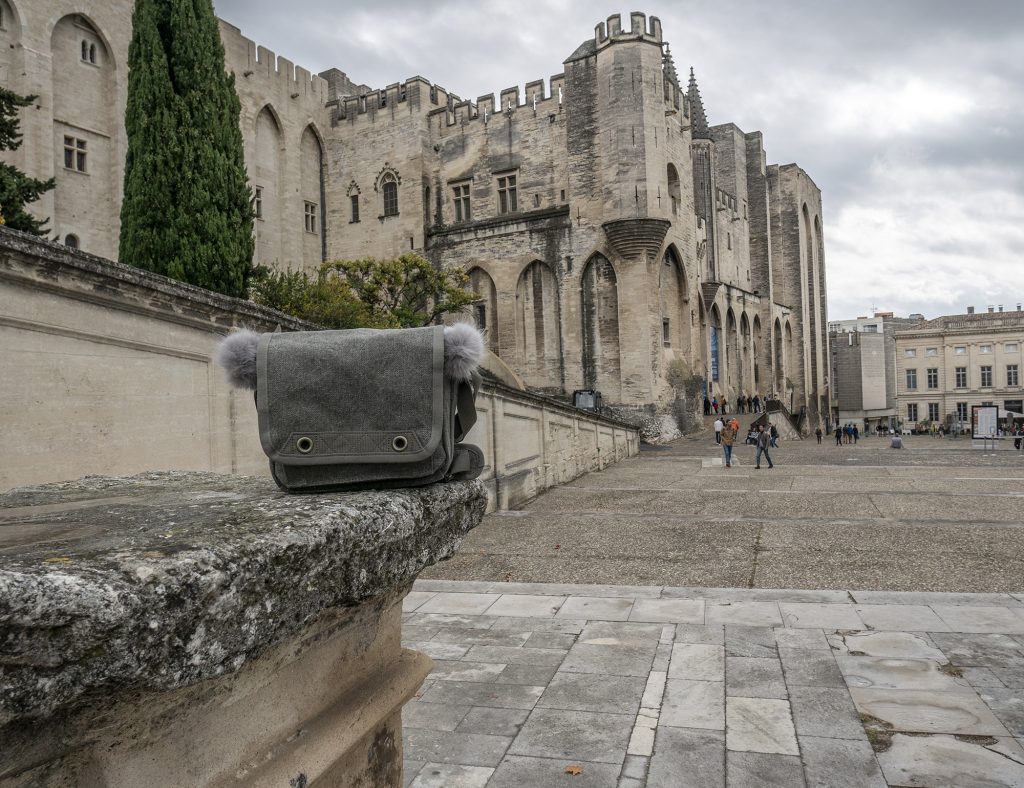
What, you might wonder, am I doing with a bag if going minimal when the kit listed above is pocketable? Well, there is a logic to this. A pair of small mics like the Clippies, which (surprise, surprise!) have clips for attaching to things like lav mics, need to be mounted in some fashion. Now you can mount them on your specs or hat if you don’t mind looking like a total prat and are happy with the inevitable handling noise or the odd change of perspective when you move your head, or you can mount them on something. If in nature, you might find a handy tree and tie them either side of its trunk for the much-loved ‘tree ear’ solution, but handy and willing trees popping up whenever I wanted in a mainly urban context seemed extraordinarily unlikely, so I went for a shoulder bag: this allows mounting mics either side of the bag, which is fairly discreet (especially if the furry windcovers are roughly colour matched), and for recording either standing still or, better, putting the bag down on a handy wall etc. or just on the ground. And, of course, a bag was useful for other things when travelling, not least for the light rain jacket I needed on hand (Provence in October was warm, but far from consistently dry). As for what bag, well I’ve long been a lover of the pinestone coloured canvas ThinkTank Retrospective bags, but wanting something smaller than the models I already had, I picked up the baby of the family – the Retrospective 4 v2.0: £88 from Camera World. This allowed mounting the clips either side: only a modest 260mm apart, but gubbins inside the bag helps with the effectiveness of the spaced pair. And, while my wife looked askance at the two little fur windcovers either side of the bag, I don’t think anyone else noticed: well, I like to think that was the case. Besides, it was more subtle than me doing a dance on the Pont d’Avignon to satisfy the demands of family and friends back in Blighty…
In the field
Well, there’s not a great deal to add except to include a few snippets of recordings from the jaunt, plus a few photos of the rig in the field.
First off, here’s a short clip from recording with the travel rig placed on a wall in the Place des Palais, as in the above photo:
Sticking with the Place des Palais, here’s a second clip of a recording, this time about 100m to the south, adjacent to an outdoor (but covered) restaurant area, with the bag with the mics carried on my shoulder (I remained standing still during the recording):
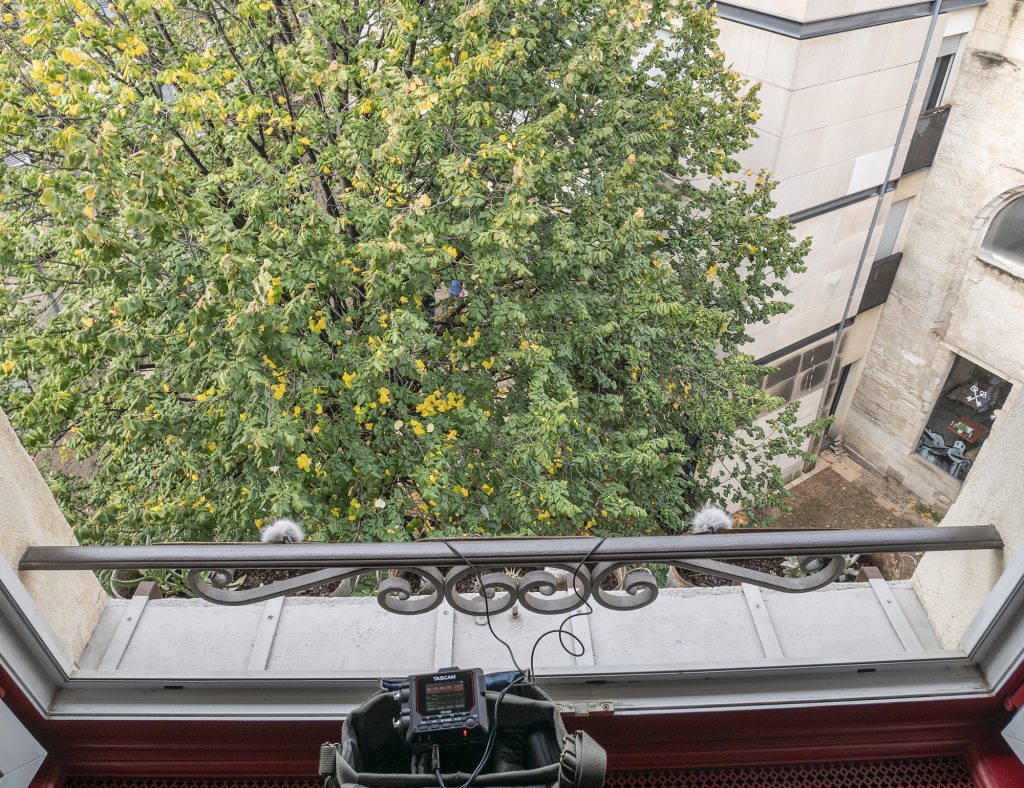
Here freeing the Clippy mics from the narrow spacing of the shoulder bag (see photo above) was only partially successful: there isn’t much going on in the street below, and when the wind picks up towards the end of the clip, you can hear how the mics are overloaded. The Mini Windcovers did a good job most of the time, but there are limits, of course: if there weren’t, none of us would bother with full basket windshields!

The remaining water wheels – of which there were previously so many more – for the numerous former dye works of the Rue des Teinturiers produce an enchanting sound, of the water passing through and the clanking of the wheels (especially the noise from the shackles that hold the wooden blades to the iron wheels). Here, again, the rig is perched on a wall.
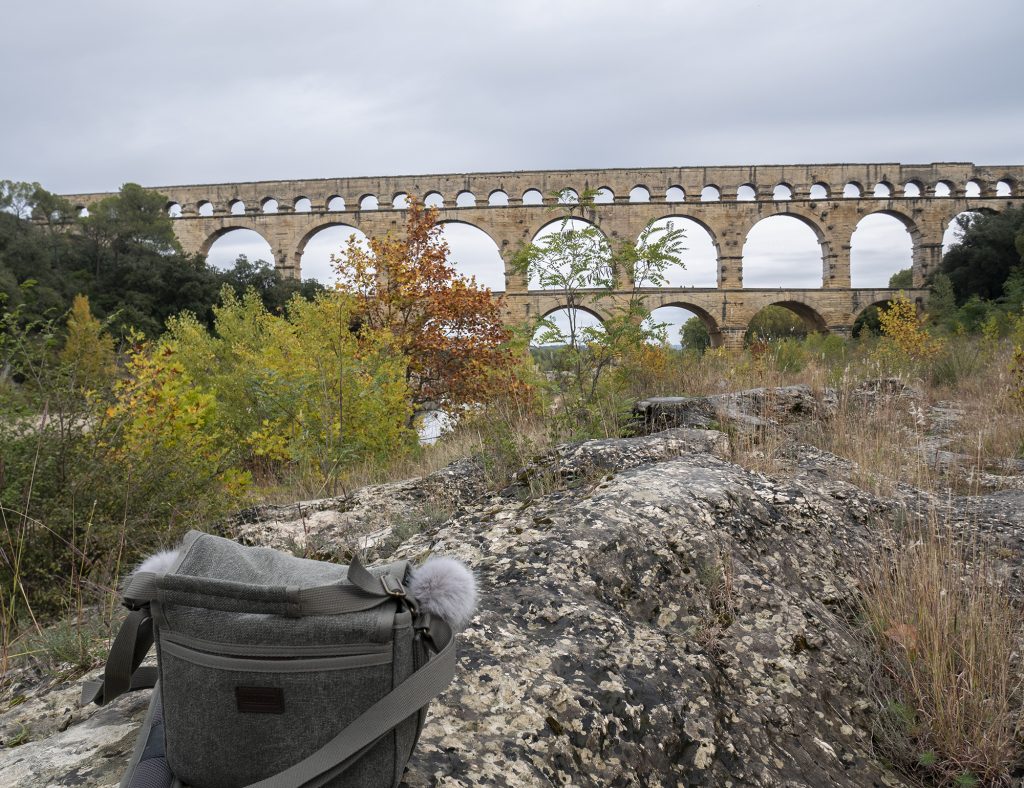
Although it was 1 p.m. when we arrived at the famous Roman aqueduct of Pont du Gard, near Avignon, there were few people about. I guess that’s October for you. A wonderful place to visit, not least finding continuations of the aqueduct well away from the main structure. Oh, sorry – back to the recording: well, the lack of people was rather matched by the lack of wildlife at that time of the year and day, so here’s a recording down by the river with the rig set as shown in the photo above. There’s a bit of distant birdsong and a distinct boom and echo at one point, which I assume was an explosion in a quarry in the vicinity.
Conclusions
There’s nothing profound and universal to conclude. The kit all performed as expected, and the sound is OK(ish). It delivered the discreet and quick to use side of things fine. Even the weird lack of monitoring wasn’t as terrible as I feared. Sure, a wider spacing of the omnis would have helped, but really the mics, polar pattern and modest wind protection were all just as limiting. None of the sound samples are very interesting or, for me, would really merit recording with care except, perhaps, the water wheels on Rue des Teinturiers: and for that a key improvement would be to record with far less ambient noise (say in the middle of the night) as well as with a better rig. So these, and the other files I recorded, are little snapshots: the unexceptional audio equivalent of a typically unexceptional holiday photograph taken with a phone or compact camera. A handheld recorder would have been a good, perhaps better, alternative if such a device had appealed to me, but at least the FR-AV2 can function well with better mics and set ups (perhaps I should even get around to trying it for a drop rig?). So, at a personal level, the main thing I drew from it is that such casual, hasty and unfocused sound recording, juggled around travel for other purposes, is very divorced from that which I usually do, where mics and rigs are carefully thought through, and where, often, I retrace my steps to locations again and again in much the same way as a landscape photographer returns to the same spot, trying to best capture the scene. Would I bother again with a compact holiday sound kit? Sure, but perhaps where the soundscape is likely to be more intriguing and where audio snapshots might have more of a resonance in the future. And would I change the travel kit in any way? Well, I really do think my tiny Mini-ALTO 115 MS rig would be the answer (it would still fit in the little ThinkTank bag), even if more conspicuous, used, I’d have thought, with a micro tripod that could double as a pistol grip. I suspect, though, that this might go down rather less well with any travel companion(s). And, of course, would rather defeat the idea of cheap and cheerful. Hmm. Well, food for thought. When and if I get a chance to try something different – perhaps in the warmth of next summer – I’ll revisit this subject.
Meanwhile, rest assured, it’s back to usual field-recording here for me with heavier gear: just off to test a pair of Mega-Blimps each on its own tripod, and one with a new 3D-Tex inner jacket…


