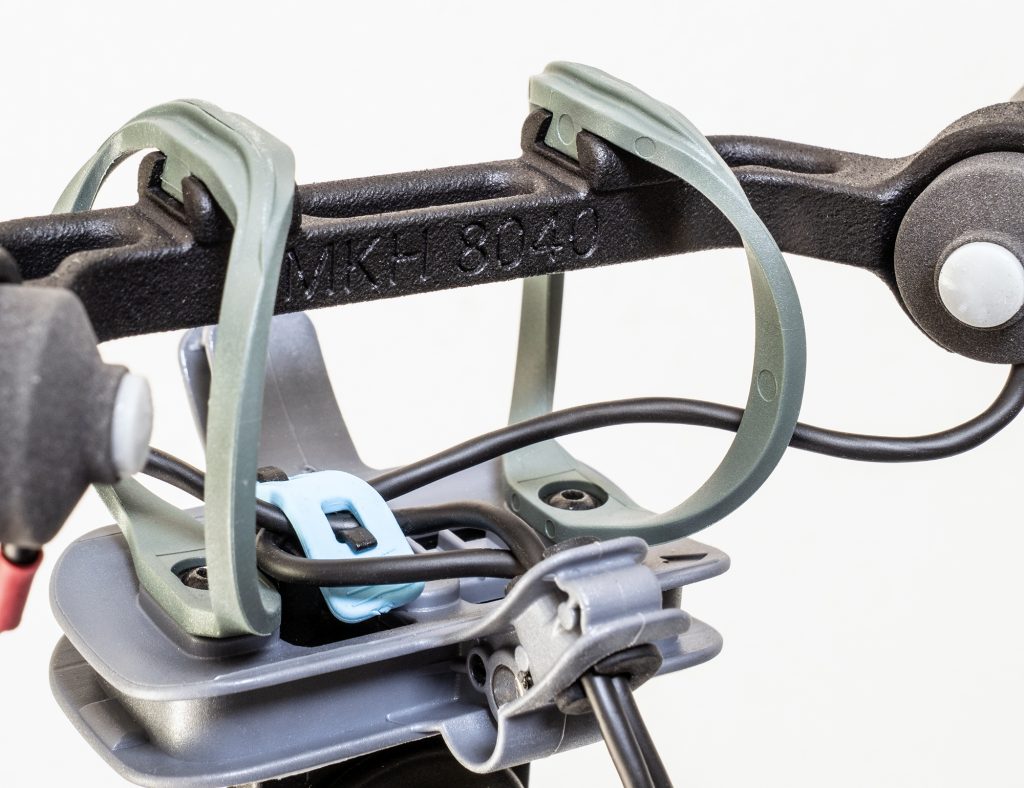
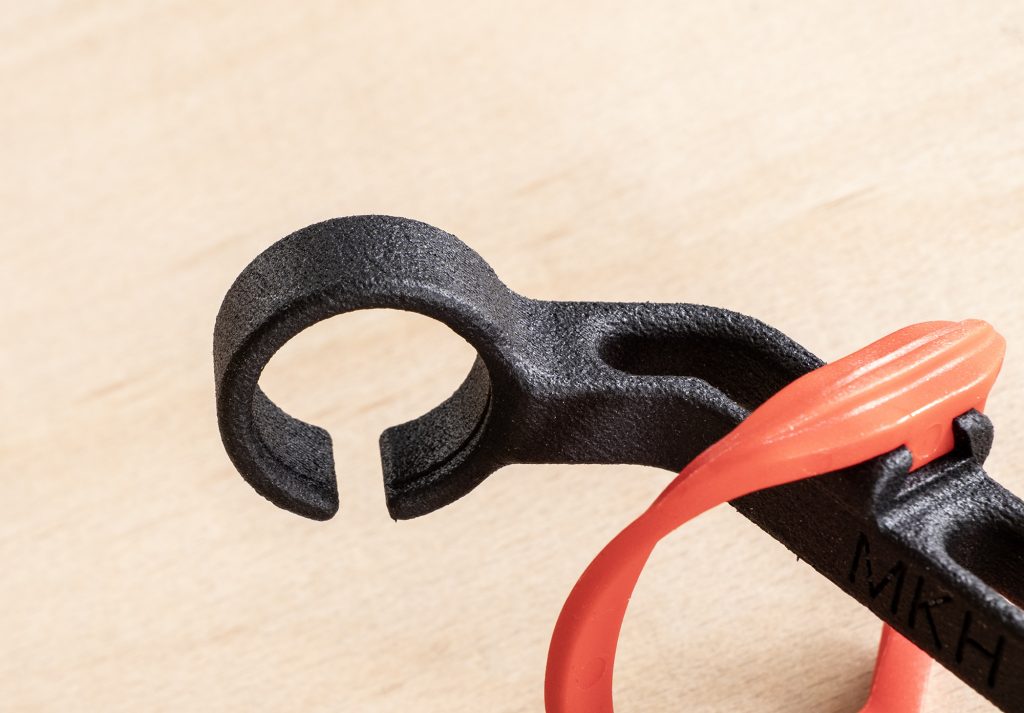
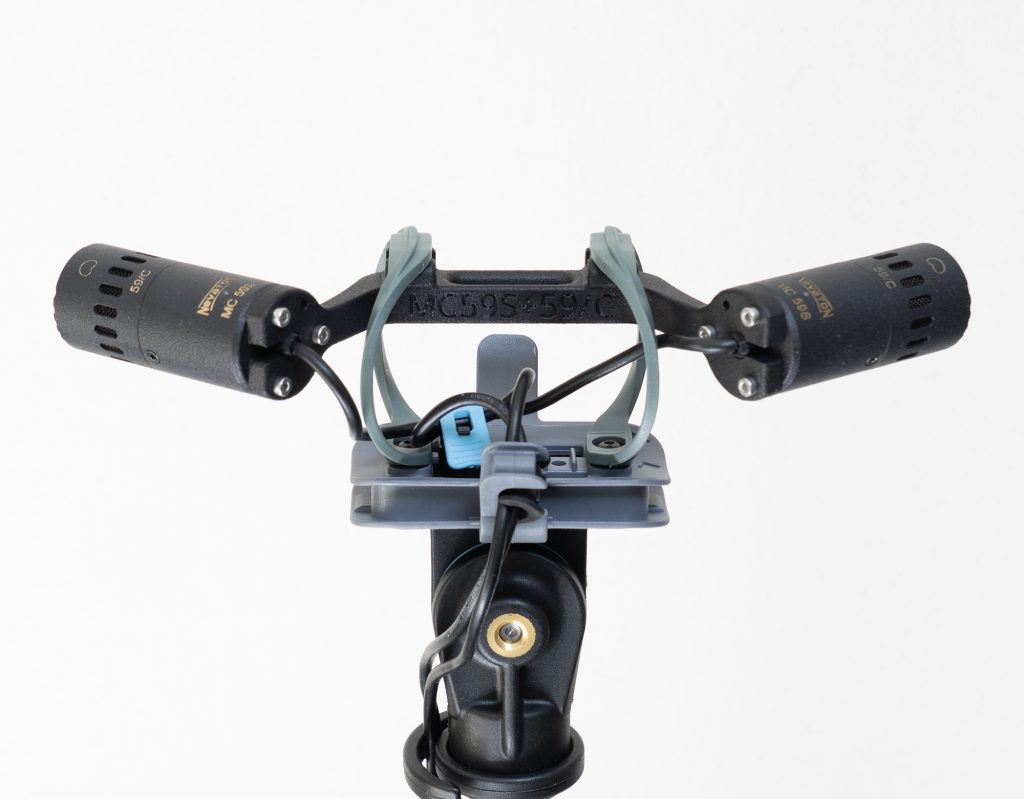
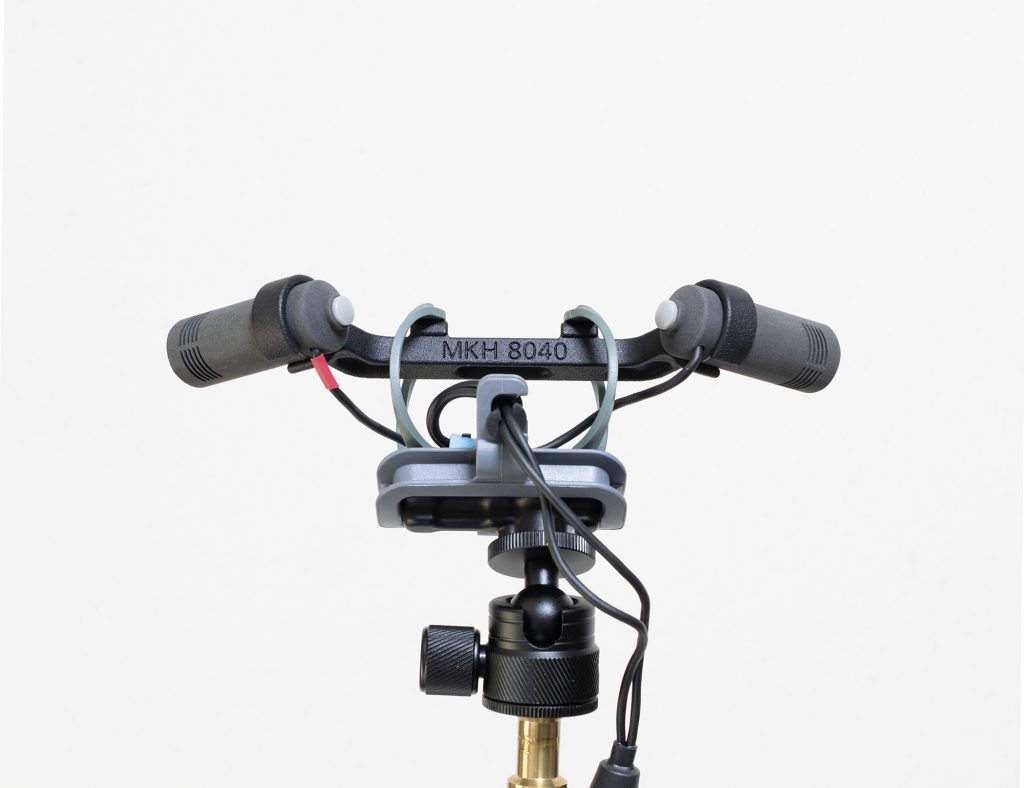
Close-up of the new Radius Mini-RAD hoops showing dovetail connection to a new MJF-printed ORTF bar for the Mini-ALTO (in this case for the MKH 8040).
Introduction
Last year I wrote a three-part series on fitting an ORTF pair in the diminutive 80mm diameter Mini-ALTO from Radius Windshields. This was, as I described, a (non-commercial) challenge from John and Simon at Radius, and I made the task a little trickier for myself by keeping the capsules of the mics on the centre-line of the windshield: too often people squeeze ORTF pairs into windshields with the capsules right against the basket, with consequent impact on wind protection. The result, as readers may recall, was a series of designs for some suitably short mics: the small cardioids I found that fitted properly were limited to the Schoeps CMC 1 KV + MK4, the DPA 4011 + MMP-GS or MMP-ES preamp, the Nevaton MC 59S + 59/C, and the Sennheiser MKH 8040. The first three are hard-wired and, crucially, avoid the projection of connectors, while the Sennheiser needs a custom MZL connector to become short enough to fit. Since then, I have added the new Nevaton MC59uS + C2 combination, which, with a length of 23.5mm, is unbelievably short for a cardioid mic.
In an update to part 3 of the original series on the ORTF in a Mini-ALTO project, I added that Radius Windshields had introduced an ORTF add-on kit with the necessary symmetrical pods (each 90mm) and fur to fit, and that Ed at ETK Cables was producing Y-cables with the customized MZLs necessary for the MKH 8040 version. I also posted links to (freely available) parts for 3d printing so that readers could make their own mounts, and I have had some feedback from those that have done this. Obviously, refinement of the mounts and turning them from homely 3d prints to injection-moulded parts would have been great, but, needless to say, ORTF in a Mini-ALTO is a tiny potential market for Radius Windshields – not least given that the necessary mics are, for the most part, relatively unusual: only the MKH 8040 is what one might call a ‘mainstream’ cardioid used in field recording and, indeed, it is this for which I have seen most interest (as gathered from feedback by those DIY-ing their mounts from my 3d files).
So the project could well have rested there, except for two things: first, I have been experimenting with getting Multi Jet Fusion (MJF) 3d prints made for me; and, second, the advent of the new Mini-RAD hoops got me thinking about revision of the ORTF in a Mini-ALTO design. This post, therefore, is about how those two aspects have come together and nudged the project on.
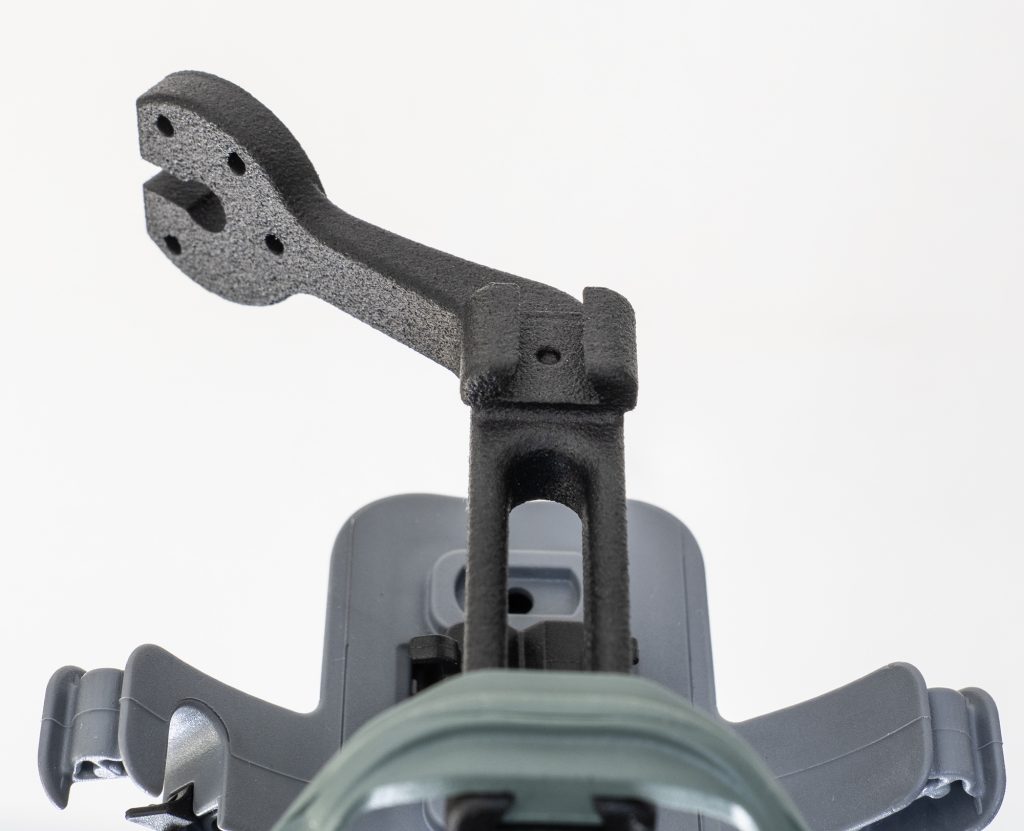
Detail showing the dovetail joint on the top of one of the MJF bars to fit the Mini-RAD hoops: the dimple mates with the pip on the underside of the Mini-RAD’s dovetail to ensure that nothing slips out. They are a tight fit anyway.
The revised design
The attraction of MJF printing for me, vs my modest 3d printing at home, has been that it liberates the designs from a flat bed. I know that people use supports, that are then removed, in their prints, but I have had little joy with this and invariably end up with a pile of spaghetti. So, getting one-piece prints of complex pieces instead of having to make them up piecemeal, with brass inserts and screws holding them together, seemed a real advantage: in short, for much I am doing nowadays I am using the little printer I have here (a Bambu Lab A1 Mini) to test things, then get them printed commercially using MJF technology.
I had just begun refining the ORTF bar designs for MJF printing – essentially combining the mic clips/mounts with the bar that holds the mics at the right angle and spacings, when I realized that the pre-production Mini-RAD hoops from Radius were imminent and that by using these I could simplify the designs. All the mounts for the ORTF pairs for the Mini-ALTOs had a common feature in that two posts or connectors linking the ORTF bar to the top of the hoops, so that the bar and the mics sat centrally in the windshield. With the much smaller Mini-RAD hoops (they are c.19mm shorter internally) it was clear that the posts/connectors could be removed from the design, and, instead, the ORTF bar could be fixed directly to the hoops. Also, the Mini-RAD hoops do not have a screw fitting at the top, as found in the standard hoops, but, rather, use a dovetail joint to connect: the dovetail includes a pip, which fits into a dimple in the Radius clips to ensure that the two parts don’t slip.
OK, a picture is worth a thousand words, so here are a few that, I hope, clarify how the new designs work and compare to the previous approach. In these examples, the updated designs are for the two Nevaton variations and for the Sennheiser MKH 8040, for the simple reason that I own these mics: I had to borrow the Schoeps and DPA short cardioids for the designs and tests last year.
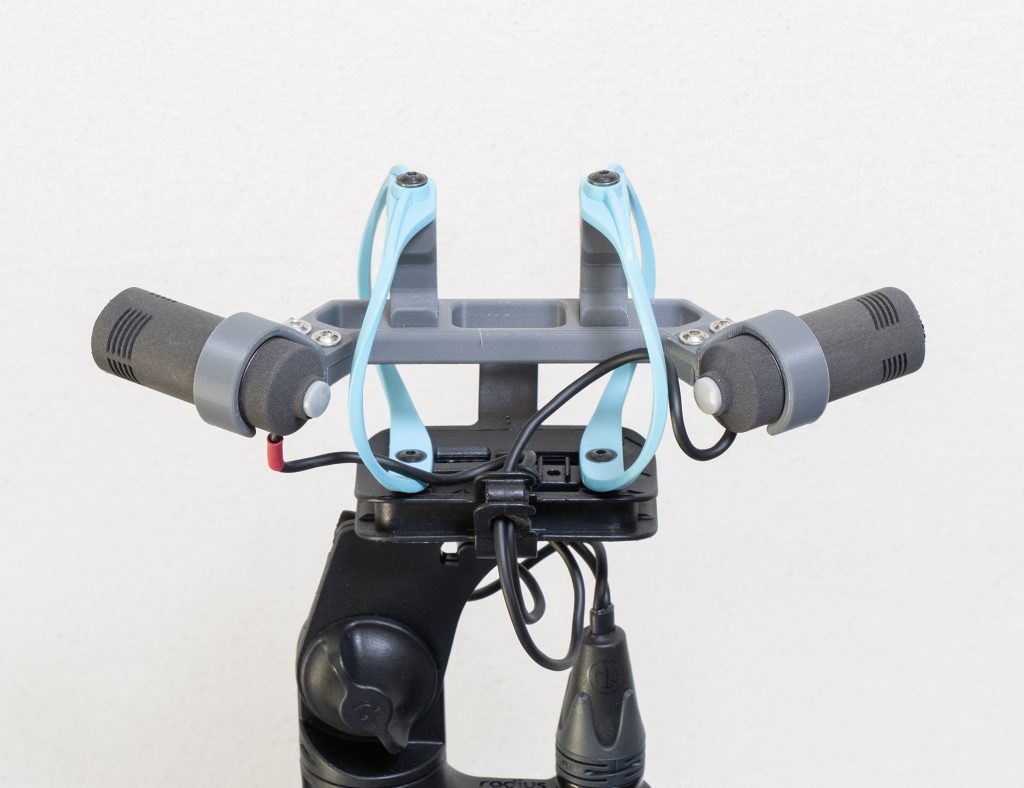
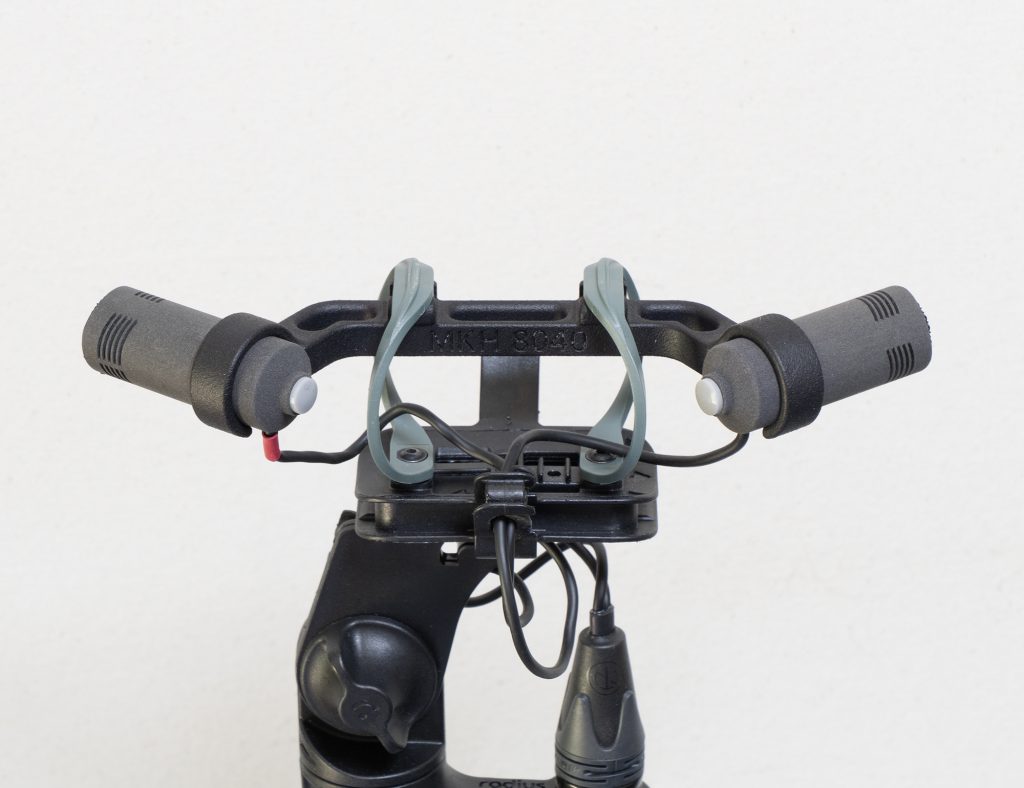
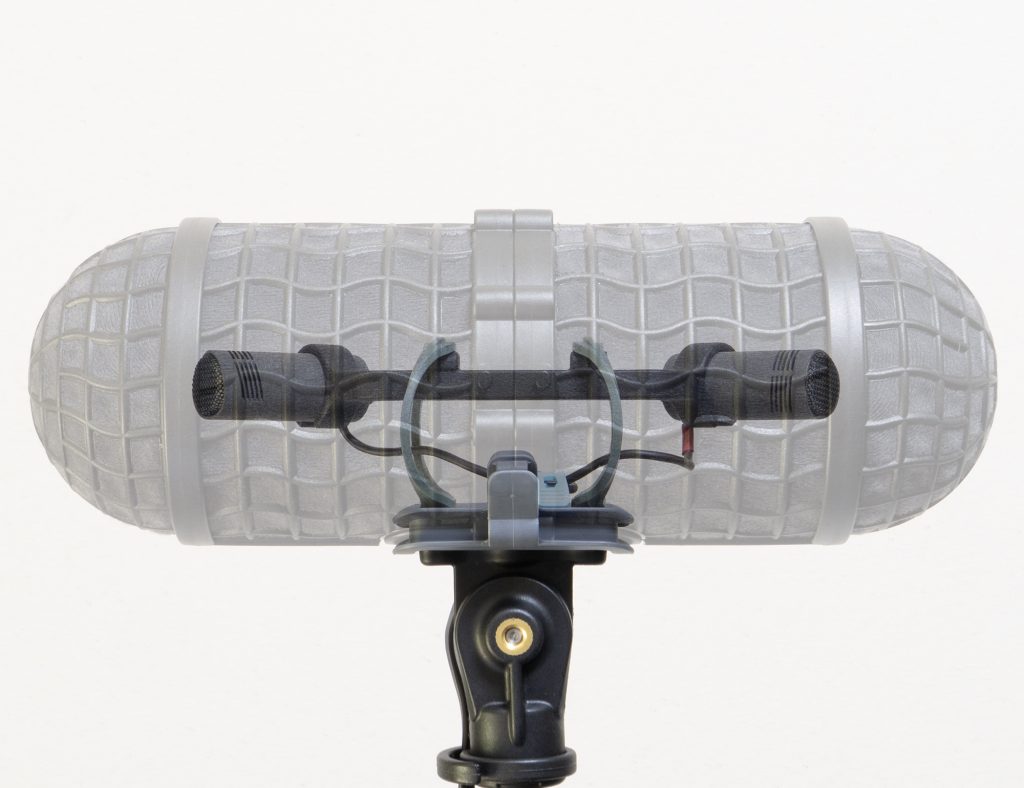
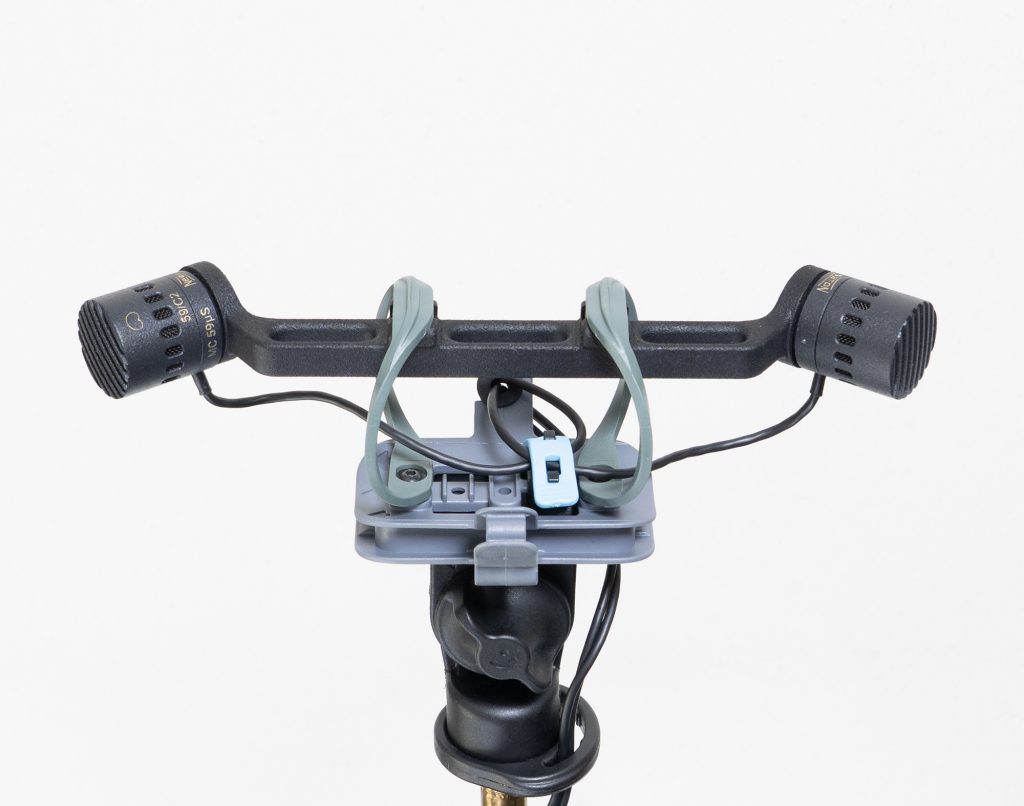
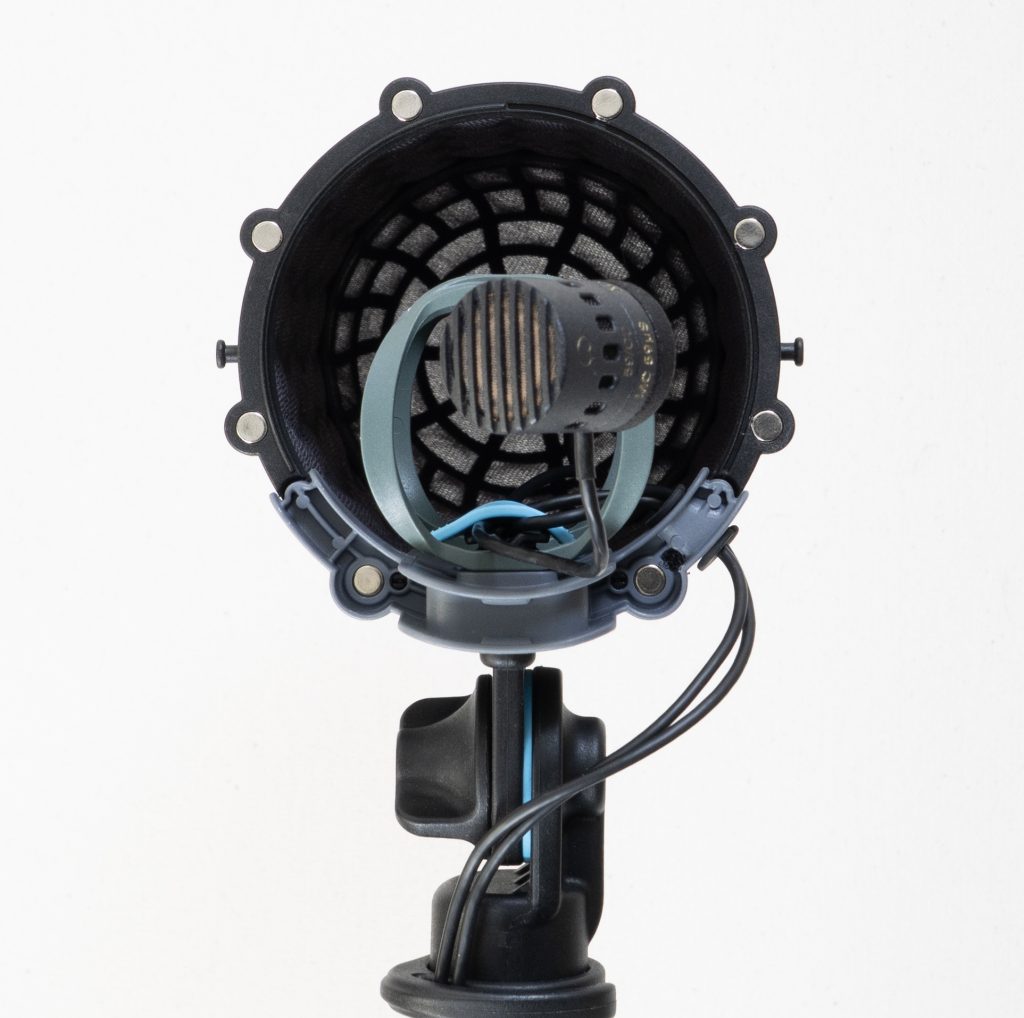
Here – as a recap – is the previous design with the standard RAD-2 hoops, showing the posts that connect the hoops to the ORTF bar and the separate clips for the mics themselves (in this case, MKH 8040): so a five-part assembly.And here is the revised design, with the one-piece MJF printed ORTF bar with integrated clips and no posts necessary to connect to the hoops. Again the mics are MKH 8040.Close-up of the new ORTF bar for the MKH 8040 showing the small groove inside the mic clips that ensures correct positioning of the mics (there is a slight projection where MZL meets the body of the mic).Composite image showing the ORTF bar with Mini-RAD hoops within the Mini-ALTO ORTF edition (i.e. with two 90mm pods), showing how the bar and the mics sit centrally in terms of height within the windshield.A single-piece MJF ORTF bar with the new Mini-RAD hoops, with the very short Nevaton MC59uS + C2 combination.Rear view of the bar for the Nevaton MC59uS + C2, showing the magnetic mounting of the mics.Side view of the Nevaton MC59uS + C2 ORTF pair, showing that the capsules remain central to the windshield basket: essential to maximize wind reduction.Mini-RAD ORTF bar for the Nevaton MC59S + 59/C combination: the preamps in this case are attached to the bar with M2 screws.
Conclusions
So there we go. From tests, there is no difference in performance and, indeed, you wouldn’t expect there to be, as long as the right compliance hoops are used (and the smaller hoops need a softer Hytrel to match the compliance of the larger hoops: for example, 45D shore in the Mini-RAD is roughly equal to 55D shore in the standard hoops; 55D = 62D etc.). But the new designs are useful simplifications of the previous versions, a lot further on from proof-of-concept designs, and as near as possible to the slick and robust injection-moulded versions that would be the ultimate, but which I think are not commercially viable. I hope this postscript to the original series on the ORTF in a Mini-ALTO project inspires others to venture along the route of bespoke shockmounts. And let it serve as a warning: the Mini-RAD hoops will doubtless feature in more elaborate and esoteric shockmount designs here!
Update: 22.7.2026
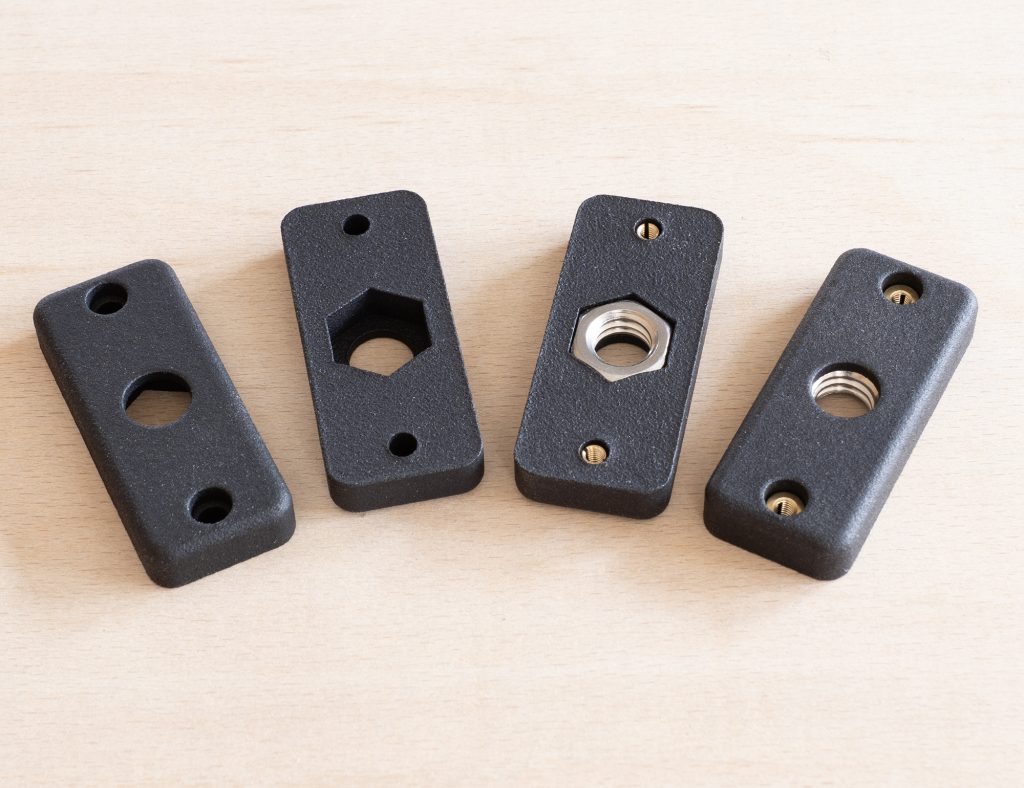
A postscript to a postscript? Hmm. Anyway, just thought I should add a short piece on base adapters. Obviously, the pivoting bases for RAD-2 and Mini-ALTO connections to boom poles, stands etc. pivot up and down the way expected for a mono mic or, indeed, an MS pair, but not for an ORTF pair where the windshields is used side-on to the sound source. In my original development of a 3d-printed solution I came up with a very simple base that allowed a 3/8″ connection to a ball head, and I have very slightly tweaked that basic design for MJF printing, retaining the captive 3/8″ UNC nut (a nice tight fit into the MJF base) and M3 brass inserts:
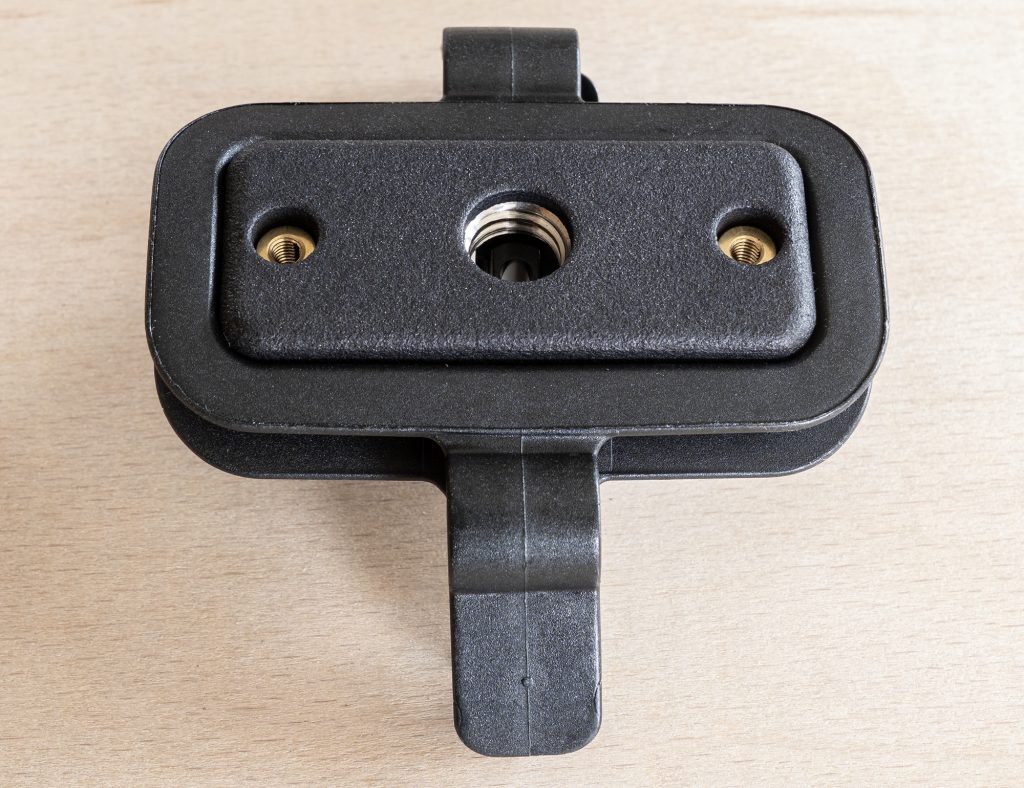
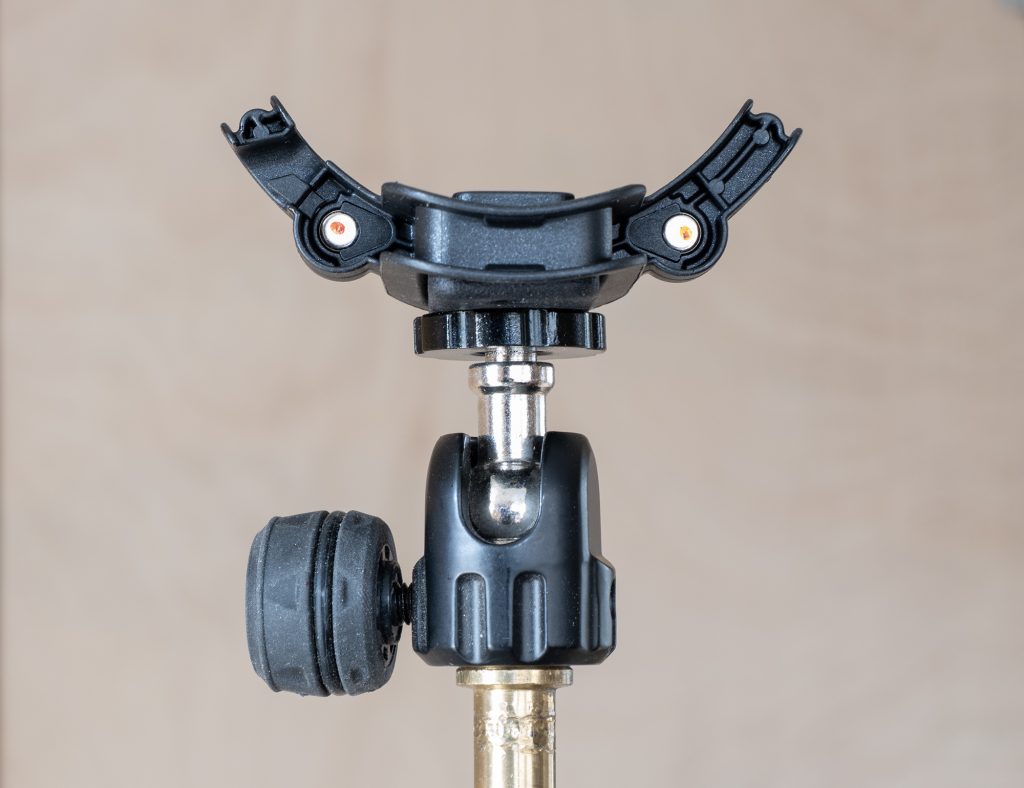
Simple base adapter in MJF with and without the 3/8″ UNC stainless-steel nut and M3 brass inserts.Simple base adapter in MJF inserted in the bottom of the ‘smiley face’ of the Mini-ALTO.Simple base adapter in MJF inserted in the bottom of the ‘smiley face’ of the Mini-ALTO, with a 3/8″ ball-joint attached (in this case the Gravity MSQT1B).
In due course I am sure Radius will produce something rather better and, indeed, their upcoming 1/4″ adapter bar is not at all bad and, with it’s 1/4″ female thread, allows use of some well-machined small ball joints that are rather nicer than the 3/8″ one from Gravity pictured above.
ORTF pair with upcoming Radius Windshields 1/4″ adapter bar – printed in MJF prior to the injection-moulded version being made – connecting the ‘smiley face’ to the ball joint (in this case one branded ‘Innorel’, but seemingly sold under several names: but nicely made nonetheless).
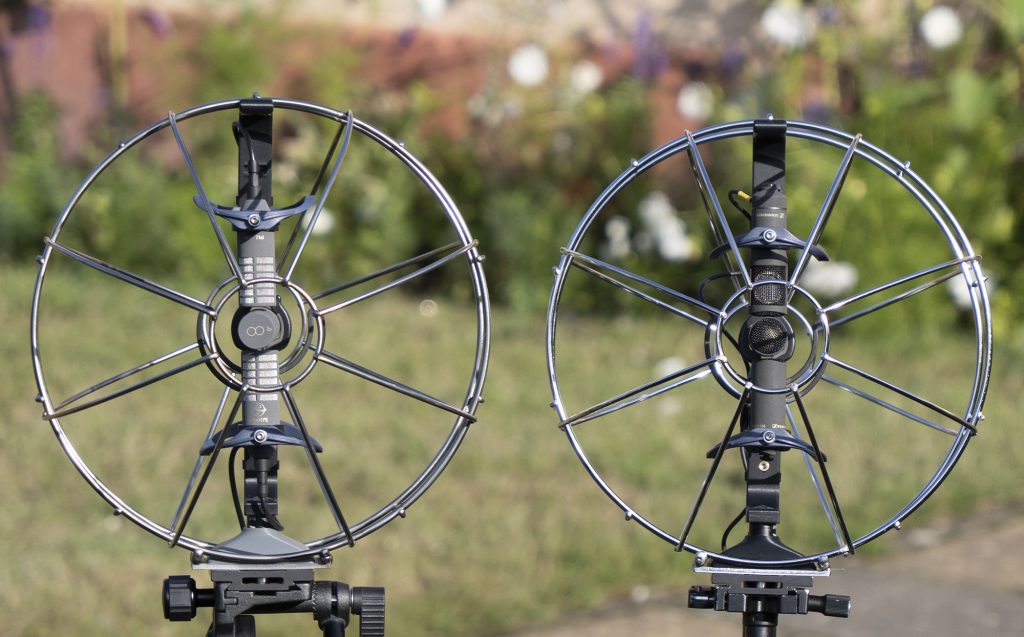
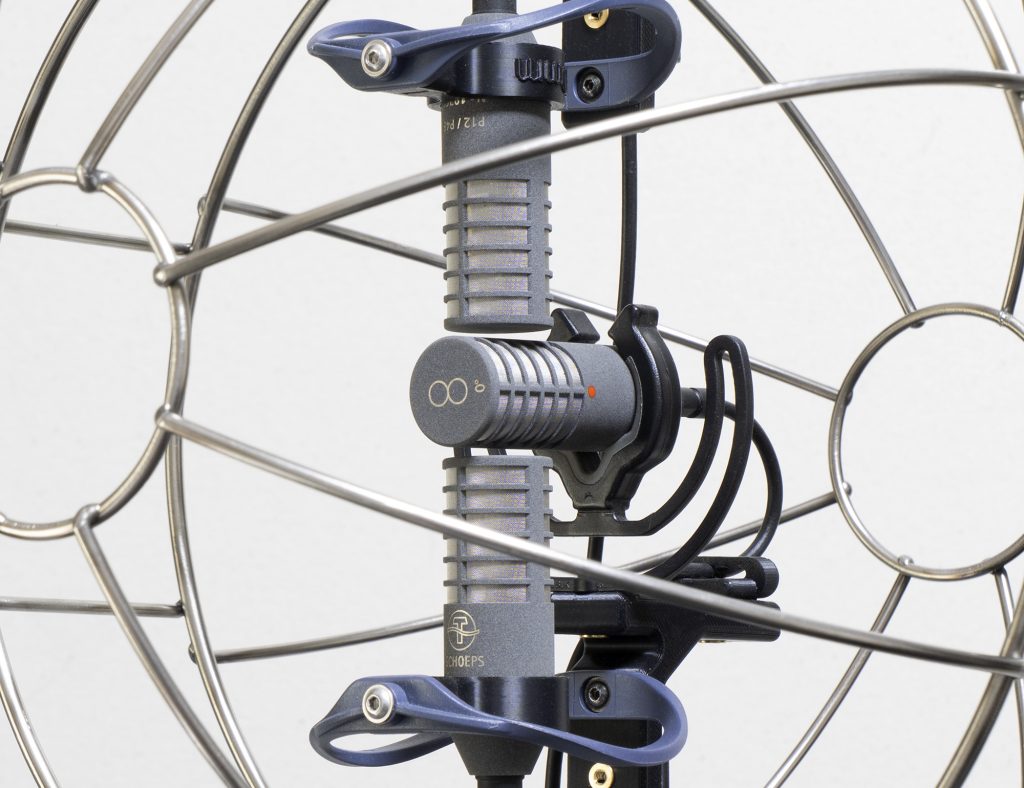
Double mid side with Schoeps CCM mics (left) and horizontal B-format with Sennheiser MKH 8000 mics (right).
In Part 1 of this three-part series of musings on double mid side (DMS), I went through the three rigging options; in Part 2 I tested the options; but in this final part, as the title says, I do something rather different, which is compare DMS to horizontal B-format (i.e. native B-format with no vertical component).
As we have seen in the previous posts, setting up DMS with side-address mid mics produces an array that looks very similar to a horizontal native B-format, or Nimbus-Halliday, array. In that case, a horizontally-oriented omni mic is flanked by vertically oriented fig 8s, one aimed forwards-backwards and one aimed sideways. In a variation of this, which I have used too, the omni can be set vertically as is one fig 8, with the second fig 8 set horizontally between the two: this variation is designed to address the directionality of the omni mic at higher frequencies in the plane of the mic body (a consequence of the mic body itself). I described and illustrated the two different horizontal B-format arrays in my pipe band recording blog posts last year. The similarity between horizontal B-format and DMS is not just that the two rigs look so alike, but also how they perform since, as Wittek et al (Wittek, H., Haut, C., and Keinath, D., Double M/S – a Surround recording technique put to test (Schoeps paper, 10.03.2010) note:
In principle, Double-M/S signals can also be converted to “horizontal B-format” by addition and subtraction: W = Mfront+ Mrear; X = Mfront- Mrear; Y = S;
In this formula, the W (omni mic) is formed by combining the front and rear cardioids, and the X (forward-rearward facing fig 8) by again using the two cardioids, albeit subtracting one from the other. In that limited sense, deriving B-format from DMS is akin to deriving it from ambisonic (A-format) arrays of cardioids.
So the questions remain: if DMS and horizontal B-format are mathematically equivalent, do they sound the same and, either way, are there pros and cons for selecting either array? This, needless to say, is more complex than you might think, as it rather depends on the use of the array. For example, even if not ideal and demanding care when decoding, DMS can be used with a shotgun microphone, typically when such a narrow polar pattern is required principally as a mono mic (say for dialogue in production sound), but giving scope for flexible stereo or surround sound when needed, without changing the rig. The shotgun can be a mono mic with a fig 8 and a rear-facing cardioid clipped to it, or a stereo shotgun (i.e. with a integrated fig 8 capsule, such as the Sennheiser MKH 8018) with a rear-facing cardioid clipped to it. In this regard DMS has no equivalent in horizontal B-format in any practical sense.
Both arrays can and often are used for stereo recording: both allow mid-side recording with a variable polar pattern for the mid mic, and, indeed, steering of the stereo sound after the event. With DMS the mid mic polar pattern is created by mixing the two back-to-back cardioids, in the same way that a variable-pattern mid mic works: only the cardioid pattern is native to the mid mic. With horizontal B-format the mid mic polar pattern is created by mixing the omni mic and forward-rearward facing fig 8: this also gives you, natively (i.e. without mixing), a fig 8 mid mic and an omni mid mic. I use all three native mid mic polar patterns for MS, so wouldn’t choose between the two approaches on these grounds: besides, you may recall my previous test comparing a cardioid to a virtual cardioid created by my mixing a fig 8 and an omni, which showed little to no difference in the sound other than the more extended bass of the virtual cardioid arising from the use of the pure pressure omni. Well, at least the sound was very similar, but I do wonder, in the light of my DMS and horizontal B-format comparisons (below) whether the polar pattern was quite the same.
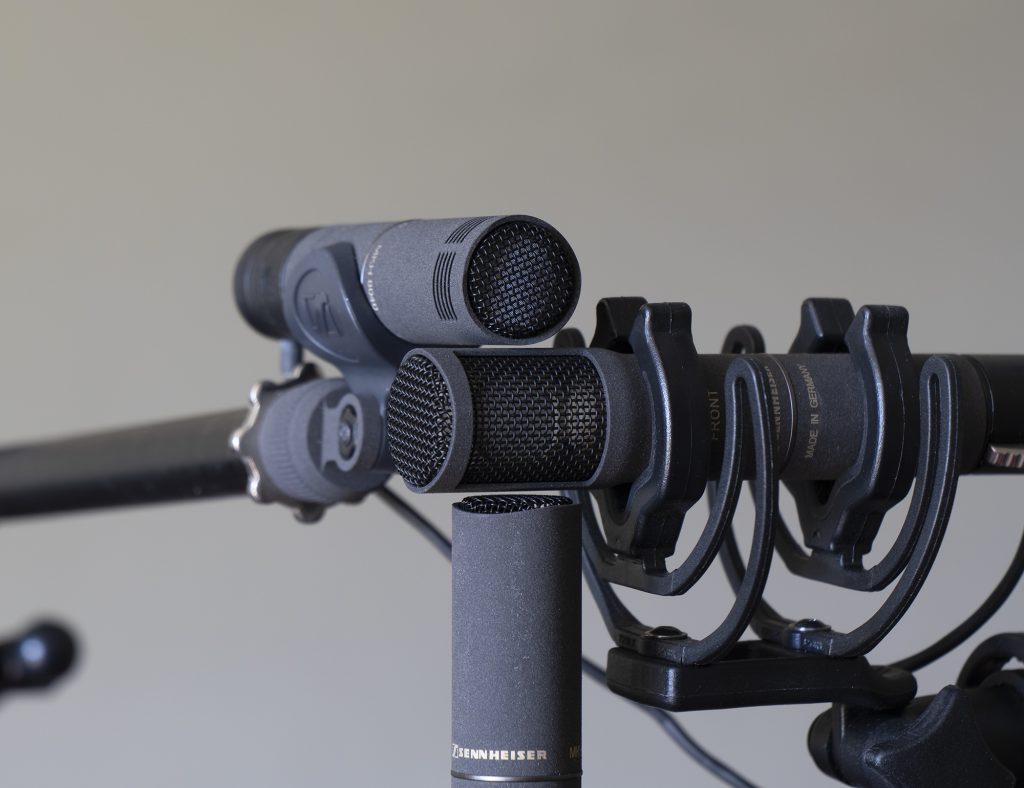
Comparing a cardioid MKH 8040 (top) with a virtual cardioid made by mixing a fig 8 MKH 8030 (centre) and omni MKH 8020 (bottom).
It is this extended low-frequency response that is perhaps the most distinctive difference between horizontal B-format and DMS when used for stereo. This difference is acknowledged in the Schoeps DMS plugin, however, which, as the user guide makes clear, ‘normalizes the sensitivity of the CCM 8 to match the CCM 2’s and compensates for the low frequency loss of the figure-of-eight microphone’: the CCM 8 being the fig 8, of course, and the CCM 2 being Schoeps’s flat (free-field) omni in the same CCM range.
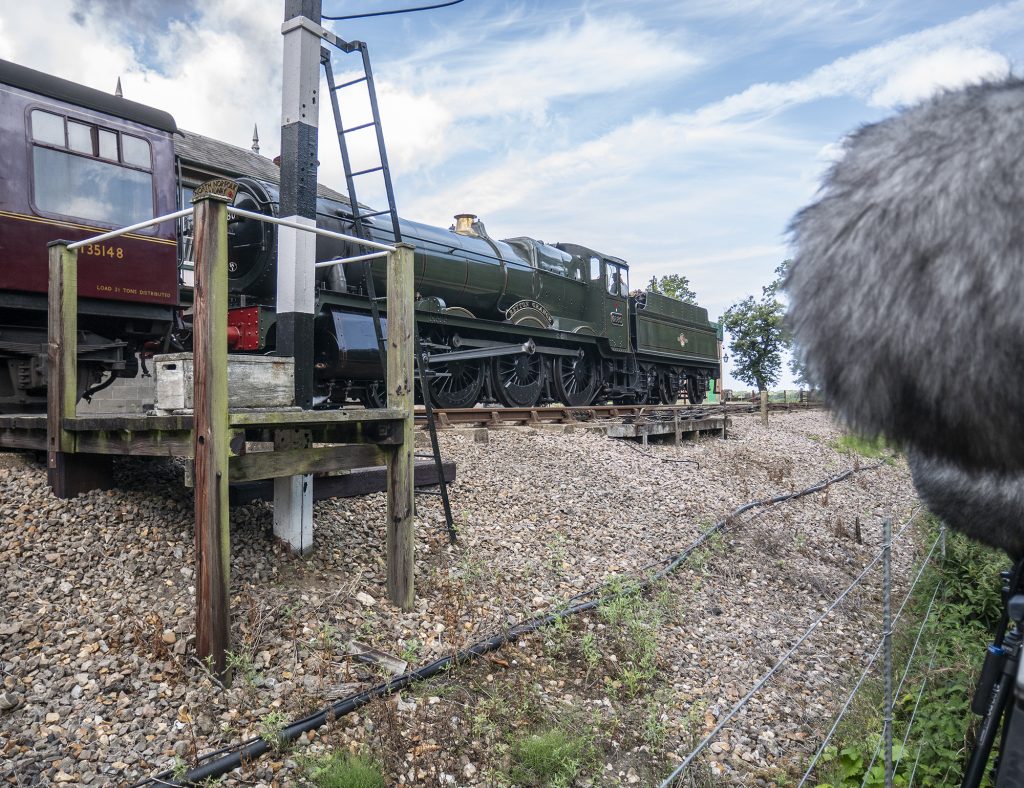
Lineside at Holt station (getting some odd looks and banter as usual, not least from the signalmen) for a DMS vs horizontal B-format comparison, as a Grange class locomotive pulls the train towards Sheringham.
Although rigging DMS with side-address cardioids provides the most obvious physical similarity with horizontal B-format, for my test purposes comparing these two rigs isn’t ideal: the Schoeps mics for the DMS rig are quite different from my Sennheiser mics for the horizontal B-format set-up. In my initial tests with these two rigs, I felt I was more demonstrating the difference between the mics than comparing the different configurations. Using end-address cardioids opens up more options, but, without three MKH 8030 fig 8s here (yet!), the best I can manage is DMS with two MKH 8040s and one MKH 30 vs horizontal B-format with two MKH 8030s and one MKH 8020. The MKH 8030 and MKH 30 are not identical, but, as we have seen before, they are fairly close. So with these two rigs in Mega-Blimps, I headed off to the local steam railway, hacking my way through the brambles and bracken to get to a point just beyond the station platform.
First up, we have the individual files for each of the three mics in each array. The files can be downloaded, and have been level-matched using the published sensitivities:
And here we have the files identically processed using the Harpex-X plug-in to stereo files as a coincident pair of hypercardioids at 127 degrees (i.e. equivalent to cardioid MS with a 50:50 balance between mid and side mics):
For some deeper bass, I then compared the two arrays back at home, starting the car to get some nice low-frequency content and, while at it, the usual Foley-like footsteps, gate openings etc. Again, here are the individual files for each of the three mics in each array:
And, again, here we have the files identically processed in Harpex-X to stereo files as a coincident pair of hypercardioids at 127 degrees (i.e. equivalent to cardioid MS with a 50:50 balance between mid and side mics):
The increased bass of the horizontal B-format array is more noticeable with the car engine than the steam locomotive, as you would expect, but both sets of recordings show broader differences between the two techniques. Some of these differences, mainly for the garden recording where there are close sounds, are an inevitable consequence of the spacing of the two rigs (about 1m apart), but there are very obvious differences that go beyond the fact that the two rigs could not be exactly coincidental. The localisation of even distant sounds is quite different. With the uncertainty of what is going on in the various DMS and B-format plug-ins, it is worth looking at a manual MS decode for the two pairs. For the DMS rig, standard MS was simply derived by using the fig 8 MKH 30 and the forward-facing cardioid MKH 8040 (i.e. ignoring the rear-facing cardioid). With the horizontal B-format all three mics were required, first creating a virtual cardioid from a 50:50 mix of the forward-rearward facing fig 8 MKH 8030 and the omni MKH 8020, and then using this as an MS pair with the sidewards-facing fig 8 MKH 8030. Here are the resultant two files for the steam locomotive departing recording:
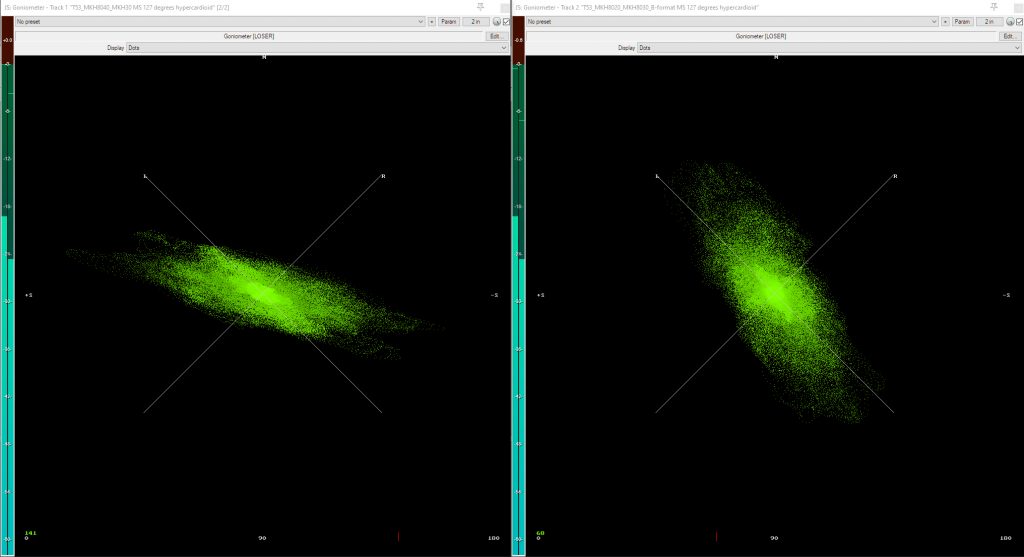
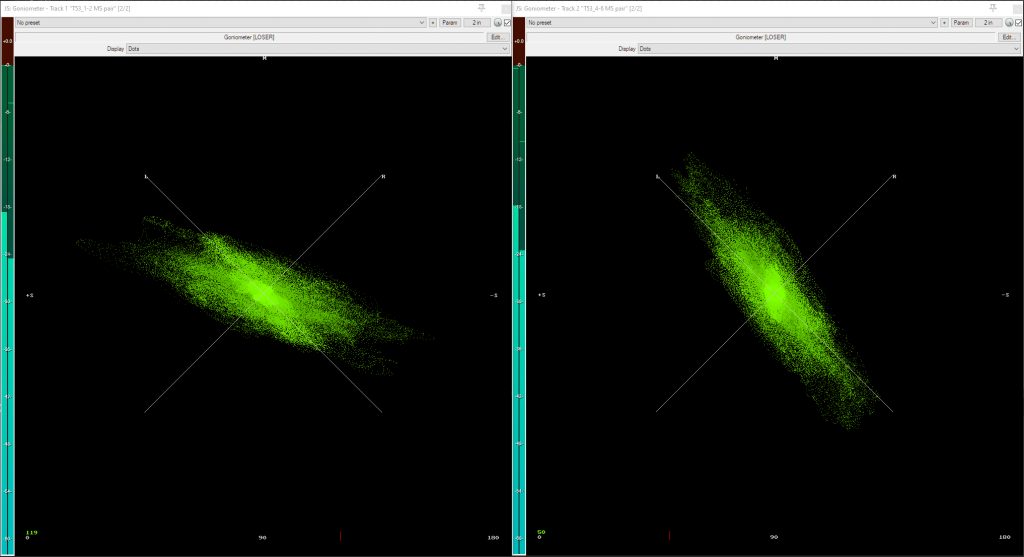
These two MS pairs, decoded to LR, show very similar results to the DMS and horizontal B-format recordings output to stereo. In both cases the stereo field is rather different, with the B-format derived stereo having less stereo spread. You can hear this in the sample files, but, for a visualization, here are the goniometer plots showing the steam locomotive whistle at the beginning of the railway recording for both the DMS/horizontal B-format recordings output to stereo via Harpex-X and for the two MS equivalents that were derived manually. I chose the whistle as a short clear sound located well off to one side (the left).
Goniometer on train whistle for DMS (left) and horizontal B-format (right), both processed in Harpex-X and output to stereo (XY with hypercardioids at 127 degrees).Goniometer on train whistle for MS using MKH 8040 and MKH 30 (left) and MKH 8020+MKH 8030 (creating virtual cardioid) and MKH 8030 – i.e. manually derived from horizontal B-format (right), decoded to stereo.
In both instances the whistle in the B-format example (or MS derived from combining the omni and forward-facing fig 8 in the B-format rig to create a virtual cardioid, then used with the side-facing fig 8) is rendered a little more centrally. Of course, this is very easy to adjust with DMS or B-format recordings, so, in some sense, is not a practical issue, but the point is that there is a difference and it isn’t simply the result of the behind-scenes mechanics of the conversion plug-in. This suggests that the mathematical combination of an omni and fig 8 to make a cardioid and the practical implementation of this don’t quite match, which is not entirely surprising: factoring in the different sensitivities of the two mics is an obvious source of possible error, changing the resultant polar pattern, although the audible differences suggest – at least to my ears – that perhaps there is more to this than that factor only.
Conclusions
If ever there was a misleading subheading, then this is it: ‘conclusions’ suggests something far more, er, conclusive than I can offer. First up among caveats, my end-use of either DMS or horizontal B-format is primarily for stereo output. Testing the different rigs with a decent, say, 5.1 system would be an interesting exercise, but at least the files above for individual mics will allow others to do that and see if they can draw any conclusions: indeed, that is the primary purpose of the blog post. The second significant caveat is the evident difficult in getting parity between rigs: using an all Sennheiser MKH approach helped, rather than the Schoeps to Sennhesier comparison, but the MKH 30 is not absolutely identical to an MKH 8030, and, of course, it meant that I had to use end-address cardioids for the DMS rig. I could have used an all Rycote mic approach (I have enough BD-10 fig 8s to achieve this), but the longer mic bodies would not have worked for horizontal B-format in the Mega-Blimp (even that has limits!). However, the previous tests comparing DMS with end-address vs side-address cardioids made me much more sanguine about such an approach. Hopefully something is left that, at the very least, provides readers with food for thought: perhaps even to compare horizontal B-format with DMS themselves.
From my own perspective, the ground I have covered in the tests, many necessarily not included here for reasons of space, for these three DMS blog-posts, along with the practicalities of rigging, the key conclusions I have drawn are:
i) use of end-address cardioids (or, at least, very small SDCs, such as MKH 8000 mics with MZLs or the diminutive Nevatons) for DMS has negligible impact on sound resulting from shadowing and, even, off-centre cardioids, especially compared to the impact of most windshields (OK, that’s not relevant to much indoor recording);
ii) there is, therefore, little reason in most circumstances to go for the more transparent approach of using side-address cardioids for DMS, although, of course, no reason to not do so if the mics are available (suitable windshield permitting if outdoors);
iii) unless the low-frequency response of an omni is critical, then there seems no advantage – at least with the mics and usage I have – of horizontal B-format over DMS.
So, going forward, although I plan to utilize both three-mic rigs in the future, I suspect that I will be using DMS more than horizontal B-format, not least as it allows a wider range of my mics to be used: most obviously, the Nevatons I have acquired recently. But equally, and with my predominantly stereo-focused approach in mind, I will continue to use MS far more (or, indeed, other stereo pairs). Certainly the flexibility of horizontal B-format or DMS in terms of selecting polar pattern or, less of an issue, steering the array in post, are insufficient grounds to merit their use for most cases where a stereo end-product is required. I’m very happy with knowing which way to point the mics (!) and happy enough, with MS, to select the mid-mic polar pattern that will suit the job best be that an omni, wide-cardioid, cardioid, supercardioid or fig 8. That said, I occasionally need to produce surround sound field recordings (e.g. recently a recording of the sea for the intro to a pipe-organ SACD – Organ Fantasy by Jean-Paul Imbert and his students) so horizontal B-format and DMS will continue to be part of my recording life.
DMS with Schoeps CCM4V side-address cardioids and CCM8 fig 8: the ideal configuration, and in the most transparent mount and windshield I can muster, but does it actually out-perform other setups?
Introduction
In Part 1 of this three-part blog-post on double mid-side I covered the rigging options for DMS using SDC mics. In this second part, I explore the differences between the rigging options, focusing on the option with side-by-side end-address cardiods and the, theoretically, rather better option with side-address cardioids: are there any audible differences? And I also include some clips of recordings to give a sense of the differences between different DMS set ups: that doesn’t just mean how the mics are configured, but, also, different mics.
Shadowing
One of the criticisms thrown at any configuration of coincident mics, but especially at those with multiple mics, is of the impact of shadowing, where elements of the mic shock-mounts or, more substantially, adjacent mics colour the sound. Of the three DMS configurations that with the most obvious shadowing is, of course, the option with side-by-side cardiods: you wouldn’t normally choose to stick something the size of mic immediately adjacent to and projecting forward from a cardioid mic capsule and there is no doubt that, visually, it looks clunky. But does it sound noticeably different?
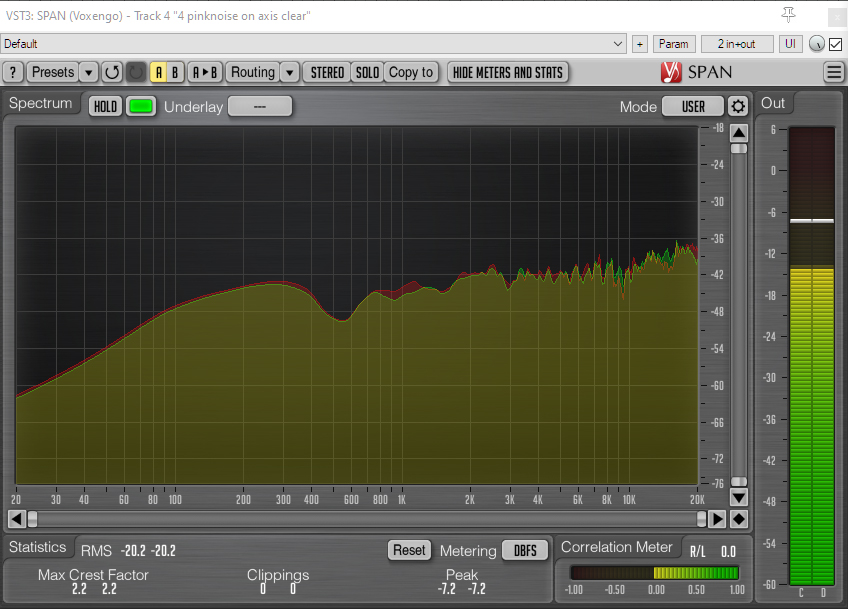
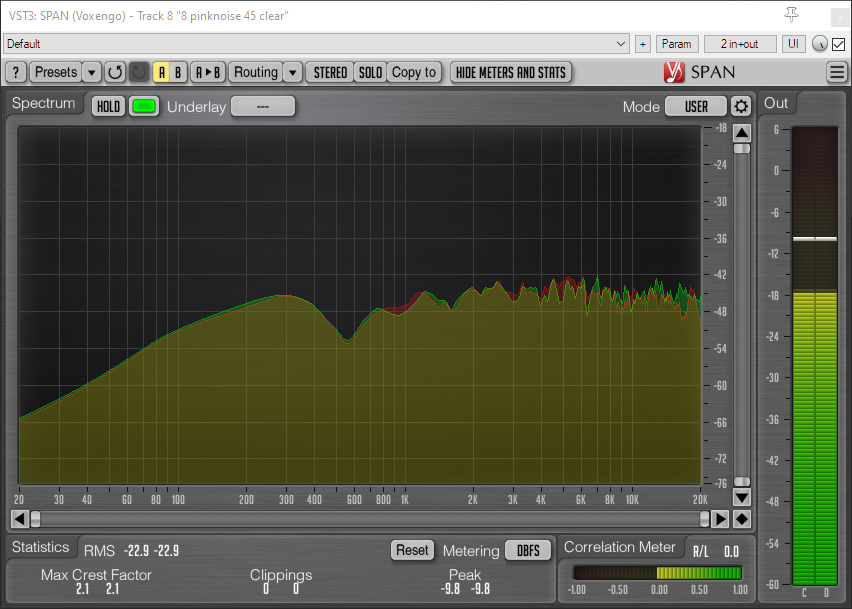
For those interested, I did some tests on the shadowing effect in such a clustered DMS rig (using MKH 8000 mics), recording pink noise played bay through one of my Vivid S12 monitors to the forward-facing cardioid in the DMS array, and then moved the fig 8 and rear-facing cardioid away (the mics were carefully set up with a separate stand for the forward-facing mic so that it remained exactly in position when the other mics were removed). This was done with the mic on axis and then 45 degrees off axis, so that, in the latter, the body of the rear-facing mic was shadowing the forward mic.
Pink noise recording by forward-facing MKH 8040 cardioid mic on axis to sound source with mic clear (green) and within DMS rig (red).Pink noise recording by forward-facing MKH 8040 cardioid mic at 45 degrees to sound source with mic clear (green) and within DMS rig (red).
You can see from the spectrograms below that there was more of an impact on the high frequencies as expected at 45 degrees. Of itself this doesn’t show whether the differences of the single, unimpeded, cardioid mic vs the identically positioned mic within its DMS cluster are significant, so, by way of comparison we can look at some similar tests exploring the impact of two windshields (which I have shown previously). First we have the MKH 8030 with the Min-ALTO 115 basket turned side-on to the speaker source so that the fig 8 mic is on axis to the sound source:
Pink noise test with Mini-ALTO 115 with MKH8030 fig 8 mic aimed at speaker: green is the bare mic on the shock-mount and the red overlay is the recording with the basket added.
And for another comparison, here is the same fig 8 test repeated with a Rycote Cyclone.
Pink noise test with Cyclone (small) with MKH8030 fig 8 mic aimed at speaker: green is the bare mic on the shock-mount and the red overlay is the recording with the basket added.
In short, the impact of shadowing in the DMS mic array is measurable, but is far less significant than the impact of these two windshields, where the fig 8 (obviously a key element of DMS) is affected by the structure of the windshield baskets, with the particularly noticeable difference in the Cyclone basket doubtless largely due to the substantial plastic ring for its end cap.
And to return to our shadowing tests for the DMS rig, we can listen to how the effect of shadowing actually sounds. I used the same means of removing the fig 8 and rear-facing cardioid without disturbing the forward-facing cardioid’s position as before, and again placed the mics in front of a single speaker (Vivid S12) in my studio and played back a short section of a recent recording of mine of a singer-guitarist (Luke Chapman), angling the mics on axis to the speaker and then at 45 degrees. Here are the resulting mono sound files:
First, here is the pair of recordings of the forward-facing cardioid mic on axis, with no surrounding mics, and then shadowed within the cluster of DMS mics:
Second, here is the pair of recordings of the forward-facing cardioid mic at 45 degrees, with no surrounding mics, and then shadowed within the cluster of DMS mics (the body of the rear-facing cardioid mic shadowing the forward-facing mic in particular):
Obviously, comparisons should not be made between the on-axis and the 45-degree recordings as, by definition, the mic has moved!
I suspect many listening to these examples may be surprised by how little difference there is between the two recordings (clear mic and shadowed mic) in each set up (on axis and at 45 degrees). Certainly, I was reassured that shadowing effects are less than might be feared with this more clustered version of the two options that use end-address cardioids. Obviously use of longer and larger mics (think two MKH 40s and an MKH 30) would have a greater effect, but, conversely, two still shorter cardioids (think of those 23.5mm-long Nevaton MC59uS/C2 mics) would reduce the effect more (subject to the impact of any mounts).
Of course, shadowing is only one potential downside with the clustered DMS rig with two side-by-side cardioids: both cardioids are necessarily offset from the centre of the fig 8 capsule, typically by around 12mm or more. With MS normally the recordist aims to align the mics so that one capsule is precisely directly above the other and as close as possible. Losing that vertical alignment, of course, risks introducing comb filtering to sounds directed at the mics from the horizontal plane (or whatever plane the mics are tilted toward): likewise, increasing the vertical spacing between the mics will introduce more comb filtering and narrow the horizontal band where the effects are minimal or non-existent. The last isn’t an issue with DMS with two side-by-side cardioids (indeed, it can allow the vertical distance between the fig 8 and cardioid capsules to reduce), but the former is: the question, again, is does this matter? I have heard the results of MS recordings of classical music with the mics side-by-side, which sound fine (for example search out the recordings of ex-BBC engineer, Roger Long, who, as ‘Rolo46’, has posted many marvellous MS classical music recordings on Gearspace using side-by-side MS mics, mostly with an MKH 30 pair), but do the theorists, who frown at such setups, have a point? My aim was to test this, simplifying matters by doing so with an MS pair, comparing vertically aligned mics with one with the mid mic offset as if for this DMS configuration, but, try as hard as I could, I simply could not get any method to work convincingly: I tried indoors with a single speaker, but comb filtering for the shifted mid mic was obscured by comb filtering from the room (few studios are entirely free of comb filtering: and evidently mine isn’t!), and I tried outdoors (the poor man’s anechoic chamber!), but just couldn’t get reliable, repeatable or convincing results. Perhaps I will have a moment or revelation and work out what I need to do, but in the meantime I’m sorry to have come up short: you’ll just have to hang your hat on whichever side of the debate convinces you most . And, of course, one can learn something from the comparative field recordings below (or, better, your own), which compare the different rigs in action.
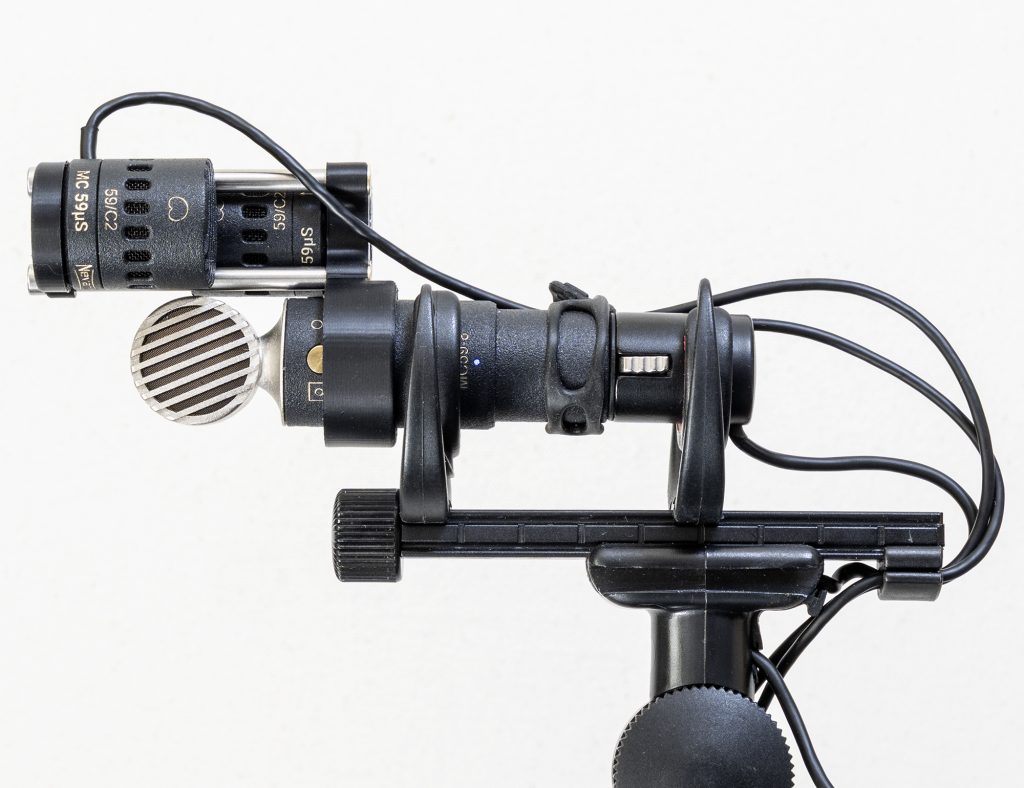
Minimizing the impact of the shadowing of end-address cardioid mics when rigged side-by-side with the ultra-short Nevaton MC59uS/C2 mics.
Field testing the different DMS rigs
On which note, I left behind such tests and took the mics into the field, to compare some real DMS rigs. This looked at a combination of different rigging approaches and, closely related, different microphones. I could have added a third variable of different windshields, but, to make things more fairly comparable, I have stuck with the same windshields in each set of field of tests. Being unadventurous (or just lazy?!), the tests comprise a series of my regular ‘quiet’ village street recordings: birdsong (plenty of swifts screaming overhead this summer), passing cars, and a bit of Foley-esque sound (as I open doors and gates, and stomp around aimlessly) cover quite a few bases. The cocker spaniels even joined in at one point with a bit of snuffling (honest, it wasn’t me!).
First off, I set up two rigs comprising the Schoeps CCM4V side-address cardioids and CCM8 fig 8 trio, and the Sennheiser MKH 8040 cardioids and MKH 8030 fig 8 mics for DMS with the mics side-by-side, recording with a Sound Devices 788T at 24bit/96kHz. In both cases I used Mega-Blimps for the windshields. With such large surround sound rigs two seems a sensible limit: three or more would mean that they are spaced rather too far apart to be comparable. Here is a short clip (1:34) of the resultant recordings, with one mono file for each mic (levels balanced according to mic sensitivity, but with no other processing) so that you can play around with them in, say, the Schoeps DMS or Harpex-X plugins: I use both for DMS processing.
a) Sennheiser:
b) Schoeps:
c) and here are two stereo files, generated in Reaper using Harpex-X (with the Blumlein stereo preset):
Second, here are the mono files for a similar test comparing DMS with the Sennheiser MKH 8040 cardioids and MKH 8030 fig 8 mics vs the Nevaton MC59uS/C2 and MC59/8 mics, again using Mega-Blimps for both rigs:
d) Sennheiser:
e) Nevaton
f) and here are two stereo outputs, generated using Harpex-X (with the Blumlein stereo preset):
And, finally, here are the mono files for another garden test, this time with a bit of wind (but no low-pass filtering applied), comparing DMS with the Schoeps CCM4V side-address cardioids and CCM8 fig 8 vs the Nevaton MC59uS/C2 and MC59/8 mics, again using Mega-Blimps for both rigs:
g) Schoeps:
h) Nevaton:
i) and here are two stereo outputs, generated using Harpex-X (with the Blumlein stereo preset):
Now anyone who downloads all those files and listens to them deserves a medal!
Conclusions
It is extraordinarily difficult to draw conclusions that are relevant to others’ use of DMS (not least since the use of side-address and end-address cardioids inherently means using different mics), but, nonetheless, I will have a stab at this. First off, although generally relaxed about multi-mic coincident pairs and the impacts of shadowing and small offsets, I came into these tests with an expectation that the acoustic problems of side-by-side cardioids in what is doubtless the most popular configuration of DMS would be more noticeable than they have proved to be. In reality, and that is with the caveat that I have not been testing DMS with bulkier SDCs such as the MKH 30 and MKH 40, they are much less significant than the impact of many windshields, especially those that were not designed to offer as much transparency to the sides and rear as to a forward-facing directional mic. So, if the aim is to place a DMS rig in a Radius Windshields Mini-ALTO or a Rycote Cyclone, then the consequences of the mic configuration are nothing compared to the impact of the windshield. However, if using a windshield with much better all round transparency such as the Cinela Pianissimo or, if boom pole use is not needed, one of my Mega-Bimps, then the impact of the different configurations will come into play. But this then gets very complex for several reasons: yes, the Schoeps CCM4V side-address cardioids and CCM8 fig 8 offer good alignment and little no shadowing (both from the other mics and the mounts), so using them in a Cinela Zephyx (for lightness) or Mega-Blimp (for more transparency) would offer the best performance from that perspective. But, at the same time, they have higher self-noise than the MKH 8030 + 2x MKH 8040 setup and lack the more humidity-proof RF technology of the Sennheiser mics. And, of course, the Nevaton MC59/8 + 2x MC59uS/C2 rig offers the most minimal shadowing for DMS with side-by-side cardioids (due to the very short length of the cardioids) as well as the lowest self-noise. As for the sound, well that’s one for individuals. I think the Nevaton DMS rig is the best sounding irrespective of mic configuration, but I may be missing something that more refined ears can pick up. Or perhaps it is just taste: it’s not as if top end classical music recordists all prefer the same mics or the same mics for a specific task.
And, just to add complexity where you don’t need it, I was surprised by the difference between the two plugins I have been using – Schoeps’s own DMS plugin and Harpex-X. In part, at least, this seems a product of the Schoeps plugin having built-in gain and frequency response compensation for its mics (which, evidently, isn’t appropriate for other mics), but the upshot is that it is very easy to get more significant differences by processing the recordings differently than it is from the actual mics or configurations used.
If you have all these mics (or, indeed, other good options) the selection criteria will need to balance all these factors: if you have some of the mics only, then that will simplify the choices; and if you have none of the options, but are thinking of one, then the usefulness of the mics for different purposes are likely to come into play (e.g. would you have use for Schoeps CCM4V side-address cardioids, or would end-address cardioids be more use?).
As for my choices? Well, I don’t own the Schoeps mics, so that does simplify things as the advantages of side-address cardioids wasn’t clear enough for me to buy the mics (especially with no other Schoeps mics in my locker), so DMS for me will be MKH 8000 mics (for tougher conditions) in a Mega-Blimp; otherwise, I will be using the Nevaton MC59/8 + 2x MC59uS/C2 rig in the same windshield for, as I said, to my ears, the best sound and, less subjectively, for even lower self-noise. And for ultra-compact DMS, should I ever need it, I would use either rig in a Nanoshield (the Nevaton DMS won’t fit in a Mini-ALTO, and the Sennheiser rig isn’t suited to the Mini-ALTO due to the fig 8 position in relation to the chunky plastic rings). But, the question I still need to address for my own use is whether DMS is preferable to horizontal B-format: and that, of course, is for Part 3 of my DMS blog-post series!
Following on from part 1, where the design of fitting an ORTF pair into the diminutive Mini-ALTO was covered (using a pair of Sennheiser MKH 8040 mics with modified MZL connectors), this second part of the blog post concerns testing the compact rig. There are two main aspects that I wanted to test to see if such an ORTF rig is usable: transparency (i.e. how much does the windshield colour the sound) and wind protection.
Composite view of ORTF in a Radius Windshields Mini-ALTO showing the position of the mics with two 90mm pods.Composite view of ORTF in a Radius Windshields Mini-ALTO showing the position of the mics with two 136mm pods.
Transparency
My main concern with colouration was not just the basket structure in general, but the thicker plastic rings that mark the join of the end caps to the cylindrical part of the windshield basket. The impact of such rings can be quite discernible with set ups in some windshields: others have noted the impact of the large rear plastic ring in the Rycote ORTF windshield, and I have noted and measured the impact of the still chunkier ring in the Rycote Cyclone on the sideward-facing lobes of the fig 8 mic when used for mid-side recording. The rings in the Mini-ALTO are much less substantial than in these examples, but, given the 80mm diameter of the basket, they are closer to the mics, so the key questions are: i) is the impact measurable?; ii) is there a difference between the impact in the two different pod sizes? and, iii) if there is a measurable impact, does this matter – i.e. does it translate to noticeable issues when making field recordings?
Without an anechoic chamber it is difficult to get an exact read on the transparency of any windshield, but, as I did with my original Mini-ALTO 115 test, for a reasonable quick and dirty test I placed a bare mic on the windshield ORTF shock-mount in front of a speaker (in my treated studio) playing pink noise, then carefully added the windshield pods without moving the mic for a second recording. I did this with the ORTF bar oriented square-on to the speaker (0 degrees), at 45 degrees and side-on to the speaker (90 degrees). I repeated the exercise for both the 90mm and 136mm pod sizes. The results for each pair of recording were compared using a spectrum analyzer and overlaid as follows:
Pink noise test with Mini-ALTO with ORTF bar square-on to the speaker (0 degrees), using one of the two mics only: green is the bare mic on the shock-mount and the red overlay is the recording with the 90mm basket pods added.Pink noise test with Mini-ALTO with ORTF bar square-on to the speaker (0 degrees), using one of the two mics only: green is the bare mic on the shock-mount and the red overlay is the recording with the 136mm basket pods added.
In these tests with the ORTF bar square-on to the speaker the sound is arriving at the cardioid mic about 63 degrees off-axis. In the case of the 90mm pods the plastic ring for the end caps is directly between source and capsule, whereas with the longer 136mm pods the ring sits beyond the direct line. Given this, it is not surprising to see a greater impact when the 90mm pods are used, in addition to some generally increasing attenuation of high frequencies, although the significant colouration only kicks in at 15.2kHz and above.
Pink noise test with Mini-ALTO with ORTF bar at 45 degrees to the speaker, using one of the two mics only: green is the bare mic on the shock-mount and the red overlay is the recording with the 90mm basket pods added.Pink noise test with Mini-ALTO with ORTF bar at 45 degrees to the speaker, using one of the two mics only: green is the bare mic on the shock-mount and the red overlay is the recording with the 136mm basket pods added.
In these tests with the ORTF bar at 45 degrees to the speaker the sound is arriving at the cardioid mic about 16 degrees off-axis. In the case of the 90mm pods the direct line between source and capsule is through the end cap of the windshield, whereas with the longer 136mm pods the direct line is through the cylindrical part of the basket and near to the end cap ring. It is interesting to see that, despite the seeming greater significance of the plastic ring to the 136mm pods at this angle, the colouration arising from the basket is a little less than with the 90mm pods.
Pink noise test with Mini-ALTO with ORTF bar at 90 degrees to the speaker, using one of the two mics only: green is the bare mic on the shock-mount and the red overlay is the recording with the 90mm basket pods added.Pink noise test with Mini-ALTO with ORTF bar at 90 degrees to the speaker, using one of the two mics only: green is the bare mic on the shock-mount and the red overlay is the recording with the 136mm basket pods added.
In these tests with the ORTF bar at 90 degrees to the speaker the sound is arriving at the cardioid mic at 35 degrees off-axis. In the case of both the 90mm and 136mm pods the direct line between source and capsule is along the longitudinal axis of the windshield and, thus, through the centre of the end cap of the windshield: in short, the mic position relative to the sound source, apart from being angled, is very much in accordance with a mono directional mic in the windshield as per the original design intention. As a result, the impact of the basket is minimal (and comparable to my previous tests of the Mini-ALTO 115 with a supercardioid mic), although a couple of troughs at high frequencies – at 15.2kHz and 17kHz – are visible with the 90mm pods.
For the purposes of comparison, here is my previous test of an MKH 8030 with the Min-ALTO basket turned side-on to the speaker source so that the fig 8 mic is on axis to the sound source:
Pink noise test with Mini-ALTO 115 with MKH8030 fig 8 mic aimed at speaker: green is the bare mic on the shock-mount and the red overlay is the recording with the basket added.
This is useful, since it shows that – within the limitations of this testing methodology – that the ORTF pair in the Mini-ALTO with 90mm and 136mm pods is less affected by the basket than the fig 8 mic in the Mini-ALTO 115. And for another comparison, here is the same fig 8 test repeated with a Rycote Cyclone.
Pink noise test with Cyclone (small) with MKH8030 fig 8 mic aimed at speaker: green is the bare mic on the shock-mount and the red overlay is the recording with the basket added.
The more significant impact of the Cyclone basket is doubtless largely due to the substantial plastic ring for its end cap.
The pink noise testing evidently shows some impact of the Mini-ALTO basket on the ORTF set up, much of which is a general and modest loss of high frequencies, with a few more obvious anomalies over 15kHz. The colouration, however, looks better than feared, not radically different between the two pod sizes, and, above all, less significant than that with a fig 8 in the Mini-ALTO 115 and far less than with a fig 8 in a Rycote Cyclone.
As I noted when I tested the Mini-ALTO 115, there is one thing demonstrating differences with this pink noise test or, indeed, more exhaustive and expert tests in an anechoic chamber, but how does the colouration actually sound? It is hard to come up with a perfect test, especially with limited resources, but I have settled on an approach that some at least may find informative. Eschewing the variability of successive live recordings, I placed the ORTF rig in front of a pair of speaker (Vivid S12s) in my studio and played back a short section of a recent recording of mine of a singer-guitarist (Luke Chapman), angling the ORTF bar square-on to the speaker, and with the mic aligned to the speaker so that it was 55 degrees off-axis. This positioning ensured that the plastic ring for the end cap was exactly on the line between the speaker and the mic with the 90mm pod, so very much the worse case positioning. Here are the resulting mono sound files:
If really keen, you can download the files and set them up in a DAW and flip between short repeated sections of each pair, which is what I have done. In both the recordings with the windshield you can hear the expected slight change to the high frequencies when the basket is added, as anticipated following the pink noise tests, but I would suggest that it is subtle and, therefore, unlikely to be of great significance to the majority of those making sound recordings in the field. Perhaps more importantly, there seems little practical reason to favour the longer 136mm pods over the more compact 90mm pods in terms of transparency: of course, there may be differences in wind protection, which is what we will explore next.
Wind protection
The laws of physics dictate that the small 80mm diameter of the Mini-ALTO cannot offer the wind protection of larger basket designs, and that was never the intention behind its compact design. That said, the small windshield performs reasonably well outdoors, and I was surprised in my original tests in breezy conditions to note that it outperformed the Rycote Nano Shield, which, although another smaller basket windshield design, has a larger cross-section (measuring internally 86mm high and, with its elliptical form, 107mm wide), although testing confirmed that larger windshields did provide better wind reduction. The questions I have for ORTF in a Mini-ALTO, therefore, are not how it compares to the same in much larger baskets, but the following: i) is there a noticeable difference in the wind reduction performance between the two different (i.e. 90mm and 136mm) pod sizes; and ii) how does the wind protection for an ORTF pair compare to that afforded to other rigs in a Mini-ALTO? With the last, I was particularly interested to see how the ORTF pair compares to a mid-side pair in a Mini-ALTO: if performance was similar to the last, then, given that I have been happy to use MS pairs in the Mini-ALTO where wind conditions allow and where compactness is paramount, this would mean that the ORTF design is similarly viable from a functional point of view.
First off, the matching front and rear pods provided by Radius Windshields for this whole experiment mean that the two Mini-ALTOs are non-standard lengths, so a couple of bespoke furs had to be made by the sewing department in Stroud. These are of the same, longer pile, grey fur that Radius provides as an option for the existing Mini-ALTOs and I have matching ones for my Mini-ALTO 115s. It might seem trivial or obvious, but it is important to have identical furs when testing the wind performance of the different rigs and pod sizes. Wind tests in the real world, where wind is turbulent and not laminar, are never quite as easy as you might think: simultaneous recordings are essential, of course, but the windshields have to be placed a bit apart to avoid one protecting or otherwise affecting the other, so wind gusts can vary a bit in terms of impact and timing. The other difficulty is matching mics: despite my growing mic locker I don’t have a stash of multiple MKH 8040 mics, but just one pair. My solution to this problem has been to record a single channel in each of the two Mini-ALTO ORTF rigs, which is fine: we are after a comparison of the wind performance of the two different sized pods not making beautiful stereo recordings, and this serves the purpose just as effectively. And for the comparison between ORTF and mid-side, where single-channel recording could be a bit misleading (i.e. comparing one channel of ORTF to, say, just the side mic of an MS pair seems like apples to oranges), I used the pair of MKH 8040s in ORTF in one of the test Mini-ALTOs and a MS pair of MKH 8030 and MKH 8090 in the Mini-ALTO 115 I use for MS: I’ve noted very little difference in wind performance with the wide cardioid vs the cardioid mics in MS.
Starting off with the windshields with no fur, here is an excerpt of a windy gust on a pretty breezy day, with the ORTF rig using 90mm pods compared to the Mini-ALTO 115 with an MS pair (MKH 8090 and MKH 8030).
And then compared using a spectrum analyzer and overlaid as follows:
Wind gust test with Mini-ALTO 115 with MS pair (MKH 8090 and MKH 8030) in green, with Mini-ALTO 90+90mm ORTF (MKH 8040) in red.
Both listening to the sound file and viewing the spectrum analyzer show that the ORTF pair in a Mini-ALTO with 90mm pods more than holds its own against the MS pair in the Mini-ALTO 115, each with the bare basket. But it is equally clear from the audio that the the differences are not constant. Moreover, we need to think about the impact of wind direction on performance, given that the two stereo pairs sit at 90 degrees to each other in relation to their windshields: in this example both mic pairs were side on to the wind direction, so that the ORTF windshield presented its small end-on form to the wind while the MS pair’s windshield presented its side to the wind. Changing this around by rotating the mic stand 90 degrees, here is a second set of recordings with the mics facing directly into the wind, so that the windshield housing the MS pair was end-on and the windshield housing the ORTF pair was side on.
The impact of wind on the MS pair is less in this second test compared to that on the ORTF pair. What we can draw from these comparisons, however, is that overall the ORTF pair in the 90mm pods seems to hold its own compared to the the Mini-ALTO 115 with an MS pair, with both baskets being bare.
Moving onto tests with furs added, which, of course, reflects more typical usage of the Mini-ALTOs outdoors, here we have a pair of ORTF and MS recordings with the wind coming from the side:
And then with the mic stand rotated 90 degree so that the two pairs are aimed into the wind, albeit with the ORTF pair’s windshield side-on to the wind and the MS pair’s windshield end-on to the wind:
So, the fur (while, of course, reducing wind noise) does not change the situation: the broadside offered by the windshield when an ORTF pair faces into it and the broadside of the windshield offered when an MS pair faces at 90 degrees to the wind are what creates the most windnoise. With this caveat, which has implications for usage (in any given situation one array may outperform the other: equally it could be argued that wind direction and sound source direction – if not negotiable by moving the mic position – might influence choice of mic array), there is no obvious difference in the overall wind performance and, to some extent, this is predictable given the mic capsule locations and orientations in the two arrays.
So now we should turn to the matter of the two pod sizes for the prototype ORTF rig: does the increased volume of the 136mm pod windshield offer an advantage in wind reduction over its shorter counterpart with the 90mm pods? For this, of course, I was able to orient the two windshields identically, and recorded a single cardioid in the ORTF rig in each simultaneously.
First up we have the 90mm pods (with fur) facing so that the wind direction was end-on to windshield:
And then the simultaneous recording using a Mini-ALTO with 136mm pods (with fur):
And then the mic stand was rotated 90 degrees so that wind direction was side-on to the windshields:
There is again some gust to gust variability between the two windshields, doubtless reflecting the highly localized differences in the turbulent wind you get in the real world, but there is nothing in these short clips (or, indeed, the much longer recordings I made) to suggest that the longer version of the ORTF Mini-ALTO with its 136mm-long pods outperforms the shorter 90mm version. This applies in both orientations into and at 90 degrees to the wind.
Conclusions
So what’s the verdict? Is an ORTF pair viable in the diminutive Mini-ALTO? If so, is a short symmetrical Mini-ALTO with two 90mm pods as effective as a longer version? My short answer is, yes, an ORTF pair is viable in a Mini-ALTO and that the advantages of pods longer than 90mm are so small as to be insignificant: so you might as well use the more compact 90mm pod version. Moreover, I would suggest that an ORTF pair is just as viable in a Mini-ALTO as a mid-side pair, although the number of cardioid mics that are short enough to make use of the 80mm diameter windshield for ORTF are few and far between: so far I have identified the MKH 8040 used here, the Schoeps CMC1 KV + Mk4, the Nevaton MC59S(C) and the upcoming DPA MMP-GS with the existing 4011 capsule as suitable candidates, and, in a third blog post, will be testing at least some of these. And there well be other mics that would fit without resulting in capsules close to the windshield basket. There are other caveats to add to this, but these are very much the same as with the Mini-ALTO for use with a mono directional mic: above all, a small diameter windshield will – all other things being equal – perform less well at reducing wind noise than a larger windshield; and, second, the structure of a basket, especially with significantly chunky plastic components, will provide colouration of sound above and beyond the curtailing of high-frequencies that is inherent to any fabric covering of a mic. So, of course, a Cinela Albert is a better bet for ORTF in terms of acoustic transparency and wind performance (as, indeed, is my own TIG-welded Mega-Blimp), but that’s not really the point: the Mini-ALTO is designed – above all – to be compact, to offer modest wind protection, and to allow rapid changing between bare mics and full basket. Now the latter, which is so relevant to production sound recording with a supercardioid or shotgun mic, may not be quite so relevant to an ORTF pair, but compactness is relevant to many recording in the field. Many people do seem to love dinky little recording rigs with miniscule recorders and lightweight stands (if a stand at all). For them, moving from a pair of furry slip-on covers for an ORTF pair on a stereo bar to a Mini-ALTO containing an ORTF pair would offer better wind performance and a more practical, transportable and robust form for the setup. For those already using ORTF in larger blimps, then a Mini-ALTO ORTF rig offers more compactness for those times when (small) size really matters, just as is the case for using the Mini-ALTO instead of larger windshields for MS or even DMS. Given that many windshields – I am thinking especially of traditional cylinder types such as the Rode, Rycote Modular and Rycote ORTF windshields – don’t have noticeably less colouration than a Mini-ALTO, for many it just comes down to size vs wind reduction: just as it would for a mono supercardioid or shotgun mic. So, yes, ORTF in a Mini-ALTO is usable and will appeal to many. Whether or not that translates to commercial viability is beyond me, not least given the small number of mics that are short enough: that is one for Simon Davies and the team at Radius Windshields to ponder. If the two blog posts on this experiment have piqued your interest, do get in touch with them (they are eminently approachable and responsive) and let them know as feedback will doubtless influence where they go with this!
The long-awaited Mini-ALTO windshields are rolling off the production line as fast as Radius Windshield’s small team can manage and are evidently going down a storm. As readers of this blog know, I’ve been playing with the Radius hoops since introduced and, more latterly, the pre-production Mini-ALTO 115 windshield (which I tested here). With the latter, my first thought was to stick a mid-side (MS) pair inside it and then, for a bit of fun, a double mid-side array. Well, the slightly mad schemes – at the opposite end of the spectrum size-wise from my DIY Mega-Blimp project – continue. In this case, the project began when John and Simon at Radius asked if I could squeeze an ORTF rig into a Mini-ALTO: not as a commercial commission, I must hasten to add, but just knowing I like a challenge and am always up for esoteric mic-mounting solutions. My first reaction was no, but thinking on it more – and having been rather immersed in ORTF lately (or, rather, an eight-mic ORTF-3D rig using Nevaton mics) – I decided to have a go.
The design problems
Straight off the bat there seemed two main issues. First, there was the common problem for anybody trying to fit ORTF pairs in a windshield: mic length means the capsules end up too near the basket edge for effective wind protection. Not for nothing did Rycote make a larger diameter windshield specifically for ORTF, and a much larger diameter for ORTF was one of the reasons behind my Mega-Blimp. With the diminutive 80mm diameter of the Mini-ALTO the problem is even greater than with a more standard 100mm diameter windshield. Second, the Mini-ALTOs have small rear pods and various – all longer – front pods, none of which are swappable from front to rear due to the polarity of the magnets that hold them in place: what would be needed is a longer rear pod and, ideally, matching pods front and rear. A third, more minor issue, is that the Mini-ALTOs are designed to be aimed at the subject on the longitudinal axis, so the base pivots the wrong way.
The design solutions
The solution to the small diameter of the Mini-ALTO – insofar as there could be one – was to use short mics and to offset the mic mounts from the centre-line of the windshield as far as possible. Most of the familiar small SDC mics are still too long, not least as connectors and, even when hard wired, projecting cables come into play: even the small Schoeps CCM4s seem too long once cables (and, for the popular Lemo version, connectors) are factored in, although the diminutive Schoeps CMC 1 KV preamp (with its side-exit cable) and an MK 4 capsule should fit. The Sennheiser MKH 8040, of which I own a pair, also seemed feasible, if only the short MZL connector (which can be used instead of the XLR module) didn’t have such a long rubber boot (itself over a long brass nipple) and then a cable projecting from this. Realizing I didn’t know what was inside an MZL, I worked out how to open one (OK, I just crudely levered the innards out with a penknife: but, no, it wasn’t one my precious Sennheiser MZL 8003 remote cables that I butchered!), and saw that there was scope to have a side-exit. A quick slice with a Dremel blade removed the brass nipple, and it was equally easy to drill a hole in the brass casing: 10 minutes and I had my proof of concept. I wasn’t convinced about my skills to take apart an MZL properly or to wire them up, so, in exchange for doing the slicing and drilling of a batch of forty (that was a fun lunchtime activity!), Ed Kelland at ETK Cables made up some cables for me: I suspect his right-angled custom MZLs might sell like proverbial hot cakes, if I don’t grab them all myself (the super-short MKH 8000 mics that result are really useful for all sorts of other arrays, not just ORTF)!
My working through to the shorter MZL solution, with the mics in an early iteration of the ORTF mount.And here’s the cable I am actually using, kindly put together for me by experienced wireman Ed Kelland at ETK Cables.
With mic length sorted – or minimized as far as I could achieve using a mic commonly used for field recording and production sound – it was time to move on to the second problem. The key to mounting the mics was, of course, to keep the hoops where they normally sit in a Mini-ALTO, but have them hold a bar to which the mics are clipped. I had been doing the same for the ORTF-3D rig, so it was an obvious choice. Then it was just a matter of making various iterations of the design (thanks to the 3d-printer) until I got the right balance between keeping the capsules away from the basket edge on one side, and the keeping the back of the mics (or the customized MZLs) away from the other side. It was really satisfying that by the time I got to the sixth version (there were other changes along the way) I got the centre of the diaphragms on the centre-line of the windshield: there’s nothing magical about that (getting it back from the centre-line would have been better in such a small windshield), but at least it doesn’t feel as if the design leaves the mic capsules right up close to the basket. And clearance at the rear is enough that the mics don’t knock against the basket in normal use: I assumed that an ORTF-equipped windshield would not be handheld by a circus acrobat recording themselves in action…
The model of the bar and clips shown with the mics, giving main dimensions.The finished design, 3d printed and tilted sideways so I could photograph it.Rear view: you can see the ball joint I am using instead of the standard base.Front view.End view.End view with pod attached: the rear of mic clearance is actually better than this photo suggests, partly due to perspective, and partly because the basket narrows very slightly at the central plastic ring (which isn’t near the mics).
As for the short rear pod and unequal length of pods, Radius sorted that by getting a couple of pairs of symmetrical pods made up for these tests. That was easy – at least for me. The reason I wanted a couple of pairs is that I was concerned about the impact of the plastic ring that marks the division between the end-cap and cylindrical body of the basket. The large thick plastic ring (bigger at one end) of the dedicated Rycote ORTF windshield has an impact on the sound, and I have been concerned with the impact of large plastic elements in other designs when using mid-side pairs: for example, the chunky ring on a Cyclone has a measurable impact on the sideways-facing fig 8 mic (which may or may not matter for a recording). The Mini-ALTO end-cap rings are nothing like as chunky and such plastic elements don’t worry many a recordist, but I think it will be instructive to test the difference between a pair of shorter 90mm pods (where the end-cap rings sit inside the 110 degree angle between the mics) and longer 136mm pods (where the end-cap rings sit outside the 110 degree angle between the mics). I will cover these tests and, also, some field recording tests in part 2 of this blog post (by which time, I hope, Radius may have made a fur to fit the new windshield lengths: it will be good to compare how it performs in wind against, say, an MS pair in a Mini-ALTO 115).
Mini-ALTO baskets, top to bottom: 136mm symmetrical pair; 90mm symmetrical pair; and, bottom, my standard 115 model (the smallest) with its unequal front and rear pods.
And, finally, to the problem of the mic base pivot being oriented 90 degrees from what would suit ORTF. Well, for that I just 3d-printed a new base for the Mini-ALTO that has a 3/8″ thread and fitted it to a Gravity MS QT 1 BQuick-Tilt Microphone Adapter. A slightly clunky and chunky solution for now, but I know that Simon and Tim at Radius have been working on a small ball-joint mount anyway that will work with the Mini-ALTOs.
What is less certain is whether they will take my ORTF design and refine it into an actual injection-moulded product. I guess that will depend partly on the testing (do come back for part 2 of this blog post) and partly on practicalities and whether they think there is a market. But, even if not, just as with the other parts I have designed to fit Radius hoops (e.g. the MS clips), I will make the parts shown freely available for 3d printing: of course, this would be rather dependent on the matching pods becoming available!