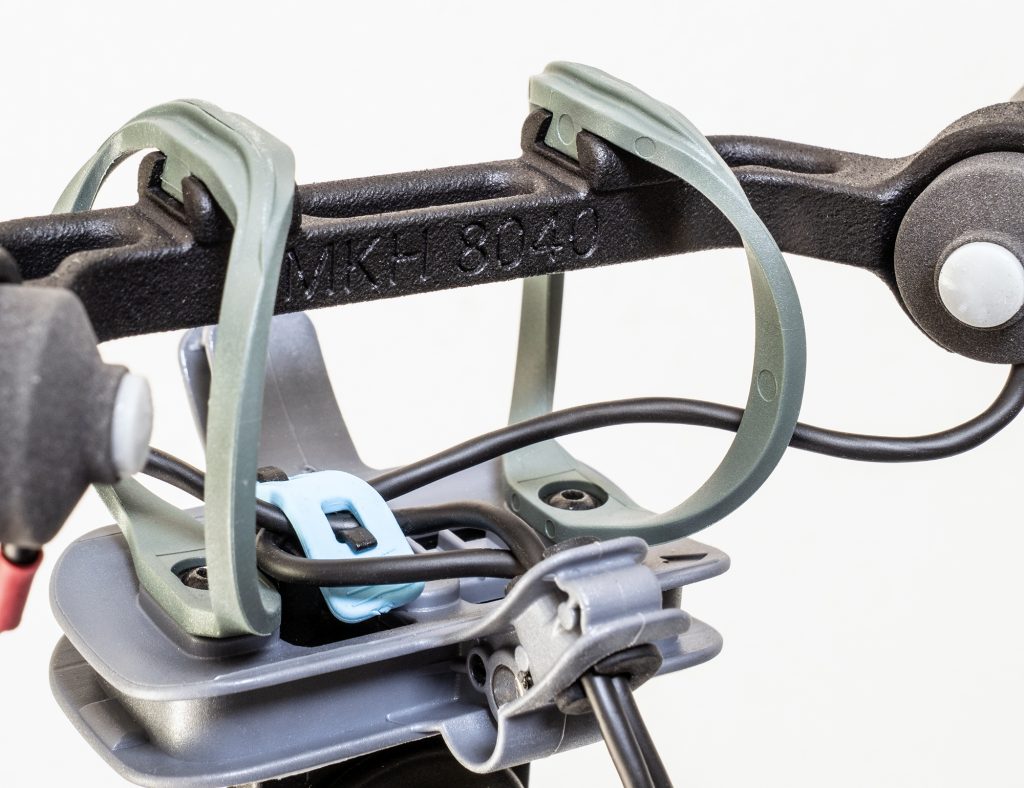
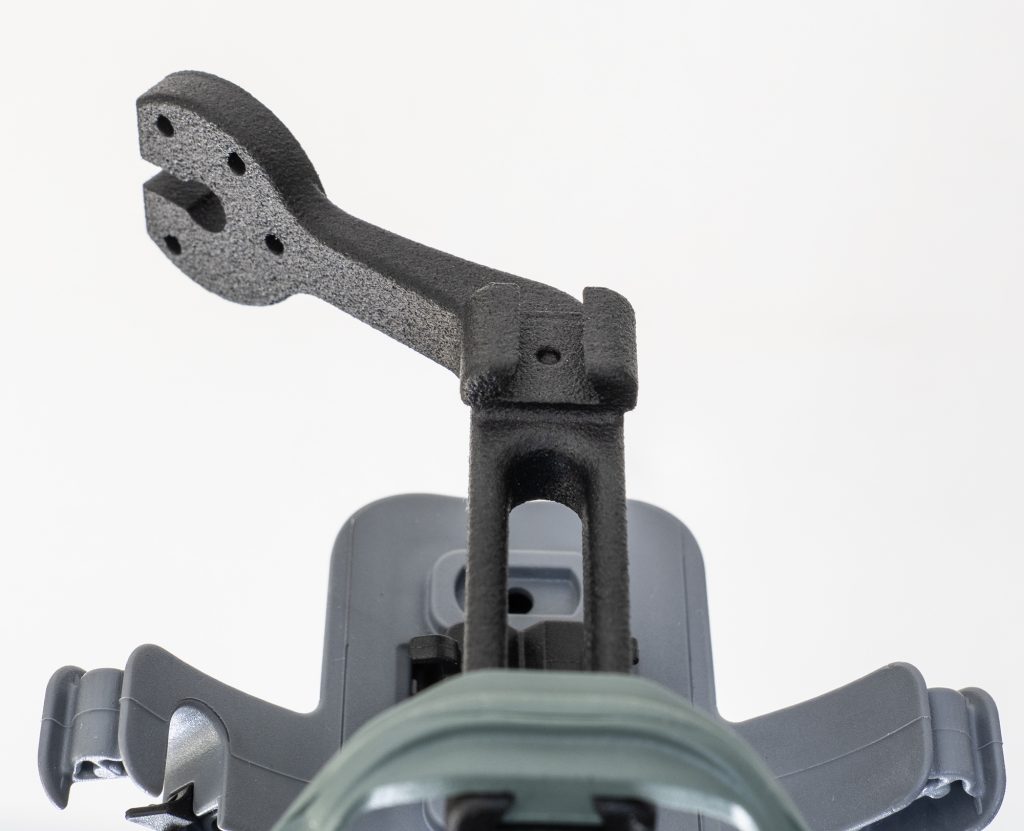
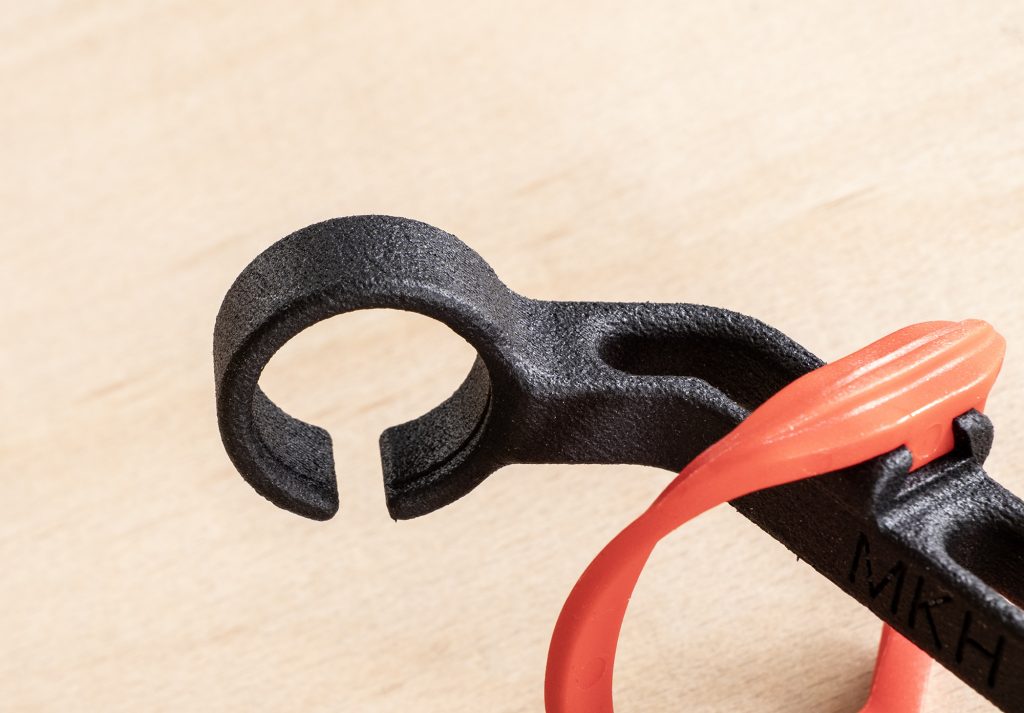
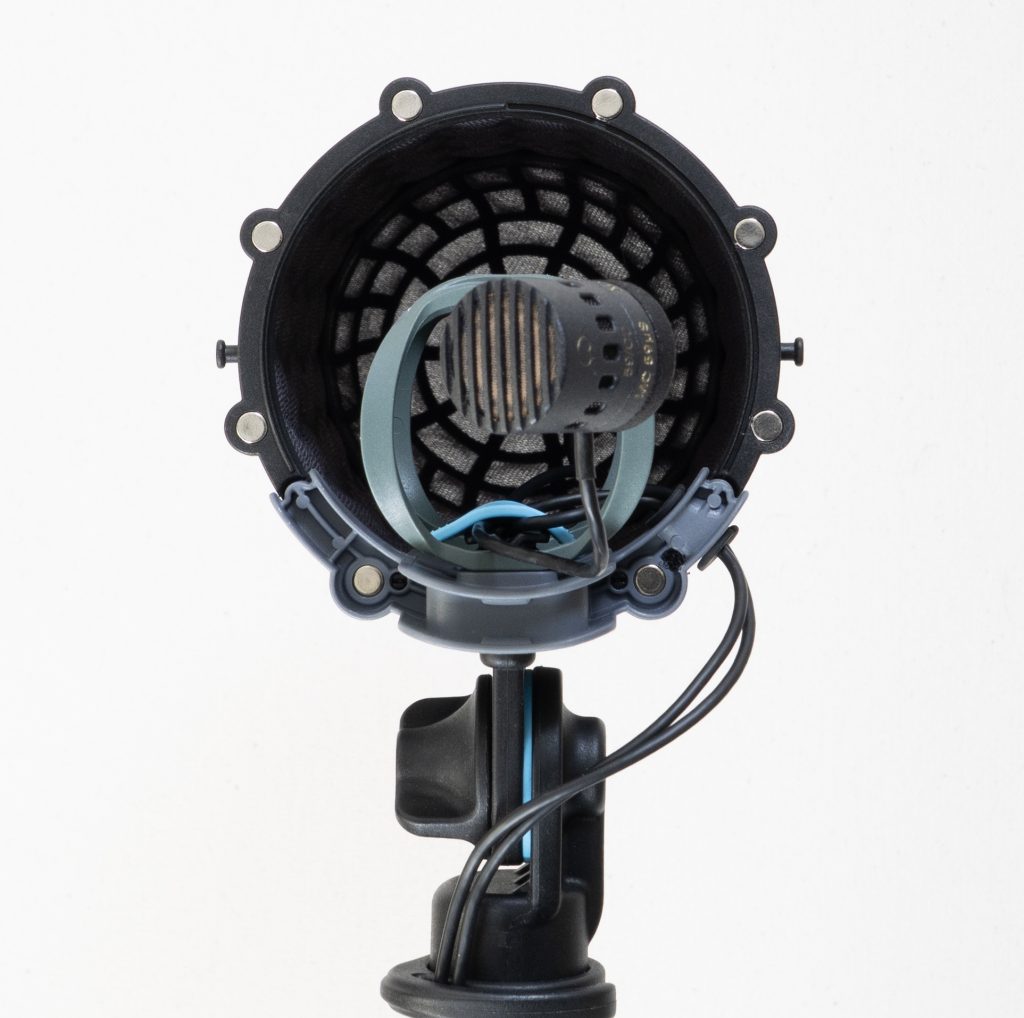
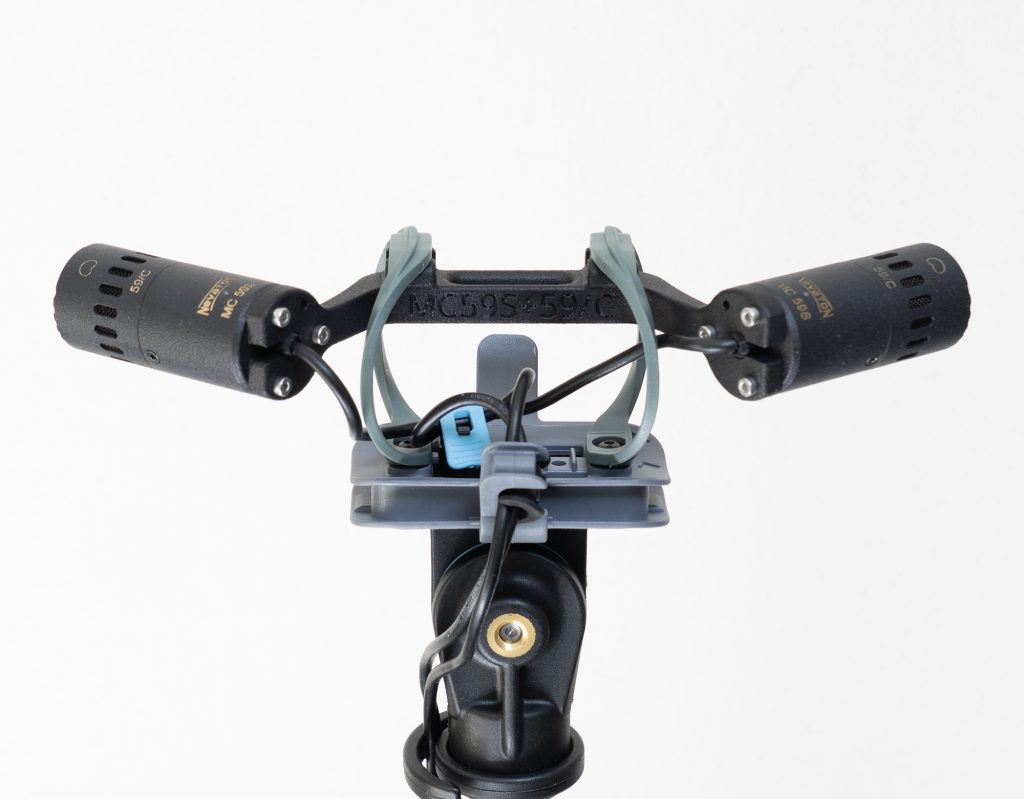
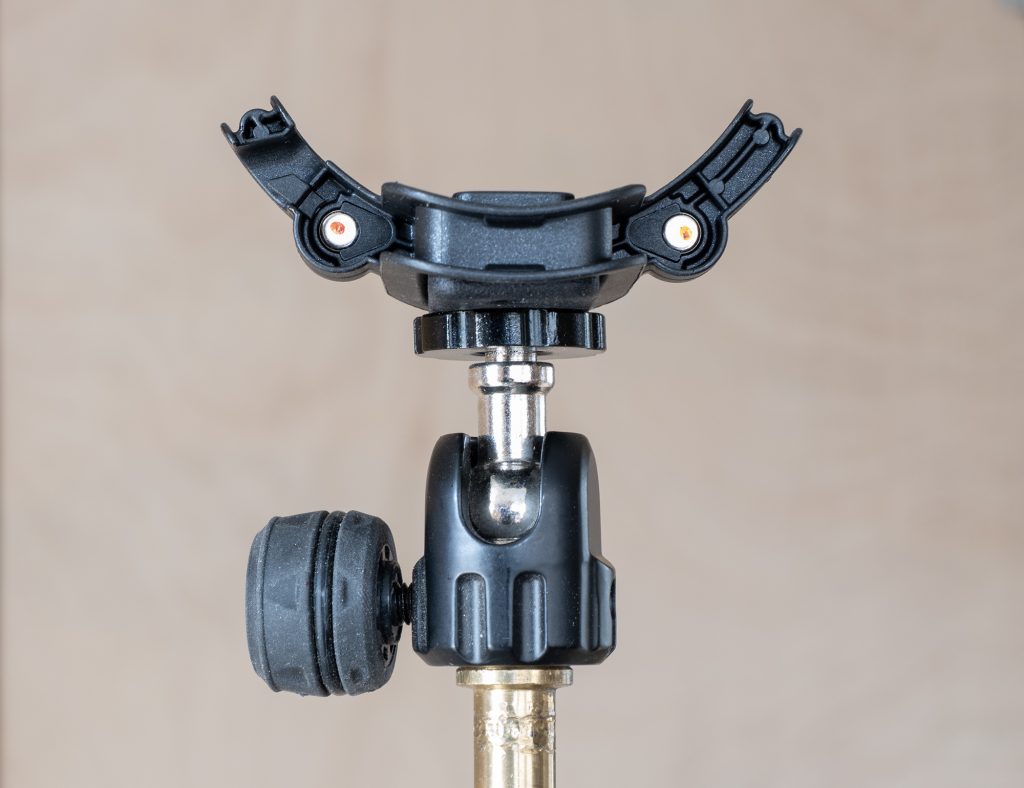
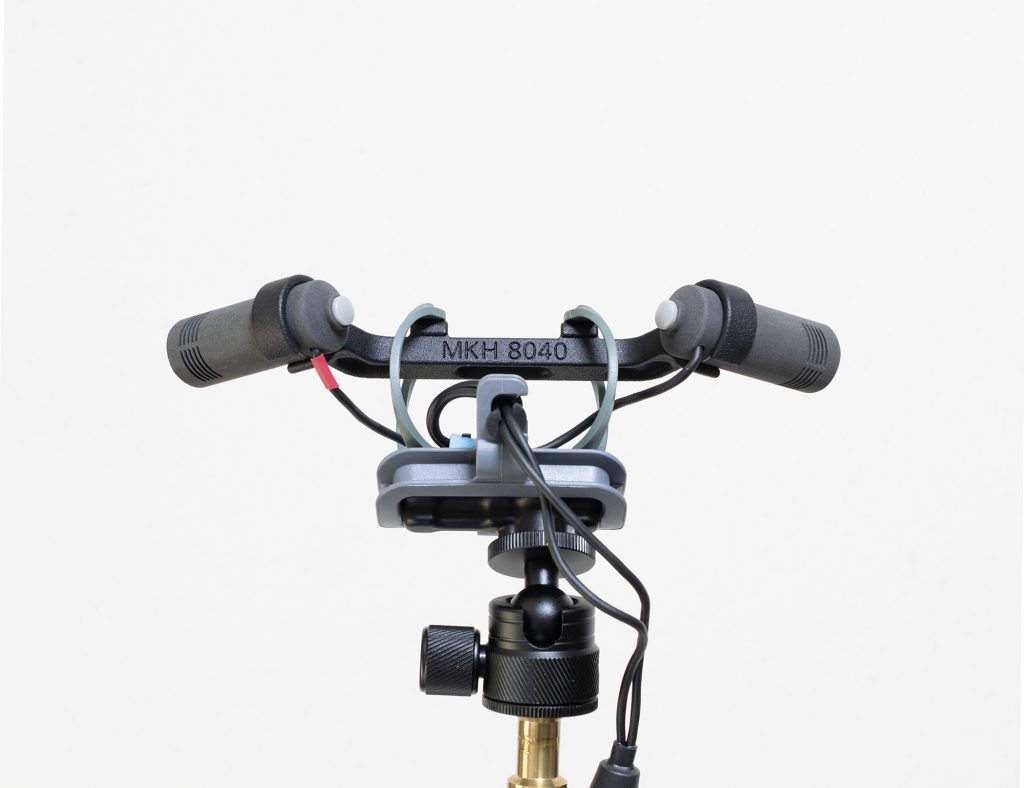
Close-up of the new Radius Mini-RAD hoops showing dovetail connection to a new MJF-printed ORTF bar for the Mini-ALTO (in this case for the MKH 8040).
Introduction
Last year I wrote a three-part series on fitting an ORTF pair in the diminutive 80mm diameter Mini-ALTO from Radius Windshields. This was, as I described, a (non-commercial) challenge from John and Simon at Radius, and I made the task a little trickier for myself by keeping the capsules of the mics on the centre-line of the windshield: too often people squeeze ORTF pairs into windshields with the capsules right against the basket, with consequent impact on wind protection. The result, as readers may recall, was a series of designs for some suitably short mics: the small cardioids I found that fitted properly were limited to the Schoeps CMC 1 KV + MK4, the DPA 4011 + MMP-GS or MMP-ES preamp, the Nevaton MC 59S + 59/C, and the Sennheiser MKH 8040. The first three are hard-wired and, crucially, avoid the projection of connectors, while the Sennheiser needs a custom MZL connector to become short enough to fit. Since then, I have added the new Nevaton MC59uS + C2 combination, which, with a length of 23.5mm, is unbelievably short for a cardioid mic.
In an update to part 3 of the original series on the ORTF in a Mini-ALTO project, I added that Radius Windshields had introduced an ORTF add-on kit with the necessary symmetrical pods (each 90mm) and fur to fit, and that Ed at ETK Cables was producing Y-cables with the customized MZLs necessary for the MKH 8040 version. I also posted links to (freely available) parts for 3d printing so that readers could make their own mounts, and I have had some feedback from those that have done this. Obviously, refinement of the mounts and turning them from homely 3d prints to injection-moulded parts would have been great, but, needless to say, ORTF in a Mini-ALTO is a tiny potential market for Radius Windshields – not least given that the necessary mics are, for the most part, relatively unusual: only the MKH 8040 is what one might call a ‘mainstream’ cardioid used in field recording and, indeed, it is this for which I have seen most interest (as gathered from feedback by those DIY-ing their mounts from my 3d files).
So the project could well have rested there, except for two things: first, I have been experimenting with getting Multi Jet Fusion (MJF) 3d prints made for me; and, second, the advent of the new Mini-RAD hoops got me thinking about revision of the ORTF in a Mini-ALTO design. This post, therefore, is about how those two aspects have come together and nudged the project on.
Detail showing the dovetail joint on the top of one of the MJF bars to fit the Mini-RAD hoops: the dimple mates with the pip on the underside of the Mini-RAD’s dovetail to ensure that nothing slips out. They are a tight fit anyway.
The revised design
The attraction of MJF printing for me, vs my modest 3d printing at home, has been that it liberates the designs from a flat bed. I know that people use supports, that are then removed, in their prints, but I have had little joy with this and invariably end up with a pile of spaghetti. So, getting one-piece prints of complex pieces instead of having to make them up piecemeal, with brass inserts and screws holding them together, seemed a real advantage: in short, for much I am doing nowadays I am using the little printer I have here (a Bambu Lab A1 Mini) to test things, then get them printed commercially using MJF technology.
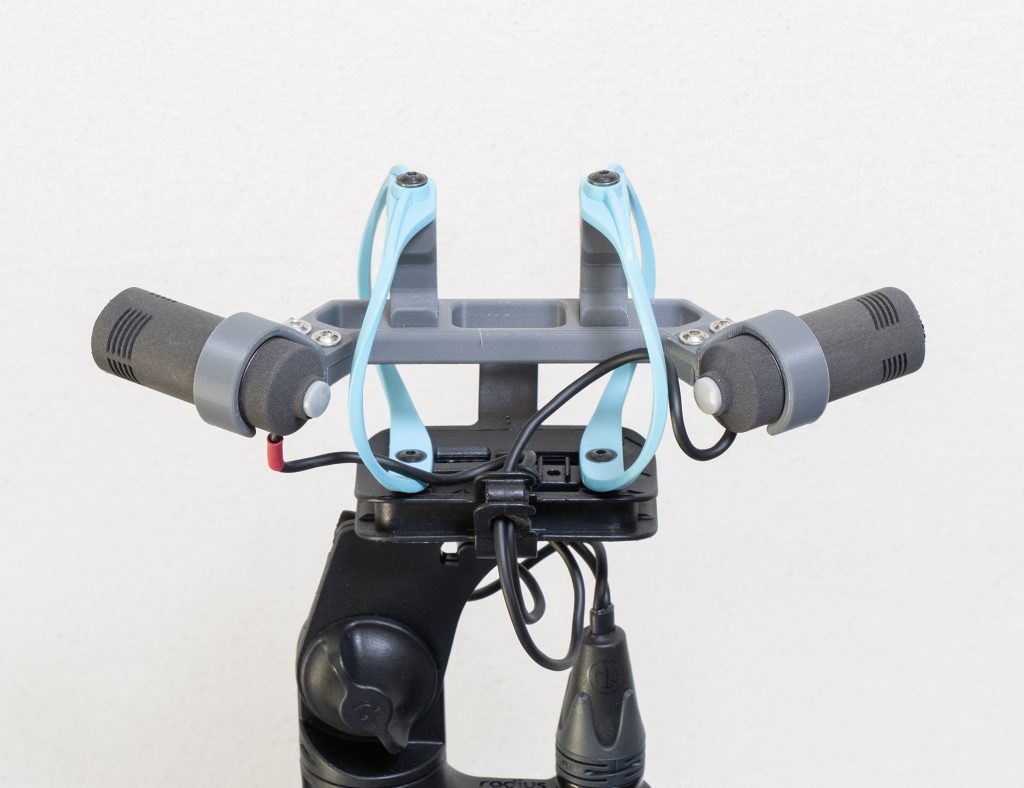
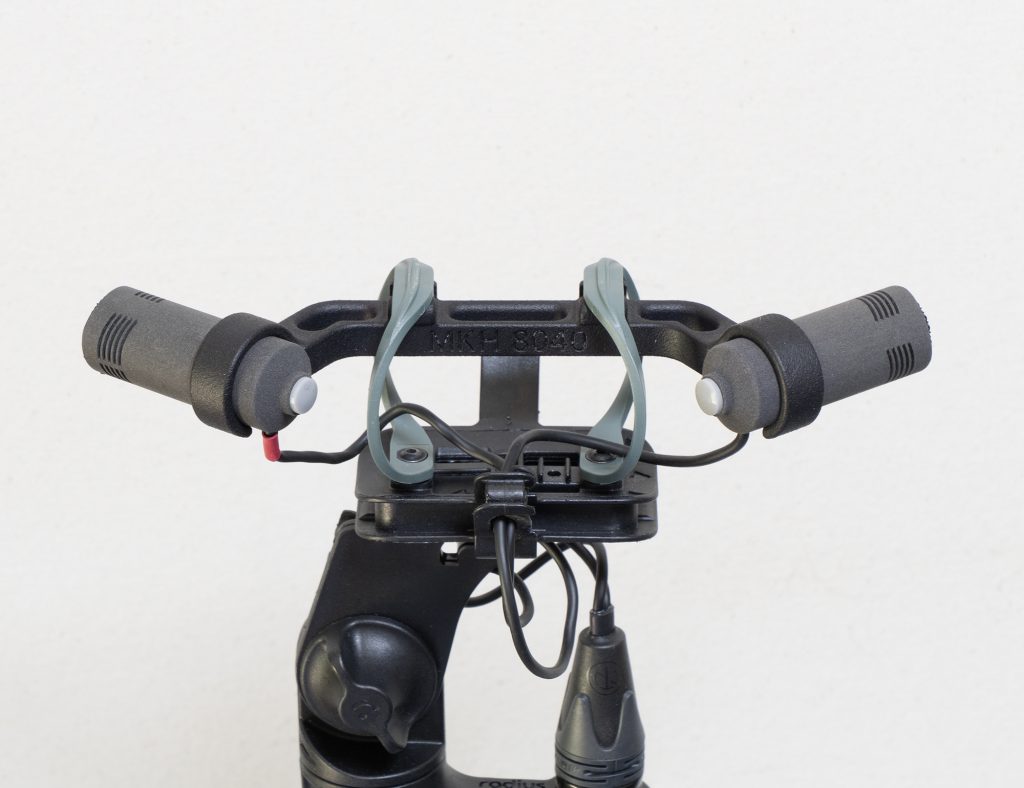
I had just begun refining the ORTF bar designs for MJF printing – essentially combining the mic clips/mounts with the bar that holds the mics at the right angle and spacings, when I realized that the pre-production Mini-RAD hoops from Radius were imminent and that by using these I could simplify the designs. All the mounts for the ORTF pairs for the Mini-ALTOs had a common feature in that two posts or connectors linking the ORTF bar to the top of the hoops, so that the bar and the mics sat centrally in the windshield. With the much smaller Mini-RAD hoops (they are c.19mm shorter internally) it was clear that the posts/connectors could be removed from the design, and, instead, the ORTF bar could be fixed directly to the hoops. Also, the Mini-RAD hoops do not have a screw fitting at the top, as found in the standard hoops, but, rather, use a dovetail joint to connect: the dovetail includes a pip, which fits into a dimple in the Radius clips to ensure that the two parts don’t slip.
OK, a picture is worth a thousand words, so here are a few that, I hope, clarify how the new designs work and compare to the previous approach. In these examples, the updated designs are for the two Nevaton variations and for the Sennheiser MKH 8040, for the simple reason that I own these mics: I had to borrow the Schoeps and DPA short cardioids for the designs and tests last year.
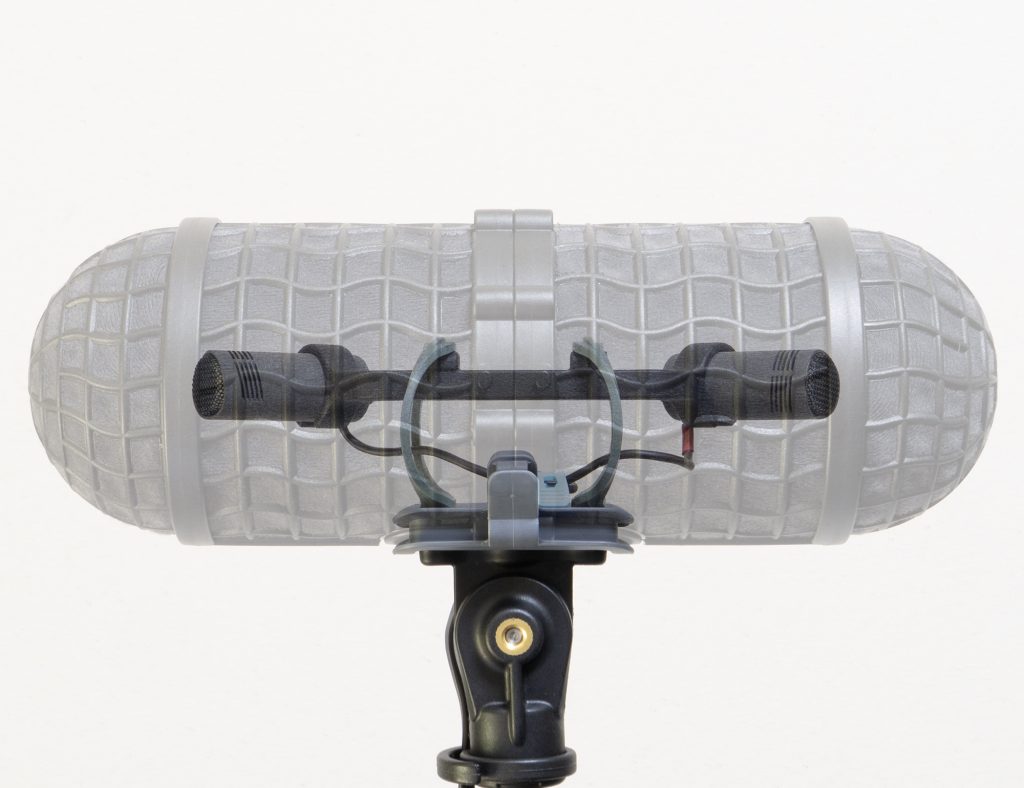
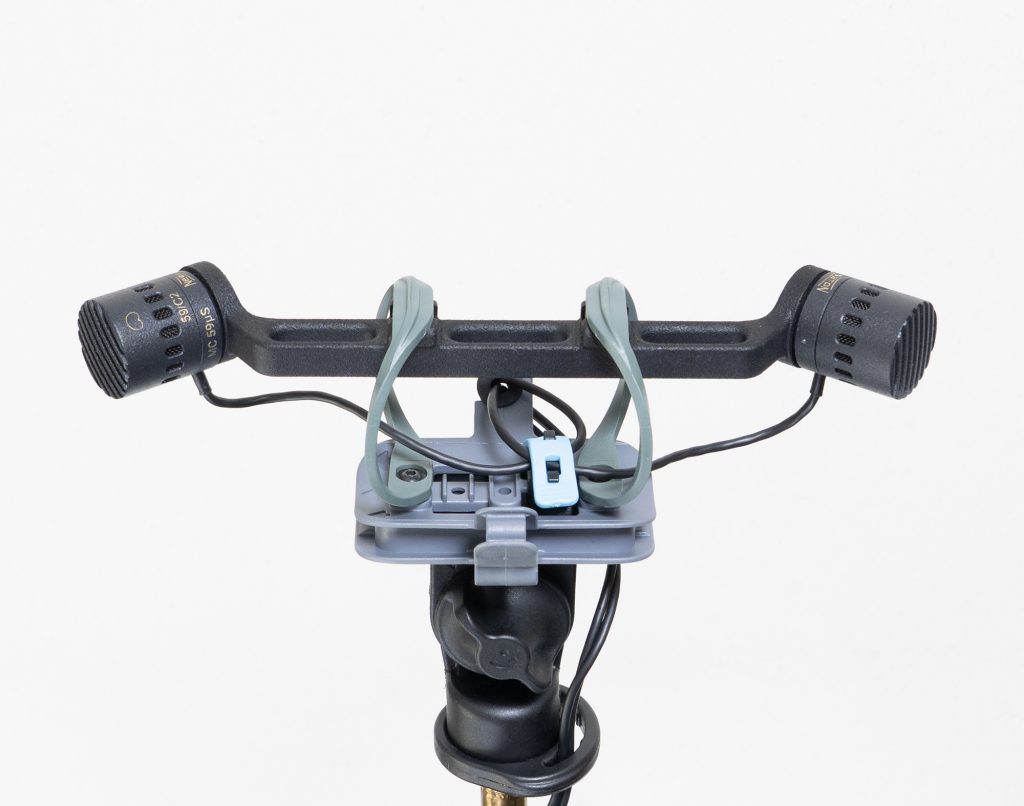
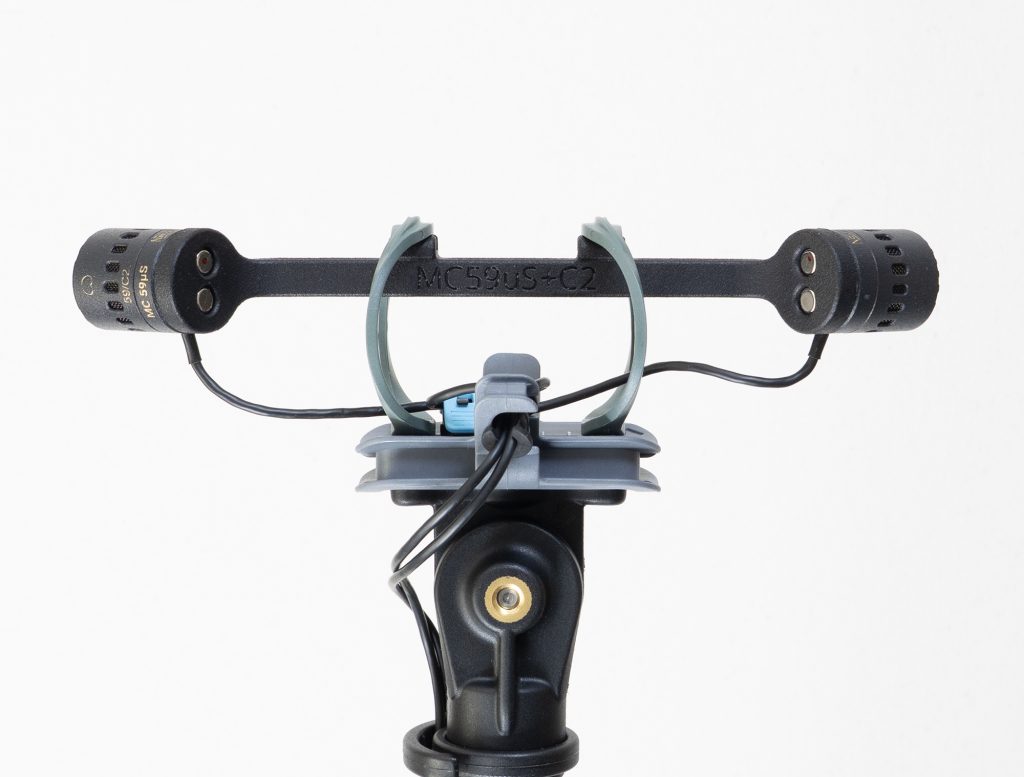
Here – as a recap – is the previous design with the standard RAD-2 hoops, showing the posts that connect the hoops to the ORTF bar and the separate clips for the mics themselves (in this case, MKH 8040): so a five-part assembly.And here is the revised design, with the one-piece MJF printed ORTF bar with integrated clips and no posts necessary to connect to the hoops. Again the mics are MKH 8040.Close-up of the new ORTF bar for the MKH 8040 showing the small groove inside the mic clips that ensures correct positioning of the mics (there is a slight projection where MZL meets the body of the mic).Composite image showing the ORTF bar with Mini-RAD hoops within the Mini-ALTO ORTF edition (i.e. with two 90mm pods), showing how the bar and the mics sit centrally in terms of height within the windshield.A single-piece MJF ORTF bar with the new Mini-RAD hoops, with the very short Nevaton MC59uS + C2 combination.Rear view of the bar for the Nevaton MC59uS + C2, showing the magnetic mounting of the mics.Side view of the Nevaton MC59uS + C2 ORTF pair, showing that the capsules remain central to the windshield basket: essential to maximize wind reduction.Mini-RAD ORTF bar for the Nevaton MC59S + 59/C combination: the preamps in this case are attached to the bar with M2 screws.
Conclusions
So there we go. From tests, there is no difference in performance and, indeed, you wouldn’t expect there to be, as long as the right compliance hoops are used (and the smaller hoops need a softer Hytrel to match the compliance of the larger hoops: for example, 45D shore in the Mini-RAD is roughly equal to 55D shore in the standard hoops; 55D = 62D etc.). But the new designs are useful simplifications of the previous versions, a lot further on from proof-of-concept designs, and as near as possible to the slick and robust injection-moulded versions that would be the ultimate, but which I think are not commercially viable. I hope this postscript to the original series on the ORTF in a Mini-ALTO project inspires others to venture along the route of bespoke shockmounts. And let it serve as a warning: the Mini-RAD hoops will doubtless feature in more elaborate and esoteric shockmount designs here!
Update: 22.7.2026
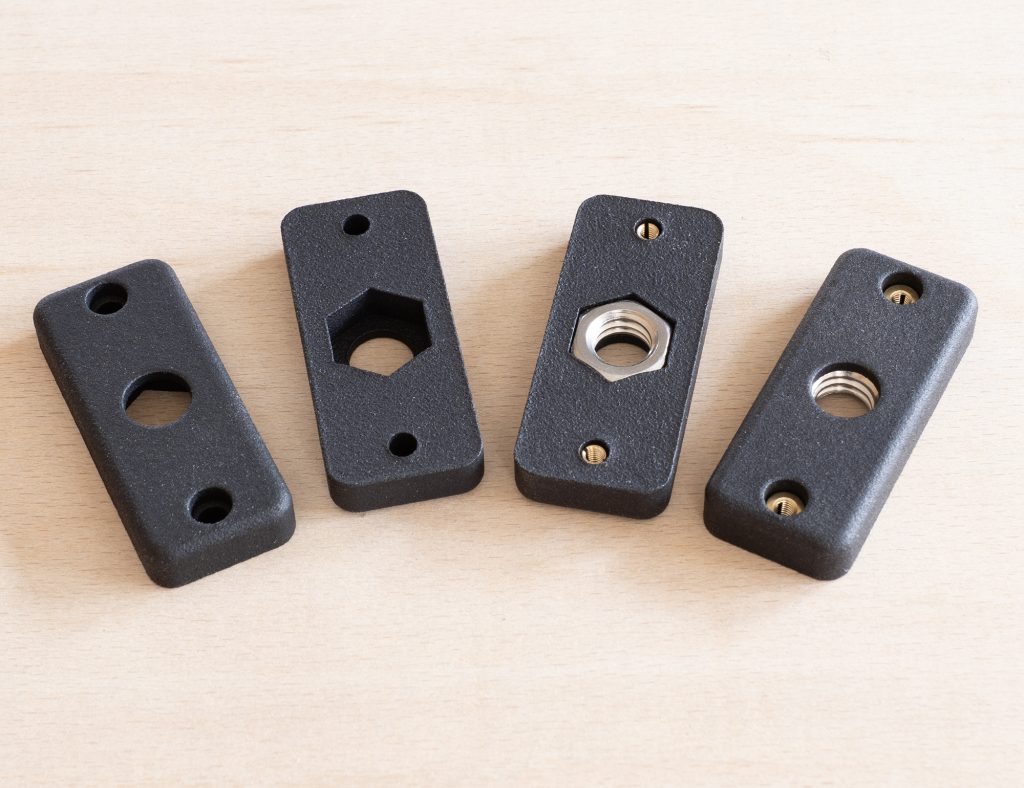
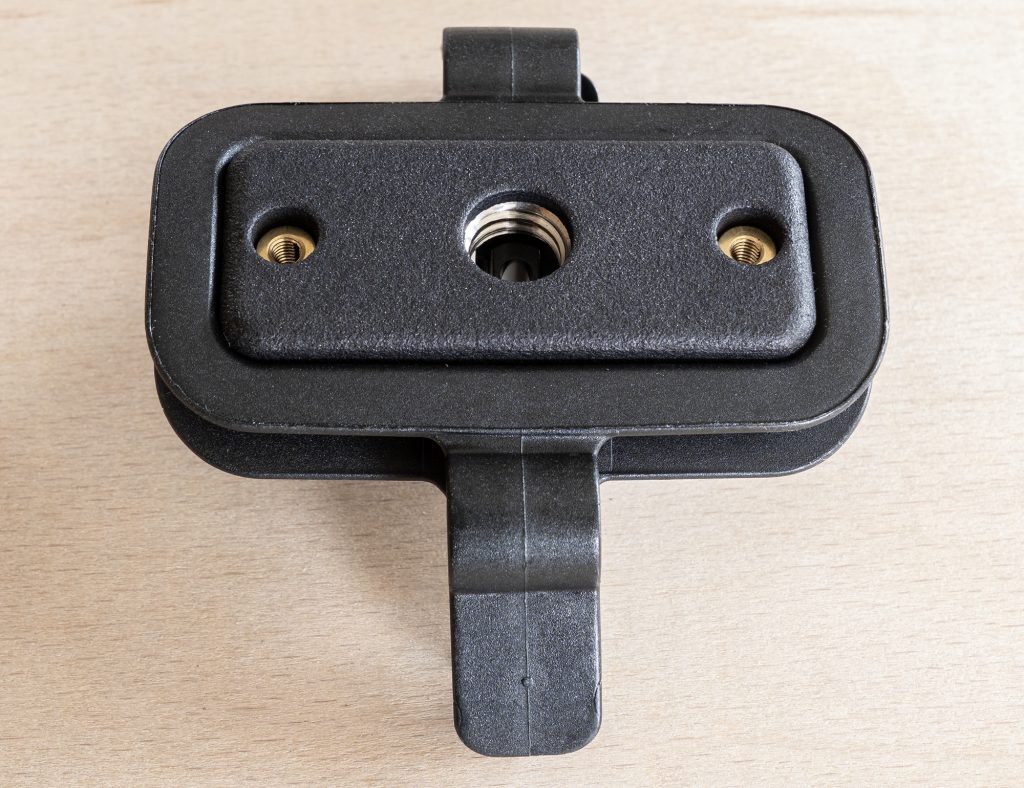
A postscript to a postscript? Hmm. Anyway, just thought I should add a short piece on base adapters. Obviously, the pivoting bases for RAD-2 and Mini-ALTO connections to boom poles, stands etc. pivot up and down the way expected for a mono mic or, indeed, an MS pair, but not for an ORTF pair where the windshields is used side-on to the sound source. In my original development of a 3d-printed solution I came up with a very simple base that allowed a 3/8″ connection to a ball head, and I have very slightly tweaked that basic design for MJF printing, retaining the captive 3/8″ UNC nut (a nice tight fit into the MJF base) and M3 brass inserts:
Simple base adapter in MJF with and without the 3/8″ UNC stainless-steel nut and M3 brass inserts.Simple base adapter in MJF inserted in the bottom of the ‘smiley face’ of the Mini-ALTO.Simple base adapter in MJF inserted in the bottom of the ‘smiley face’ of the Mini-ALTO, with a 3/8″ ball-joint attached (in this case the Gravity MSQT1B).
In due course I am sure Radius will produce something rather better and, indeed, their upcoming 1/4″ adapter bar is not at all bad and, with it’s 1/4″ female thread, allows use of some well-machined small ball joints that are rather nicer than the 3/8″ one from Gravity pictured above.
ORTF pair with upcoming Radius Windshields 1/4″ adapter bar – printed in MJF prior to the injection-moulded version being made – connecting the ‘smiley face’ to the ball joint (in this case one branded ‘Innorel’, but seemingly sold under several names: but nicely made nonetheless).
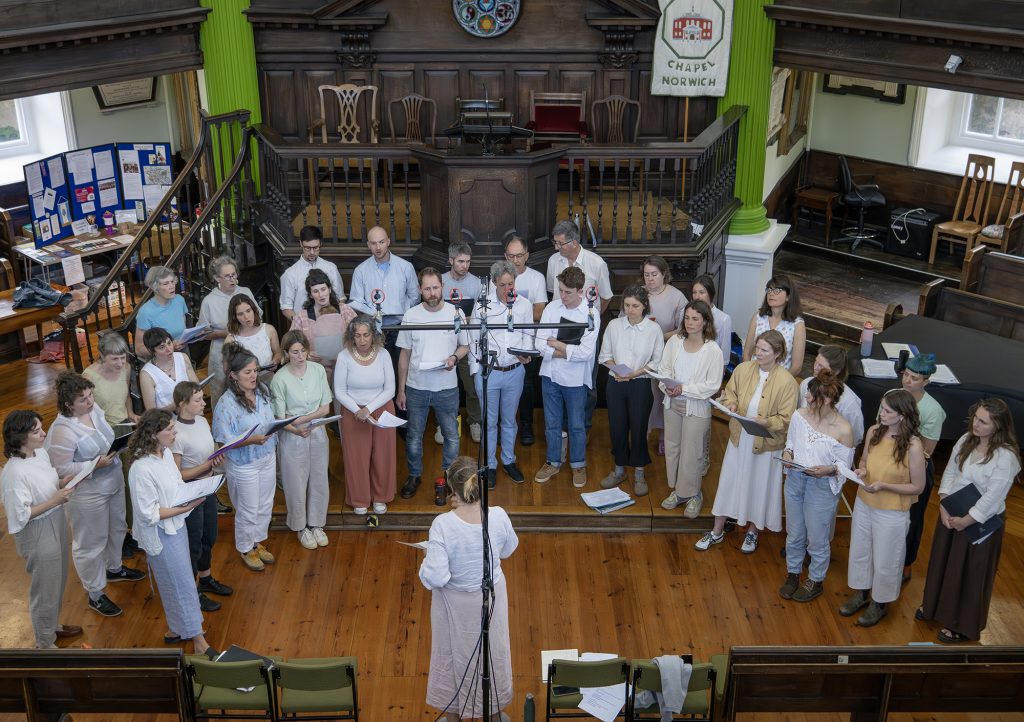
Last week I had the pleasure of making a few recordings with simple videography of the Embers choir – a Norwich-based community choir led by Deva O’Neill, who sing a wide range of European folk songs. I stumbled across a few phone videos of them on-line, and thought the choir sounded great, so got in touch and offered to help produce a few videos with – hopefully – better sound: the sort of thing they could use on social media, and, of course, that are always nice to have as a record for posterity. Fortunately they were game for it. Normally the choir practices in the Martineau Hall, but, for the purposes of recording, I suggested that they book the wonderful Octagon Chapel, which is next door in Colegate. It is a fine Nonconformist chapel built in 1754-6 by the Norwich-based architect and builder, Thomas Ivory, and, happily, has excellent acoustics. The recording was to be a simple affair: setting up at the beginning of their weekly practice, recording and filming three songs once they had warmed up and got into their stride, and when the gear was ready. Nothing elaborate, and not for a commercial album release etc. The choir were so welcoming and friendly, had thoughtfully turned up in muted colours (and not a stripe – the bane of videography – in sight: I hadn’t even remembered to request this!) yet conscientious and focused. It was a delightful evening.
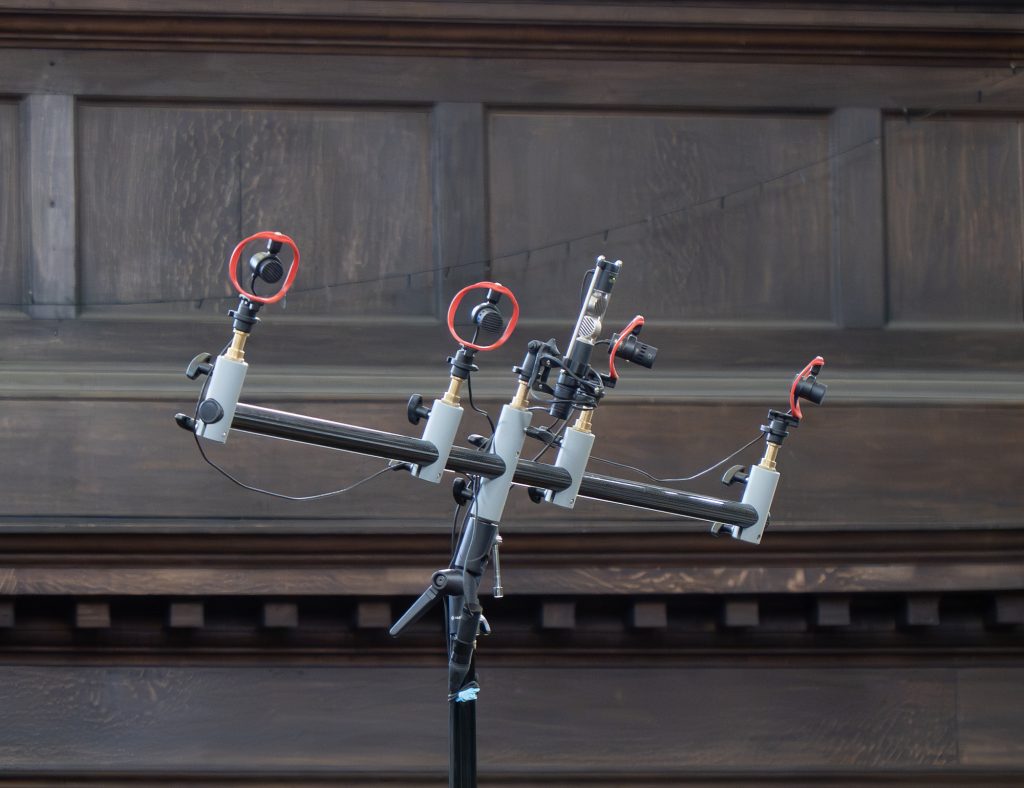
Modified Manfrotto 154b stereo bar with the omni AB and NOS pairs (aka an OCCO rig) flanking the DMS rig in the centre.
The mic rigs
With minimal set up time, I wanted options from which I could select in post, so thought I would try pairs of omnis and cardioids, along with one of my twin-based DMS rigs. For consistency I decided to go with mics from one manufacturer, so, as still immersed in much testing of their mics, went for the Nevaton option. With a new addition to my various Manfrotto 154b stereo bars of a 1m-long carbon-fibre tube (which, as with the stock and modified aluminium ones, I filled with rockwool to remove any resonances), I went for omnis (MC59/O) spaced at 1m (slightly toed out), with a NOS pair of cardioids (MC59S/C) between (i.e. 300mm spacing and angled 90 degrees relative to each other), with a DMS pair of an MC59 Twin and MC59/8 in the centre. Essentially an OCCO set up with DMS thrown in. The mics were all mounted in Radius Windshield shockmounts – the omni and cardioid pairs on the little field-edition mounts with 55D-shore hoops (in the prototype evil red that I love!), and the DMS pair in stiffer black 72D-shore hoops. The bar was mounted on a Manfrotto 1004BAC stand, suitably sandbagged, and the seven cables ran to a Sound Devices 788T (I had a passive splitter too, and a second recorder for redundancy). Well, that’s about it: all very simple, and when the choir kicked off they did one take for each of the three pieces they wanted to record. They were content with each of the first takes, though for safety I should perhaps have suggested a second take of each, but it is hard when people are happy, they are not being paid, you are a new face, and the stakes are modest! Anyway, we got away with it (mostly: the sharp-eared will notice a few things of course!).
The recordings
Having a few options means that – aside from covering myself when recording – this is a chance to make a few comparisons, not just with the mic pairs individually, but also in combination (OCCO pairs are often used with one pair dominant and the other pair added at a lower level). Moreover, it gives a chance to compare NOS and omni pairs to DMS decoded to stereo in different ways including those surprising options in Harpex-X for near-coincident and spaced pairs (yes, the mind boggles how this can work!): just how different does DMS decoded to NOS or AB 100cm sound to the real things? So there is much to chew over after the primary work is done, with the three short videos and recordings sent off to the choir.
In fact there are so many permutations, I’m not sure where to start. First off, perhaps best to give the NOS and omni AB 100cm pair:
Then mixing these together, as if often the case with OCCO rigs, here is the NOS + omni AB 100cm with the latter down 9dB, and the reverse:
For the DMS here is a decode to a Blumlein pair, which works well (and, of course, is a logical decoding in Harpex-X):
And, finally and less convincingly (given the difficulty of creating a virtual near-coincident or spaced pair from a coincident array), here are the DMS pair decoded to both NOS and omni AB 100cm in Harpex-X:
These files can be downloaded, mixed, compared (with levels changed as needed) etc., but, for a comparison across a song here is a video that sees the mic pairs and combinations swap on the fly:
Conclusions
There are some obvious ones: DMS decoding in Harpex-X to virtual near-coincident and spaced pairs doesn’t sound much like the real NOS and omni AB 100cm pairs and is decidedly worse in both cases. Perhaps others have found success with it, but I’ve been a bit sceptical of such options in Harpex-X and, it seems, with good reason: it is not something I have used before and I won’t be doing so again! The DMS decode to a Blumlein pair (i.e. crossed fig 8s angled at 45 degrees to the front), however, is much better, which is not surprising given that Blumlein and DMS are coincident and mathematically equivalent set ups (although, of course, DMS allows much more flexibility in post): and, of course, the use here of a twin mic for the forward and rear-facing mid mics makes for greater coincidentality than with two separate cardioids. I can’t say that I am very keen on the omni AB 100cm pair, which sounds rather swampy, but that isn’t surprising: if using an omni AB pair on its own I would not go as wide as this. The NOS and omni AB pair combinations (i.e. with one pair down by 9dB and vice versa) sound rather better and, also, the NOS pair alone sounds fine. For the finished videos, however, I went for the DMS decode to Blumlein: as readers of this blog will have realized by now, I do like MS (and related techniques such as DMS) and Blumlein, but, quite reasonably, you may prefer a different option! Anyway, I hope one or two find this useful food for thought and an encouragement to undertake your own tests.
Oh, and for completeness, here are the three videos as finished:
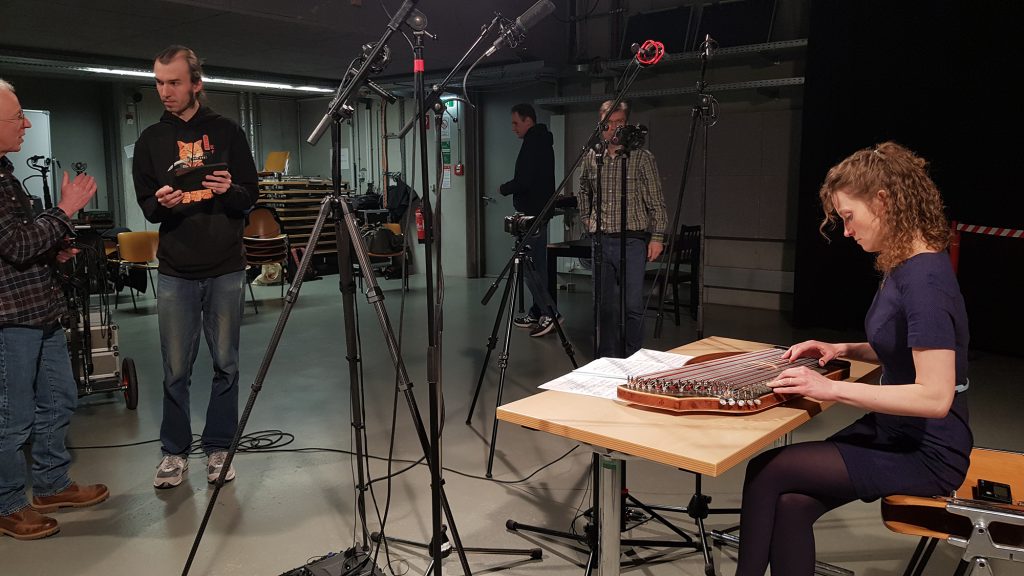
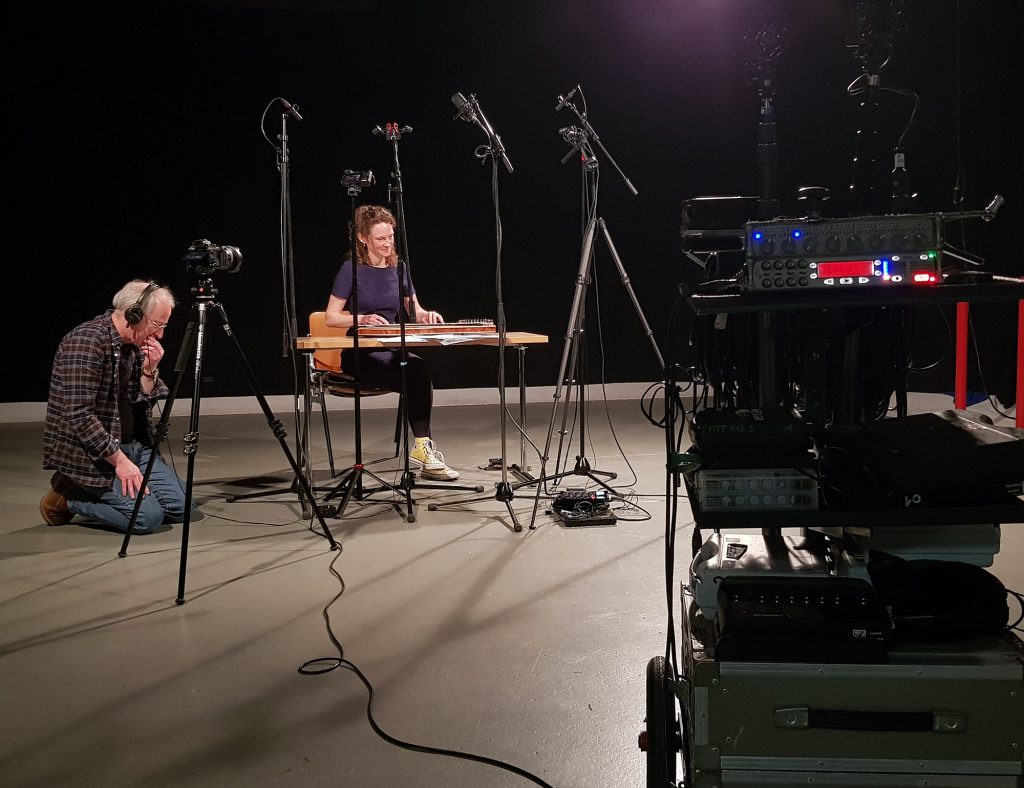
Recording Anna Karnthaler playing the zither at the Filmakademie Wien. Photo by Gerald Roßbacher.
Introduction
Following on from my Avignon jaunt in October, this is another tale of a short city break in Europe with a hidden agenda of sound recording. The planning of a four-day visit to Vienna with some of my wife’s side of the family got me thinking: it seemed like a golden opportunity to sneak off from the group to see the engineers at Nevaton, 40 miles down the road at Siegendorf. During my testing of their mics over the last year, they have been asking many a time when I might visit them, and, as it is a bit of a hike from Norfolk, this seemed to be the perfect chance. And then, more latterly, I have been in contact with William Eduoard Franck, based at the Filmakademie Wien: William is a force of good-humoured energy and expertise, Head of Direct Sound at the academy, a great proponent of the importance of sound in film, and organizer of the new Soundscopia Vienna events and forum. He invited me to meet up with him at the academy. So it was looking as if I might skip some chunks of the family trip, but I felt I could live without the dancing horses, and missing a few coffees with Sachertorte on the side might be no bad thing for the waistline! So, on the basis that the (not so) hidden agenda parts of my trip might be of interest to one or two readers, here goes…
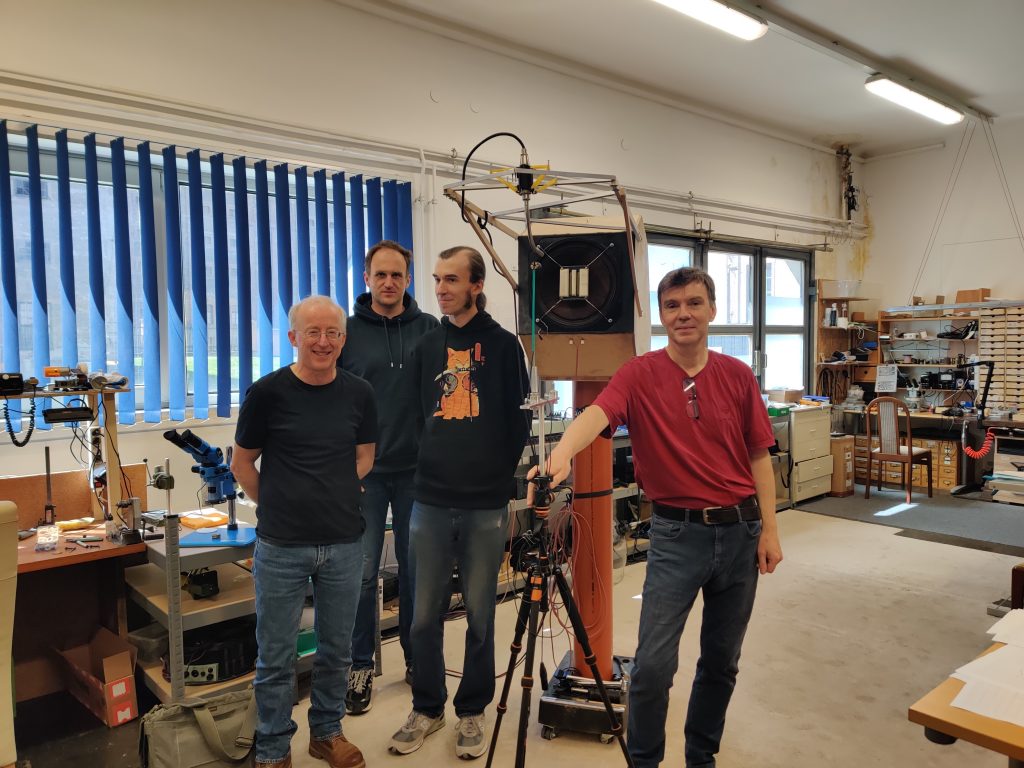
In Siegendorf outside the Nevaton premises: one short Englishman, flanked by, left to right, Dmitry Smolnikov, William Eduoard Franck and Egor Semenov. Photo by Pavel Kozlov.
Nevaton factory visit
I’d seen a few photos of the workshop/factory/laboratory (it seems to be somewhere between the three) that Nevaton moved to in Siegendorf, from St Petersburg, a couple of years ago, but visiting it in person and – above all – meeting the good folk there (Egor, Pavel and Dmitry) in the flesh promised to be a great opportunity. William Eduoard Franck also joined me on my trip out to Siegendorf. Well, he more than joined me, kindly driving us there: I loved the way that William was entirely confident that he would have no problem identifying me when picking me up at Radetzkyplatz in Vienna (I quote: ‘you will be the only English Man (stylish as you are)… around’)!
When opening up mics from time to time, you can look at a circuit board (which, in my case, doesn’t tell me much, given my lack of electronics training!) and see the outside of the capsule. With most mics, I haven’t dared or had need to get that far, and have limited myself to peering through the grille, trying to see what is inside: you may recall my close-up photos of, say, the Sennheiser MKH 8030 which typify the limit of what I – and many others – see of the insides of a mic. So this is my long-winded way of saying that, in addition to meeting the designers and builders of the mics, I was especially keen to see how their capsules are made and, more specifically, the dual-capsule designs (i.e. with a passive rear diaphragm) that are a feature of most of the Nevaton MC59 mics.
Inside the Nevaton workshop with Pavel, Egor and Dmitry, and the mic frequency response testing rig. Photo by William Eduoard Franck.
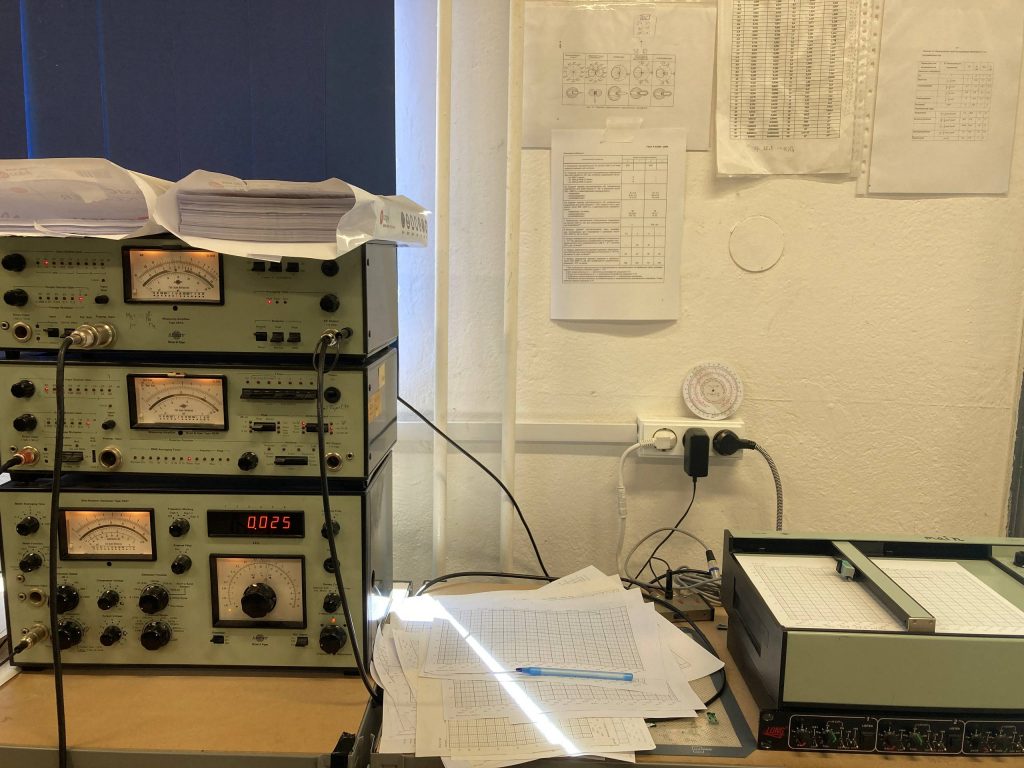
With Egor translating and adding much additional detail, Dmitry (the chief designer and engineer) obliged by showing the process from cutting the mica sheet (off a roll 37 years old: you can’t get the same quality these days!), to careful tensioning (and checking resonant frequencies using a Brüel & Kjær 2010 Heterodyne Analyzer: this allows measurement to see if tension is within tolerance, and to allow capsule tuning – especially relevant with front membranes with slightly different tensions to those of passive rear membranes), through to assembly – even down to the little paint kiln. Without their former massive anechoic chamber of St Petersburg days, testing mics is done in the large but untreated room, using a Brüel & Kjær 4133 measurement mic and Brüel & Kjær measurement gear (1027 sine-wave generator; 2610 and 2636 measuring amplifiers; and 2308 XY recorder) corrections are made in real time for frequency plots on paper. Old school, doubtless, but very effective nonetheless. And for testing self-noise, the mics are placed in a sound-proofed double-box made of granite: I feel inspired by this item and could see myself making one (everything else there was out of my league and for serious engineers!). Plenty of fine engineering equipment – including some enviably solid small CNC machines – makes for a very competent set up. Inevitably, some processes are farmed out: as far as I can see this includes little more than gold sputtering of the mica, replication of the PCBs (and, once prototype and pre-production test versions are hand soldered by Dmitry, population of production versions with surface-mount components), and making of the brass mic bodies. So very much an in-house operation, as, indeed, I expected.
I’m a sucker for some old-school technology courtesy of Brüel & Kjær: it certainly does the job.
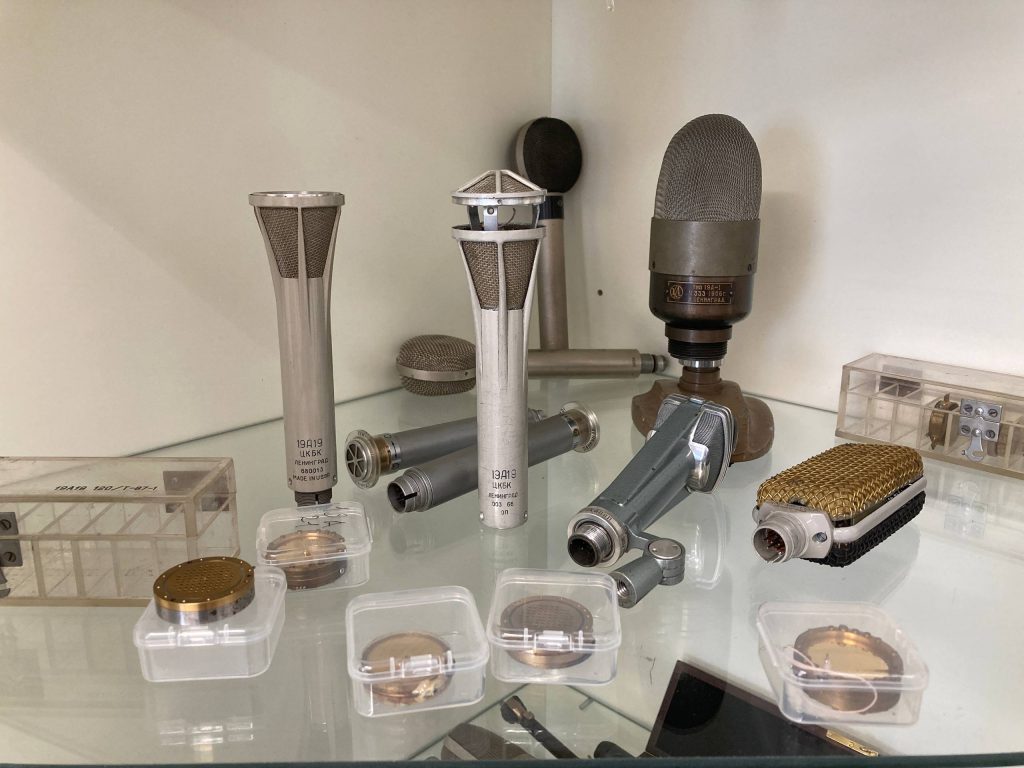
I can’t do justice to the whole process and, of course, that isn’t really my story to tell: hopefully, in time Nevaton will build on their new website and, perhaps, also use social media to give more detail. But, from an inexpert but keenly interested perspective, it was fascinating to see something of the processes involved; the remarkable care taken with the complex nature of the Nevaton mics; the meticulous checking, measurement, and fine tuning involved; and the sheer passion Dmitry, Egor and Pavel have for their mics, reflected in the continuous developments they are making. And it was great to understand more why, in this highly automated world, there is so much hand crafting involved in high-end microphone manufacture. Finally, of course, it wouldn’t have been a visit without seeing the little Nevaton mic museum, reflecting their long history, and to meet Dmitry’s beautiful cat Nyusya during lunch, which was so kindly laid on.
A little bit of Nevaton’s history in one of their display cases in their museum.
Zitherat the Filmakademie Wien
The number of famous composers associated with Vienna is overwhelming and their imprint today remains significant, be that musically or, with examples such as the Mozarthaus, physically. But for some the music of Vienna is most associated with the zither player, Anton Karas. Plucked from obscurity in 1948, playing in a Viennese heuriger (wine tavern), by the film director Carol Reed to compose and perform the soundtrack to ‘The Third Man’, Karas’s playing certainly shouts out ‘Vienna!’ to me. So, to add another layer of complexity to the trip, I thought it would be fun to incorporate a zither recording. A bit of detective work (OK, Googling) later, I came across Zithersound, the website of a group of three zither players, all former pupils of Professor Cornelia Mayer, the great exponent of the Karas style (and transcriber of his music) who died in 2021. I was lucky that one of the group, Anna Karnthaler, was game for a bit of zither recording. My initial thought was to find a quiet place (perhaps a church) to record in a minimalist manner, but, as things do, the plan snowballed rather and became combined with my planned meeting with William Eduoard Franck at the Filmakademie Wien: we ended up with a session in one of the film studios there, during a class workshop that William was hosting. He provided his sound cart (even fishing out his Sound Devices 788T – untouched since Covid – to make me feel at home) and camera, the wonderful technicians obliged with some lighting, the multi-talented Gerald Roßbacher lent a hand, and, last but not least, the team from Nevaton – Dmitry, Egor and Pavel – drove into Vienna with a clutch of their mics and their MixPre-10.
Recording in progress. And, yes, there was a reason why I was monitoring so close to the zither! Photo by Gerald Roßbacher.
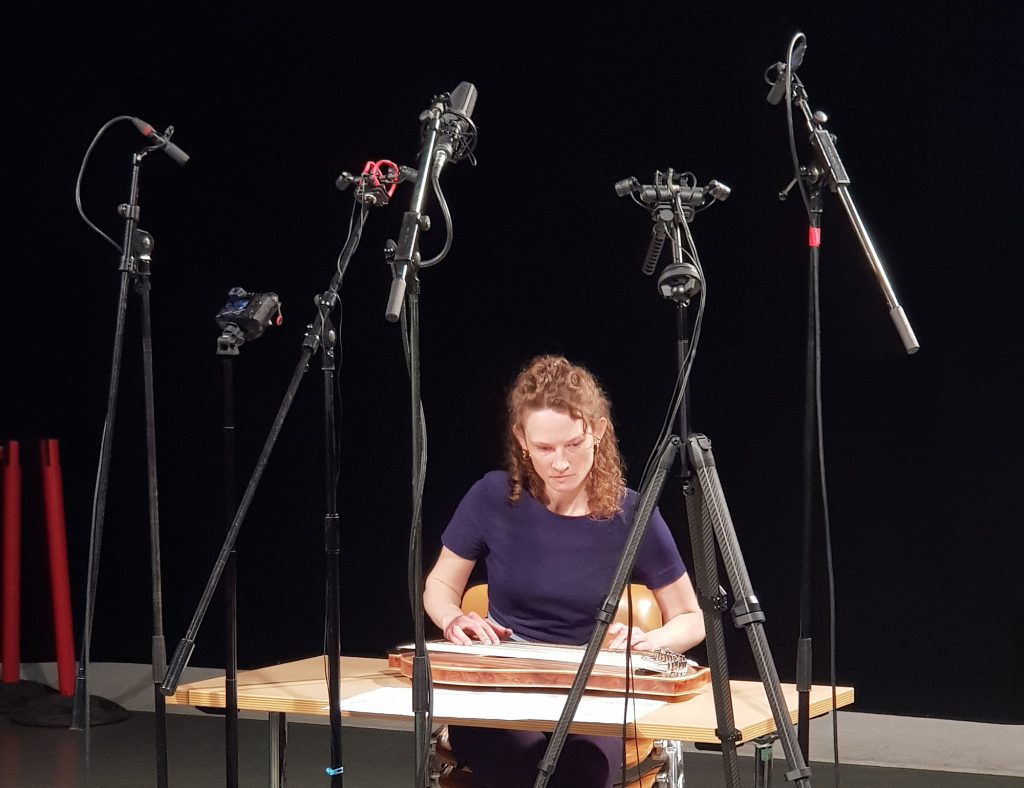
So, my quiet solo location recording turned into something much more sociable and interesting. And it proved to be a chance to hear and test the Nevaton MC50, which, if you haven’t come across it, is a quad large diaphragm condenser. In this case we used it in double mid-side (DMS) mode, which, in post, I decoded to stereo using the Harpex-X plug-in. Other mics used were a pair of the tiny Nevaton MC59uS + 59/C2 cardioids in ORTF, which I had brought with me on my travels; another pair of the same, also in ORTF, which Nevaton brought along, which was set up a different position along with an MC59/H Pro shotgun mic (the same prototype, or pre-production, model I used for my tests here); and a pair of MC59/O omnis.
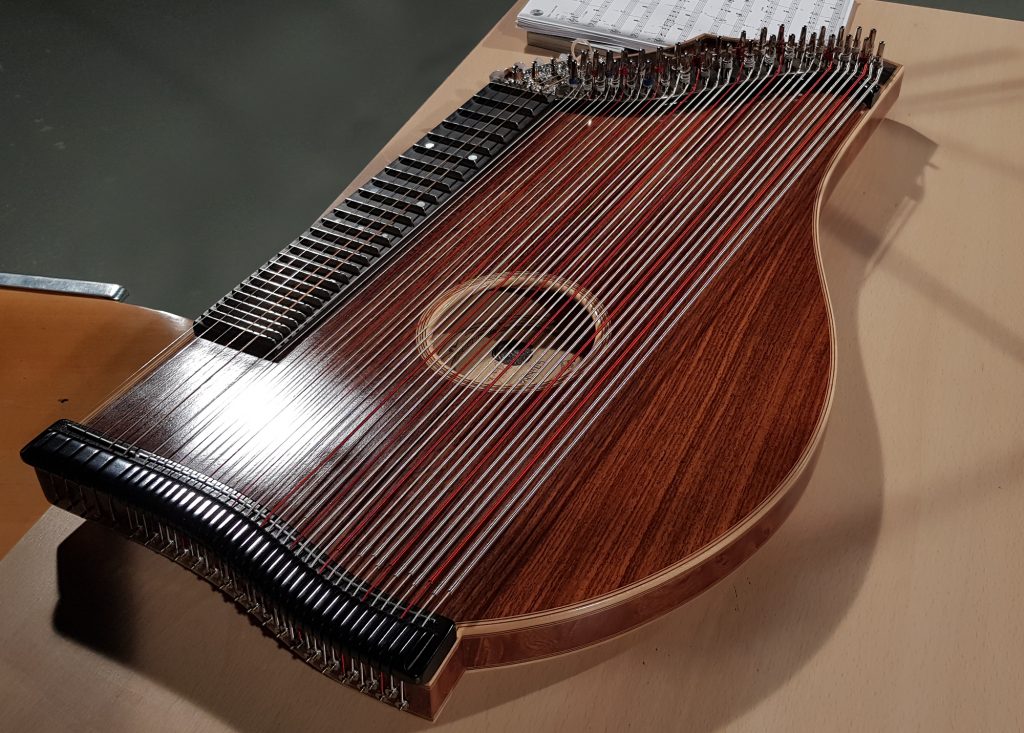
A close up of the mics: the central ORTF pair and the MC50 were pretty coincident; the wide-spaced omni pair were centred to the ORTF pair; and the additional ORTF pair and shotgun mic combination (second from right) were position aiming more at Anna’s left hand. Photo by Gerald Roßbacher.A close up of Anna’s concert zither used in the recording. Photo by Gerald Roßbacher.
Preparation for a recording like this, especially when travelling light (miserly yet practical!) away from home and with a tight timescale, was inevitably imperfect: ideally, I would have assembled a rig to allow all the mics to be near coincident (apart from the duplicate ORTF pair), and had the omnis at a fairly close spacing. But, hey ho, things don’t always work out ideally and, without such a rigging option, I was just grateful for some mic stands to hold the various mics, even if these resulted in some rather non-coincident positionings and with some rather widely spaced omnis (at 1.17m). So what followed wasn’t by any means a scientific comparison of the mics, but certainly still of interest and value – well at least to me! And, it was a fun way to spend a morning, see the Filmakademie, and spend time with all involved. And, goodness, I did enjoy hearing the zither in the flesh for the first time. I’m so grateful to all for indulging me, not least Anna, who must have wondered what she was doing! She played various pieces, including The Third Man (aka Harry Lime) theme, and here is a video of three short pieces, which Anna performed as a seamless sequence: the pieces are ‘Frohsinn auf der Alpe’ (‘Joy in the Alps’), ‘Das Glöcklein im Thale’ ‘The Little Bell in the Valley’) and ‘B’hüth’ dich Gott!’ (‘May God Protect You’) by Carl J. F. Umlauf (1824-1902). As usual with such videos of mine, the mics switch and what is in use at any moment is shown on the screen. Where combinations of mics are used, the subsidiary ones are 6dB or more down in the mix, not least to reduce phasing issues.
And here is a version of the same video, just with the centrally located ORTF pair on its own, and a dash of reverb added.
For completeness, here are the various WAV files (with no processing) so, if anyone is keen, they can play around and mix files to their heart’s content!
Coda
Yes, the musical world of Vienna is getting to me, but there isn’t really much to say in this ‘coda’. I hope the very basic introduction to the Nevaton set up in Siegendorf is of interest and fleshes out a little the nature of the company behind the clutch of mics I have been testing lately: a small team, dedicated to producing mics to the highest standard they can, constantly looking to innovate and improve. Obviously rather thin on corporate and sales staff, so be patient if inspired to get in touch: hopefully, distribution will improve as they get more settled in their new location. And the upside of the smallness of the company is that you can talk directly to the engineers. It was a complete pleasure to spend a day with Dmitry, Egor and Pavel, and also, of course, with William Eduoard Franck. And it was fantastic to be shown, by William, the facilities at the Filmakademie Wien (lucky students!) and to be able to use them: to have the opportunity to record Anna playing the zither in Vienna was the icing on the cake and a fun exercise too. I have a long history of fusing holidays with activities on the side, and highly recommend it: of course, it takes a bit of effort to set up some things such as on this trip, but, goodness, it was worth it. And as for Vienna otherwise? I’d highly recommend it, from the galleries and museums (I particularly enjoyed the Courbet exhibition at the Leopold; and, better still, the quirky and excellent Third Man Museum), to the ferris wheel in the Prater, to walking the old streets in the Innerstadt, and the amazing public transport. A friendly, welcoming and civilized place too.
But don’t worry, the Random Jottings of Dr Badphil isn’t turning into a travel blog: I’ll be back with another set of detailed tests soon. Tschüss!
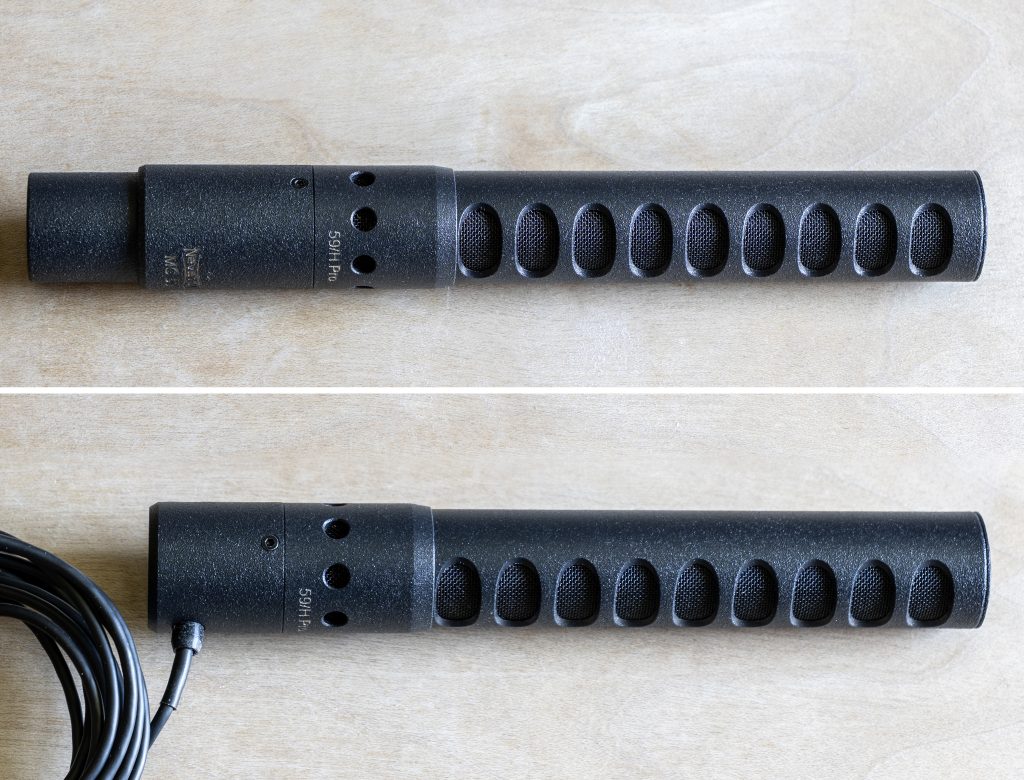
MC59/H Pro capsule shown fitted with the MC59 standard preamplifier with its XLR connector (top) and the more compact MC59M preamplifier with its side-exit hard-wired connection (bottom).
Introduction
As I have noted previously, Nevaton’s MC59 mics – that is, its SDC range – are skewed towards the wider polar patterns, with no hypercardioid or supercardioid models available at present (though I hear one is coming!), yet a variety of omni, wide omni and cardioid options. The MC59/H is an exception to that, being a shotgun model: the MC59/H Pro is a new variation of that mic and is what I am testing here. The mic should be available soon, but the copy lent to me by the engineers is the only one in existence – hence the loan and the fact that, as I type, it is winging its way back to Austria!
Physical form
The capsule part of the mic is 120mm long with the 95mm-long interference tube having a diameter of 20mm, which broadens out to the 22mm diameter that is common to the MC59 mics for the part of the mic that contains the capsule itself. The overall length (and, of course, weight) of the mic depends on which preamplifier is used: ranging from the 49mm XLR-equipped MC59 down to the 5.5mm-long MC59uS. I suspect for practical usage – i.e. allowing for a more balanced mic and providing space for shockmount clips – that most will choose the standard MC59 or the 25mm-long hard-wired MC59S. Certainly with the various preamp options to hand here, I have been using the standard MC59 for the shotgun capsule.
In its physical appearance the mic looks identical to the existing MC59/H, so all the changes in the new ‘pro’ model are under the hood. I understand from the engineers that the main difference is that it has a double-membrane acoustic transducer like most of other capsules in the series (i.e. excepting the MC59/OW, open-wide cardioid, and the omnidirectional mics in the series – i.e. MC59/O, MC59/O+ and MC59/O2, which are pure pressure transducers with single membranes). The second membrane, or diaphragm, has no gold plating and is passive – as, indeed, seen in the Shure KSM42 cardioid LDC mic. The interference tube itself looks unusual in that it has oval openings rather than the more familiar close-spaced slots of most designs, although, of course, many a slotted interference tube covers internal circular openings as, indeed, they do with the Sennheiser MKH 8060 and MKH 8018 mics used in the comparisons for this post.
Self-noise
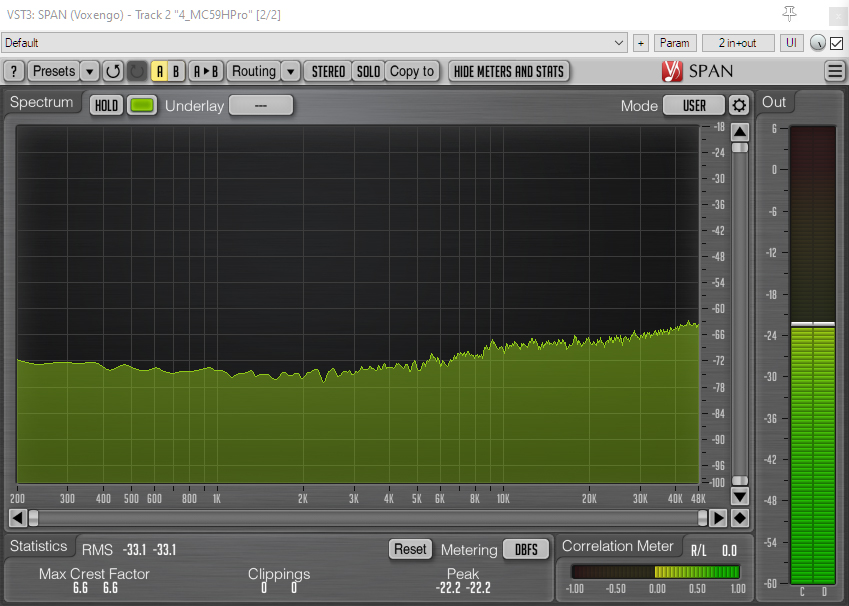
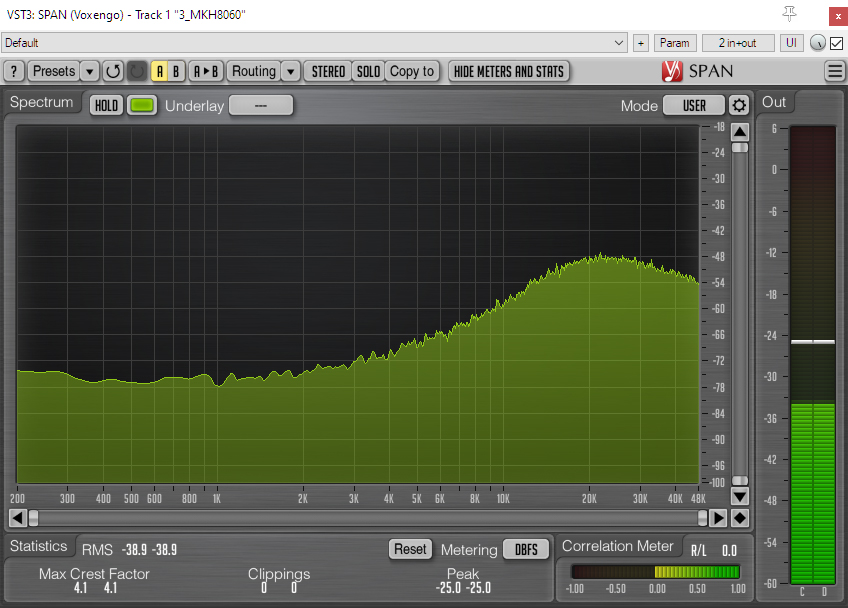
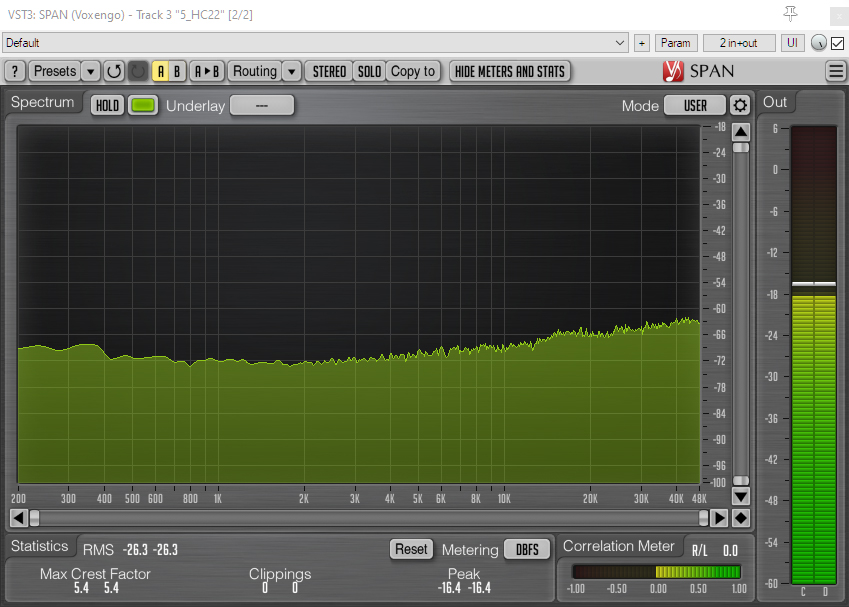
One of the stand out features of Nevaton mics is their low self-noise, and the MC59/H Pro is similar to the standard MC59/H and the other MC59-series mics in this regard. Nevaton themselves suggest -5 to -6 dBA, but, as ever, it is good to test rather than just repeat the specs, not least since self-noise of two mics with the same value can sound quite different due to different frequencies in the composition of the hiss. In this case, I compared the self-noise of the MC59/H Pro to two mics I have been using a fair amount and which I have tested previously: the Sennheiser MKH 8060, which has a very respectable published self-noise of 11dBA, and the Rycote HC-22, which has a still lower published self-noise of 8.5dBA. Both these published specs seem about right from my previous tests.
As usual with such tests, to start with I measured sensitivity rather than just going with the manufacturers’ figures. For this I set up each mic in turn in my studio using a jig so that the centre of the front of the actual diaphragm was in exactly the same place, then played a 1kHz tone through a Vivid S12 speaker, and compared levels using a narrow band-pass filter centred on 1kHz. Obviously there were no absolute figures from this, but relative sensitivity was measurable. I then recorded the three mics using a Sound Devices MixPre-3 recorder at 96kHz in the quietest space I could find in the house (under the usual great pile of duvets etc.) at full gain (76dB), brought the files into Reaper and applied the small gain adjustments to match levels based on my sensitivity measurements. I applied a 24dB/octave high-pass filter at 200Hz to remove any residual distant rumbles of traffic, tractors etc. Here are the recordings:
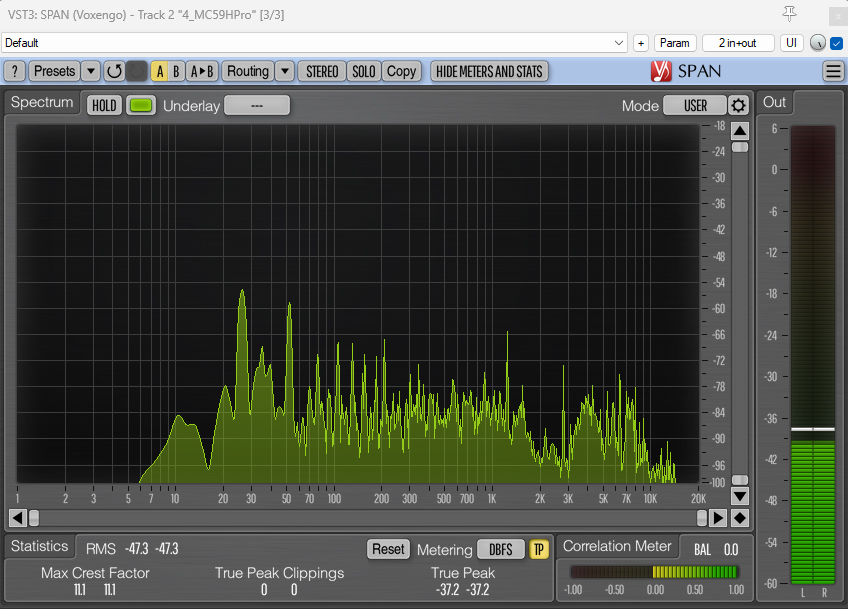
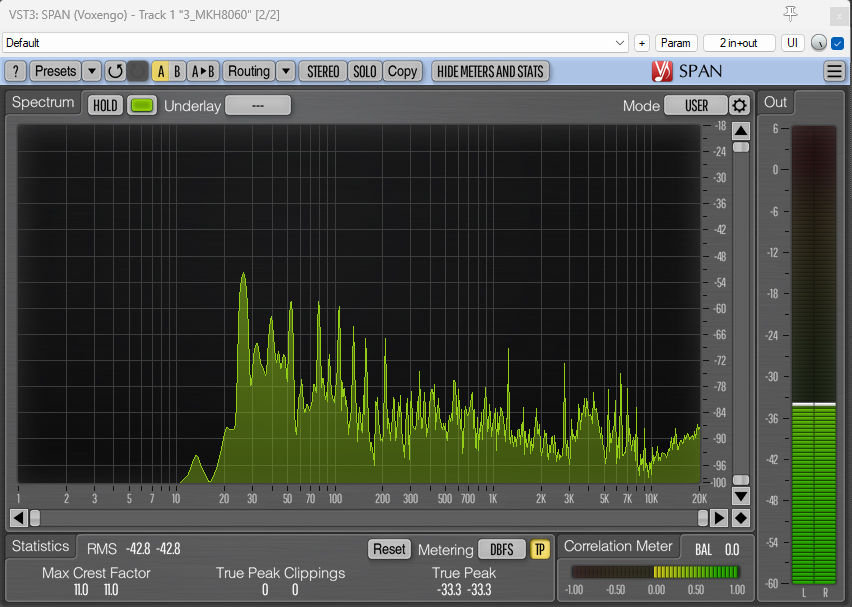
And here are the spectrum analyzer visualizations:
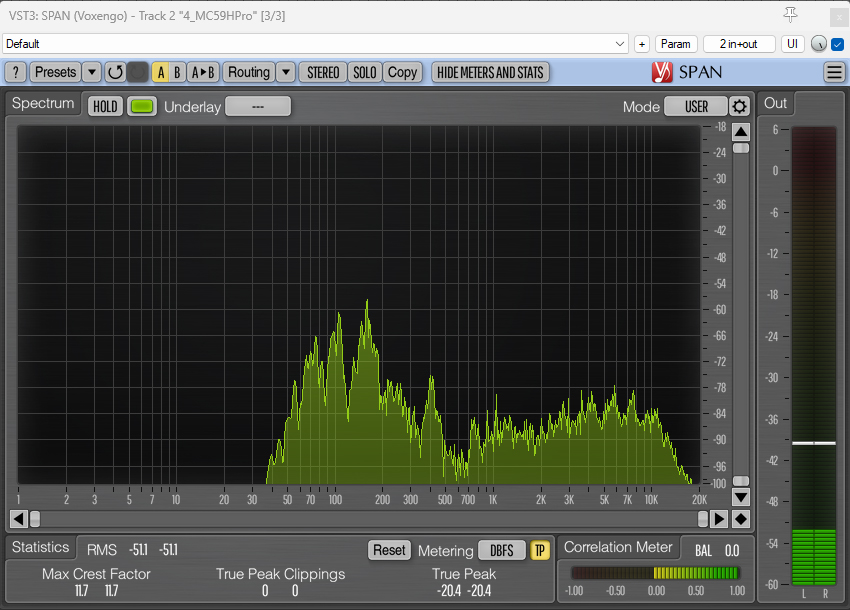
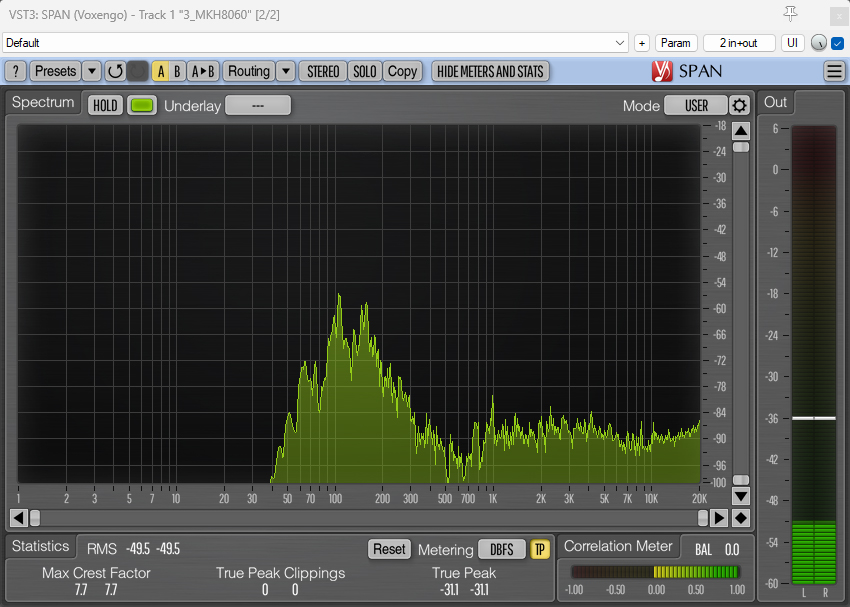
Nevaton MC59/H Pro self-noise.Sennheiser MKH 8060 self-noise.Rycote HC-22 self-noise.
The sound files and the spectrum analyzer visualizations show that the MC59/H Pro is indeed the quietest of the three mics, which takes some doing given the low self-noise of the MKH 8060 and, especially, the HC-22. The two Rycote and Nevaton mics have a broadly similar hiss, albeit at different levels, while the Sennheiser has a more noticeable high-frequency hiss: as with the more recent MKH 8018, the MKH 8060 is not tuned like its first-order siblings, where steeply rising self-noise towards 20kHz continues to rise to 48kHz, but, rather, sees the rise in self-noise start lower and is less steep, and then flattens off after 20kHz, resulting in the self-noise being characterized by more of a high-frequency hiss (say in the 6-12kHz region). In practical terms, these massively cranked-up self-noise tests will be largely immaterial for most recordings, as all the mics are quiet in normal use: but for some, say recording extremely quiet sounds in quiet locations (think effects recordings), there is no denying that the Nevaton has a significant edge in this regard.
Frequency response
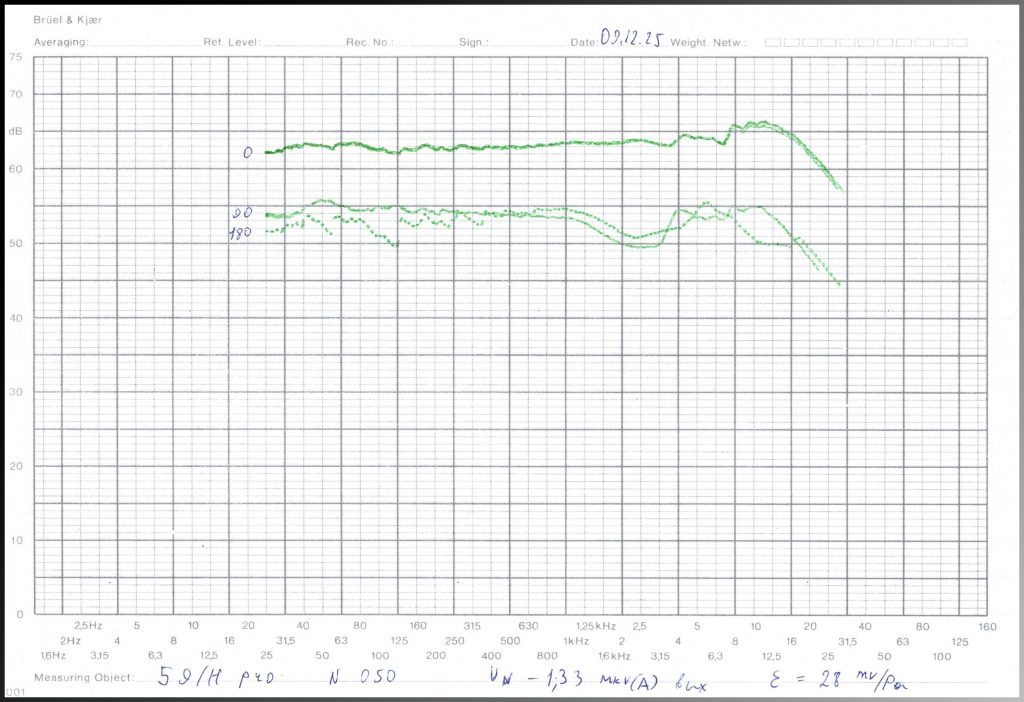
Prospective purchasers of Nevaton mics are not aided by the lack of published polar and frequency plots, although, as with the MC59 Twin, the engineers at Nevaton have provided me with specific frequency response measurements of the actual mic I am testing (with none of the smoothing of published graphs):
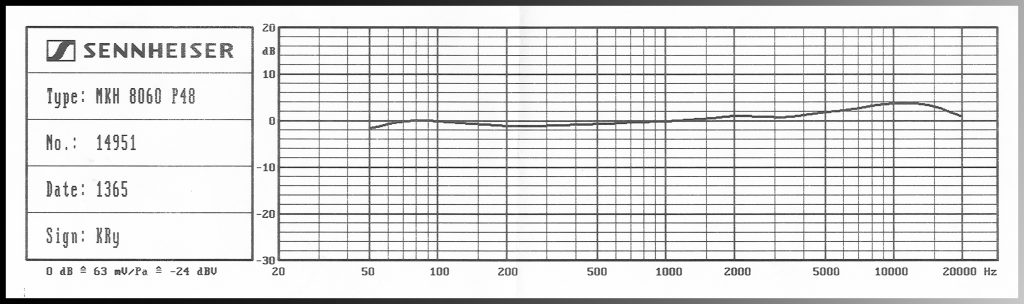
Nevaton’s frequency plot (unsmoothed, measured in large workshop) for the MC59/H Pro pre-production model tested here.For reference: frequency plot for the MKH 8060 mic used for most of the comparisons in this blog post.
The two frequency plots show broadly similar responses for the MC59/H Pro (at 0 degrees) and for the MKH 8060, with a significant bump in the high frequency response. That latter is typical of many shotgun mics and I assume is there in both cases to counter typical use with windshields with attendant loss of high frequencies, and for clarity with dialogue. Anyway, let’s leave the graphs and do some real world tests!
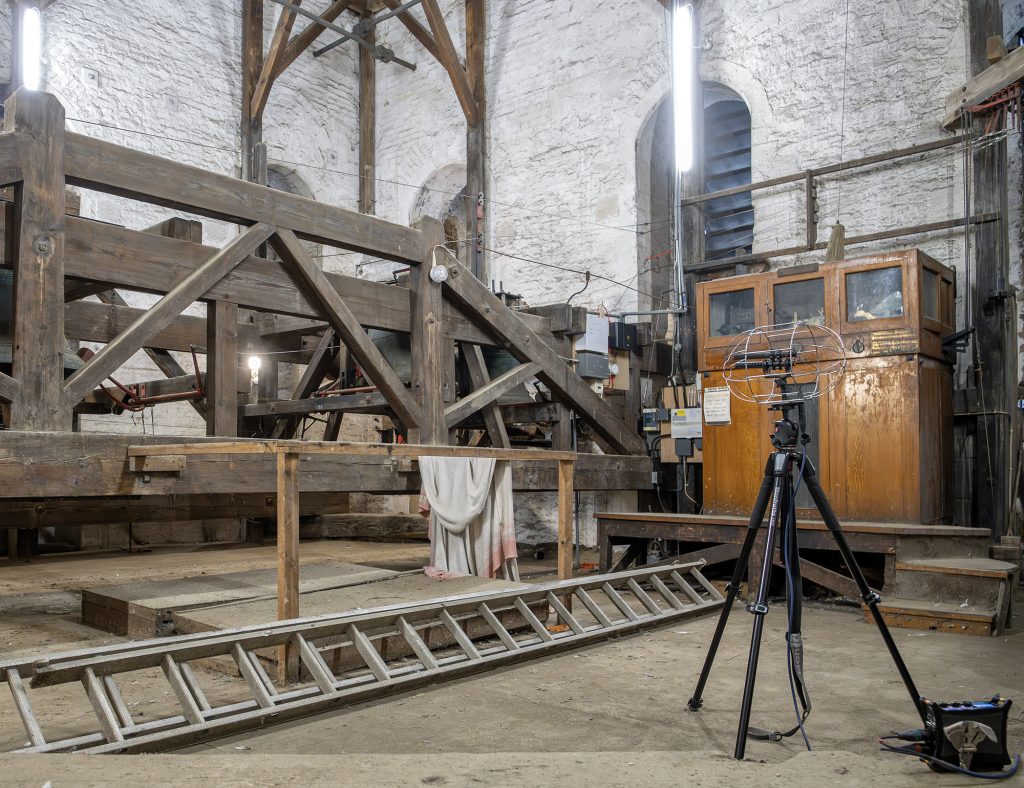
Yet again, back to the massive early 12th-century cathedral belfry, for some loud and high-frequency tests: the windshield fur was removed for the photo, but replaced for the tests.
Kicking off with high frequencies, I returned to one of my old haunts in the belfry of Norwich Cathedral where the overtones of the bells provide an interesting sound source. Sticking with the MKH 8060 comparison (as I do for most of this blog post), I rigged this and the MC59/H Pro in a Mega-Blimp (as usual, there was a bit of a breeze blowing through the belfry), and recorded the mics into a Sound Devices MixPre-3. Here are the resultant recordings:
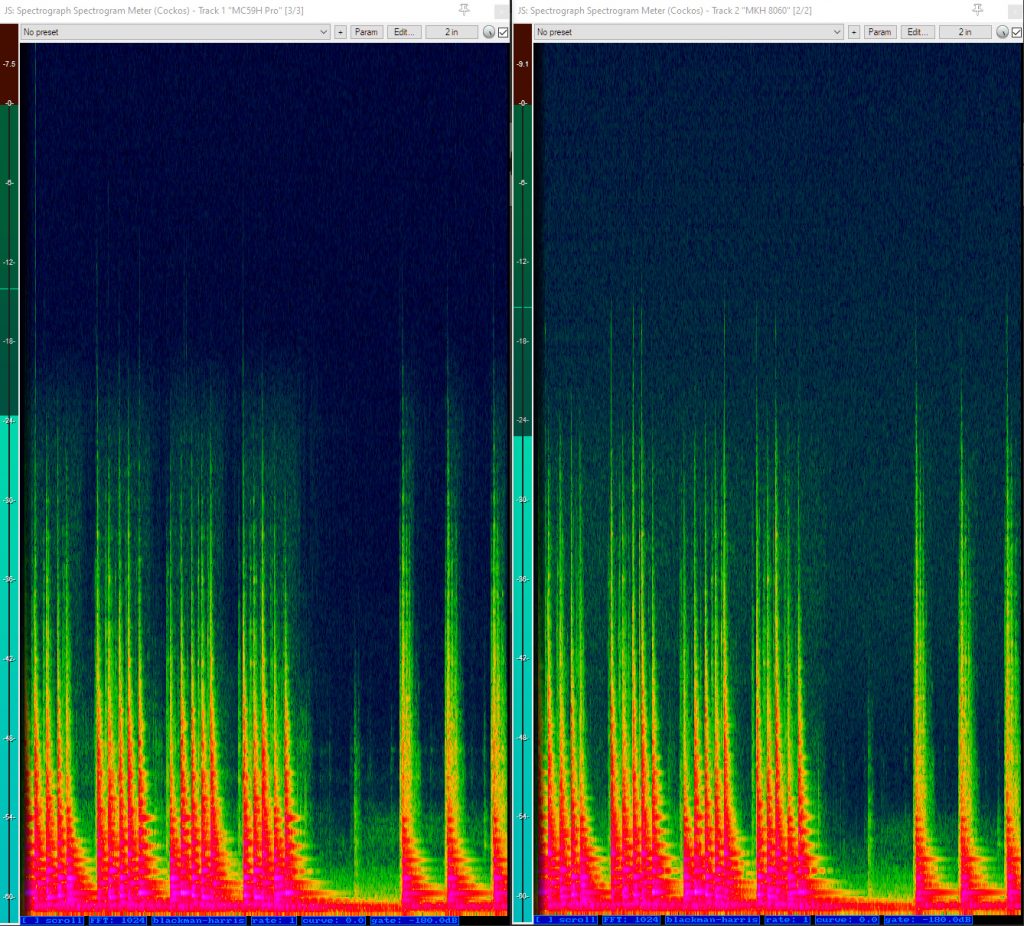
And here is a spectrogram of the recording, showing the chimes. There isn’t a great deal of difference between the two mics in terms of high-frequency response, although the MKH 8060 shows a little more signal above 20kHz, albeit with more self-noise.
Spectrogram of the bells tolling 3 p.m. On the left: MC59/H Pro. On the right: MKH 8060. The vertical axis extends to 48kHz.
I’ve used the cathedral bells for some time for such tests, but recently discovered a more homely and controllable – but, yes, more boring – source of high-frequency sound, useful for exploring mic response in the form of the humble shaker (that simplest of percussion instruments). Here are simultaneous recordings made using the two mics, adding to the exploration by recording on axis, at 90 degrees and 180 degrees, all at the same distance (1.5m). The recordings, which were made outside to reduce reflections, at the three different angles are separated by brief silences.
Listening to these recordings, you can hear the different side and rear rejection of these two mics at the frequencies produced by the shaker (i.e. above 400Hz).
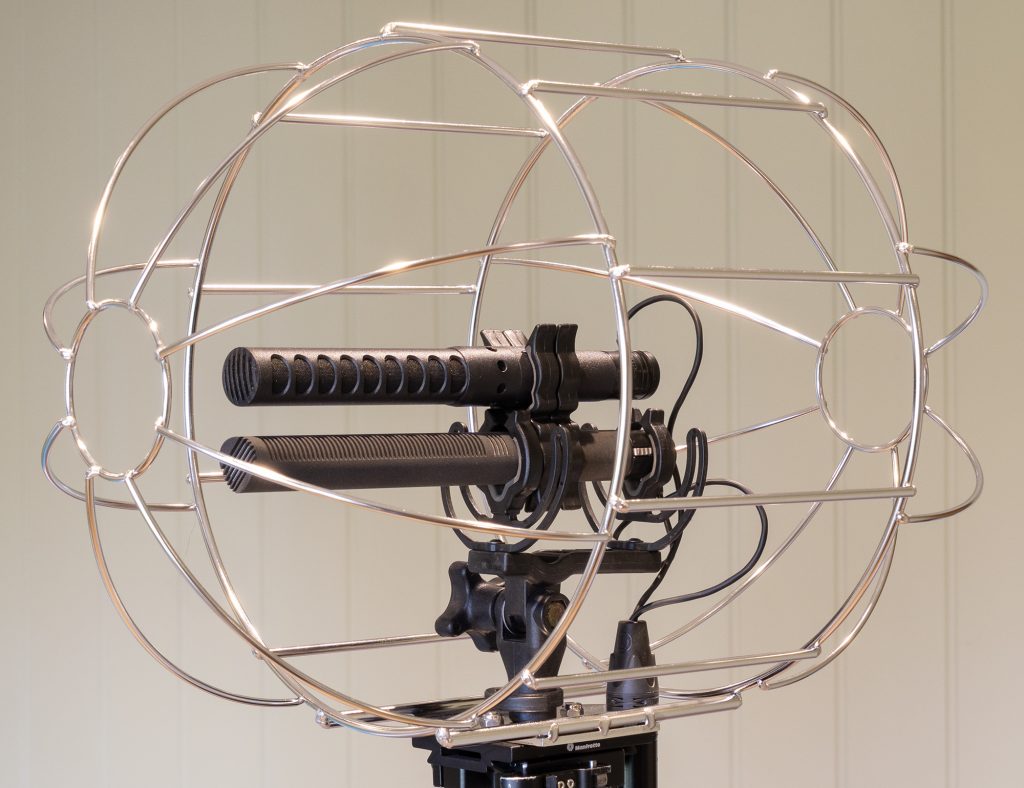
The MC59/H Pro and MKH 8060 rigged for testing in a Mega-Blimp.
Turning to the other end of the spectrum, I set up a Sennheiser MKH 8060 and the MC59/H Pro pair in a single windshield aimed at the exhaust pipe of the rear of a parked car (with the engine idling, of course). Then the mics were rotated side-on to the exhaust and, finally, angled 180 degrees to the sound source. Here are short clips from the recordings, each having the on-axis recording followed, after a very short silence, by the 90 degree recording and, then, the 180 degree recording:
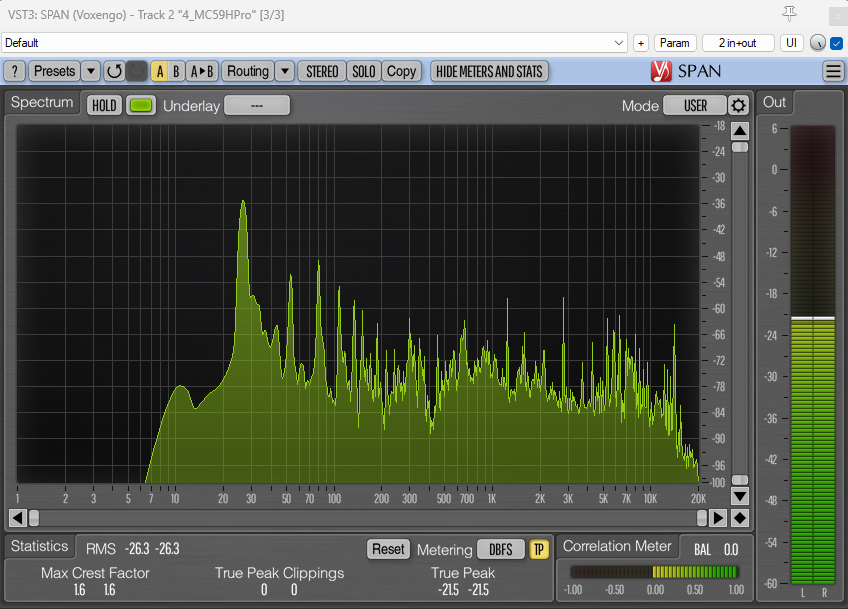
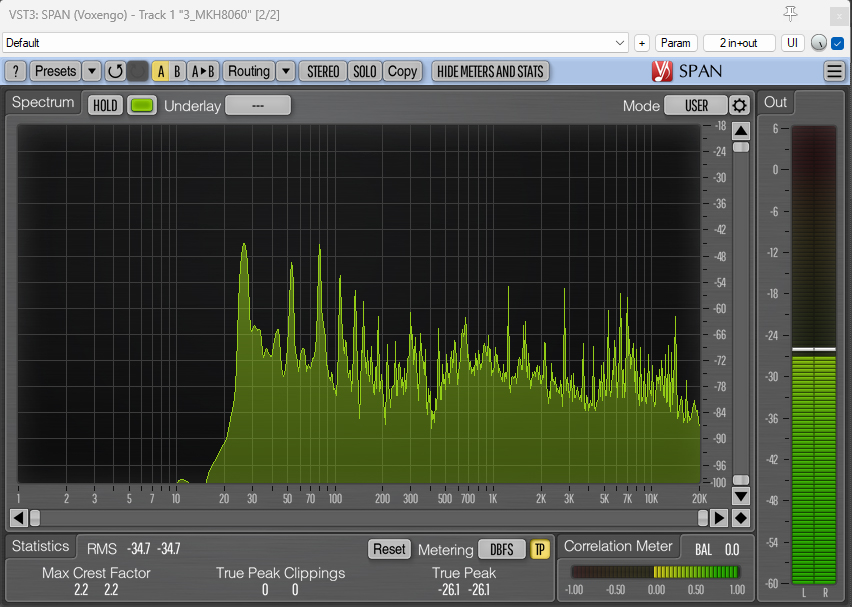
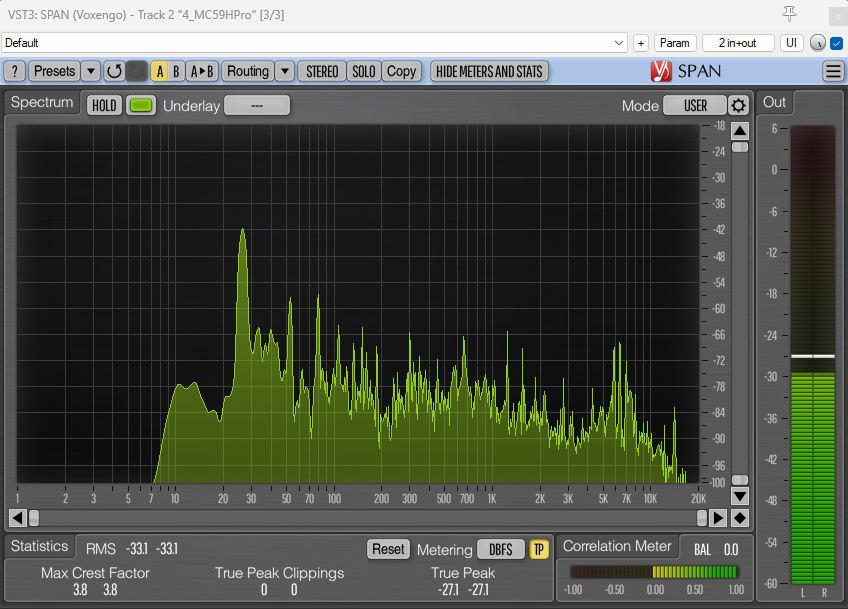
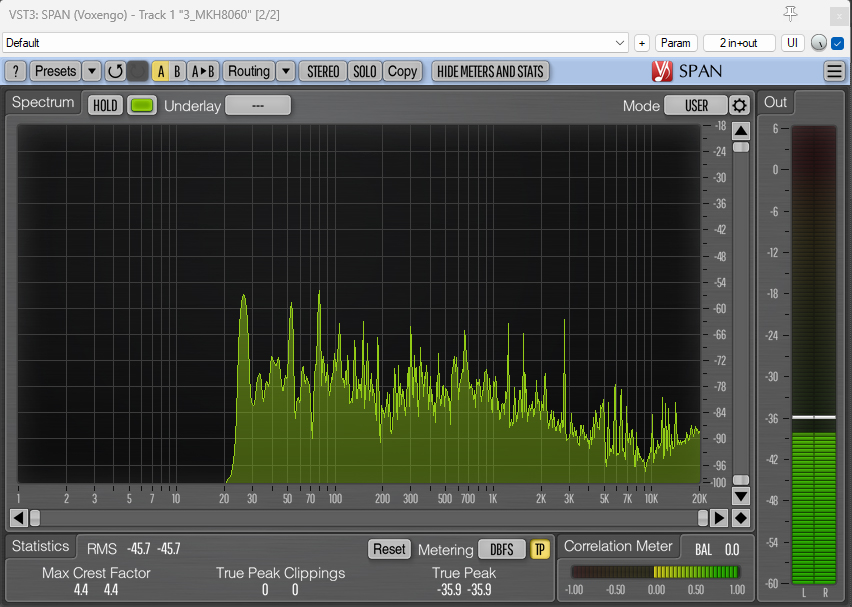
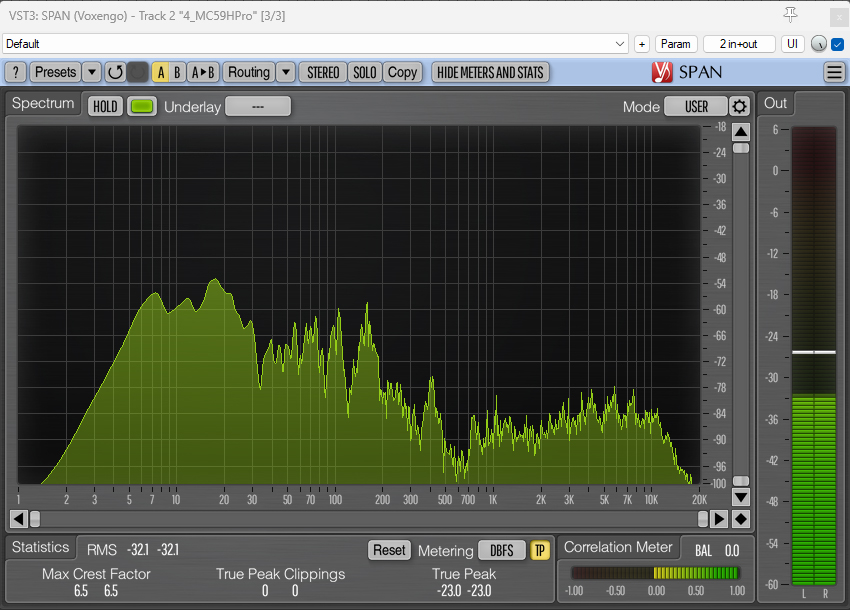
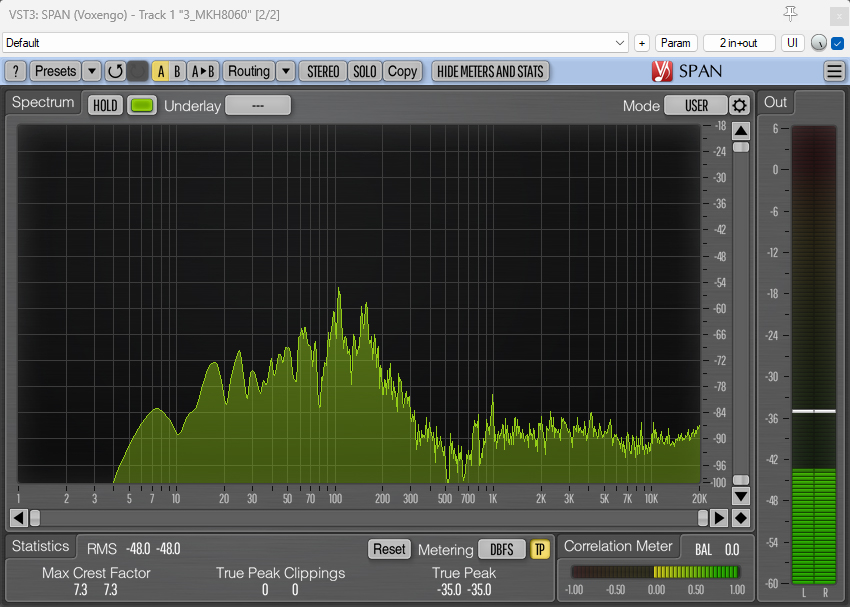
And here are the spectrum analyzer visualizations:
Car exhaust recorded on axis with the MC59/H Pro.Car exhaust recorded on axis with the MKH 8060.Car exhaust recorded at 90 degrees with the MC59/H Pro.Car exhaust recorded at 90 degrees with the MKH 8060.Car exhaust recorded at 180 degrees with the MC59/H Pro.Car exhaust recorded at 180 degrees with the MKH 8060.
In the two recordings you can hear and (from the spectrum analyzer visualizations) see that the fundamental at 26Hz is much more pronounced with the MC59/H Pro than with MKH 8060, by around 10dB, reflecting the reduced bass roll-off in the Nevaton mic. At ninety degrees, even this low frequency is attenuated in both mics, as you would expect: by around 11dB in the case of the MKH 8060 and by around 7dB with the MC59/H Pro. At 180 degrees, however, the two mics are quite different in the case of low frequencies: with the MKH 8060 the 26Hz fundamental is louder than at ninety degrees, and only 6.5dB down compared to the on-axis sound, while the 26Hz fundamental in the MC59/H Pro recording is down 21.5dB compared to the on-axis recording. There’s nothing very unusual about the MKH 8060 in this regard: it is a shotgun mic with a good low-frequency response on axis and with low frequencies also quite evident in the rear lobe, which is an inevitable feature of most conventional shotgun mic designs. The MC59/H Pro has a stronger bass response on axis, but also, and much more unusually, its double-membrane acoustic transducer means that it doesn’t have a back lobe at low frequencies, and the effect is both noticeable and dramatic. Of course, this may or may not be useful for any given recordist or situation. In many uses of a shotgun mic, especially if mounted on a boom pole, then a high-pass filter is almost certain to be required anyway, obscuring much of the effect of the different design. In that case, if rear rejection is wanted, a mic such as the Sanken CSR-2 might be more useful (its rear rejection isn’t for very low bass, but rather above this in the 80Hz to 1kHz range) or the Schoeps SuperCMIT (though Schoeps caution that much care is needed using the latter’s preset 2, which gives maximum reduction of the rear lobe). However, there are many situations where a shotgun mic might be mounted statically and where on-axis bass response is wanted (e.g. music recording, or a sound effect recording where the low-frequency content is significant), but where the absence of low frequencies (e.g. traffic rumble, the sound of distant aircraft or even, and this is especially relevant to indoor recording, reflections of the source sound) in the rear lobe will be a significant advantage. Obviously, if choosing a shotgun mic with rear lobe reduction – be it one such as the Sanken CSR-2 or Schoeps SuperCMIT models with active second transducers, or the Nevaton MC59/H Pro with its passive second diaphragm – the application and, of course, the sound of the mic need to be considered carefully.
Handling noise
More so than in the case of condenser mics with other polar patterns, a shotgun mic is likely to be handheld, be that in a pistol grip or at the end of a boom pole, so handling noise merits consideration. For this, as with other comparative tests, I mounted the MC59/H Pro alongside an MKH 8060, both on identical shock mounts (Radius Windshields RAD 2s) on a short stereo bar fixed at the end of a boom pole.
Here are the sound files, in which I describe how I am using (or, rather, abusing!) the boompole:
And here are the spectrum analyzer visualizations:
MC59/H Pro: handling noise (exaggerated twisting in bare hands). MKH 8060 handling noise (exaggerated twisting in bare hands).
With no high-pass filter applied, the MC59/H Pro has a much greater susceptibility to handling noise, especially below around 60Hz, than the MKH 8060. In part, this doubtless reflects its increased bass response. But, of course, handheld or boom pole mounted shotgun mics invariably require use of a high-pass filter to reduce both handling and wind noise, and applying a typical 80Hz (24dB per octave) high-pass filter to both mics levels things up considerably. In short, I wouldn’t be concerned about booming the MC59/H Pro.
Here are the sound files with the 80Hz HPF applied:
And here are the spectrum analyzer visualizations with the 80Hz HPF applied:
MC59/H Pro: handling noise (exaggerated twisting in bare hands) with 80Hz high-pass filter applied.MKH 8060: handling noise (exaggerated twisting in bare hands) with 80Hz high-pass filter applied.
Voice/dialogue
Moving to voice, again I compared the MC59/H Pro to the MKH 8060. First, here is a test with the two mics mounted with back-to-back clips in a single Mega-Blimp, which was statically mounted outside:
And here is a test that combines indoor recording, with the mics mounted together (with back-to-back clips) on a boom pole: in this case the speaker/talent is moving forward the whole time and the boom is never stationary. Sorry about the less than ideal boom swinging: I could blame my current tendonitis, but I think that is just me searching for an excuse! Anyway, the indoor space selected was chosen to be a worst case scenario, being a small reverberant room (4.4m x 4.6m) with a low ceiling (2.14m) with a wooden floor and no soft furnishings, to expose any comb filtering arising from the interference tubes of the two mics.
These short snippets are doubtless a poor demonstration of the efficacy of the two mics – and their differences – when used for dialogue (and my booming for the second pair of recordings does leave a lot to be desired), but I am conscious that production sound recordists really do need to spend time themselves with a shotgun mic to see if the nuances of one versus another suits their purposes or taste better. At a crude level, however, my experience from use of the two mics is that I would be very happy with either for dialogue recording, and I must confess I expected much worse of the two mics in that difficult reverberant interior.
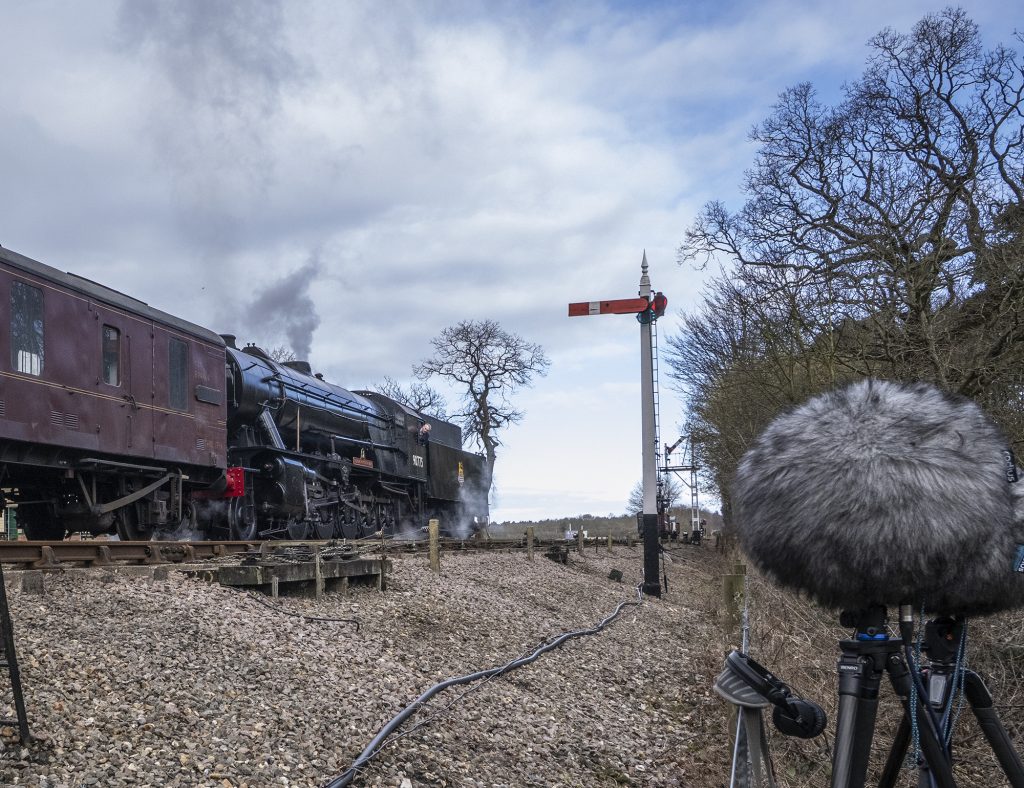
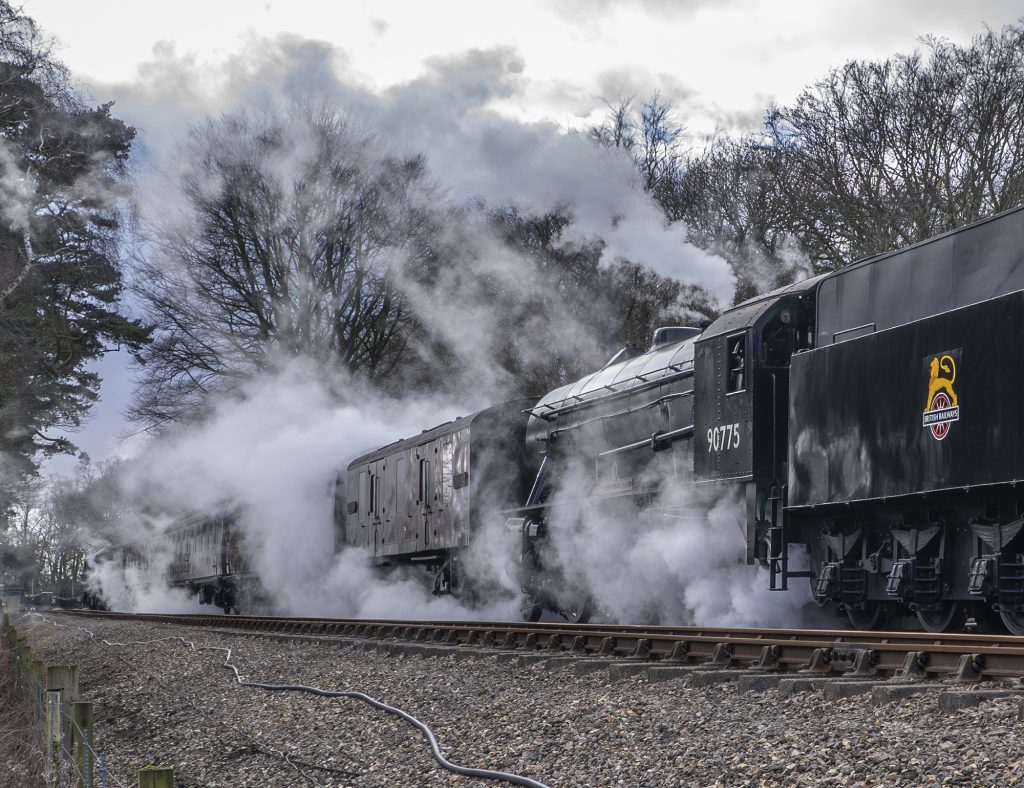
Train leaving Holt station on the North Norfolk Railway, pulled by WD 2-10-0 – 90775 ‘The Royal Norfolk Regiment’ and – I have no idea why – also pushed by a British Rail Class 31 diesel (5631). Don’t be deceived by the two Mega-Blimps in the photo: the two shotgun mics were in the same windshield, with the other one being used for a test recording of the MC59 Twin – for which see my separate post.
Effects/location recording
As so often featured in these blog posts (too often now perhaps?!), I went down to the local steam railway again for a recording test. It might be getting a bit repetitious, but, nonetheless, as a sound source it seems to have a good bit of variety in terms of frequency (from steam hissing, to low-frequency rumbling and engine noises, the latter especially evident in this case with the diesel locomotive pushing the train too), as well as movement. And, as ever, the larger furry windshields gave the chaps in the signal box a good laugh: it’s always good to brighten someone’s day! Anyway, here we go with the two recordings:
A bit of music: something bluesy down in the woodshed…
Well, with apologies to Stella Gibbons for the subheading, but not really a woodshed: rather, the nice and spacious workshop of woodcarver Luke Chapman, who will be familiar by now to readers of this blog for his long-suffering of my mic tests, putting down his chisels and chainsaws to pick up a guitar. In this case he provided a bit of impromptu blues slide guitar playing in front of a test rig comprising the MC59/H Pro, the MC58/8 fig 8 (so you can hear the shotgun mic used in an MS pair), the MC59 Twin (so you can hear how the MC59/H Pro MS pair sounds compared to other MS pairs with different mid mic polar patterns – wide cardioid, cardioid and supercardioid), and the Sennheiser MKH 8018, which is, of course, a stereo (MS) shotgun mic. All plugged into a Sound Devices 788T. Here is a video, where the mic set ups keep switching (with the current mic set up clearly shown on the screen):
And here are the individual tracks in full, which you can download and scrutinize should you so wish. First off, here are the MC59/H Pro and MKH 8018 mono shotgun recordings:
And here are the stereo recordings using the the two shotguns – the MC59/H Pro paired with the MC59/8 fig 8, and the MKH 8018 used in its stereo MS mode:
And, finally, here are the comparative MS recordings used in the video above, made using the MC59 Twin to create wide cardioid, cardioid and supercardioid mid mics, combined with the MC59/8 fig 8:
Conclusions
As ever, it is largely for readers to draw their own conclusions from the tests above, insofar as the recordings and comparisons allow. As with any mics, especially when you are talking higher-end mics suited to professional use, choosing a particular mic often comes down to taste and, of course, usage. With regard to the latter, I would undoubtedly be keener to take an RF mic (such as the MKH 8060) if heading off to the extreme humidity of the tropics for some recording than a true condenser mic (even if with some heating of the capsules from the preamps as in the Nevaton mics), and, conversely, would prefer to use an MC59/H Pro either where self-noise was a critical matter (e.g. for very quiet effects recording) or where the low-frequency rejection of the rear lobe was useful. As I said, the latter has applications for music recording and, in this context, it is interesting to learn that Nevaton’s existing standard MC59/H capsule is often used for classical music recordings: I suspect the new capsule will appeal all the more to such users.
As a final note, of course, I must return to the fact that the MC59/H Pro is a pre-production or prototype model. This might suggest that this blog-post has no relevance to other sound recordists, but, evidently (by the fact I have written it!), I don’t think this is the case: on the one hand the MC59/H Pro has much in common with its currently available sibling (the MC59/H), and, on the other, it flags up what Nevaton are developing in terms of their shotguns (and doubtless they might be persuaded to accelerate development of this model if there is interest) and, also, (as with my other pre-production model tests, such as that for the Sennheiser MKH 8030) there is value in having independent tests and reviews available for when a microphone becomes available. When that day comes, I do hope that I can manage to get hold of an MC59/H Pro again, and just not as a loan: it is certainly an impressive mic and I can see applications where it might be uniquely useful. So, crossing fingers here that it won’t be too long!
A chilly but, for once, dry day down at the station for some omni MS tests. OK, I’ll be honest, I was down there to test some shotgun mics, and just brought the omni and twin mics along on a whim!
Introduction
In my previous blog post on the Nevaton MC59-8 (fig 8) and new MC59 Twin mics, I touched briefly – as an aside – on the question of using the MC59 Twin or, indeed, any similar twin mic (such as the Sennheiser MKH 800 Twin) for mid-side (MS) recording on its own: i.e. without a second mid mic. This means using the combined output of the two (cardioid) capsules with the rear (or right) out of phase to create the fig 8,and simultaneously using the two outputs combined in phase to create the omni. Evidently this allows the single mic to be used for omni MS, although no other variation of MS (i.e. with a different polar pattern for the mid mic) is possible with such usage: only the omni pattern will create a mid mic at 90 degrees to the side (fig 8) mic. Of itself this isn’t a problem since, while many assume a cardioid or, perhaps, a supercardioid mid mic only is necessary for satisfactory results for MS, an omni mid mic is eminently usable, even desirable, in many situations. Indeed, in a previous post I provided (simultaneously recorded) comparisons of MS rigs with different polar patterns – the MKH 8020 (omni), MKH 8090 (wide cardioid), MKH 8040 (cardioid) and MKH 8050 (supercardioid) – so you can hear how they compare. Rather, assuming omni MS is appropriate for the recording, the issue with using a twin mic on its own for MS is to do with the fact that the polar pattern of an omni created by the two diaphragms is imperfect: whereas most SDC omni mics are also imperfect, typically becoming more directional from, say, around 8kHz (I am thinking here of the polar pattern of my MKH 8020 mic), the frequency response on axis remains consistent, while the omni polar pattern of a dual-diaphragm mic is best at the front and rear (i.e. on axis to the individual diaphragms) but sees significant high-frequency fall off at 90 degrees, as illustrated in my previous post. This isn’t a particular issue if using a twin mic as an infinitely variably patterned mid mic in MS in conjunction with a separate fig 8 mic, since the mid mic is facing forward to the assumed focus of the sound source. However, when using a twin mic on its own for MS, the two diaphragms are necessarily facing sidewards for the fig 8, so the omni mic (created from the same two capsules) is aimed poorly for sounds directly in front of the mic. On the positive side, though, the fig 8 and omni mic are truly coincidental, having none of the vertical separation of the two mics in a normal MS pair.
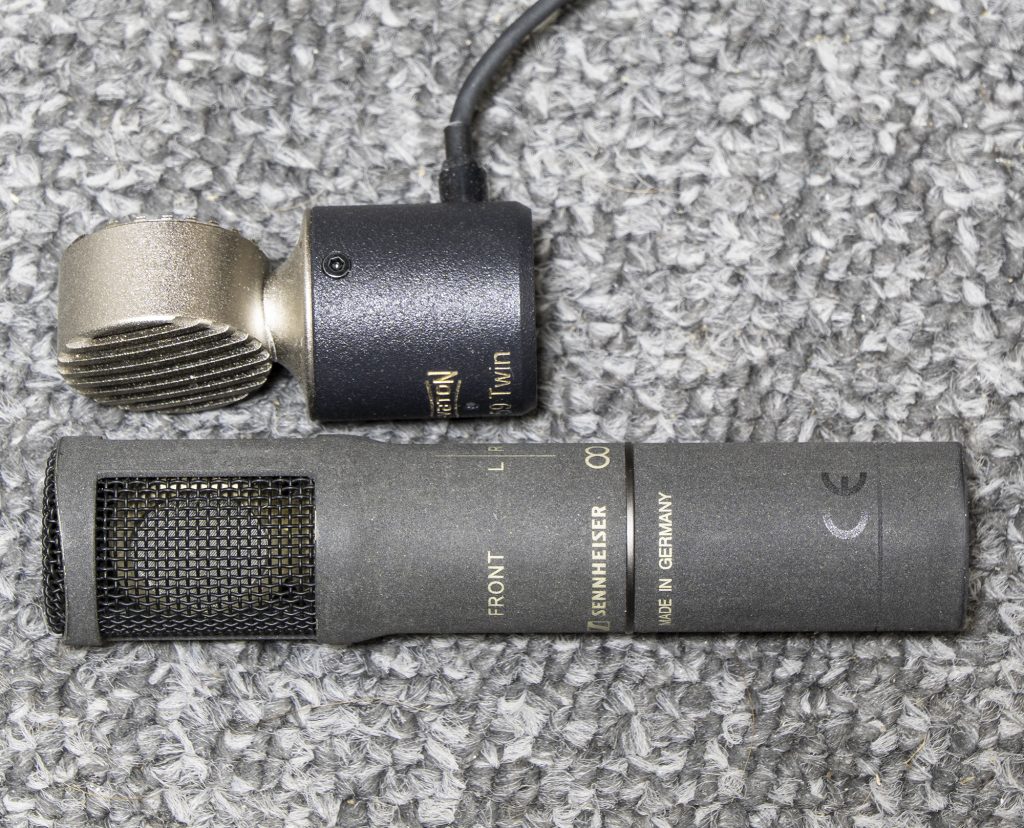
The diminutive size (48.5mm overall length) of the MC59 Twin (shown here in comparison to an MKH 8030 fig 8) makes in particularly tempting for those who fancy a miniscule omni MS rig with just the one mic!
Field testing
The introduction above is just an amplification of my cautionary aside on use of twin mics in their own for omni MS in my previous post. But so much for theory: the point of this short present post is to provide an example of a simultaneous field recording so that others can download and scrutinize the files, compare and analyse short snippets in a DAW etc. as they wish and draw their own conclusions. I have deliberately chosen a field recording since it is hard to imagine anyone would accept the very high-frequency loss in, say, a classical music recording, and it is the most likely scenario – due to compact rigs – where someone might be tempted to make an MS recording with a single twin mic. And I have gone for one of my, perhaps all too frequent, railway loco recordings as it is good to have a varied sound source crossing the stereo field. So here we go with the two sample recordings, one using the MC59 Twin only and one using the MC59 Twin with the omni MC59/O as the mid mic:
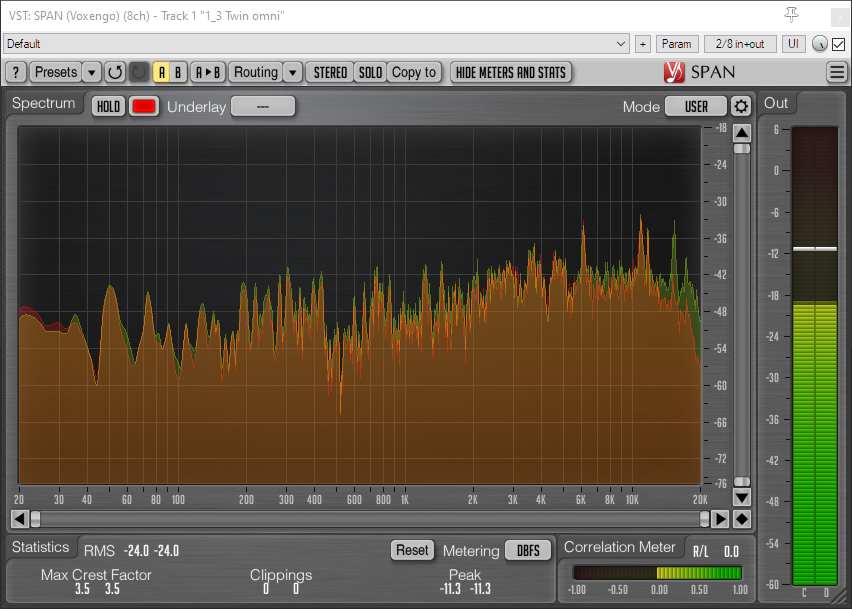
Just as with the pinknoise test in my previous post, this field recording reveals the fall off in high frequencies at 90 degrees to the omni mic created from the MC59 Twin, which, in this MS use, becomes on-axis for frontal sound sources. You can see this in the spectrum analyzer visualization below, which is a snapshot of the sound as the steam loco passes directly in front of the mics. Whether or not you can hear a significant difference is another matter as the drop in sensitivity to high frequencies really only kicks off in this example around 15kHz.
MC59 Twin in omni mode off axis (red) overlaid on MC59/O omni mic on axis (green): that is, both mics set up for MS use, with the main sound coming from directly in front of the mics.
Conclusions
The main purpose of this short blog post is to provide an example comparing the all-in-one omni MS recording with a twin mic vs the more normal approach taken with separate mid and side mics. Take from it what you will! From my own perspective, while it sounded better to my ageing ears than I suspected, I can’t really think of circumstances where I would find it helpful to use the MC59 Twin on its own and accept the pay-off of high-frequency loss on axis. I would much rather use the twin more flexibly as the infinitely variable mid mic of an MS pair, along with an MC59-8 fig 8, in which set up, of course, it can also function as a DMS rig, with all the choices made in post: and, as we have seen before, this is still a very compact pairing, capable of use in the field in a small windshield such as the Mini-ALTO.