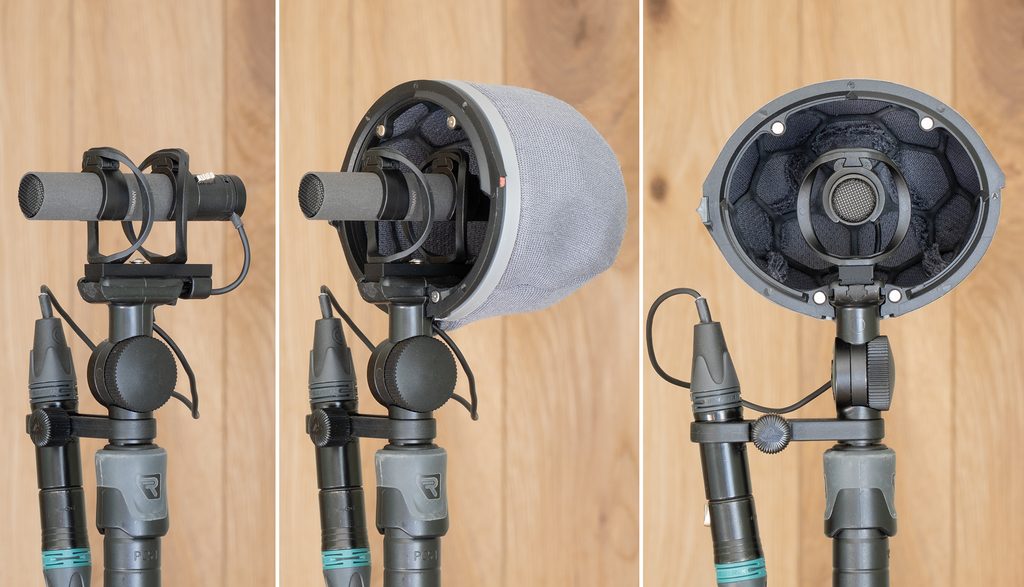
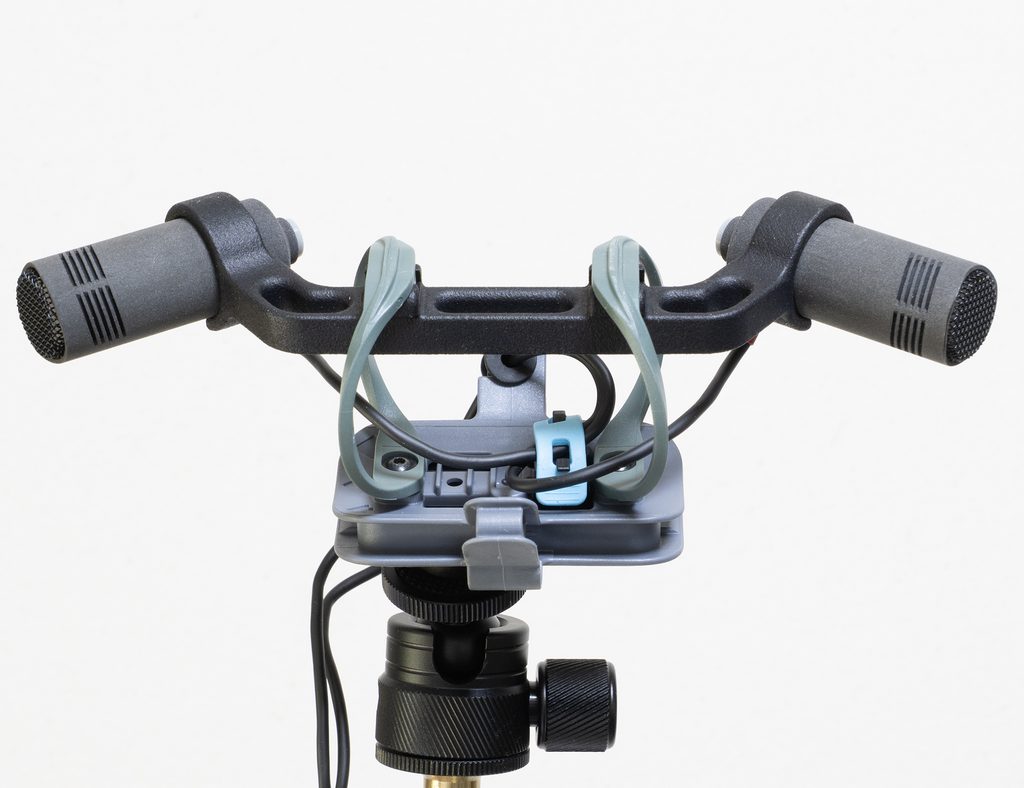
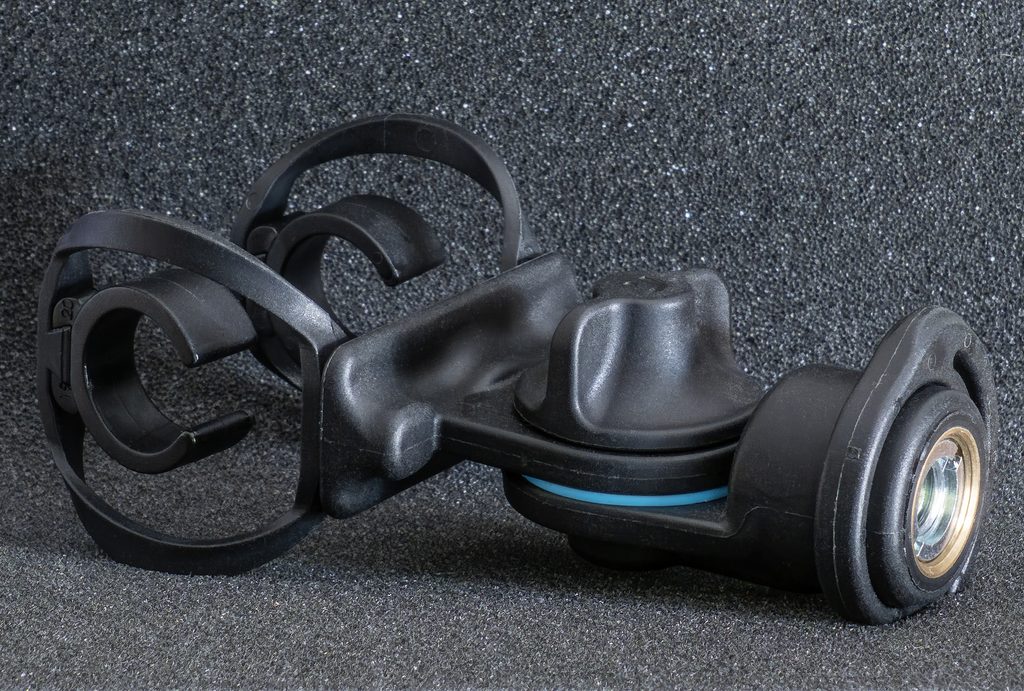
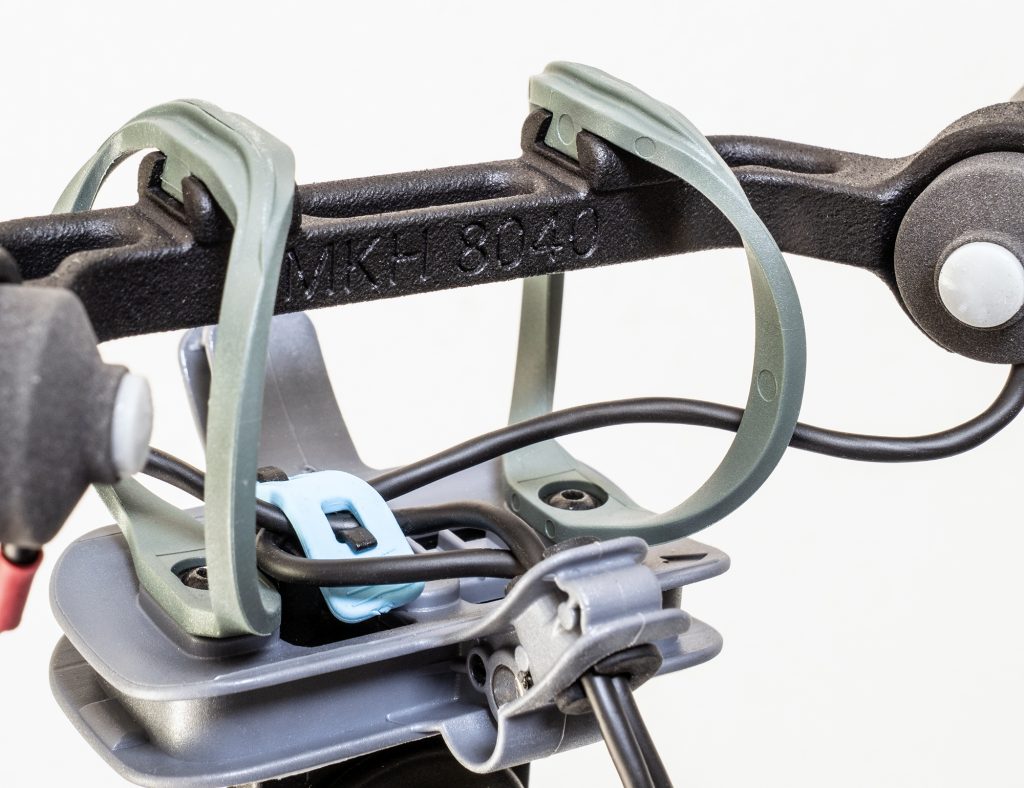
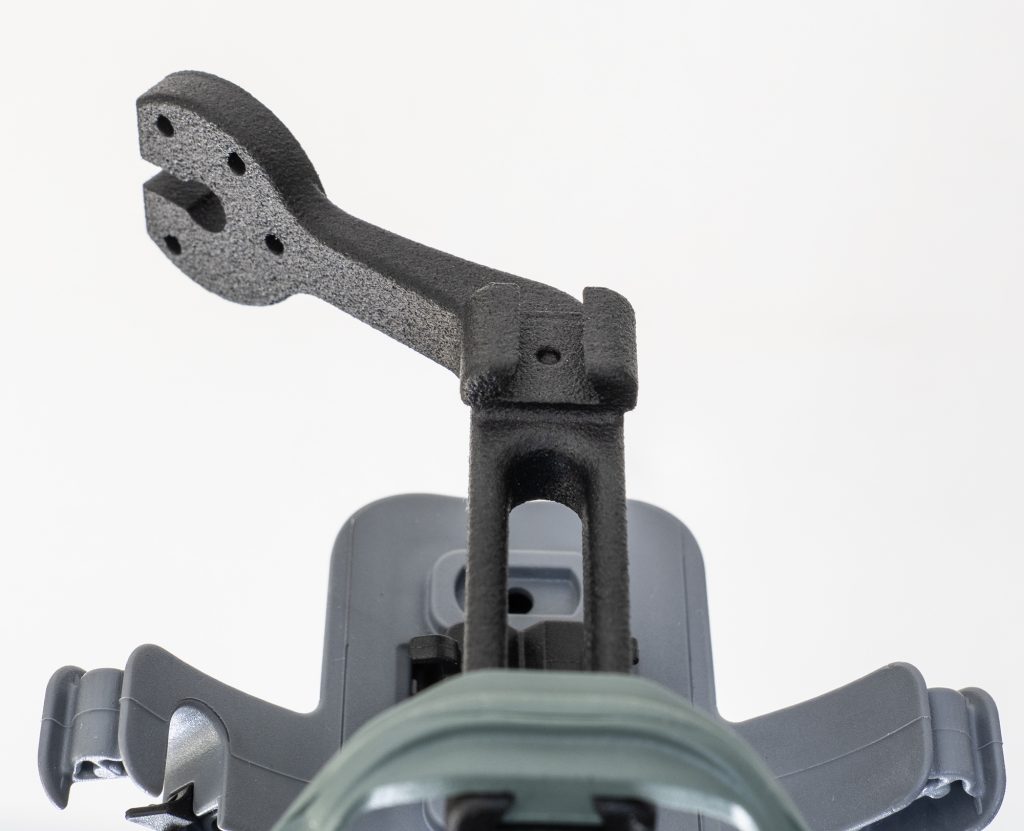
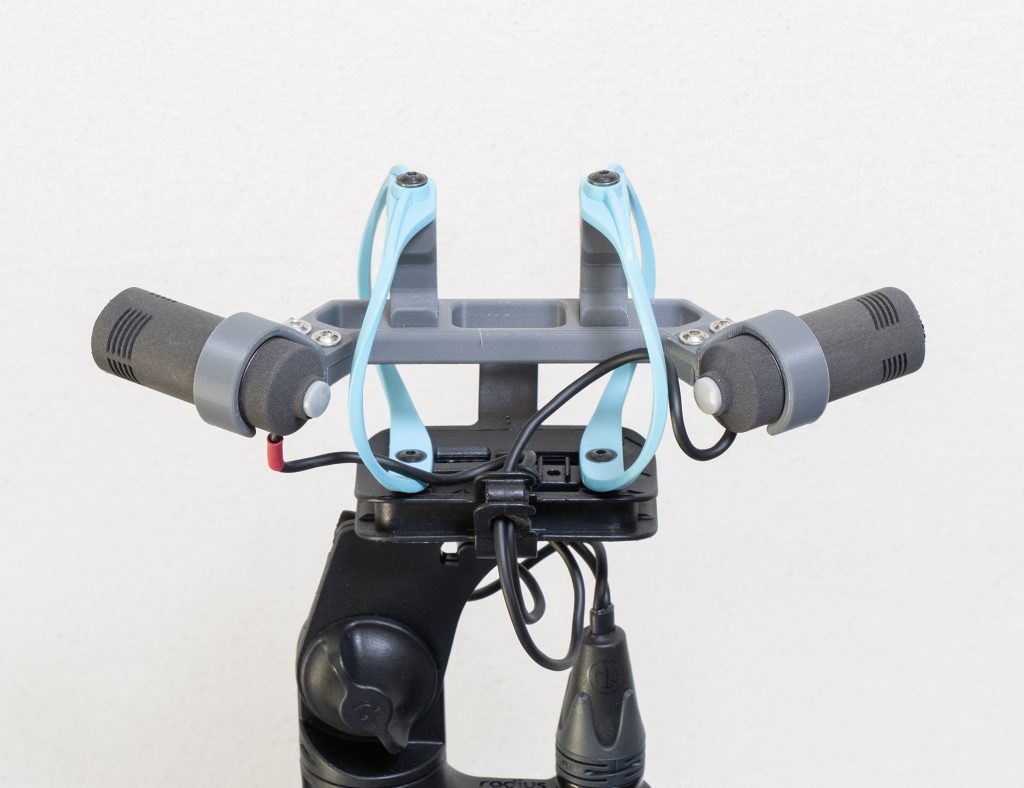
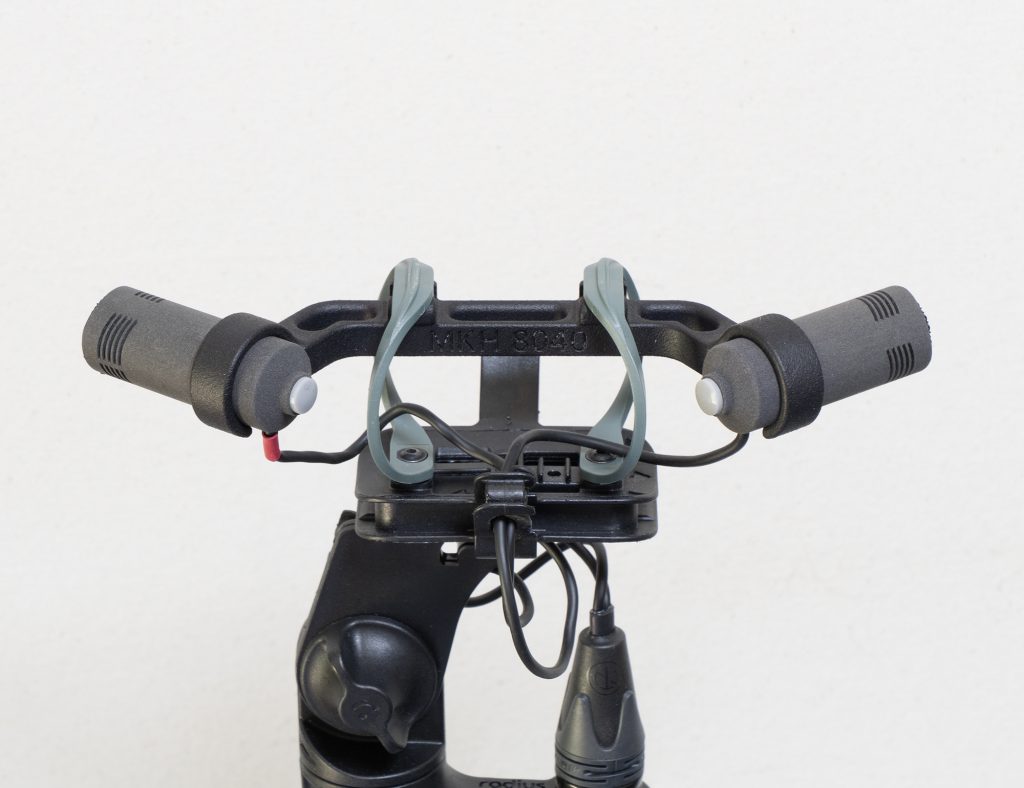
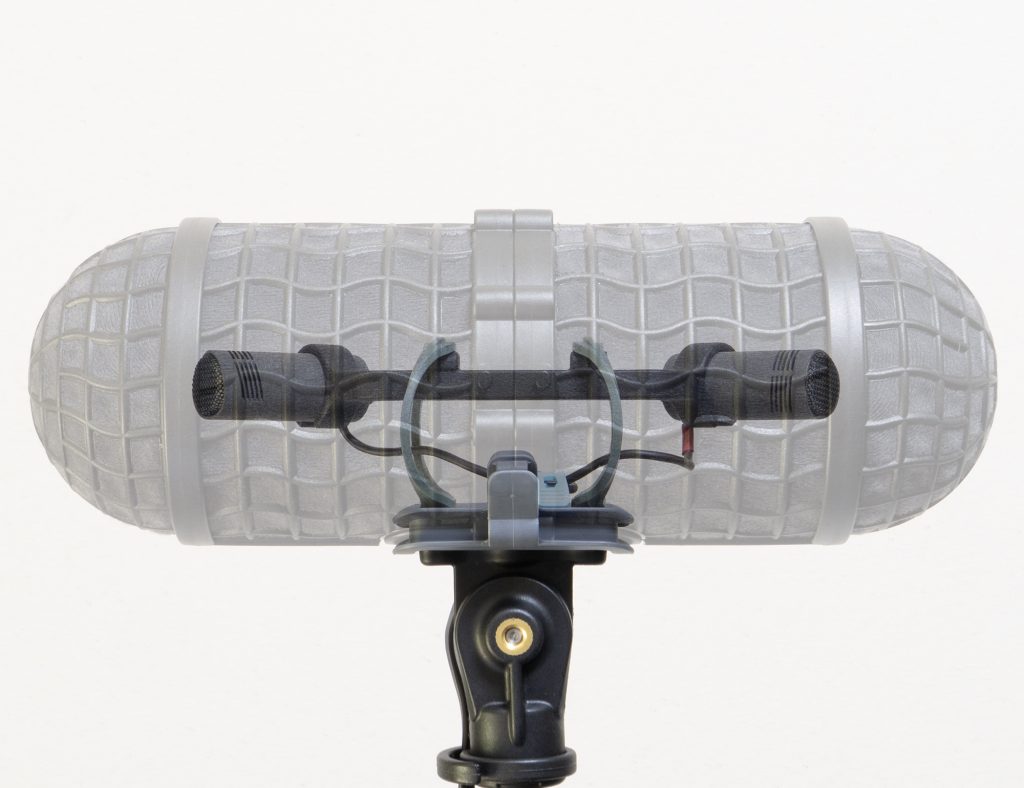
Mini-RAD hoops from Radius Windshields retrofitted to a Rycote Nano Shield.
Introduction
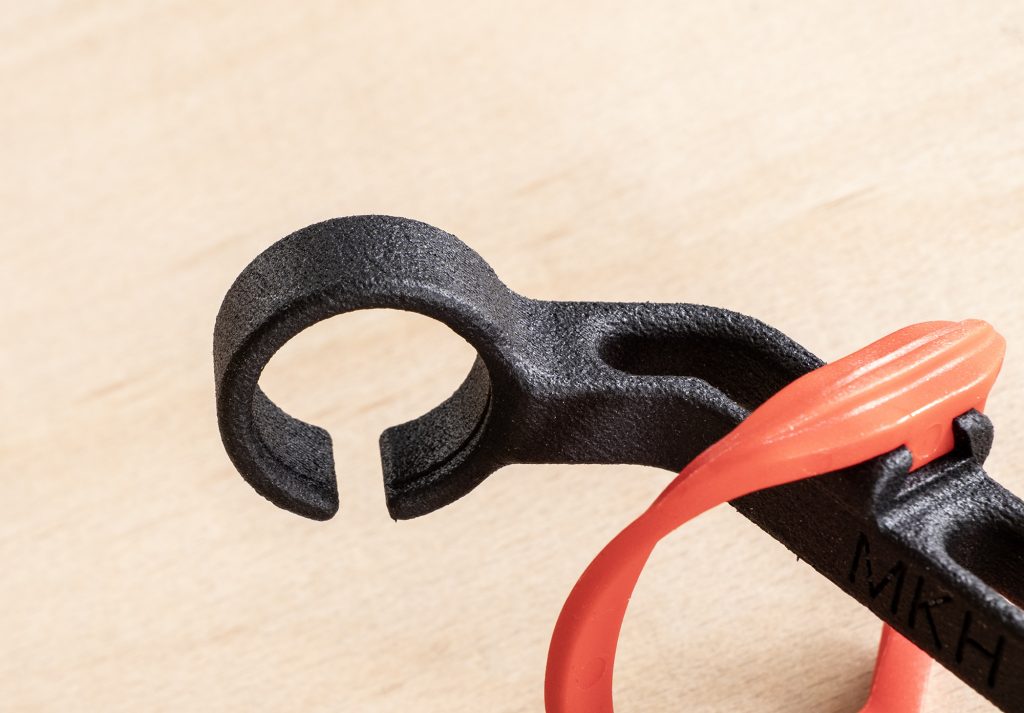
Back in 2024, when Radius Windshields had introduced the RAD-1 and RAD-2 hoops, but hadn’t yet produced the Mini-ALTO windshield, I retrofitted the hoops to a Rycote Nano Shield: you see this in the blog post here. This was tricky since the hoops are too tall to fit easily into the Nano Shield, so they had to be mounted on the underside of a purpose-made rail: this was a bit fiddly in use. With my 3d-printed double clips this gave me a workable compact MS rig, which – while a bit clunky – was better than using back-to-back clips in a Nano Shield fitted with lyres (not enough vertical room and the Nano Shield lyres have very little side-to-side compliance, which does side-address mics no favours). Once the Mini-ALTO arrived, such need ended and, of course, Radius’s subsequent production of their own injection-moulded (and adjustable) version of my more rudimentary 3d-printed MS clips was the icing on the cake.
The arrival of the smaller Mini-RAD hoops from Radius Windshields, however, means that retrofitting to a Nano Shield becomes much easier: no longer is hoop height an issue. Now this raises the question. from two different angles, as to why bother? First off, the smaller Mini-RAD hoops are just too tiny to allow insertion of an MS pair, so what would they offer over the Nano Shield’s original lyres? And, secondly, given that the Nano Shield was seemingly insufficiently tested before going into production, thereby attracting some negative feedback from users due to unexpected handling noise issues when used for production sound (which led to the issuing of some revised parts, including the 3D-TEX sock that covers the basket), why bother with the windshield at all? Well there wouldn’t be this blog-post if there wasn’t some merit in the retrofit, although, needless to say, reasons for doing so will vary from recordist to recordist and for some there may be no value. The key reasons for me are:
• Side-address mics. The Nano Shield’s lyres in many ways were an improvement on the standard Rycote lyres, but their design, which means compliance became much more restricted to the Z-axis (axial to the mic diaphragm for a typical end-address SDC), works well for end-address mics, but is not so good for side-address mics. The standard Rycote lyres have more side-to-side (X-axis) compliance and the Radius RAD-2 and Mini-RADs more still. This is why the Radius hoops work so effectively seemingly off-axis in, say, the ORTF in a Mini-ALTO designs I have been designing. So, if wanting to use a side-address SDC (be that a cardioid like the Schoeps MK 4V, a fig 8 or a stereo shotgun – of course, with a fig 8 capsule in it – such as the Sennheiser MKH 8018) is a very good reason to retrofit.
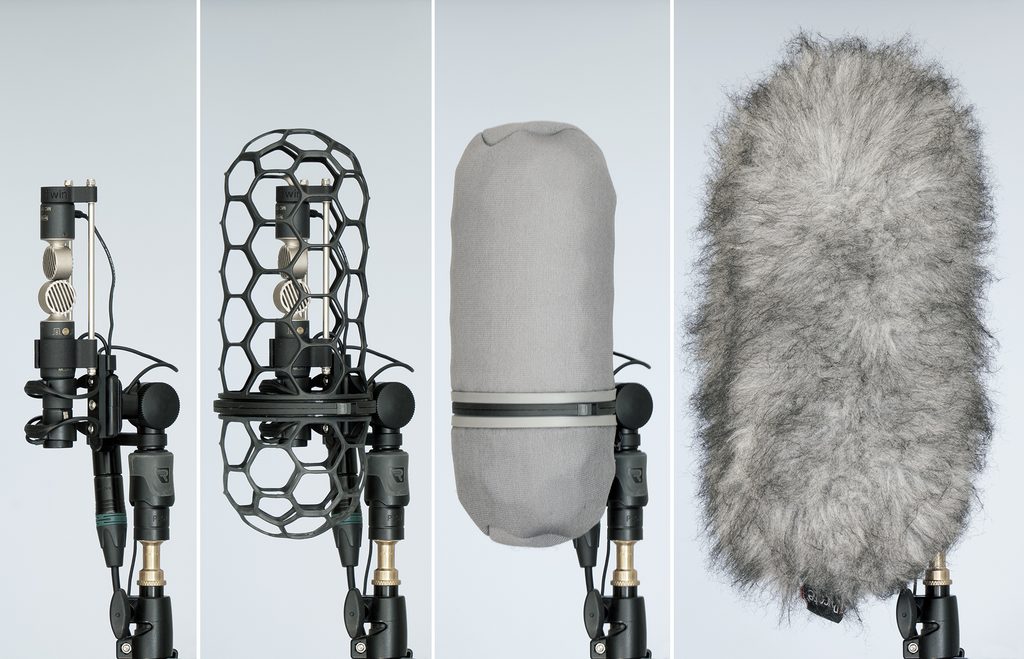
• Vertical use. This slightly overlaps with the point above, because the Nano Shield lyres are not effective when used vertically, first of all since vertical use implies side-address mics (unless recording planes or high-flying birds!) and, second, as the Z-axis compliance means they are simply too floppy when used vertically. OK, the answer could be to use a different windshield for vertical use, but this is where the Nano Shield’s design really comes to play, even if, as I suspect, through serendipity rather than deliberate design. The basket design is extremely unusual: I’m not thinking so much of the elliptical profile, but, rather the seamless construction. Most windshields, of course, have a basket that meets in a seam or a rail along the underside: this makes for simpler construction and, also, the rail – if it has one – provides scope for a variety of support points for shock mounts for mics of different length and design. The rail of the Nano Shield, however, is internal (part of the mic mount) and each pod is seamless around the straight barrel and into the hemisphere (if you can call it that when elliptical!) although, of course, there is a significant plastic component where the two halves of the windshield mate. The lack of a forward ring – a product of a separate end-cap in many a windshield – is beneficial to almost all use of a windshield, and the Cinelas are very good in this regard too. The thick plastic ring of an end cap evidently has an impact on (i.e. colours) the sound. What is more surprising with the Nano Shield is that the seamlessness extends to what is usually the bottom of the windshield: a seam or rail on the underside of a windshield in normal use has little to no impact. However, turn the windshield vertically, and use with either a mono omni mic or some form of 360 degree array (be that DMS or ambisonic), then a chunky seam or rail at the rear of the windshield starts to have an impact. Of course, not all windshields are equal in this degree: the relatively modest thin seam of a Mini-ALTO offers much less impact than the chunky rail of a Rycote Modular. But the seamlessness of the Nano Shield combined with its lightweight and open basket structure offers something quite different if – and I accept this is a big if – you are after a compact vertical windshield for individual side-address SDCs or, like me, an end-to-end pair for double mid side (DMS) using at least one twin mic: as I showed in my blog-post for DMS with the MKH 800 Twin and MKH 8030 combination, the Nano Shield offers an alternative to the Mini-ALTO for a compact rig, with the advantage of more transparency at the rear, but with the disadvantage of overly sagging lyres (and, of course, the general lack of robustness, ease of use and fit that mark the Mini-ALTO).
The emphasized Z-axis compliance of Nano-Shield lyres can be useful when used horizontally, but when used vertically, as here, the lyres sag.
Some readers may also wonder whether retrofitting the Nano Shield with the Mini-RADs resolves any remaining noise issues. I am not at all certain how much of the Nano Shield’s problem was related to its lyres, if at all, not least as I have struggled to replicate the noise/resonance once the Rycote-issued revised parts were fitted. But, that said, I am not swinging a boom day in day out, and much of my use involves static mounting of windshields for recording sound effects etc.: others may find in more intense real-world boom-pole use that the Mini-RAD retrofit is helpful in further resolving the noise issues of the Nano Shield, and it would be fascinating to hear if that is the case.
Rigging and testing
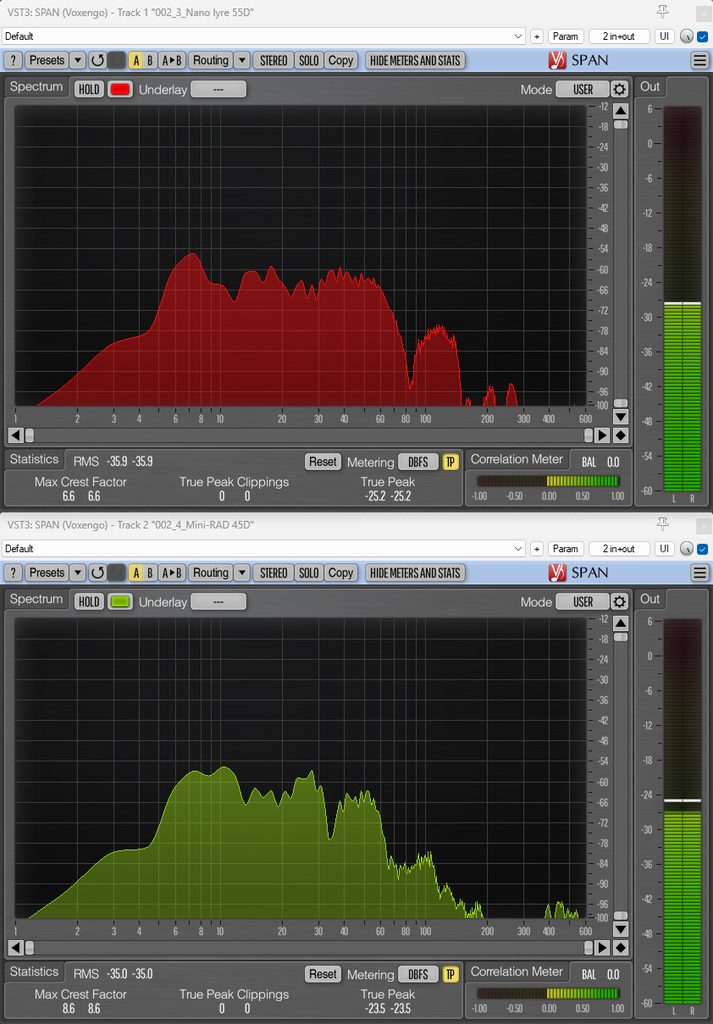
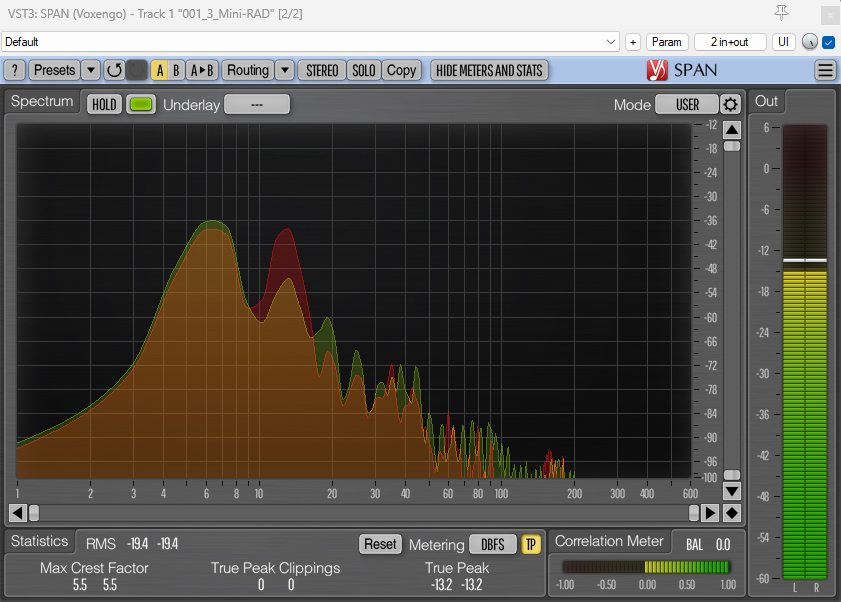
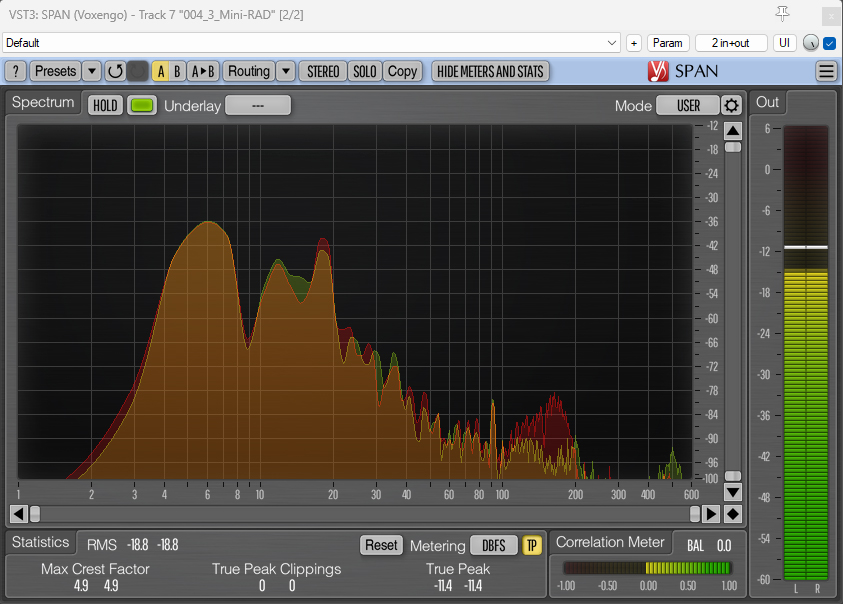
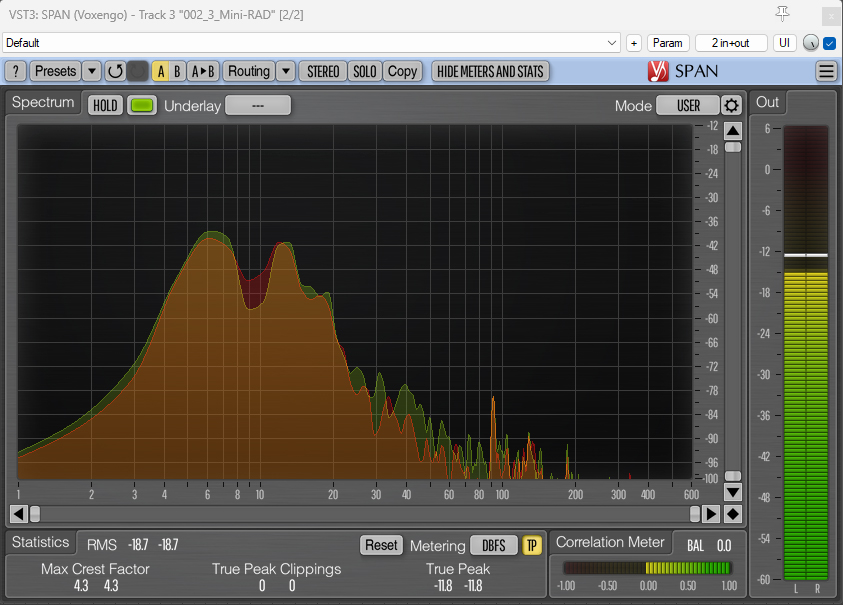
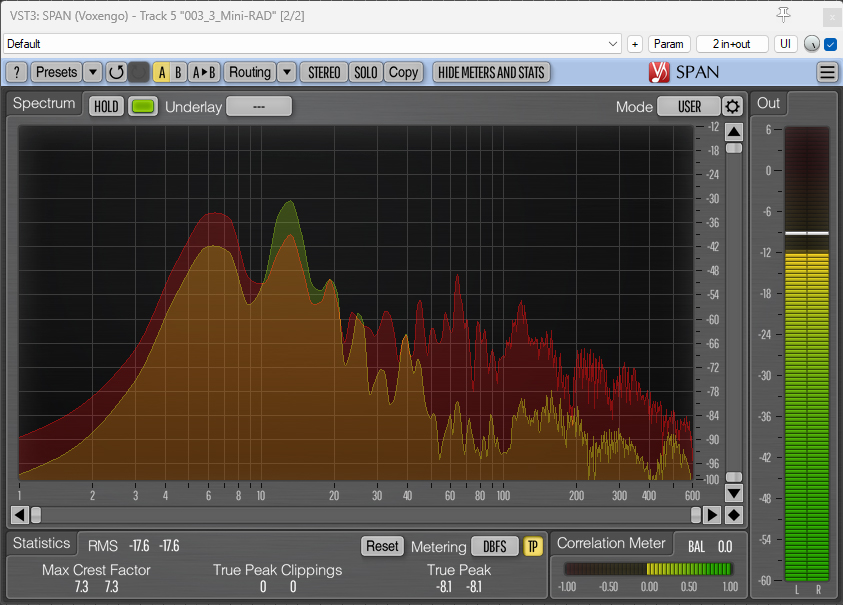
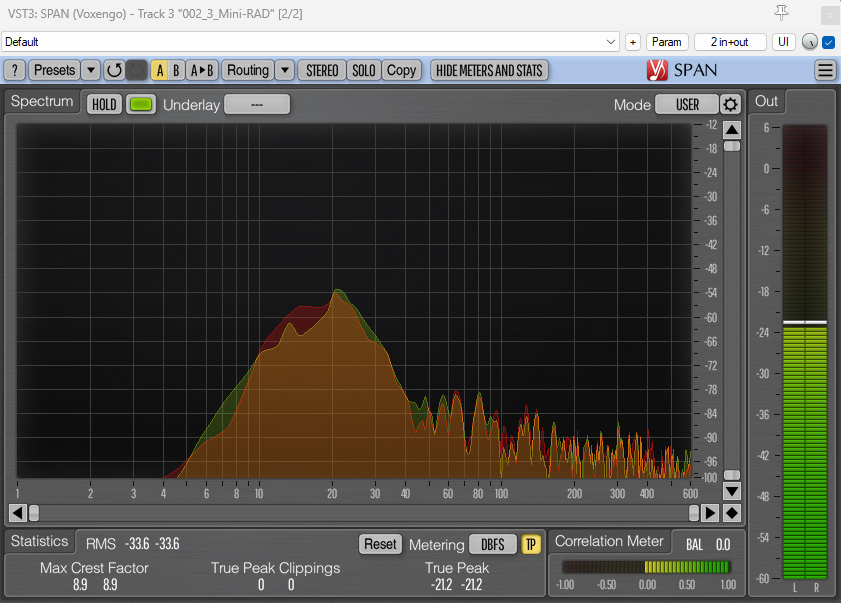
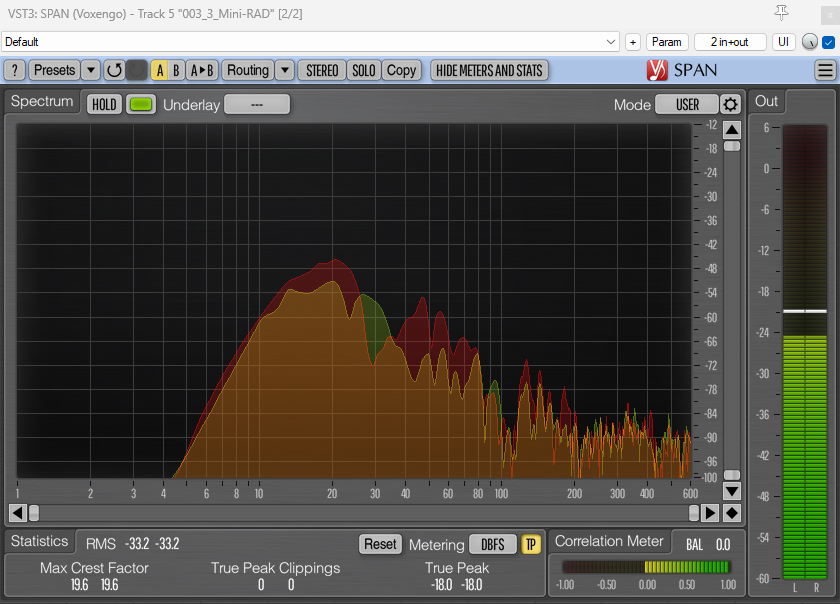
Given my reasons for doing this retrofit, there isn’t a great deal of testing to be done: I am already happy with the performance of the Mini-RADs and have posted my real-world tests on them here. For the sake of thoroughness, however, I did a specific comparison of the standard and retrofitted Nano Shields (i.e. with the baskets on, not just comparing the bare shock mounts), with both mounted on a short stereo bar at the end of an extended boom pole. There was no noticeable difference, and the spectrum analyzer results are shown here:
Comparing Nano Shields fitted with original Nano lyres in 55D (top: red), and retrofitted with Mini-RAD hoops in 45D (bottom: green). Rigged with matched Rycote C-08 cardioids on a Gitzo GB3560 carbon-fibre boom pole at full extension (3.95m) and being given some rough handling.
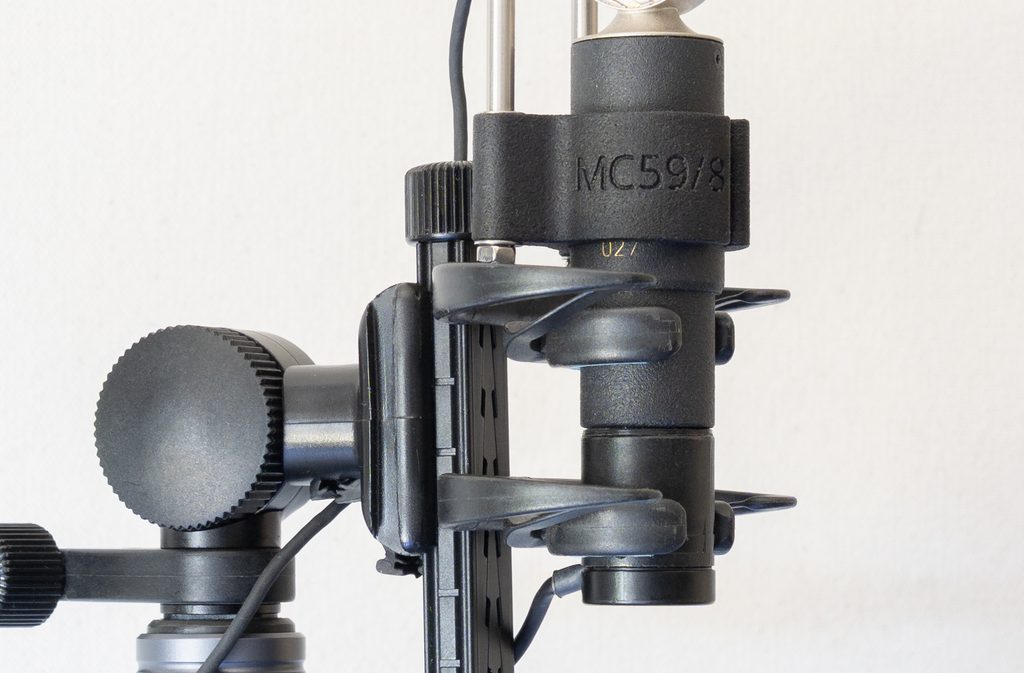
In terms of the vertical rigging prevention of sag, the results are very much as expected, as shown in this DMS rig:
Vertical DMS rig with the Nevaton MC59/8 and MC 59 Twin: no sag in the suspension with the retrofitted Mini-RADs and, of course, the benefit of the all-round transparency afforded by the seamless Nano Shield basket (the mics capsules are nice and clear of the mount and the junction of the two pods).
Conclusions
The Nano Shield had a mixed reception and, as I understand it, only modest sales, doubtless in part due to the many social media comments on the noise issue. Despite the windshields not being as well tested or, indeed, as easy to use as the Mini-ALTO (in many ways the natural successor and alternative), the basket design remains quite unique and a rather clever bit of injection moulding: there isn’t, for example, even a Cinela equivalent that has all the same attributes. As such, if a Mini-RAD hoop retrofit helps anyone bring their Nano Shields back into use, then that’s a good thing: I’ve certainly found the fairly simple process worthwhile.
My simple 3d-model for the bar to support the Mini-RADs is freely available here in Onshape, but I am sure others interested in trying the retrofit will want to develop their own versions, perhaps with different lengths and spacings between hoops: fit is also a bit dependent on 3d printer and material.
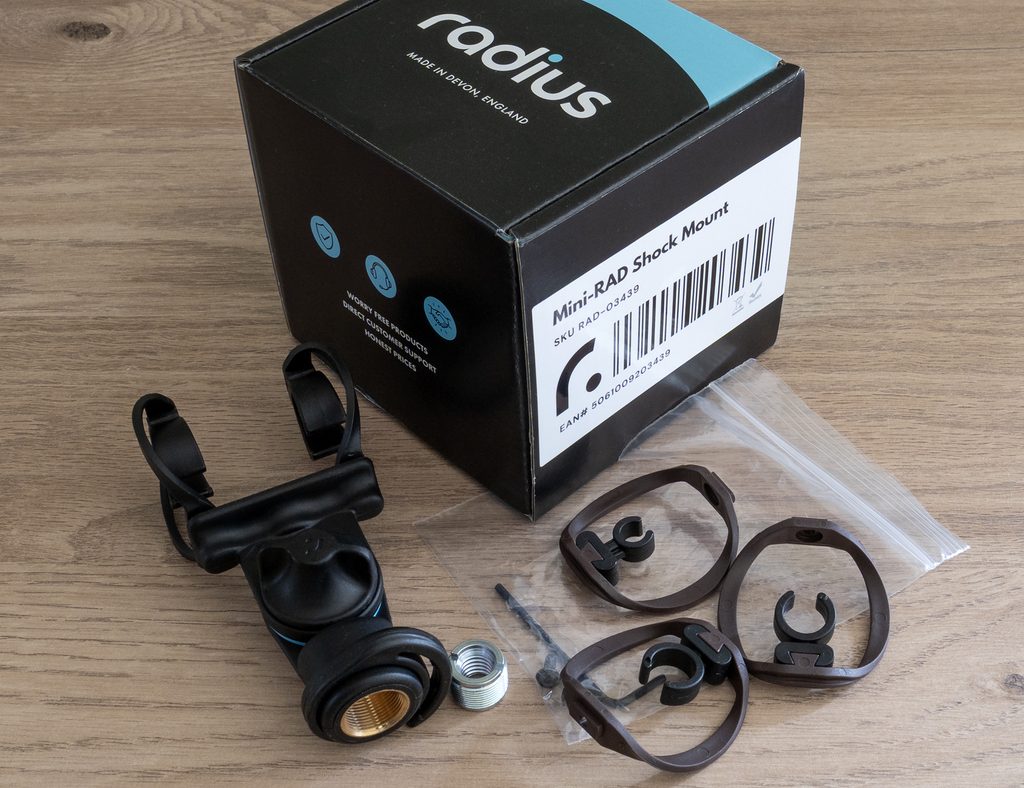
The Mini-RAD shock mount, showing what’s in the box: the dark (‘espresso’) brown hoops (45D) and black hoops (55D) are the muted colours/tones chosen for production and designed for low visual impact.
Introduction
In a recent post I showed how the updated ORTF mounts for the Mini-ALTO were able to take advantage of the Mini-RAD hoops, but, needless to say, this wasn’t the design intention behind the new shock-mount components from Radius Windshields. So this blog is about using the hoops for their designed purpose, as low-profile suspensions for single mics. As one option, Radius sell the hoops as part of a complete kit, as shown in the photo above. This comes with the Mini-RAD shock mount, fitted with a pair of Mini-RAD hoops (55D black) with 19/21mm clips, as well as the following spares/alternative parts: 1 off Mini-RAD hoop (45D espresso brown: i.e. Pantone 497C ) with 8.0mm clip; 2 off Mini-RAD hoops (45D espresso brown) with 12.5mm clips; 1 off 2mm Allen key; 2 off M3 x 10mm screws; and 1 of metal 5/8-27M to 3/8-16F adaptor. The kit has an MSRP in the UK of £72.00 inc. VAT, which means it is slightly more expensive than, say, the Rycote InVision INV-6 or INV-7 (both with an RRP of £63.60), although, of course, the Rycote alternatives don’t have any spare lyres or clips. While talking prices, the Cinela E-OSIX model used in the comparisons below retails at around £240 inc. VAT, but that does include the integral XLR connectors and cable. Given that the Mini-RADs can be retrofitted to existing Radius Windshield bases (not least the diminutive Field Edition base) and – like the larger RAD-1 and RAD-2 hoops – to Rycote mounts (including the Invision INV-7 and INV-6) the availability of the hoops sans mount will be very useful for many too: these come in at £15 inc. VAT for a pair (and include any of the three sizes of clips).
Size and mounting
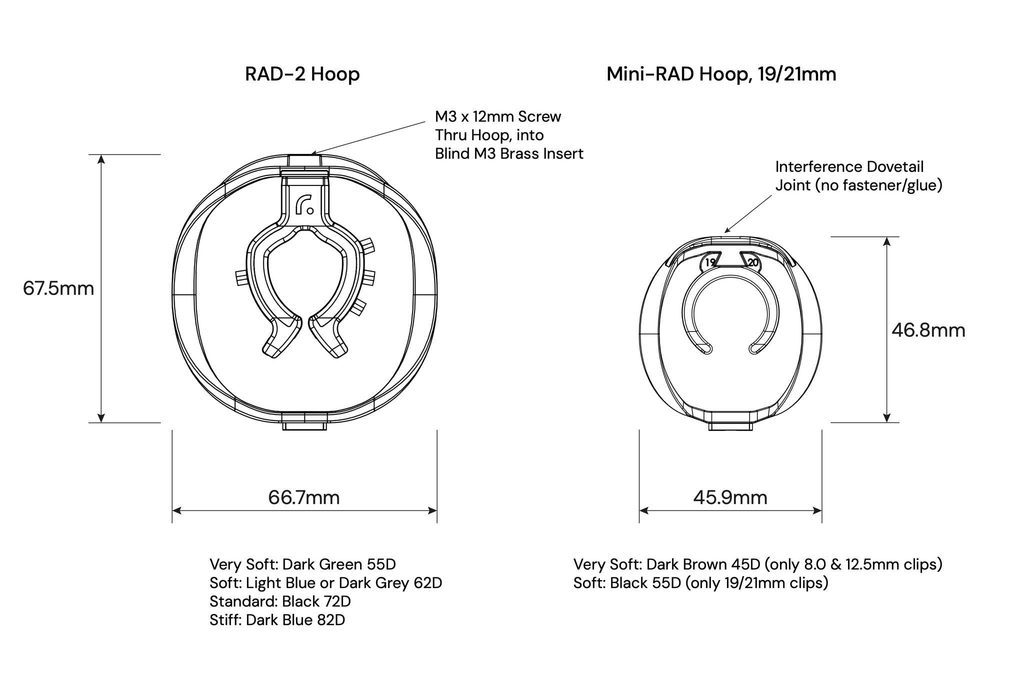
The fundamental difference between the standard hoops from Radius Windshields and the Mini-RAD hoops is, of course, the size. A picture (especially one with dimensions!) is worth a thousand words:
The RAD-2 and Mini-RAD hoops compared: dimensioned drawing courtesy of Radius Windshields. As well as the sizes it also shows the different shore ratings and colours.
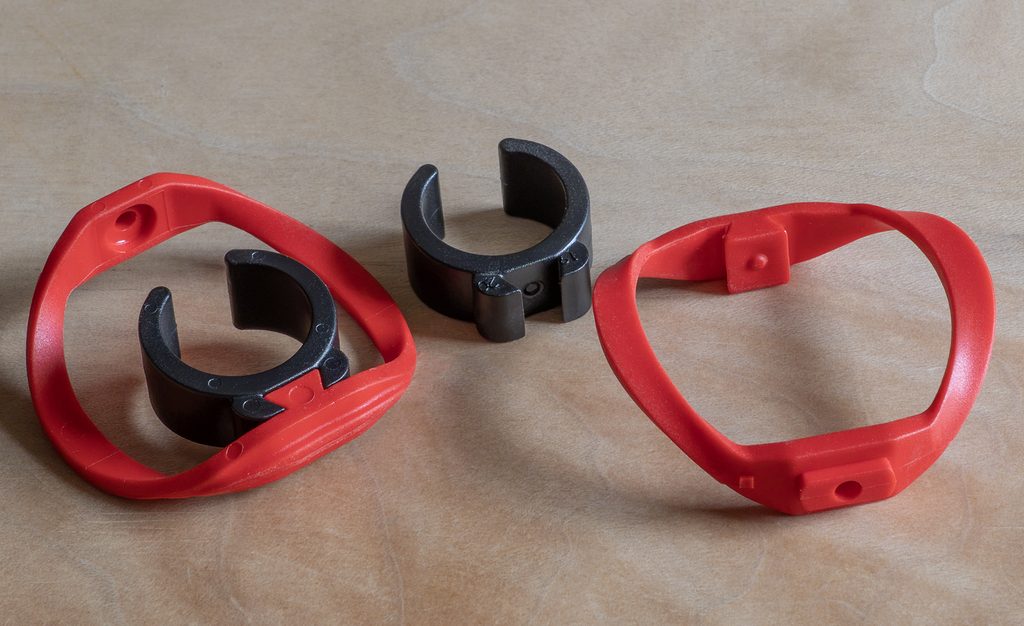
Although the fixing at the bottom remains the same, the top mount is a radical departure: the smallness of the hoop means there is no longer scope for a mic clip that is screwed to the hoop. Rather than eschewing a separate clip and going for a clip and hoop injection moulded all as one (like the Rycote lyres), I am mightily relieved that Radius have kept the modular approach: without that I would not be able to use the Mini-RADs for such unintended designs as the ORTF bars or, more prosaically, fit the 19/21mm clips to the softest hoops (45D)! The separate hoop and clip has been achieved instead by the use of a dovetail joint: this is a tight fit, but with any tendency to slide out removed by use of a projecting pip on the underside of the hoop’s dovetail and a corresponding dimple on the top of the clip’s part of the dovetail.
Mini-RAD hoops in ‘Evil Red’ (a colour used for a pre-production test run of the 45D hoops), which makes it easier to show the details of the dovetail: you can see the pip on the underside of the dovetail in bare hoop on the right, and the corresponding dimple in the unfitted clip.
While a tight fit of the dovetail is essential to remove any movement – and noise/vibration arising from that – this does mean that pulling the two parts is bit of a challenge: in reality, I think most users will leave hoops and clips mated most of the time, which is not an issue.
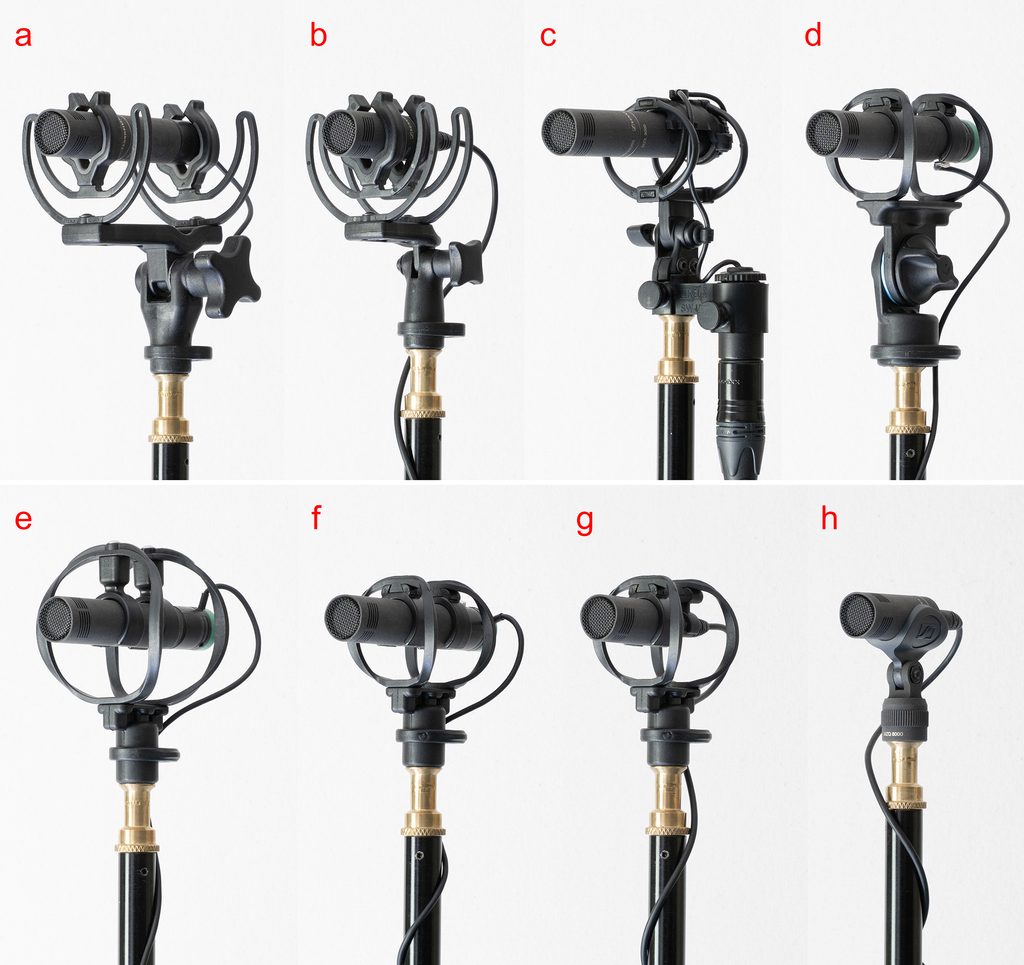
Some suspension and mount visual comparisons, all fitted with a Sennheiser MKH 8040 (with a mix of XLR and MZL connectors/cables) and at the same scale: a) Rycote Invision INV-7 with XLR; b) Rycote Invision INV-6 with MZL; c) Cinela E-OSIX-4018C with XLR; d) Radius Mini-RAD with XLR; e) Radius RAD-2 hoops on a Radius Field Edition mount, with XLR; f) Radius Mini-RAD hoops on a Radius Field Edition mount with XLR; g) Radius Mini-RAD hoops (19/21mm and 8mm) on a Radius Field Edition mount with MZL; and h) Sennheiser MZQ8000 mic clip (no shock mount or cable clip) with XLR.
The photo above shows a size comparison of the Mini-RAD hoops, in various configurations, with the RAD-2 hoops, Rycote lyres and the Cinela E-OSIX, and a basic mic clip. I’ve shown the Mini-RAD hoops fitted on both the supplied pivot mount and the still smaller non-pivoting Field Edition mount from Radius since the latter particularly suits low-profile use on a stereo bar (for coincident, near-coincident and spaced pairs) where any pivot is better – and, indeed, normally – applied to the whole bar where it joins the top of the stand. The small size of the Mini-RADs doesn’t just help visually (think of audiences for live concerts, and, the bane of many location recordists, the pressure for visually minimal set ups to suit video), but also practically – think especially about spot mics in tight places, including those on individual drums within a kit.
Compliance
This gripping sub-heading doesn’t mean I’m looking at how the hoops meet regulatory standards, but, of course, addressing the issue of the impact of different size and design on the stiffness/compliance of the different sizes of hoops. Obviously, despite their same internal dimensions, the original RAD-1 and RAD-2 hoops differed in this regard even when made of the same shore-rated Hytrel: that was the whole point. The Mini-RAD hoops add a third degree of complexity to this, but, if we are to compare performance – and not just size – equivalence needs to be established. Handling the different sized hoops strongly suggests that, for a given shore rating, the Mini-RADs are stiffer by around one order (i.e. the standard 55D black Mini-RADs feel more like the light blue/dark grey 62D RAD-2 hoops).
While the Mini-RAD and RAD-2 hoops are similar in their compliance in the X, Y and Z axes, by virtue of their similar design, there are some significant differences compared to other suspensions. By my measurements (measuring deflection when applying a standard weight) the various hardnesses of Mini-RAD and RAD-2 hoops have 80-90% compliance in the X axis (side-to-side) compared to the Z axis (axial along the mic body), and around 10% compliance in the Y axis (vertical), again compared to the Z axis. This compares to my measurements for the Rycote lyres of around 60% for the X axis and 10% for the Y axis. More dramatically, with the Rycote Nano Shield lyres the comparative measurements are around 20% for the X axis and around 17% for the Y axis. Shock mounts for SDC mics primarily focus on the Z axis since for most SDCs this is axial to the diaphragm: it is the movement – from vibration – to and fro of the whole mic and diaphragm that generates noise just as if sound waves were hitting a stationary mic. That is fine in principle, but, of course, not all mics are end-address: there are side-address cardioid mics, such as the Schoeps MK4V, and, more commonly, fig 8 mics (or, indeed, stereo mics such as the Sennheiser MKH 8018 that have fig 8 capsules in them). A lack of X-axis compliance serves such mics poorly, as can be seen in the tests below. Y-axis (vertical) compliance, of course, has no benefit to any SDC mic (I can’t think of an instance where you would mount a side-address SDC horizontally, but with its capsule facing up and/or down!).
Using the Mini-RADs off-axis works really well due to their X-axis compliance, as in my ORTF mounts for the Mini-ALTO.
The Mini-RAD hoops, like the RAD-2 (and, indeed, the RAD-1) hoops, are well thought through, compliant to suit both end and side-address mics, mono and mid-side. On a personal note, I’ve also found their high X-axis compliance very useful for such things as my ORTF mounts for the Mini-ALTO, where the hoops are not conventionally aligned, as there is almost no loss of compliance (and performance) in such rigs.
Mini-RAD shock mount
The mount itself is rather dual purpose: it provides a compact pivoting base for a small set up with the Mini-RAD hoops and, at the same time, fits the Mini-ALTO windshield, providing a more compact base than that offered by the RAD-2 shock mount. As such it is much better suited to a boom pole and, of course, for a more minimal set up with the smaller Mini-RAD hoops for, say, music recording. It is with the latter in mind, no doubt, that the threaded brass insert has a 5/8″ thread, suited for mic stands, rather than the standard 3/8″ thread of boom poles etc. (I should hasten to add that it does come with a 5/8″ to 3/8″ adapter). The large (30mm) diameter of the pivot makes for fantastic grip: no chance of mic droop being caused by this shock mount even with a heavy mic. And that grip is continuously variable, which is nice if you don’t want the restrictions of the teeth of the RAD-2 mount (which allow pivot in 10 degree intervals): taking the pivot apart, I see that the teeth are still there in the Mini-RAD mount, but in this case don’t need to mesh as they each grip the opposing faces of the soft blue washer. Neat, and you can always remove the washer if you want the RAD-2 type mechanism. But as supplied it is, as I say, extremely grippy and has none of the issues that I have had with my Rycote Invision INV-7 (especially the older style, small knob variant) and INV-6 mounts.
Up close with the shock mount for the Mini-RADs. The 5/8″ thread with 3/8″ insert speaks volumes for the intended market! You can see the blue washer that allows continuous rather than stepped rotation for those fine mic position tweaks, whilst still providing immense grip.
And if you need a smaller mount without a pivot, there is, as we have seen, the ultra-minimal Field Mount from Radius: this is well suited – with the Mini-RAD hoops – for very small SDCs, such as the MKH 8000 mics with MZL connectors or the Schoeps mics with Lemos.
Performance
So much for the rather obvious physical differences between the Mini-RADs and the RAD-1 and RAD-2 hoops, but how well do the smaller counterparts perform? Obviously, that’s the key question. I went down something of a rabbit hole on this, exploring vibration shaker test machines, and even going as far as making one fed by sine waves or pinknoise, before I realized that I’m no engineer and that as a consequence I was struggling to know what amount of vibration was required to translate meaningfully to real-world use, and, likewise, the relevance of Z-axis vibration (these machines produce vertical vibration). So, for all our sakes, I have retreated to the more familiar territory of real-world testing! To my mind, there are two main areas to test: use in motion (some may want the lowest profile for booming a small mic – say a small supercardioid indoors with a small foam windshield) and, above all, for fixed use. The last is especially important, since use by the music industry – be that recording, broadcast or live sound – is evidently a driver behind the development of the Mini-RAD.
For boom use, I have tested as I have done before: mounting two identical mics (MKH 8040 with XLR module) on a short stereo bar on the end of a boom pole to record boom handling noise. All mounts used matching ultra-thin Mogami cables for the final stage to the mic to minimize effects of cable-borne noise. The boom pole was fully extended, and held statically but with a medium vibration induced, to represent the sort of movements that are translated and magnified along a boom pole.
Spectrum analyzer visualization for boompole handling: Mini-RAD 55D hoops (green) vs RAD-2 62D hoops (red overlay).Spectrum analyzer visualization for boompole handling: Mini-RAD 55D hoops (green) vs Rycote 72D lyres (red overlay).Spectrum analyzer visualization for boompole handling: Mini-RAD 55D hoops (green) vs Cinela E-OSIX (red overlay).Spectrum analyzer visualization for boompole handling: Mini-RAD 55D hoops (green) vs Sennheiser MZQ 8000 clip (red overlay).
There are no surprises that the Mini-RAD hoops hugely outperform the basic Sennheiser MZQ 8000 clip (i.e. no shock mount), apart from the slightly higher peak at around 12Hz (i.e. well below any frequency that would be of concern when booming – or indeed most microphone usage): all mic shock mounts are going to have some extreme low-frequency emphasis, or resonance, as that is the inevitable consequence of any spring, but the trick of a well designed system is keeping that too low to matter and, also, ensuring that the harmonics don’t cause issues. That low-frequency is slightly more emphasized in the RAD-2 hoops, again without being a concern, and the larger Radius hoops are a bit better performing than the Mini-RADs above this: this suggests that, if booming, the RAD-2 hoops could be the better choice, which, again, is not a surprise. In these tests the MIni-RAD hoops slightly outperformed the Rycote standard (72D) lyres (with the latter’s noise between 100 and 200Hz being distinctly audible), but, and more expectedly, were bettered by the Cinela E-OSIX.
For static use, I again used a stereo bar to mount two identical mics (MKH 8040 with XLR module), but in this case putting them at the top of a lighting stand placed on a suspended wooden floor. To get a largely non-audible impulse similar to the vibration effects requiring mitigation in the real world (e.g. movement of people on stage or in an audience, tapping of a performer’s foot or low-frequency vibration transmitted from traffic movement) I simply and very gently tapped my (shoeless) heel on the floor near the stand. Obviously repeating that vibration exactly each time is nigh on impossible (and I did consider some mechanism to try and help this), so it is really the comparison of each pair that matters: given that each time I compared the Mini-RAD to something else, that still allows useful conclusions to be drawn. Anyway, here are the spectrum analyzer results:
Spectrum analyzer visualization for stand-mounted mics: Mini-RAD 55D hoops (green) vs RAD-2 62D hoops (red overlay).Spectrum analyzer visualization for stand-mounted mics: Mini-RAD 55D hoops (green) vs Rycote 72D lyres (red overlay).Spectrum analyzer visualization for stand-mounted mics: Mini-RAD 55D hoops (green) vs Cinela E-OSIX (red overlay).Spectrum analyzer visualization for stand-mounted mics: Mini-RAD 55D hoops (green) vs Sennheiser MZQ 8000 clip (red overlay).
With floor-transmitted vibrations to mics statically mounted to a lighting stand, the results were a little different than in the boom pole test. If nothing else, it shows that different types of real-world vibration react differently with mics in suspension systems so supports my abandonment of a lab-based vibration device! There is one consistent element, in that the Mini-RAD hoops outperform the basic mic clip (i.e. no shock mount), albeit more subtly due to the much smaller degree of vibration involved (which is why, of course, many music recordists don’t use shock mounts at all on SDCs). Looking at the crucial area of 20Hz to 200Hz where low-frequency vibrations can cause audible issues, the Mini-RAD 55D hoops slightly outperform both the Rycote lyres and, also, the larger RAD-2 hoops. The boom-handling advantage of the Cinela E-OSIX is no longer clear: it has a very slight edge under 100Hz, while the Mini-RAD hoops are slightly better than it above this frequency. Of course, the E-OSIX is expressly designed for production sound and not music recording, so this is hardly surprising.
Conclusions
I am painfully aware that the rather homely comparative tests in performance are unlikely to be the last word on comparative performance, both from the perspective of the test procedure and, also, that they don’t cover all variations of mics, suspension compliances and sources of vibration. But, having used all these shock-mounts for some time now, the results above are consistent with my broader observations. That is, for boom pole use, the Mini-RADs seem to be slightly outshone by the larger RAD-2s and, above that, the very specific mic-tailored Cinela E-OSIX. But the Mini-RADs are competent for such use, nonetheless, so I wouldn’t hesitate to go for them if, for example, you needed a super small indoor rig for a supercardioid such as the MKH 8050 with an MZL connector. And, with any boom pole or pistol-grip use, correct mic placement, appropriately thin and flexible cabling to the mount, careful cable routing, and correct selection of hoop/lyre compliance (not least mixing front and rear hoops) is critical for whatever shock mount you use.
For static mounts for music recording – which is very much a target use – the Mini-RADs are excellent and are not outperformed by any other shock mount tested here: indeed, knowing, and having used, many other types of shock mount, I can’t think of any other contender that is likely to be as effective as those considered here. Of course, many involved in music recording and live music don’t use shock mounts for SDCs: in a stone-floored church and when using very short, non-resonant and solid mic stands that may be a sensible choice, but in a whole host of situations I suspect they are missing a useful tool. Given the performance of the Mini-RADs, their low visual impact (especially compared to RAD-2s and the Rycote lyres) and their comparatively low pricing (very obviously compared to the Cinela E-OSIX, but also, more pertinently, compared to the Rycote lyre-based mounts), it will be fascinating to see how widely they are adopted for SDCs in the music world, be that for live performances, or studio and location recording.
Meanwhile, be prepared for some more off-the-wall complex DIY mic mounts using Mini-RAD hoops here: they’ve certainly got me thinking!
Close-up of the new Radius Mini-RAD hoops showing dovetail connection to a new MJF-printed ORTF bar for the Mini-ALTO (in this case for the MKH 8040).
Introduction
Last year I wrote a three-part series on fitting an ORTF pair in the diminutive 80mm diameter Mini-ALTO from Radius Windshields. This was, as I described, a (non-commercial) challenge from John and Simon at Radius, and I made the task a little trickier for myself by keeping the capsules of the mics on the centre-line of the windshield: too often people squeeze ORTF pairs into windshields with the capsules right against the basket, with consequent impact on wind protection. The result, as readers may recall, was a series of designs for some suitably short mics: the small cardioids I found that fitted properly were limited to the Schoeps CMC 1 KV + MK4, the DPA 4011 + MMP-GS or MMP-ES preamp, the Nevaton MC 59S + 59/C, and the Sennheiser MKH 8040. The first three are hard-wired and, crucially, avoid the projection of connectors, while the Sennheiser needs a custom MZL connector to become short enough to fit. Since then, I have added the new Nevaton MC59uS + C2 combination, which, with a length of 23.5mm, is unbelievably short for a cardioid mic.
In an update to part 3 of the original series on the ORTF in a Mini-ALTO project, I added that Radius Windshields had introduced an ORTF add-on kit with the necessary symmetrical pods (each 90mm) and fur to fit, and that Ed at ETK Cables was producing Y-cables with the customized MZLs necessary for the MKH 8040 version. I also posted links to (freely available) parts for 3d printing so that readers could make their own mounts, and I have had some feedback from those that have done this. Obviously, refinement of the mounts and turning them from homely 3d prints to injection-moulded parts would have been great, but, needless to say, ORTF in a Mini-ALTO is a tiny potential market for Radius Windshields – not least given that the necessary mics are, for the most part, relatively unusual: only the MKH 8040 is what one might call a ‘mainstream’ cardioid used in field recording and, indeed, it is this for which I have seen most interest (as gathered from feedback by those DIY-ing their mounts from my 3d files).
So the project could well have rested there, except for two things: first, I have been experimenting with getting Multi Jet Fusion (MJF) 3d prints made for me; and, second, the advent of the new Mini-RAD hoops got me thinking about revision of the ORTF in a Mini-ALTO design. This post, therefore, is about how those two aspects have come together and nudged the project on.
Detail showing the dovetail joint on the top of one of the MJF bars to fit the Mini-RAD hoops: the dimple mates with the pip on the underside of the Mini-RAD’s dovetail to ensure that nothing slips out. They are a tight fit anyway.
The revised design
The attraction of MJF printing for me, vs my modest 3d printing at home, has been that it liberates the designs from a flat bed. I know that people use supports, that are then removed, in their prints, but I have had little joy with this and invariably end up with a pile of spaghetti. So, getting one-piece prints of complex pieces instead of having to make them up piecemeal, with brass inserts and screws holding them together, seemed a real advantage: in short, for much I am doing nowadays I am using the little printer I have here (a Bambu Lab A1 Mini) to test things, then get them printed commercially using MJF technology.
I had just begun refining the ORTF bar designs for MJF printing – essentially combining the mic clips/mounts with the bar that holds the mics at the right angle and spacings, when I realized that the pre-production Mini-RAD hoops from Radius were imminent and that by using these I could simplify the designs. All the mounts for the ORTF pairs for the Mini-ALTOs had a common feature in that two posts or connectors linking the ORTF bar to the top of the hoops, so that the bar and the mics sat centrally in the windshield. With the much smaller Mini-RAD hoops (they are c.19mm shorter internally) it was clear that the posts/connectors could be removed from the design, and, instead, the ORTF bar could be fixed directly to the hoops. Also, the Mini-RAD hoops do not have a screw fitting at the top, as found in the standard hoops, but, rather, use a dovetail joint to connect: the dovetail includes a pip, which fits into a dimple in the Radius clips to ensure that the two parts don’t slip.
OK, a picture is worth a thousand words, so here are a few that, I hope, clarify how the new designs work and compare to the previous approach. In these examples, the updated designs are for the two Nevaton variations and for the Sennheiser MKH 8040, for the simple reason that I own these mics: I had to borrow the Schoeps and DPA short cardioids for the designs and tests last year.
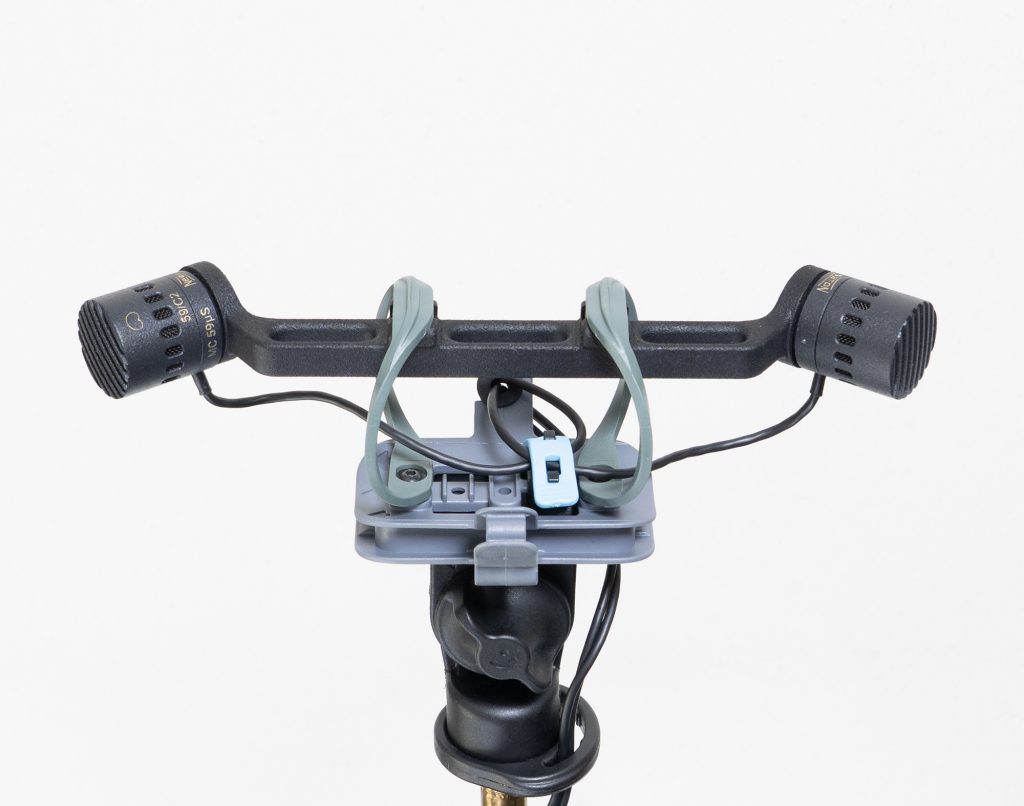
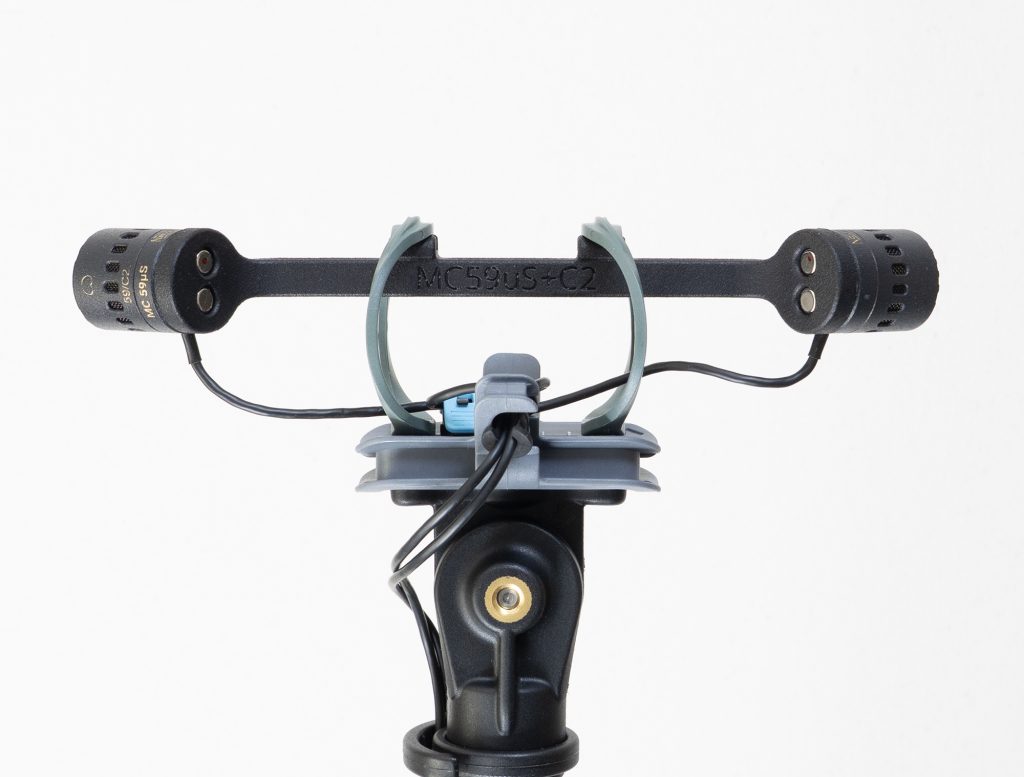
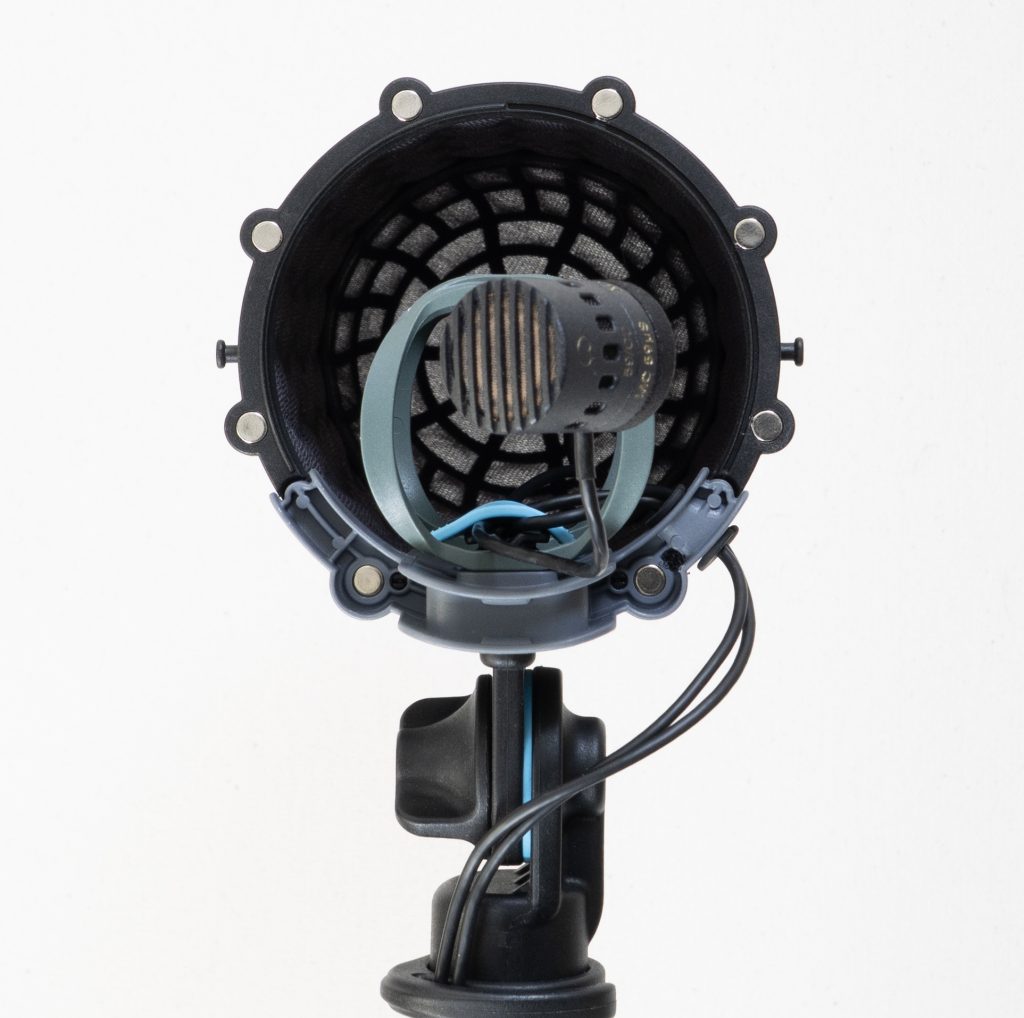
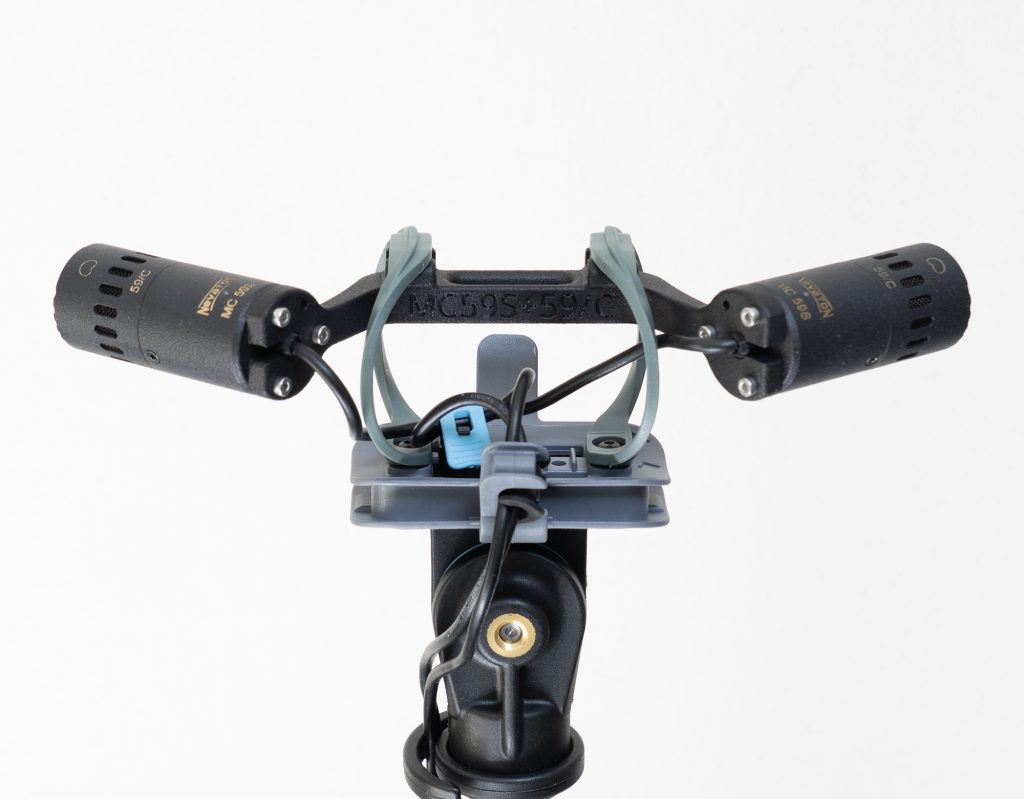
Here – as a recap – is the previous design with the standard RAD-2 hoops, showing the posts that connect the hoops to the ORTF bar and the separate clips for the mics themselves (in this case, MKH 8040): so a five-part assembly.And here is the revised design, with the one-piece MJF printed ORTF bar with integrated clips and no posts necessary to connect to the hoops. Again the mics are MKH 8040.Close-up of the new ORTF bar for the MKH 8040 showing the small groove inside the mic clips that ensures correct positioning of the mics (there is a slight projection where MZL meets the body of the mic).Composite image showing the ORTF bar with Mini-RAD hoops within the Mini-ALTO ORTF edition (i.e. with two 90mm pods), showing how the bar and the mics sit centrally in terms of height within the windshield.A single-piece MJF ORTF bar with the new Mini-RAD hoops, with the very short Nevaton MC59uS + C2 combination.Rear view of the bar for the Nevaton MC59uS + C2, showing the magnetic mounting of the mics.Side view of the Nevaton MC59uS + C2 ORTF pair, showing that the capsules remain central to the windshield basket: essential to maximize wind reduction.Mini-RAD ORTF bar for the Nevaton MC59S + 59/C combination: the preamps in this case are attached to the bar with M2 screws.
Conclusions
So there we go. From tests, there is no difference in performance and, indeed, you wouldn’t expect there to be, as long as the right compliance hoops are used (and the smaller hoops need a softer Hytrel to match the compliance of the larger hoops: for example, 45D shore in the Mini-RAD is roughly equal to 55D shore in the standard hoops; 55D = 62D etc.). But the new designs are useful simplifications of the previous versions, a lot further on from proof-of-concept designs, and as near as possible to the slick and robust injection-moulded versions that would be the ultimate, but which I think are not commercially viable. I hope this postscript to the original series on the ORTF in a Mini-ALTO project inspires others to venture along the route of bespoke shockmounts. And let it serve as a warning: the Mini-RAD hoops will doubtless feature in more elaborate and esoteric shockmount designs here!
Update: 22.7.2026
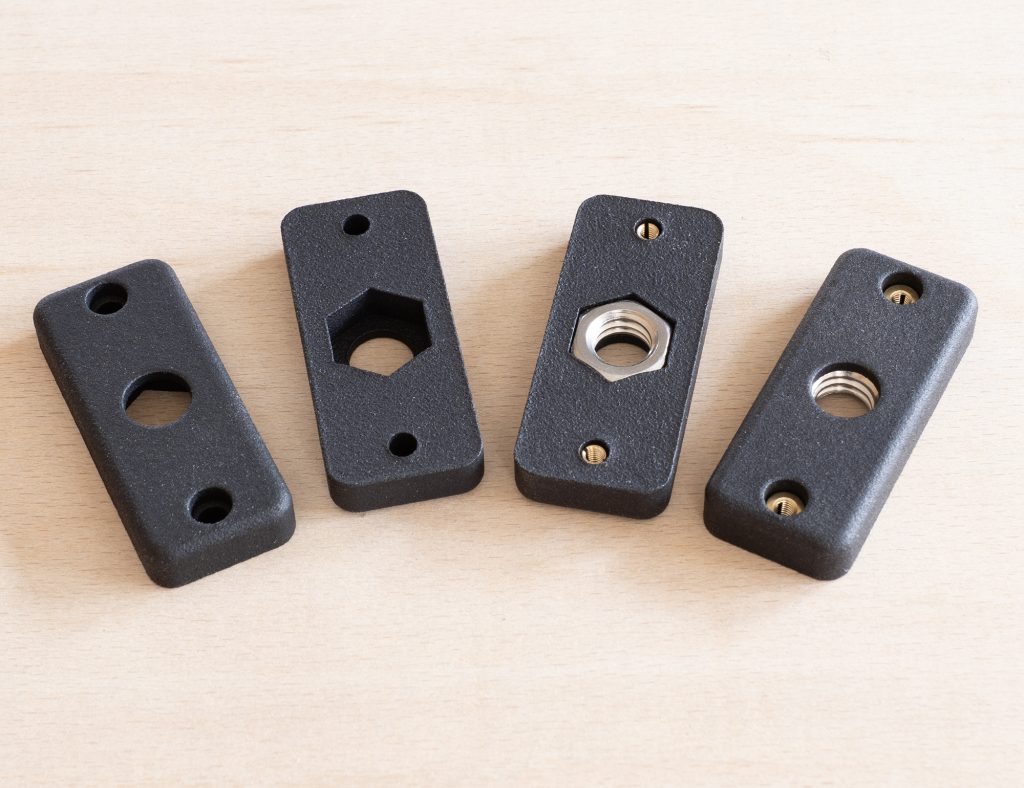
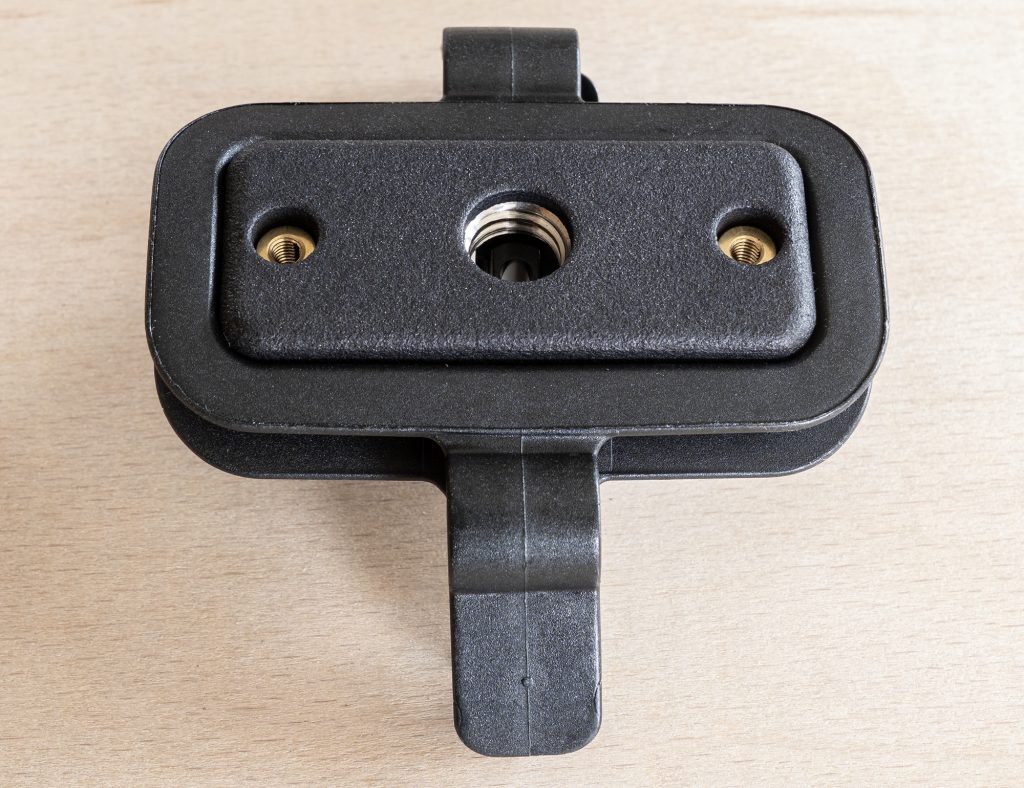
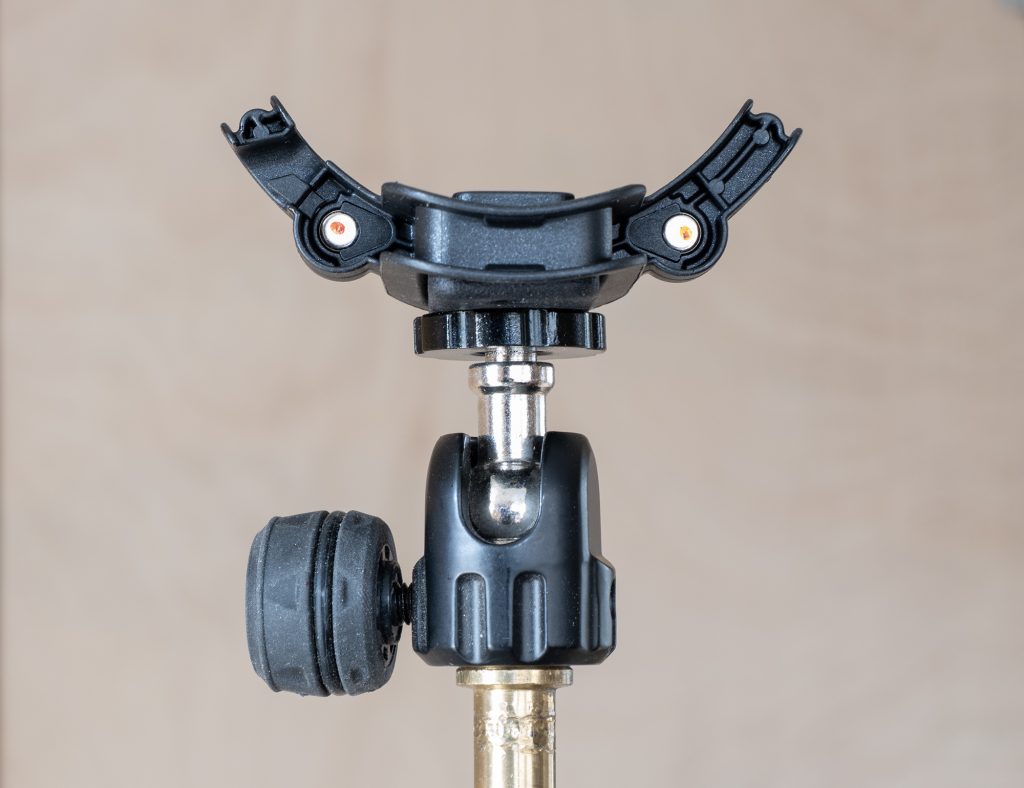
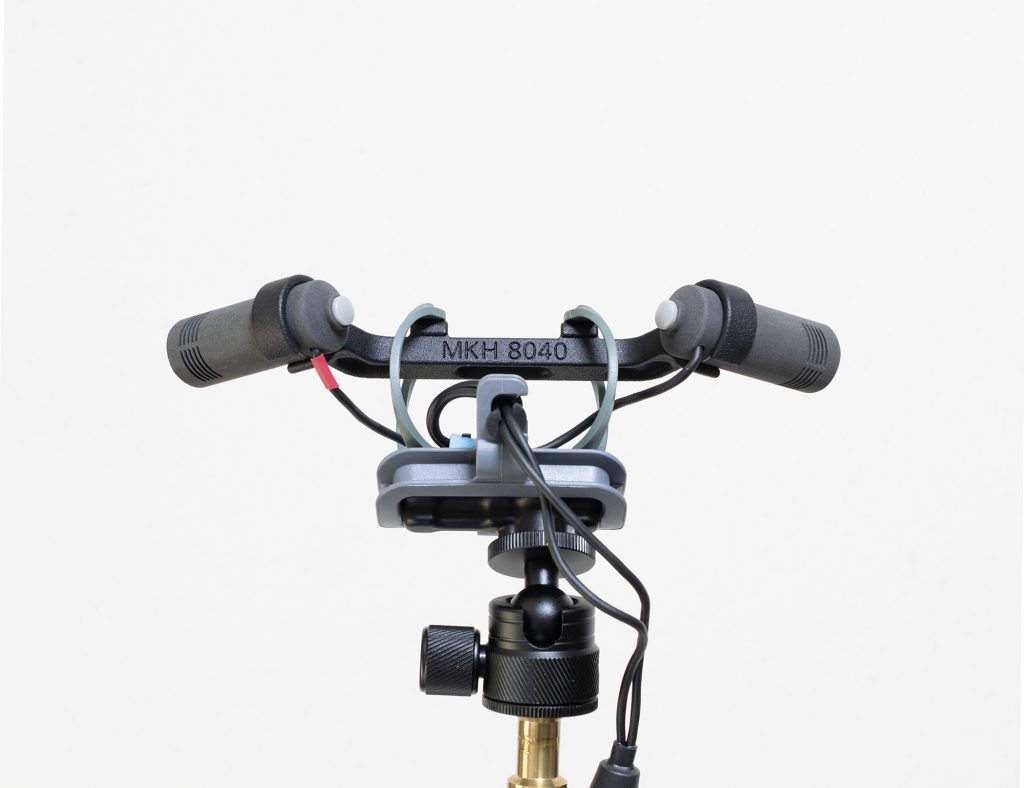
A postscript to a postscript? Hmm. Anyway, just thought I should add a short piece on base adapters. Obviously, the pivoting bases for RAD-2 and Mini-ALTO connections to boom poles, stands etc. pivot up and down the way expected for a mono mic or, indeed, an MS pair, but not for an ORTF pair where the windshields is used side-on to the sound source. In my original development of a 3d-printed solution I came up with a very simple base that allowed a 3/8″ connection to a ball head, and I have very slightly tweaked that basic design for MJF printing, retaining the captive 3/8″ UNC nut (a nice tight fit into the MJF base) and M3 brass inserts:
Simple base adapter in MJF with and without the 3/8″ UNC stainless-steel nut and M3 brass inserts.Simple base adapter in MJF inserted in the bottom of the ‘smiley face’ of the Mini-ALTO.Simple base adapter in MJF inserted in the bottom of the ‘smiley face’ of the Mini-ALTO, with a 3/8″ ball-joint attached (in this case the Gravity MSQT1B).
In due course I am sure Radius will produce something rather better and, indeed, their upcoming 1/4″ adapter bar is not at all bad and, with it’s 1/4″ female thread, allows use of some well-machined small ball joints that are rather nicer than the 3/8″ one from Gravity pictured above.
ORTF pair with upcoming Radius Windshields 1/4″ adapter bar – printed in MJF prior to the injection-moulded version being made – connecting the ‘smiley face’ to the ball joint (in this case one branded ‘Innorel’, but seemingly sold under several names: but nicely made nonetheless).