Introduction
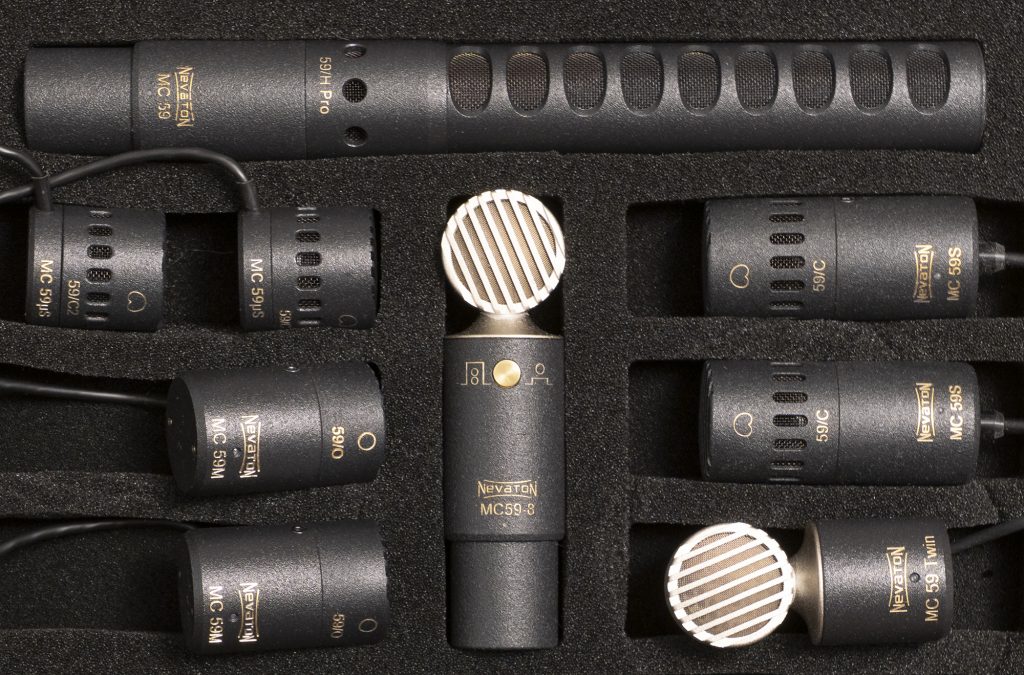
I first came across Nevaton mics through Magnús Bergsson’s excellent Hljóðmynd – Soundimage website. Magnús uses a wide range of mics, including some real top-drawer models, and is full of praise for the Nevaton MC59 models. I then had some direct experience with a pair of prototype side-address supercardioid Nevaton mics with 27mm capsules on the MC59 preamp body, but this was only a brief loan from the folks at a sound library for whom I was making an ORTF-3D windshield. I was impressed with these mics, so I was excited when Egor and Dmitry at Nevaton decided to send me a pair of their MC59S +59/C cardioid mics, followed, in due course, by a pre-production pair of the MC59uS + 59/C2. The former appeared in my blog post back in May this year on fitting ORTF pairs into the diminutive Mini-ALTO windshield, and, for those not familiar with the mics or the company, provided a brief introduction to them. In a subsequent post, in July, this year, on fitting an XY pair into the Mini-ALTO, I introduced the new cardioid option from Nevaton – the MC59uS + 59/C2. The sharp-eyed will have also noticed that these Nevaton mics pop up in some of my subsequent posts, such as those on double mid side (DMS). In one post on DMS I also include an example using an MC59-8, which is the fig 8 of the series. Yet to appear in any of my blog posts are additional mics from the series, which I have since been testing, comprising the omni (which has been around for some years) and two new (again, pre-production or prototype) mics: the MC59H/Pro (a shotgun mic) and the MC59 Twin (rather obviously a twin mic, with separate outputs for the back-to-back capsules). Evidently, rather than the mics making the odd walk-on appearance in blog posts, it is high time I consider the Nevaton MC59s in more detail, with tests along usual lines. My dilemma, insofar as you can call it this (yes, I know many won’t be too sympathetic to me having to cope with all these mics!), has been how to tackle this motley and growing range of different polar patterns, since to test/review all of them in one post would make it inordinately long. On reflection I think it most sense to consider the fig 8 and twin in this post (they are so closely related in terms of design), then the two cardioid models that I have in another post, and, then, the omni mic and the shotgun mic in two more posts. I will doubtless also consider many of the mics together on a single recording project too. So, in short, there will be a flurry of MC59 posts here as, indeed, there have been similarly for other mics (e.g. Rycote and Sennheiser). There isn’t a huge amount of information out there about the Nevaton mics and there are some rather unusual aspects to their design, so hopefully the posts will be of interest to some.
NB Just in case you were not aware, although with a long history in Russia, Nevaton relocated its whole operation (development, research, production, service and support) to Austria in 2024. The new factory is in Siegendorf, which is about 40 miles south of Vienna. They have a new website here.
The MC59-8 fig 8 and the MC59 Twin
As readers of this blog may have noticed, I do like a fig 8 mic due to my love of mid-side recording along with double mid side and horizontal native B-format rigs. The latest fig 8 mic I have been testing is an intriguing one sent to me by the good folks at Nevaton: the MC59-8. It is not a new design, having been around a few years, but it is new to me, and one I wanted to be able to test as part of an MS pair. The fig 8 forms part of the MC59 series, but in this case is not modular: its preamp, with an XLR connector, is integral with the capsule. There’s nothing particularly unusual about a non-modular design (the highly regarded Sennheiser MKH 30 is similarly so), but the fact that it has a switch to select between fig 8 and omni polar patterns is distinctive: this, of course, reveals that it is a dual-diaphragm design. I’m not snobbish about only using single-diaphragm fig 8s (indeed, the Rycote BD10 is a decent dual-diaphragm fig 8 in the unpopulated c.£500-600 area; and the much more expensive Sennheiser MKH 800 Twin is very well regarded, including when used as a fig 8): rather, I’m intrigued as to how it compares to other fig 8s I use.
Given the dual-diaphragm design of the fig 8, and its switchable omni mode, the MC59-8 has obvious potential to become either a multi-pattern mic or, better, a twin mic. Both, of course, allow for the further polar patterns, but only a twin design allows for the outputs of the two diaphragms to be output separately, either to a mixer or, more normally, recorded as two separate channels. I was excited to hear earlier in 2025 that Nevaton were going down the route of developing an MC59 Twin and even more so when they sent me one of the first ones just before Christmas. Exciting for the scope of having a continuously variable pattern mid mic (from omni to fig 8) for MS and, also, the scope that it opens up, when used in conjunction with the MC59-8 (or, indeed, a second MC59 Twin) for a more compact and less clunky DMS rig. Its diminutive size – just a third of the length of the Sennheiser MKH 800 Twin, and a quarter of the length of Nevaton’s existing LDC twin (the MC550) – opens up all sorts of rigging opportunities.
Physical form
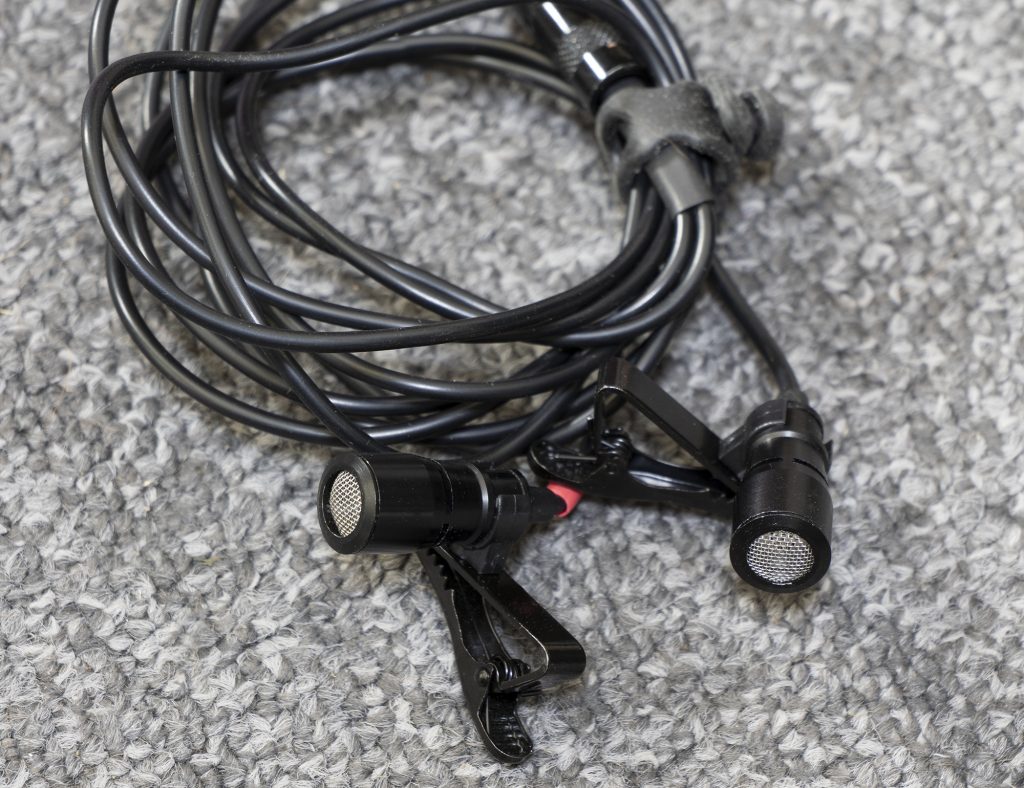
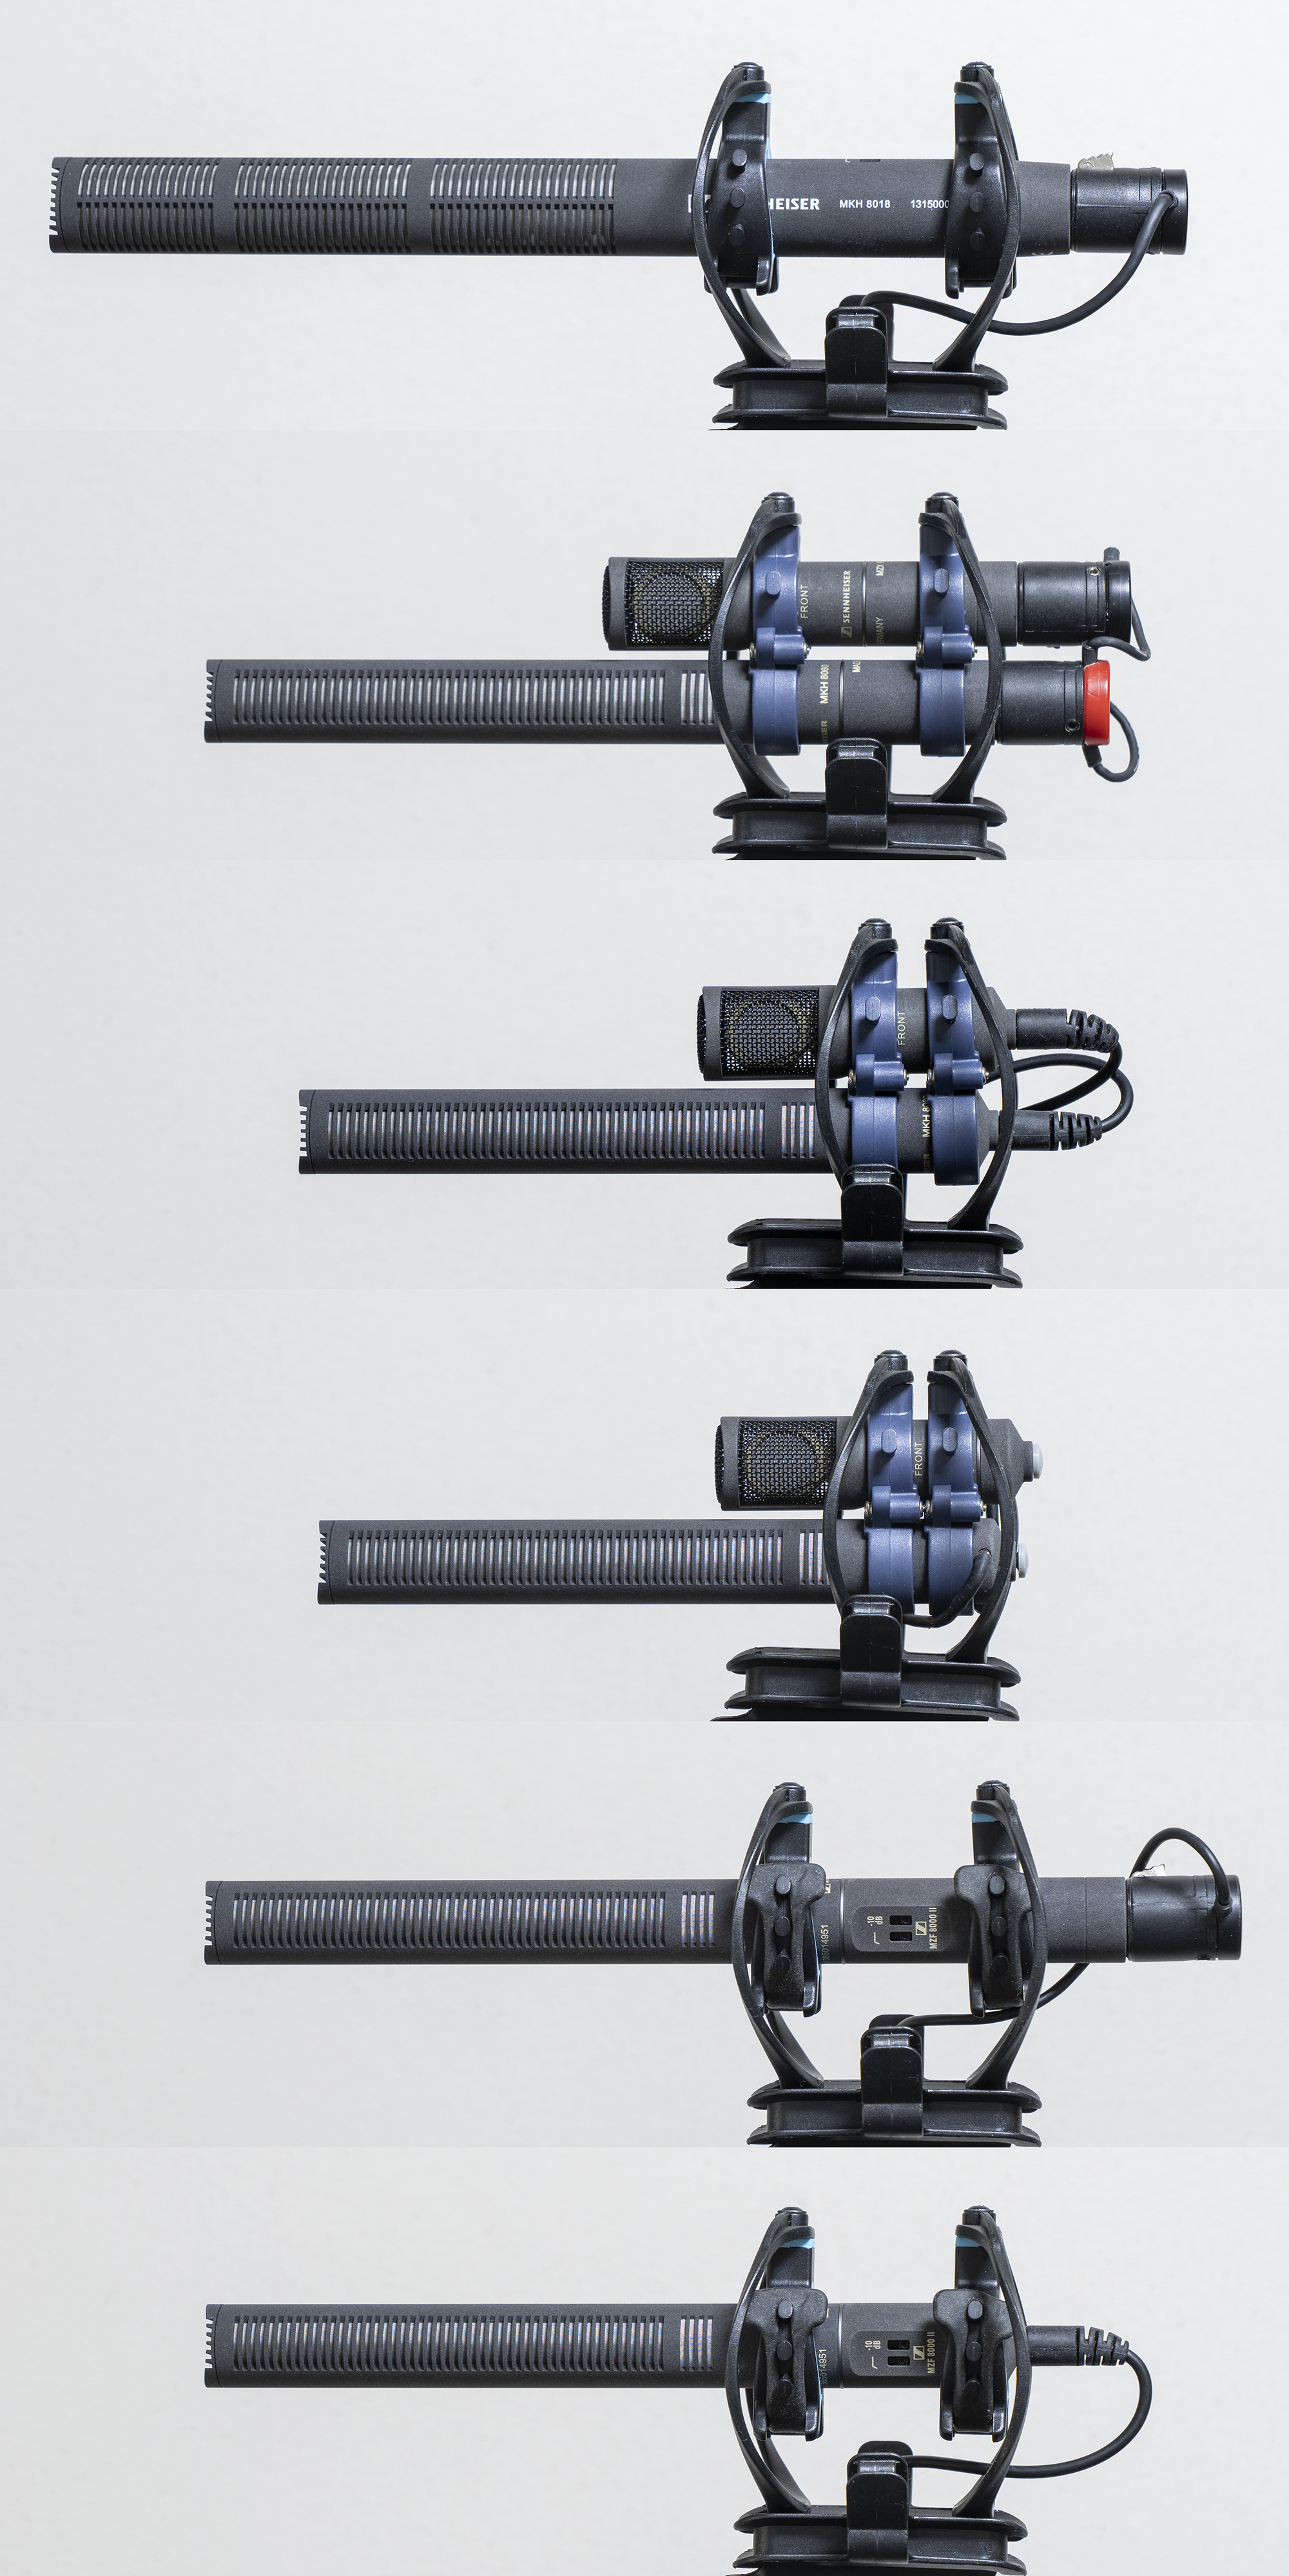
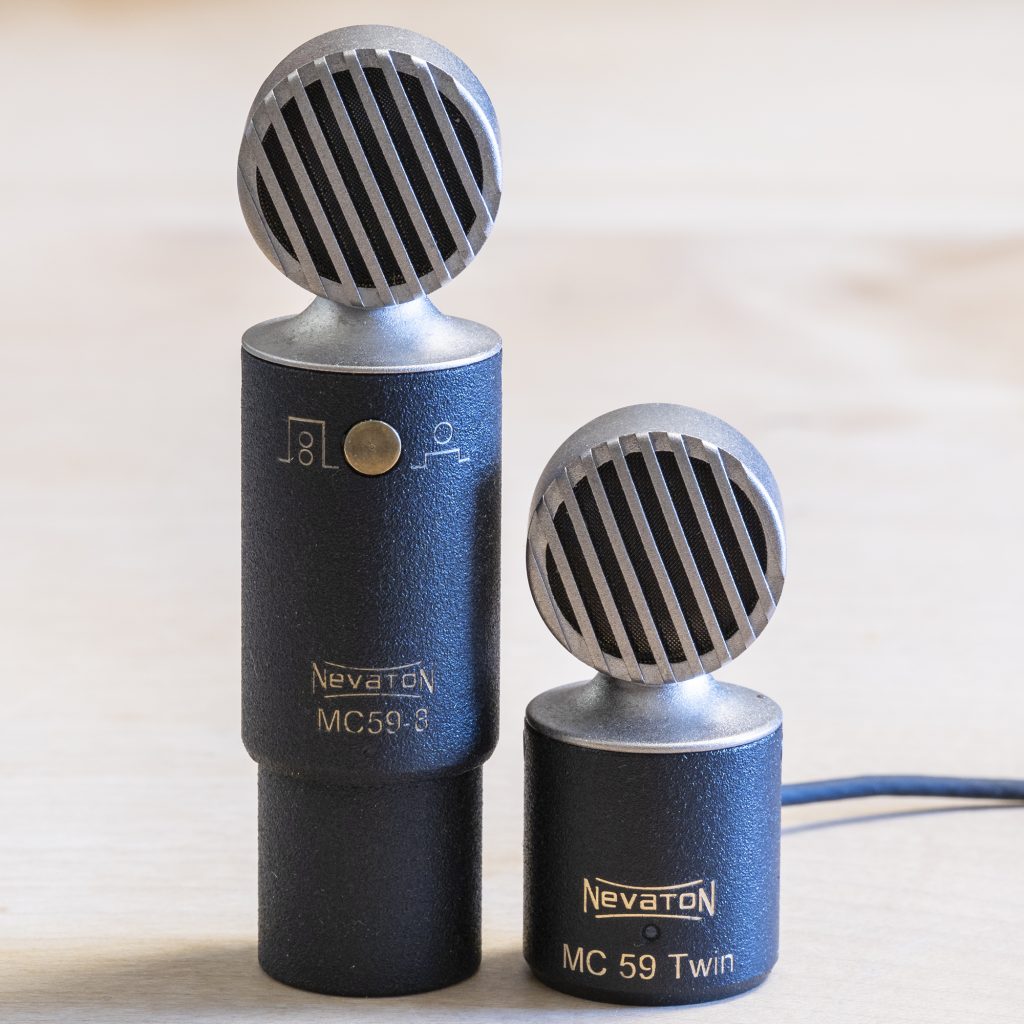
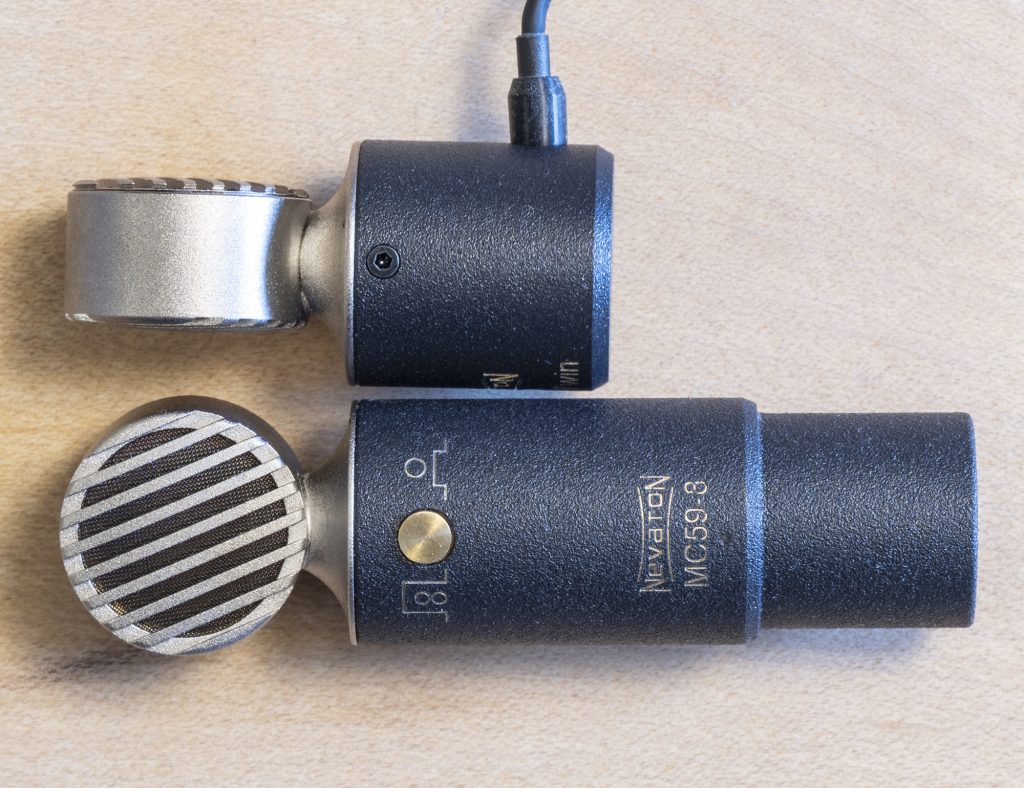
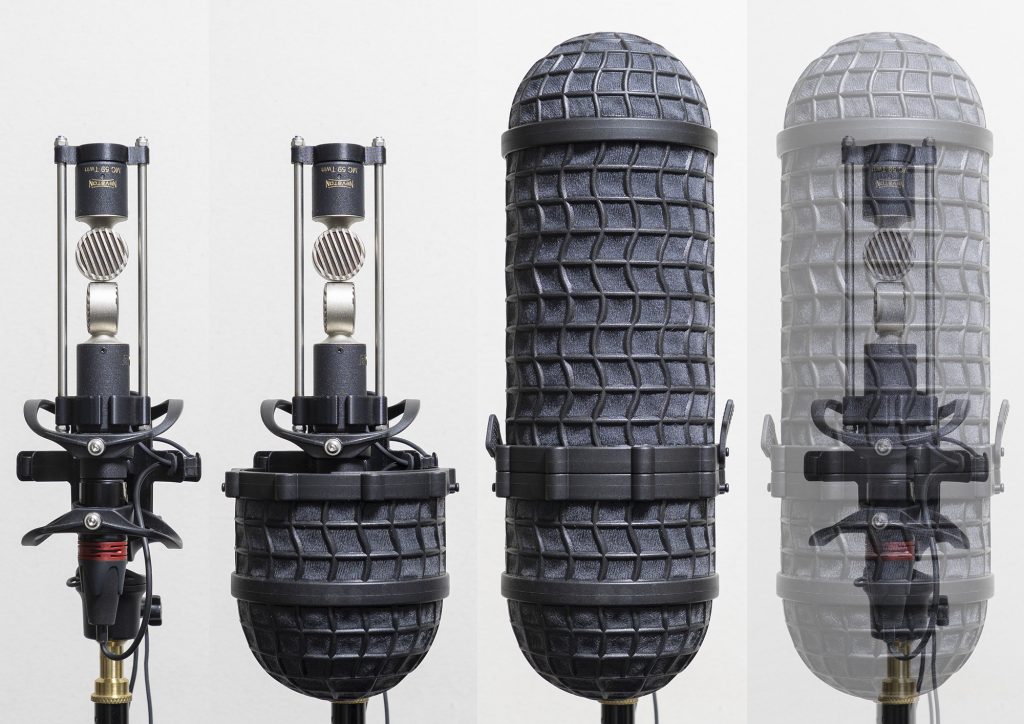
The MC59-8 eschews the form of the other fig 8 mics I have here, in that the side-facing capsule is not housed within a continuation of the cylindrical mic body, but, rather adopts a distinctive lollipop form. The preamp body is 22mm diameter, like the other MC59 mics, although it narrows to 19mm for the XLR connector part. Overall length is 80mm.
The ‘lollipop’ capsule design of the MC-59 Twin is identical to that of the fig-8, but the body is quite different. Most notably the MC59 Twin lacks the omni switch (obviously) and, more significantly, has no XLR connection: instead it is hardwired with a side-exit cable. This allows the mic to achieve a compact 48.5mm overall length. The side-exit cable helps ensure that the advantages of a short body length are not lost to a lengthy rear-exit connector and cable, and, moreover, allows the mic to be flush mounted either via its two M1.6 threaded holes or, for slick mounting options, magnetically (the base has two internal magnets in it).
Both mics have brass bodies that have been sandblasted and nickel plated. Past MC59-8 mics have then been fully powder painted in black, but mine is an example of the new approach, which is to leave the capsule part with its nickel finish. The newer MC59 Twin follows the same approach. Inside, the capsule of both mics is identical, with the two diaphragms placed 7.1mm apart, and symmetrical from each side. The spacing between the capsules is pretty similar to that of the Sennheiser MKH 800 Twin.
Self-noise
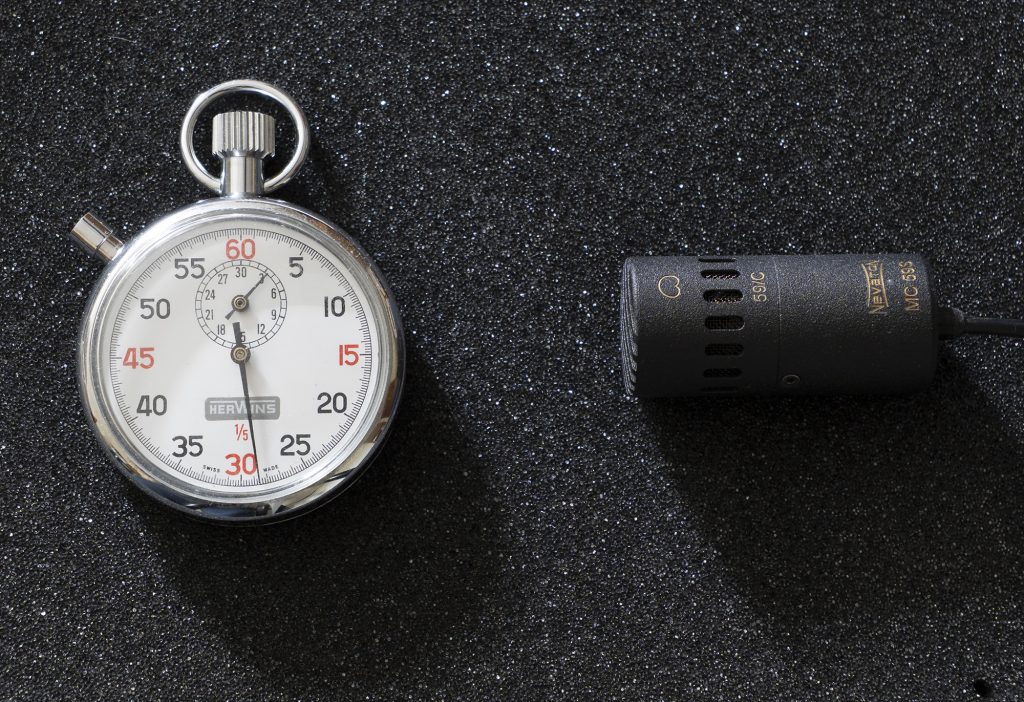
SDC fig 8 mics never seem to reach the low self-noise figures of their siblings with different polar patterns, and this is no different with the Nevaton MC59s than any other series of SDC mics. But, given the low self-noise of the MC59 series, it is no surprise to find that the MC59-8 and the closely related MC59 Twin are quiet mics. Nevaton’s own published self-noise figures for the fig 8 are those measured with an equal capacitor (i.e. the standard method according to the IEC), which is about 6 dBA, with overall (i.e. including the capsule) self-noise for fig-8 mode being about 13.5 dBA, and for double-membrane omni mode being about 7.5 dBA. First off, I did some self-noise tests on the MC59-8 in fig 8 mode, comparing it to four other SDC fig 8 mics: the Sennheiser MKH 30 (published spec of 13dBA); Sennheiser MKH 8030 (published spec of 13dBA); Schoeps CCM8 (published spec of 18dBA); and Rycote BD10 (published spec of 18dBA).
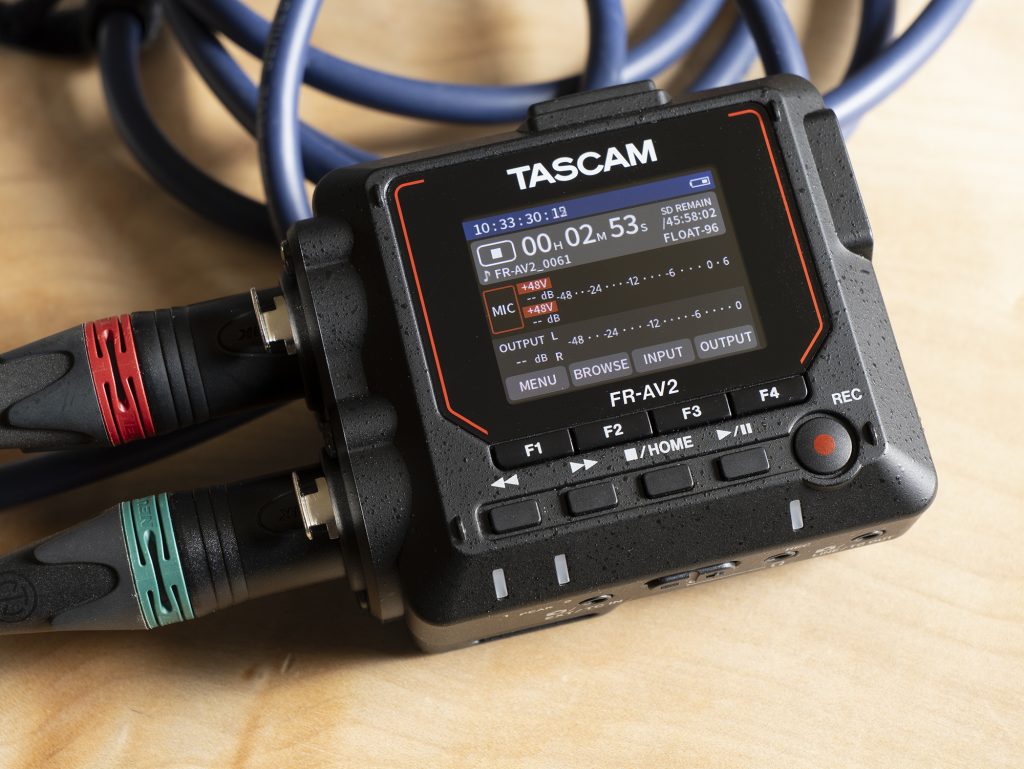
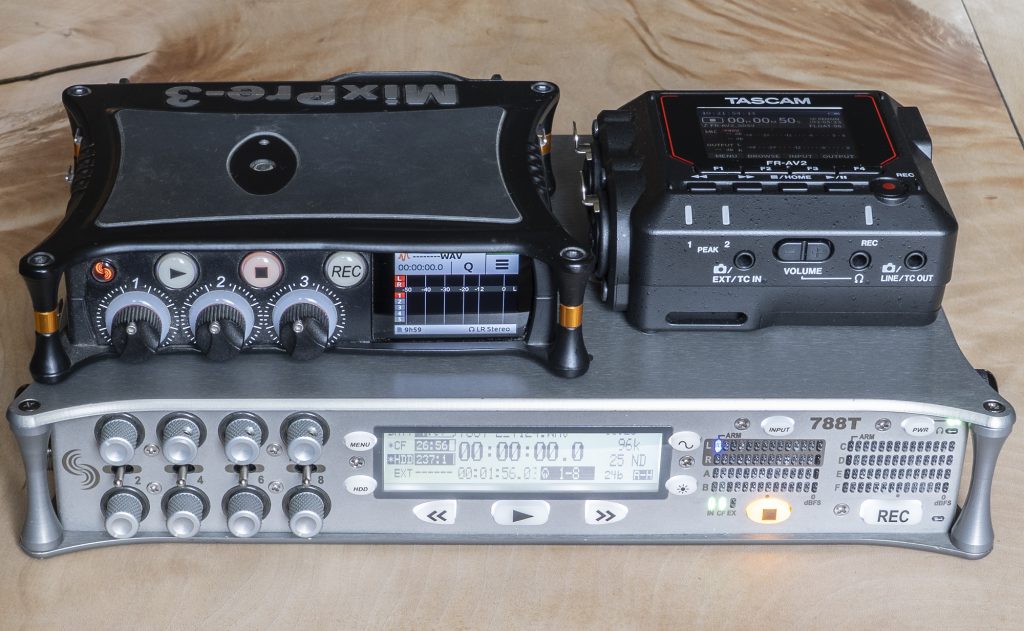
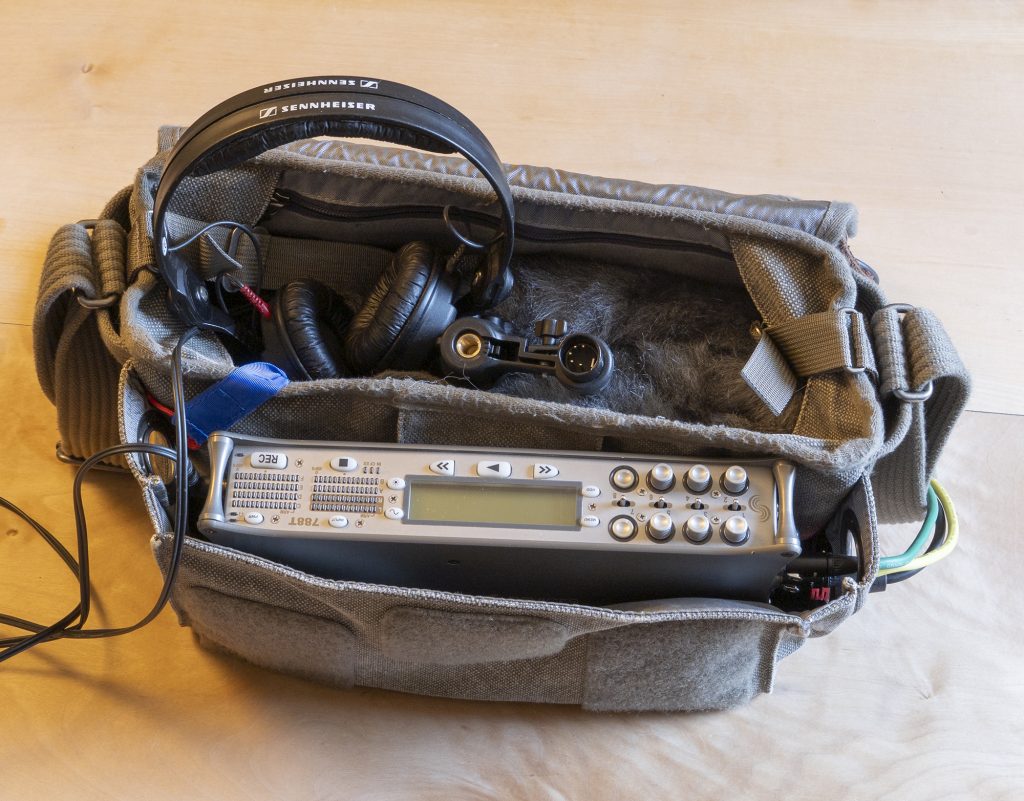
To start with, I measured sensitivity rather than just going with the manufacturers’ figures. For this I set up each mic in turn in my studio using a jig so that the centre of the front of the actual diaphragm was in exactly the same place, then played a 1kHz tone through a Vivid S12 speaker, and compared levels using a narrow band-pass filter centred on 1kHz. Obviously there were no absolute figures from this, but relative sensitivity was measurable. The figures were broadly in keeping with the published figures, though there were some obvious differences: for example the MKH 30 was 2.9dBV less sensitive than the MKH 8030 rather than the expected 1dBV. I then recorded all the mics using one of my Sound Devices 788T recorders at 96kHz in the quietest space I could find in the house around midnight (under a great pile of duvets etc.) at full gain (76dB), brought the files into Reaper and applied the small gain adjustments to match levels based on my sensitivity measurements. I applied a 24dB/octave high-pass filter at 150Hz to remove any residual distant rumbles of traffic etc.
Short clips of the results can be downloaded here:
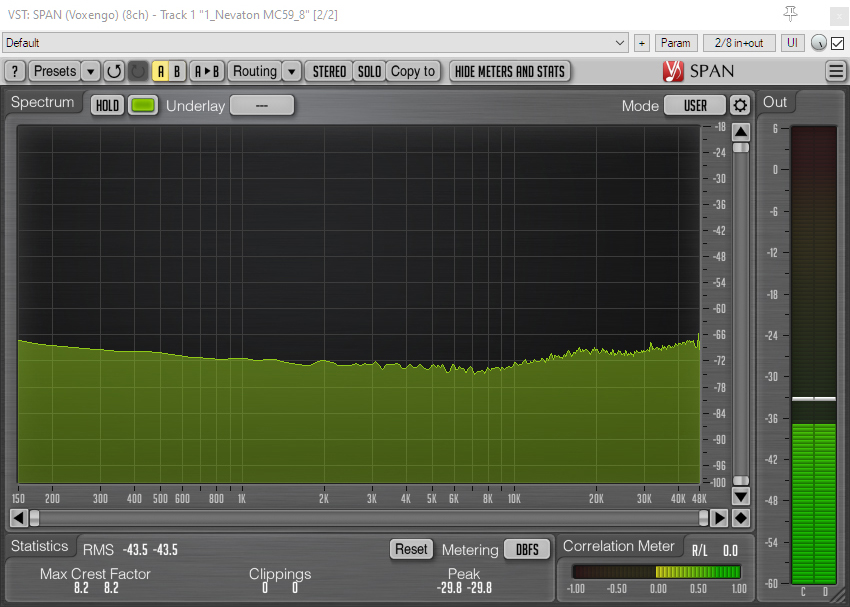
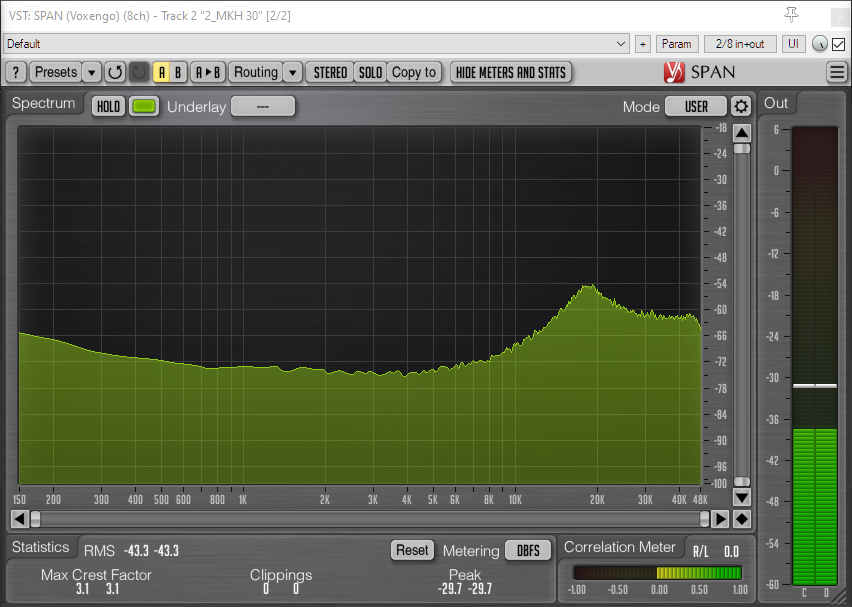
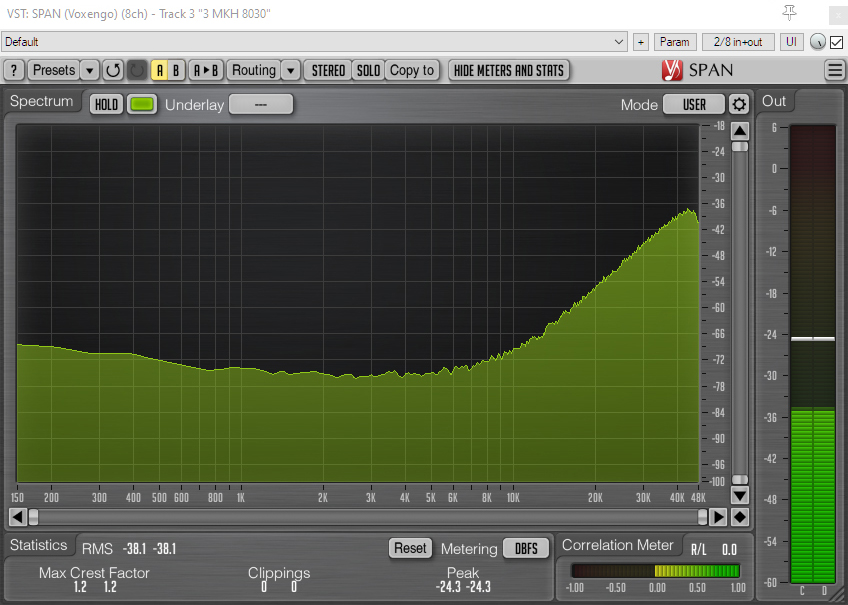
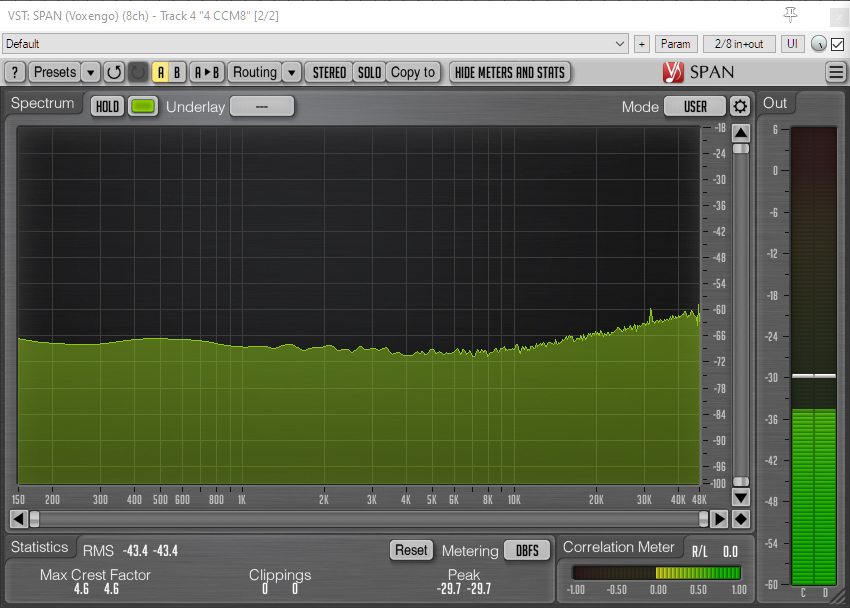
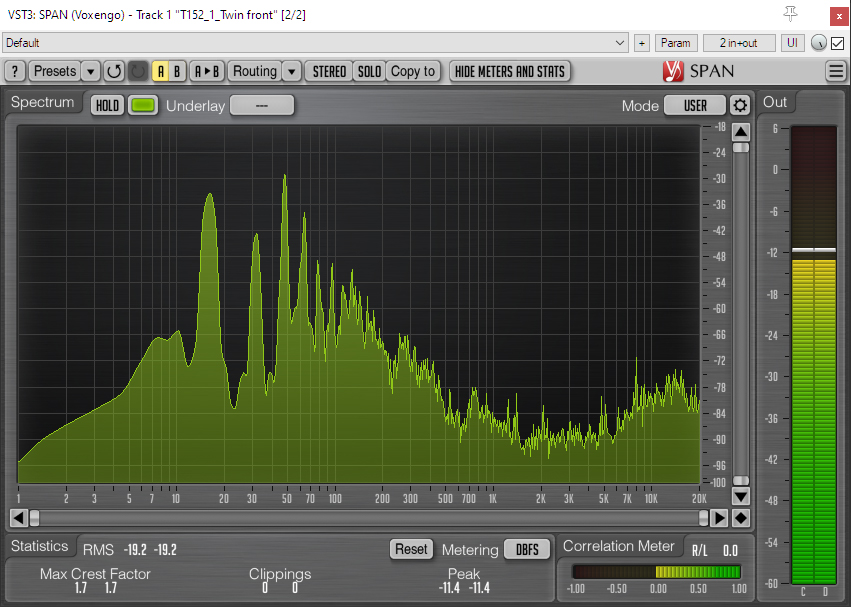
Of course, there is more to self-noise than simple level: for example, the Rycote mic has more of a noticeable high-frequency hiss than the CCM8; the two Sennheiser mics sound remarkably similar; and the MC59-8 has less of the higher frequency hiss (which is often the most noticeable element of self-noise) than the two Sennheisers. And, needless to say, as you go up the frequency range – beyond my hearing but relevant to younger ears and, above 20kHz, to sound designers reducing the pitch of sounds – the self-noise of the MC59-8 stays remarkably flat, again just as the MC59S/C does, in contrast to the other mics. But. for most practical use, the results are as expected: the MC59-8 is broadly in the same range as the two Sennheisers, the Rycote is significantly noiser and the Schoeps is the noisiest (despite it having the same published spec as the Rycote). The spectrum analyzer visualizations show something of these differences:

The self-noise (and, indeed, sensitivity) of the MC59 Twin matches that of the MC59-8, which, given the use of the same capsule, is not surprising. My slightly homely self-noise tests found a 0.3dB difference, which doubtless is more than covered by measurement error. In omni mode the MC59 Twin again has lower self-noise, as it also does in cardioid mode (i.e. with a single diaphragm).
Frequency response
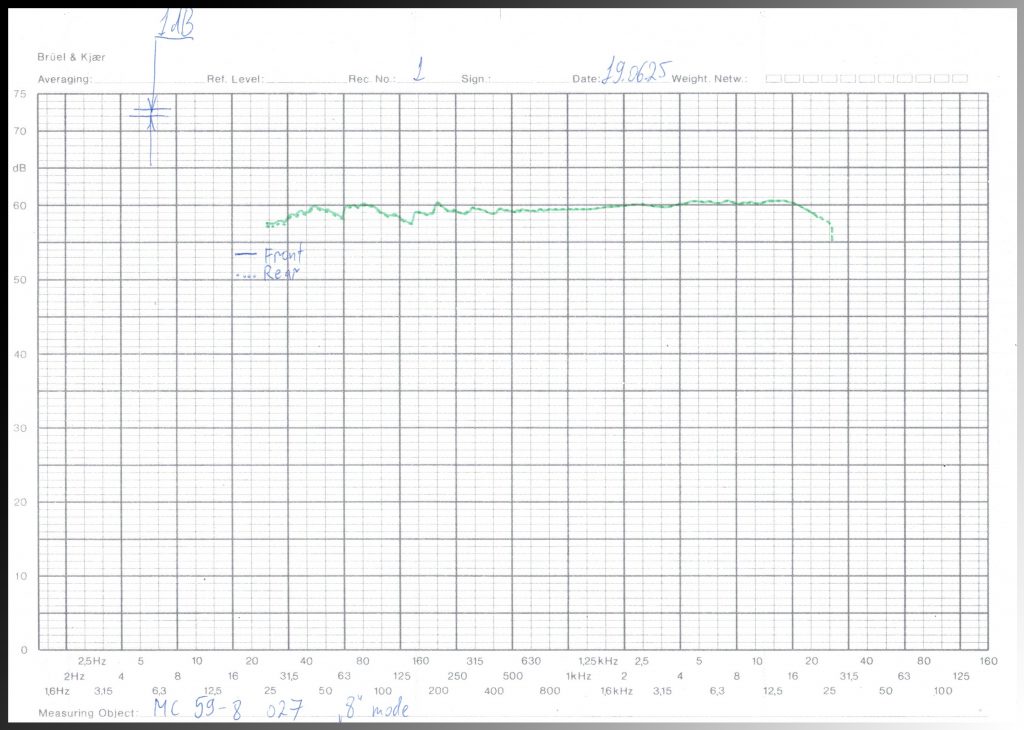
The discussion of frequency response of a fig 8 mic that also offers an omni mode and an infinitely variable twin mic, with both using the same dual-diaphragm capsule is necessarily complex. Life would be made easier for prospective purchasers if frequency response plots and plots for the main different polar patterns were published, but this absence of information from Nevaton isn’t unique: I can’t find such information on the long-established Sennheiser MKH 800 Twin either! However, to give Nevaton their due, they provided me with specific frequency response measurements of my actual mics (with none of the smoothing of published graphs): for the front and rear capsules for the MC59 Twin, and for the front and rear of capsules of the MC59-8 as well as for omni mode. For both mics a clear correspondence between front and rear capsules is evident in terms of frequency response.
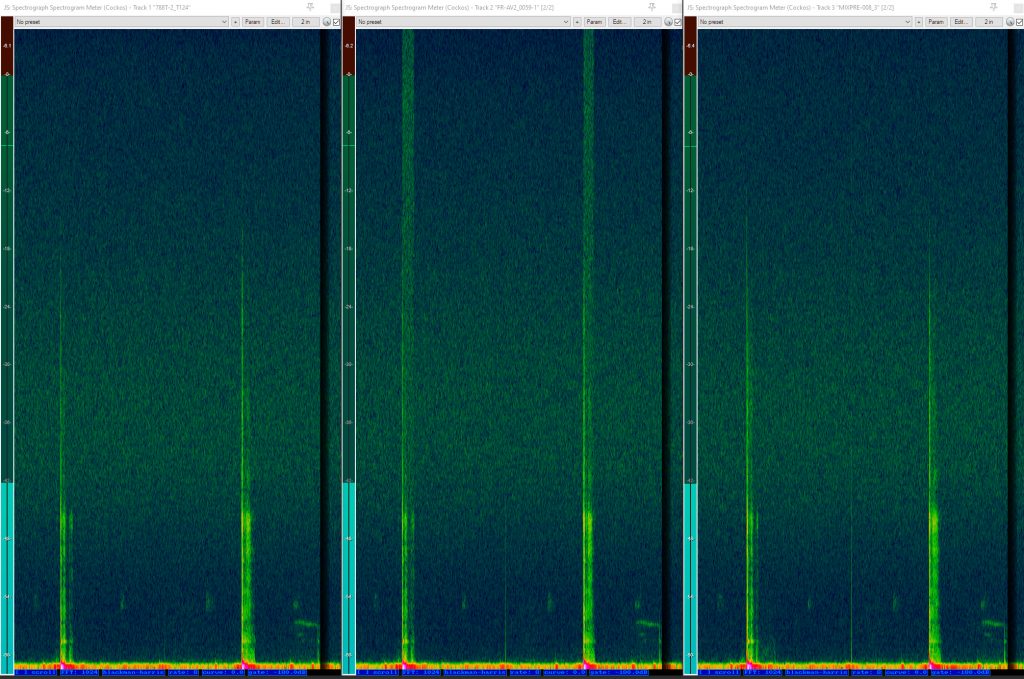
For overall frequency response, previous experience of the MC59 cardioids gave me high hopes of decent response at both ends of the spectrum. Taking as an example for the high-frequency ability of the mics the 96kHz train recording that you can find further down this blog post, the spectrograms of the MC59-8 and the Sennheiser MKH 8030 are informative:
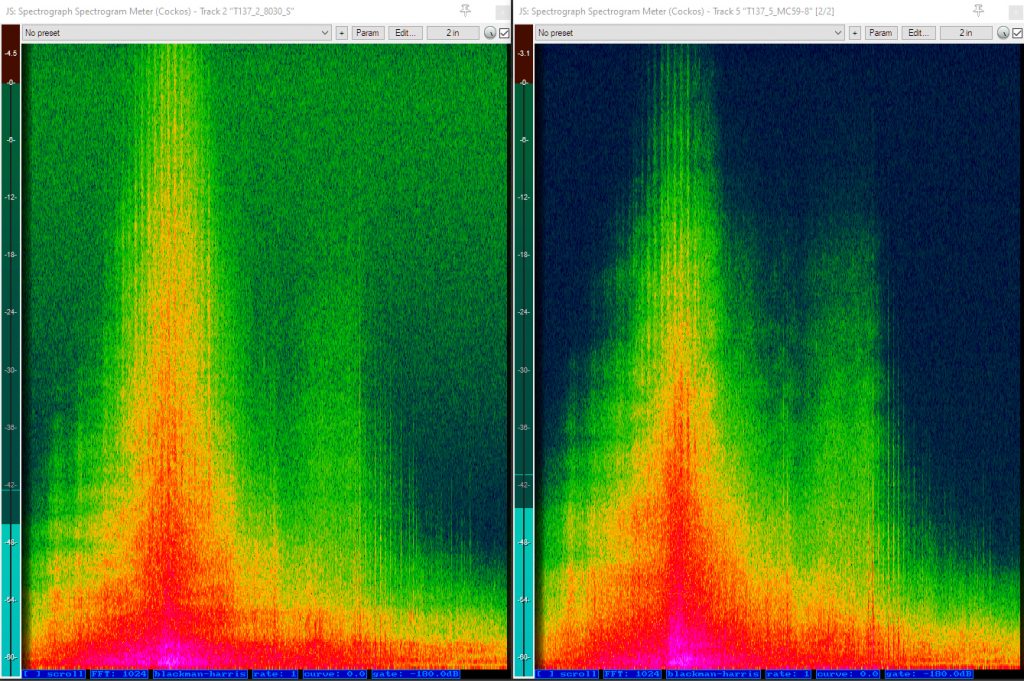
The Nevaton MC59-8 comfortably exceeds the specified 20kHz upper limit to the frequency range, with signal clearly discernible up to the maximum of 48kHz shown on these spectrograms. The MKH 8030 shows a stronger signal over 20kHz, as expected (given its ultrasonic credentials), but with the self-noise above normal limits of human hearing much more in evidence. So an excellent response over 20kHz from the Nevaton MC59-8, which was exactly repeated with the MC59 Twin (hardly surprising given the commonality in their capsules).
While thinking about high frequencies, I was interested to see what the fall-off was with the omni pattern at 90 degrees. So I placed the MC59-8 next to the MC59 Twin, both in omni mode, but with one on axis and one at 90 degrees to pinknoise played back via a single nearfield monitor in my studio. Obviously a long way from an anechoic chamber and with a less than useful low end, but the spectrum analyzer visualizations are useful nonetheless.
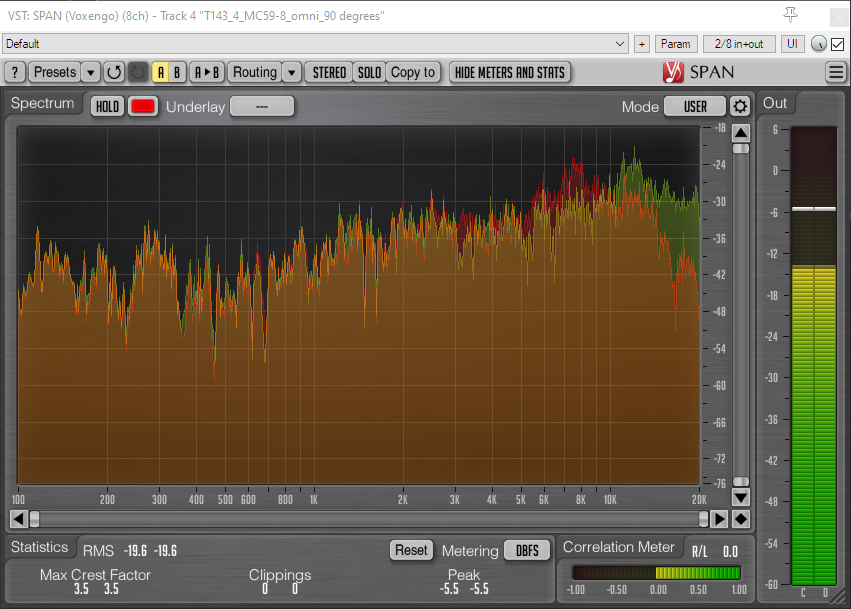
In the visualization I have set the lower end of the scale at 100Hz to remove the less than informative detail at this end of things (I cover the bass performance below). In the image, which shows the on-axis MC59 Twin in omni mode and the off-axis [at 90 degrees] MC59-8 also in omni mode, we see a significant fall off above 15kHz. There is nothing at all surprising about this as it is exactly what you would expect given the progressively greater fall off of such higher frequencies at 90 degrees with any cardioid mic, and it is, therefore, an inherent feature of the omni mode in similar dual-diaphragm mics (not just the Sennheiser MKH 800 Twin, but, indeed, the many multi-pattern LDC mics). And, of course, most true pressure omni mics have an increasingly directional polar pattern at such high frequencies, with significant fall off at 90 degrees and more to the rear: it is just that with a dual-diaphragm omni this pattern is different, with more fall off at the sides and none at the rear. So using a dual-diaphragm omni mic, like any polar pattern, needs thought and awareness of how that pattern changes with frequency. Aimed on-axis for many sound sources the MC59-8 or MC59 Twin in omni mode will sound fine, but aimed off-access (in effect used as an end-fire mic) they are less likely to be successful. This last use might seem an unlikely one, but in the past I have come across those advocating the use of the Sennheiser MKH 800 Twin as a single mic solution to omni MS (i.e. using the same capsule for the fig 8 and the mid mic): more experienced voices counter this, of course, noting that the omni mid mic (made of sideways-facing cardioids) will have significant loss of high frequency facing forward. This applies equally well to the MC59 Twin, or any such mic, and I mention it here as a cautionary note: there is much to love about the flexibility of a twin mic, but best not get carried away (and, if your ears are old, forget that frequencies beyond your hearing might be rather curtailed)! That said, it is perhaps useful to those still interested to give an example of omni MS with the MC59 Twin alone and with the MC59 Twin used as the fig 8 with the omni mid mic being an MC59O: as more of a general interest than specific to the MC59 Twin, I have done this in a separate blog post.
After that slight – and possibly slightly esoteric – detour, let’s get back to the broader discussion of frequency response. For the lower frequencies, this time when doing my frequent test with a car exhaust I wasn’t happy as the fundamental was rather high (just under 40Hz): my new (but old) car is evidently rather high pitched! So, having pondered over asking a cathedral organist to play some 16Hz notes for me, I went for the lazier option of playing 10Hz, 16Hz and 20Hz notes through my little Vivid S12 monitors. I was surprised that I got decent output with all three low frequencies and escaped without de-coning the speakers. The results were pretty much the same for all three frequencies, so I have just chosen 16Hz as it seems (not least given the 32′ organ pipe relevance) most reflective of real world use. Here are the spectrum analyzer visualizations:
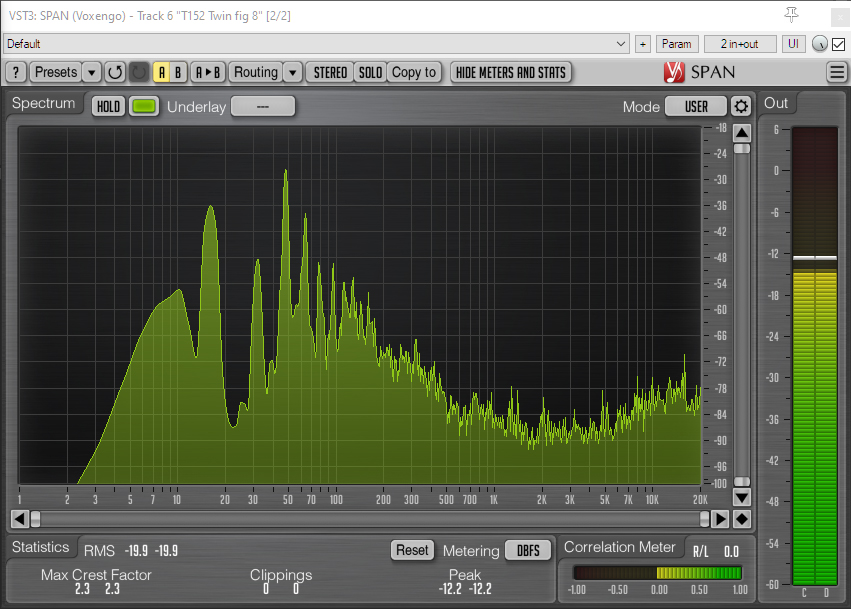
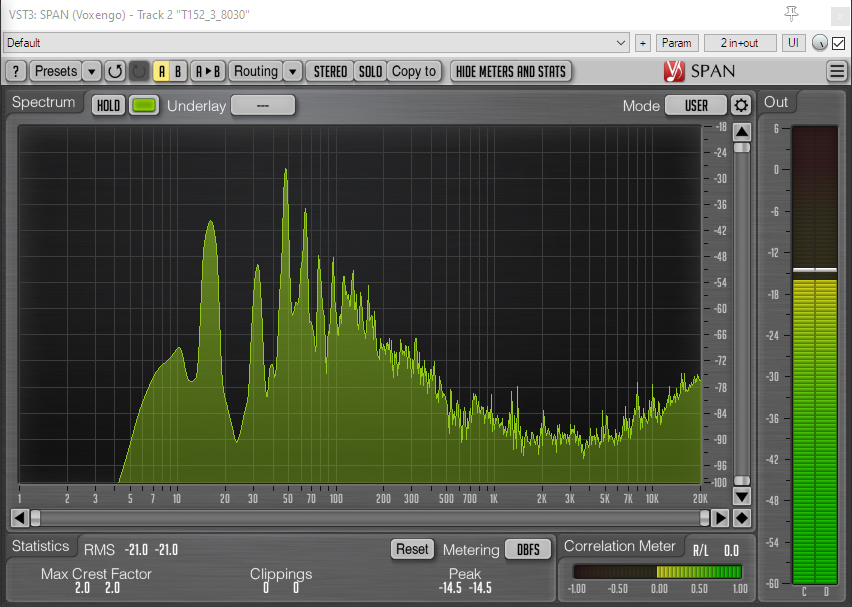
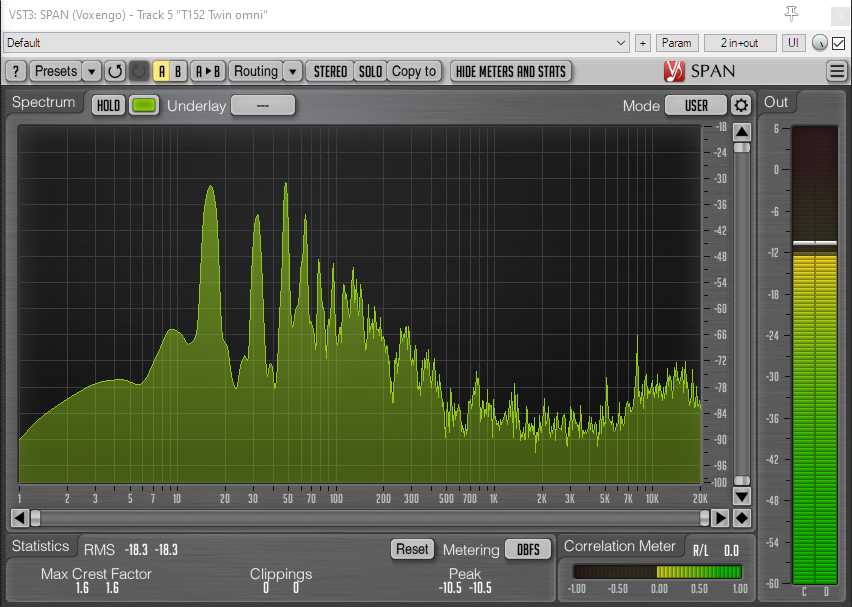
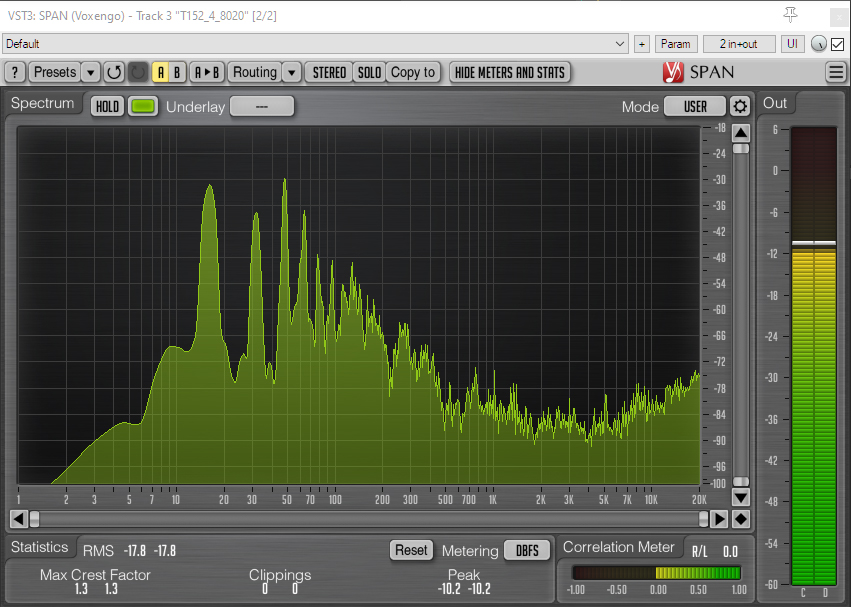
As expected, there is a vast difference between the bottom end of the fig 8 mics and their omni counterparts. More interestingly, the MC59 Twin in fig 8 mode has more low end than the MKH 8030, which itself has a pretty good bass response for a fig 8 mic; and, also, the MC59 Twin in omni mode holds up well against the MKH 8020 true pressure omni, indeed with a little bit more at the very low frequencies (below 20Hz).
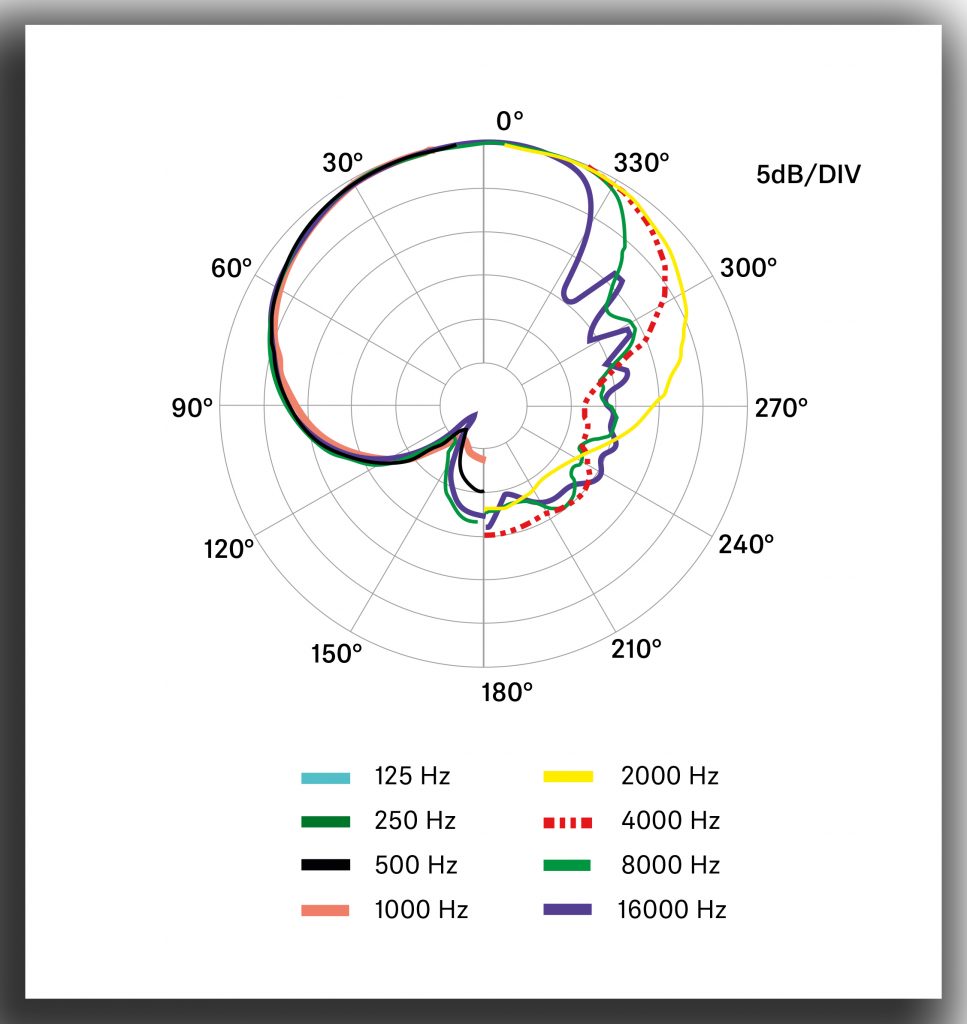
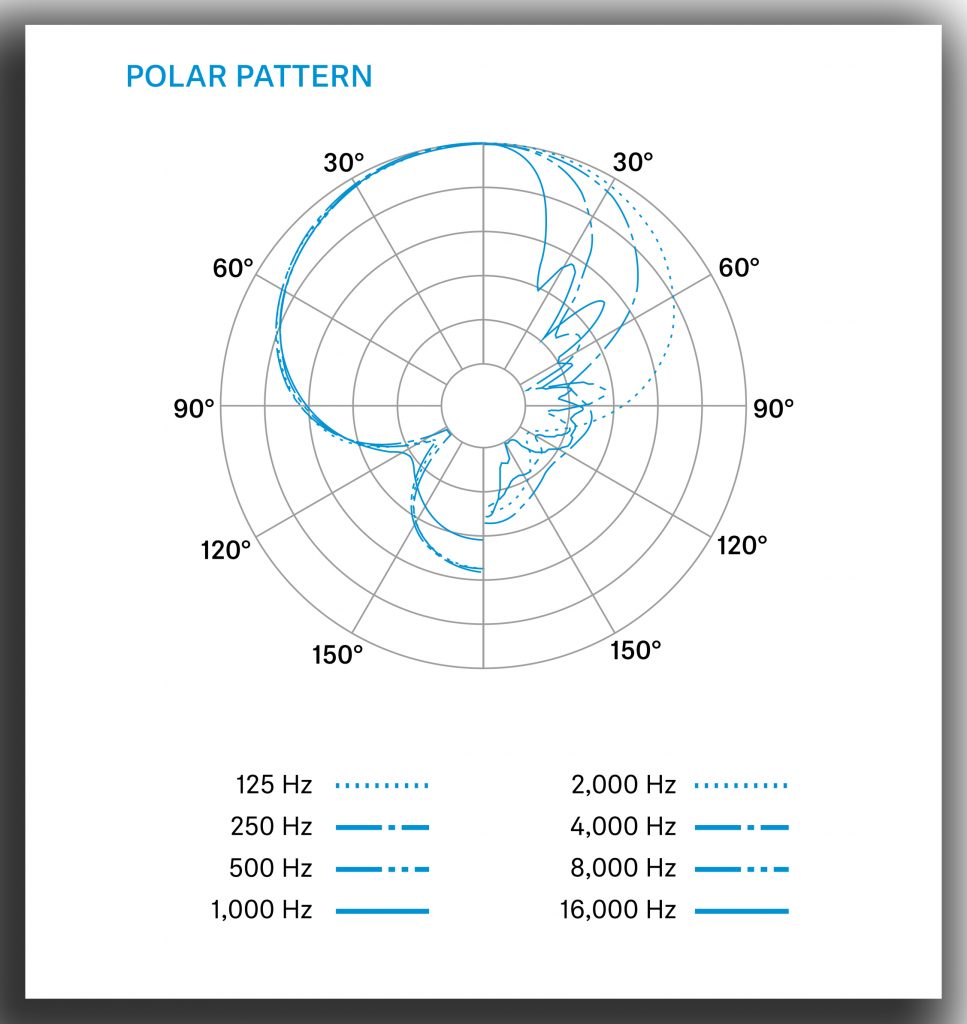
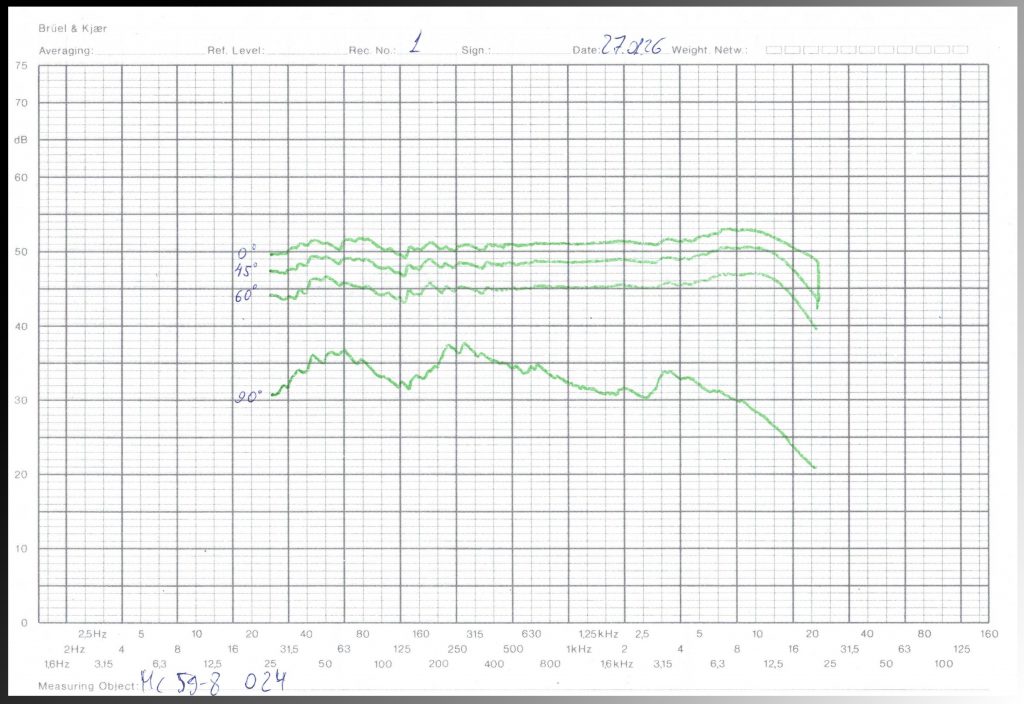
Polar patterns and nulls
I mentioned above that the MC59-8 and MC59 Twin are like the Sennheiser MKH 800 Twin (in fig 8 mode) in lacking published polar plots, which is a pity. One of the oft-repeated downsides of dual-diaphragm fig 8s is the lack of consistency in frequency responses off axis: indeed, the single-diaphragm fig 8 has the most consistent polar pattern across audible frequencies of any first-order mic. But, that said, my other dual-diaphragm SDC fig 8, the Rycote BD-10, has a very symmetrical and consistent fig 8 pattern across a wide frequency range, along with effective nulls, so I made no assumptions about Nevaton’s version. Producing accurate polar plots is outside the scope of what I can do, but what is feasible is making some comparative recordings to explore how the nulls of the fig 8s compare and, related, how the on-axis and off-axis sounds compare. For this I compared the MC59-8 to the Sennheiser MKH 8030 at 0 degrees (on axis), at 45 degrees, and at 90 degrees (the null). To do this, I mounted the two mics in a Mega-Blimp with capsules adjacent, and directed a bluetooth speaker playing pinknoise at the mics at a distance of 1.8m at the three angles. The set up was outdoors in a large grass field 130m away from the nearest building, to reduce reflections, with the mics and sound source at head height. Although the small speaker means bass is limited (hence the cut-off at 200Hz in the spectrum analyzer visualizations below), the results were more useful than other tests I tried. These show that the attenuation in the null is pretty consistent compared to the on-axis sound at all frequencies, although there is no doubt that the null of the MC59-8 is not quite as deep as that of the single-diaphragm MKH 8030. Measuring the overall attenuation in sound between 200Hz and 20kHz for the MKH 8030 gave a figure of 23.5dB RMS while with the MC59-8 the figure was 20.7dB RMS (i.e. a difference of 2.8dB). It should be stressed, however, that these tests are far from absolute measurements of the nulls, and there will some effect from the windshield, non-pinpoint source, residual reflections, and background noise: needless to say, an anechoic chamber would give more dramatic (and accurate) results. Rather my tests are simply meant as a real-world comparison. Moreover, not all single-diaphragm fig 8s have such deep nulls as the MKH 8030, with, for example, previous tests showing the AKG CK94 having about 1.8dB less attenuation in the null (those tests being indoors, with more reflections). There is also a suggestion from the MC59-8 to MKH 8030 comparison – insofar as these tests can be relied on (although I repeated the tests in different outdoor locations, with the same result) – that the MC59-8 has a more consistent (i.e. in reference to the on-axis sound) frequency response at 45 degrees than the MKH 8030 at high frequencies (around 8kHz and above). Anyway, the bottom line is that I am reassured that the MC59-8 (and MC59 Twin) have effective nulls and, also, consistency in the frequency response off-axis. I’m not sure I would overly focus on any tests, however, be they my more homely ones or more expert ones: the critical test is how the mics function in real use, not least, from my perspective, in MS (for which see recordings below).


Fitness for cold and damp field recording?
In my comparisons in this blog I have compared the fig 8 and twin Nevaton MC59s to Sennheiser MKH mics, which, with their RF technology, are well-known for their ability to operate in extremely damp and humid conditions. As such the Sennheisers have become my go-to mics for field recording, even though the UK is hardly the tropics. Back-electret mics are pretty robust too, but true condensers are usually more susceptible to dampness and humidity. Nevaton’s website has a cautionary note about the use of their classic condensers and humidity, which goes as far as pointing out the superior performance – in this regard – of RF mics: that’s some refreshing honesty! But the website also has a tantalizing note about the heated capsules in its LDC mics and, relevant to us here (or, at least, those like me who use mics for outdoor location and field recording) a reference to the ‘slight heating’ in the preamplifiers, which apparently helps to prevent condensation in their SDC mics. During my many emails with Egor at Nevaton, he has sent me thermal images of the MC59 mics showing this effect, which has further piqued my interest. What was missing from my perspective was any analysis of how this worked in basket windshields, which are my default for the field, versus the more insulating – but less useful – foam windshields for mics. With cold and damp wintry weather here in Norfolk, I decided to do some tests myself. I did play around with trying to get a thermal camera inside a Mega-Blimp, with only partial success, but feel a different test is more relevant to others. I first imaged the mics outside and turned off with no windshield. I then turned them on and added a Mini-ALTO windshield and its fur, letting the rig stabilize over around 25 minutes, at which point I quickly removed the fur and windshield and imaged the mics again. And then, finally, I left the mics switched on but with no windshield, again giving the set up time to stabilize before imaging again. Here are the three thermal images:
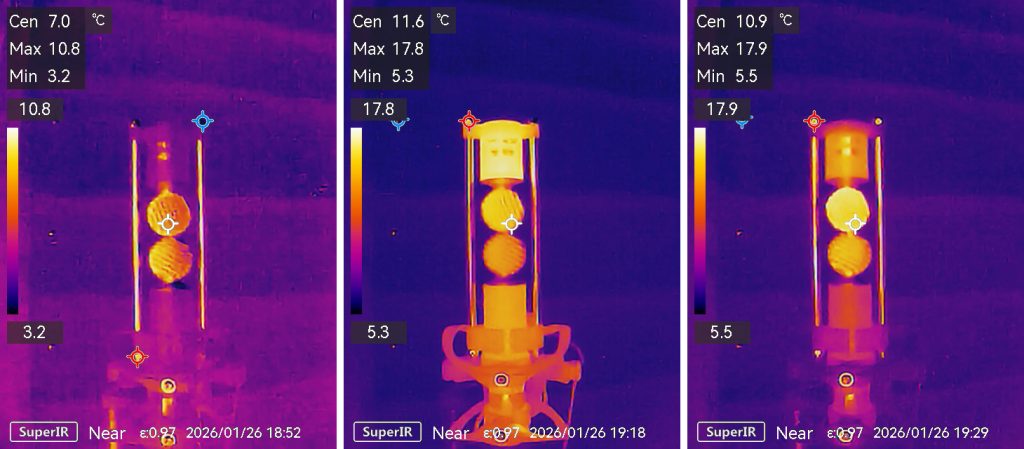
It’s clear from these tests that, as expected, the preamps of the mics, and especially the MC59 Twin, raise the mic body and capsule temperature a little above the ambient temperature and that it is a bit more noticeable when the mics are inside the windshield with fur: I suspect that’s probably more to do with protection from the cooling effect of the cold wind than the whole windshield interior being heated up. I feel there is a lot more to explore with this, especially in relation to dew points, condensation and high humidity, but it is certainly evident even from this basic test that a useful by-product of the Class A preamplifiers is that they bring the temperature of the capsules of the MC59 mics a few degrees above the ambient temperature. And despite testing the mics in damp winter conditions, I had no issues with condensation and humidity.
A comparative field test with fig 8s
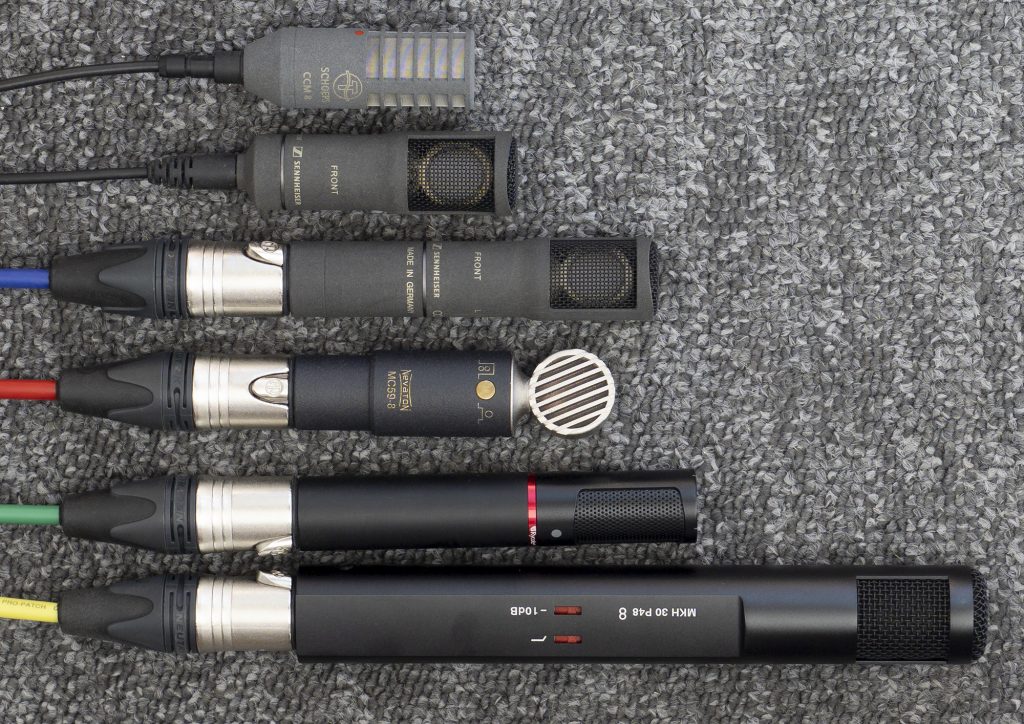
With that reference to using the mics in the field, you will anticipate that I ventured outdoors with a clutch of fig 8s, albeit, for this recording, in benign conditions. It’s not a profoundly interesting recording, but serves to show the M59-8 against some familiar fig 8 alternatives. I don’t own a Schoeps fig 8, but the company lent me a CCM8 last year for my various Schoeps DMS tests, so I was able to do a quick comparative test during the brief overlap following the arrival of the MC59-8, along with the other fig 8s that I own: the Sennheiser MKH 8030 and MKH 30, and the Rycote BD10. Here are some short excerpts from a recording of my quiet Norfolk village street, with a passing car and birdsong, unedited apart from level matching:

MS and DMS rigging
Aside from such test recordings, I don’t use fig 8s as mono mics for field recording and I don’t imagine anyone does: all the more so with twin mics. The chief interest of the MC59-8 and MC59 Twin to me is, as I said in the intro, for MS and DMS. In this context the physical form of the two mics is not a matter of purely academic interest, but, rather, fundamental to their usefulness, especially for DMS. In my recent three-part blog-post series on double mid side, I looked closely at rigging options, both in terms of mounting the mics to reduce colouration from the effects of adjacent mic bodies, the mounts themselves and the windshield baskets. The MC59 Twin is a really useful addition in that it opens up new ways to approach DMS rigs for field recording that, say, the excellent but much longer MKH 800 Twin does not. While the short length of the MC59 Twin is the key factor, slightly perversely a bit more length to the MC59-8, with its XLR connection, helps too: that is, the fig 8 is easy to mount using shockount clips, while its smaller twin stablemate can be suspended above.
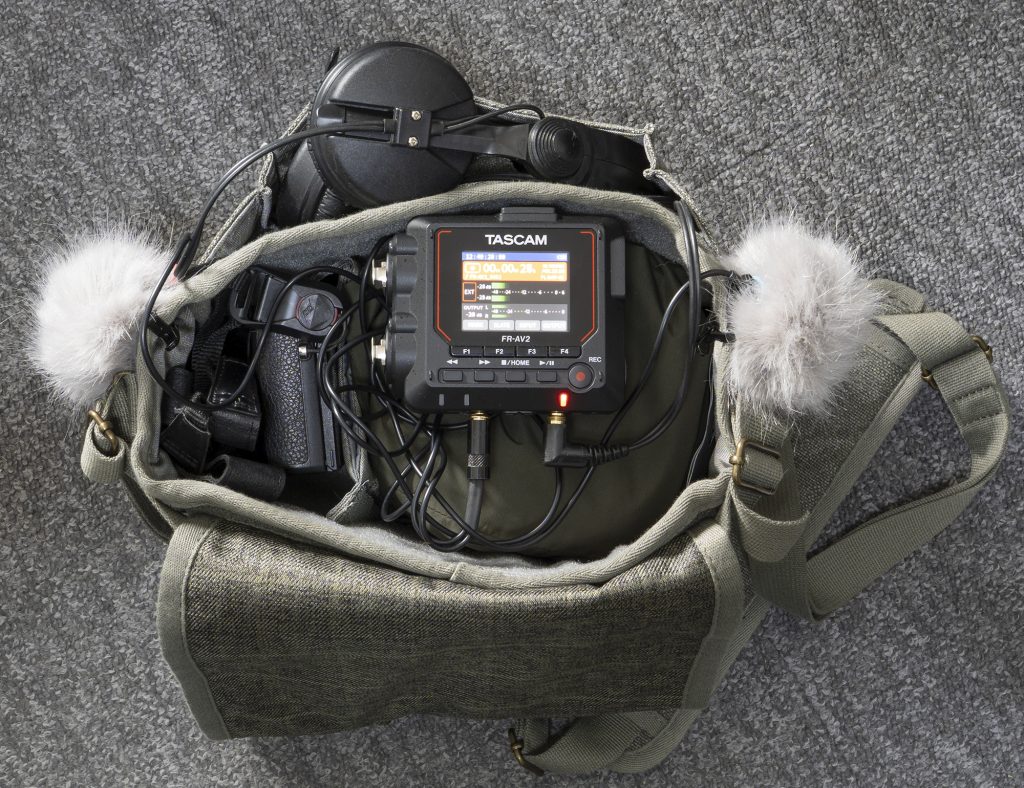
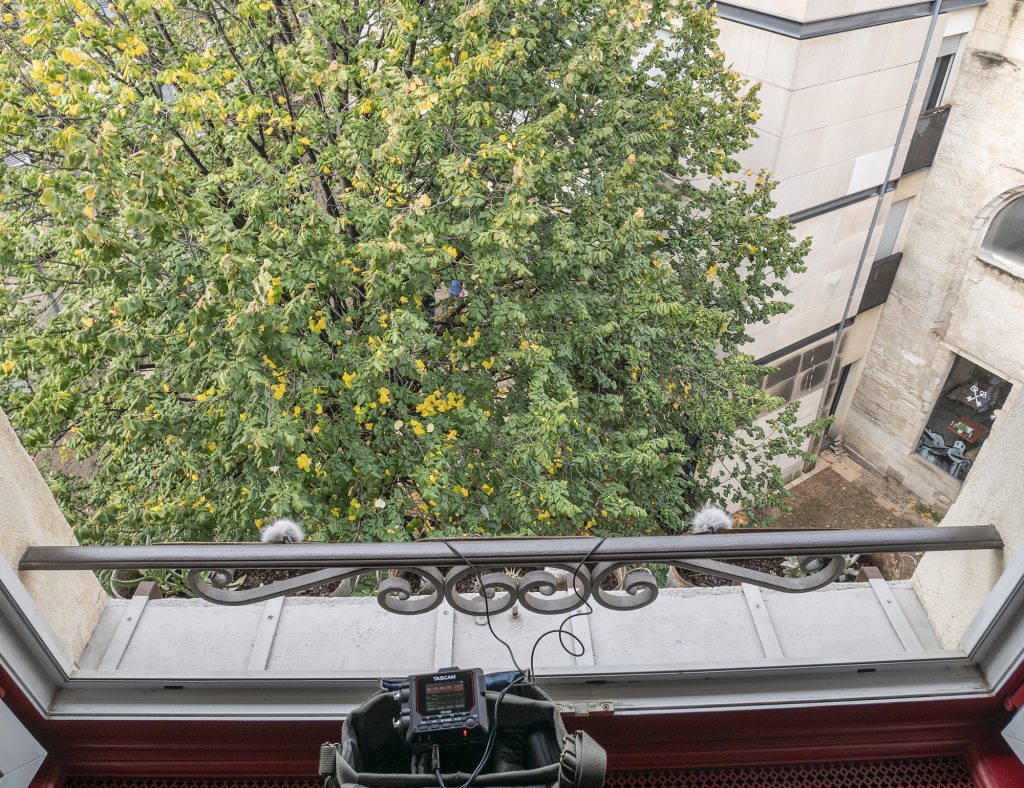
The image above shows my approach to the mounting opportunities offered by the pair, with a simple Ø22mm clip for the fig 8 linked by a pair of M3 stainless-steel bolts (through 4mm stainless-steel rods) to the mount for the MC59 Twin above. The small diameter of the rods, which pass in front of the fig 8 capsule, has negligible impact on the sound of the mic (even within its ultrasonic range). The MC59 Twin mounting takes advantage of the magnets in the mic, with a corresponding pair in the mount. This DMS clip will fit many a shock-mount and windshield, but I was particularly pleased that it works so well with a compact Mini-ALTO 180: unlike my previous – and, as I have said previously, rather unsatisfactory – attempts at DMS in a Mini-ALTO, this does not result in the fig 8 mic capsule being located at the chunky plastic rings where the two halves of the windshield join, but pushes them well clear of this and the base (or ‘smiley face’) of the Mini-ALTO. As a result it is a very transparent rig: obviously for more wind protection in can be mounted in larger windshields using the same clip.
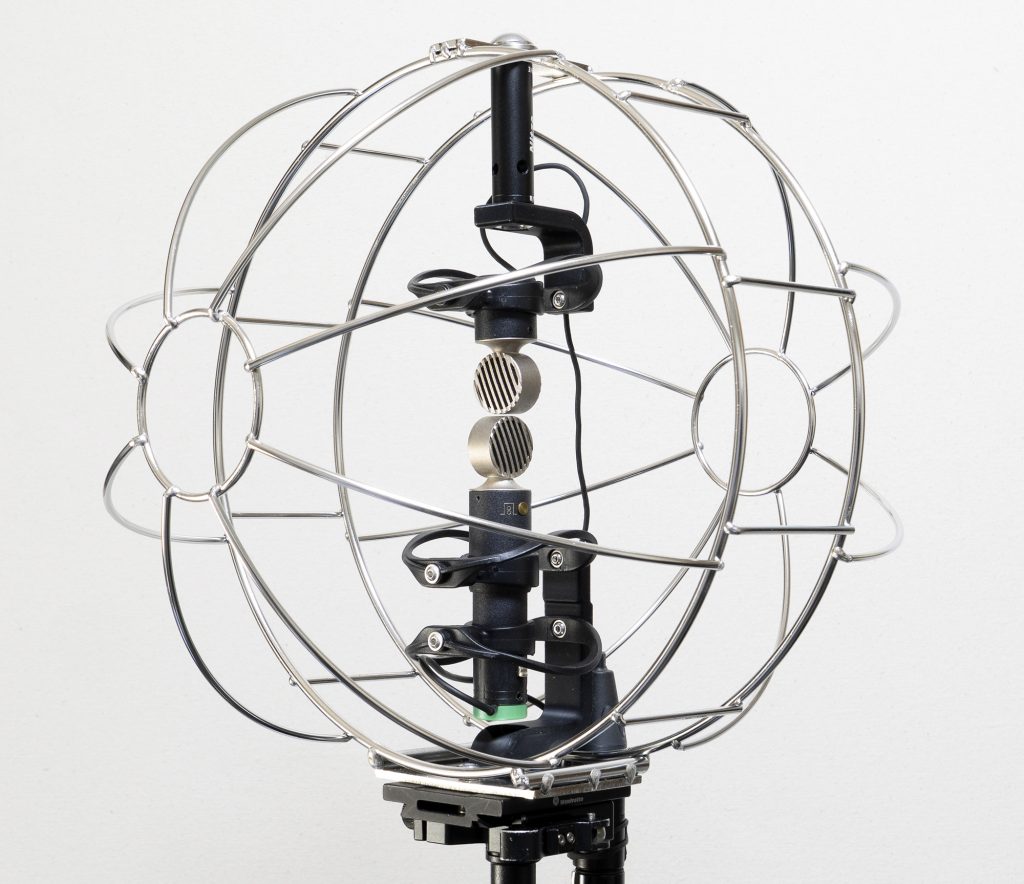
And for the ultimate in transparency I have been rigging the pair so one mic is top mounted and one is bottom mounted in a Mega-Blimp, doing away with the need for any connection between the two mounts. Coupled with the minimalist structure of the TIG-welded basket, this makes for the least coloured DMS winshield rig I have managed to DIY, or have come across as a commercial product, to date: for the first time there is essentially nothing to impede soundwaves reaching the front or rear-facing cardioids or the fig 8 mic. For my earlier review of DMS rigging options, in which using Schoeps side-address CCM4V cardioids (again taking advantage of a top mount in a Mega-Blimp) gave the then least impeded set up see my post of last year.
Mid side and double mid-side tests
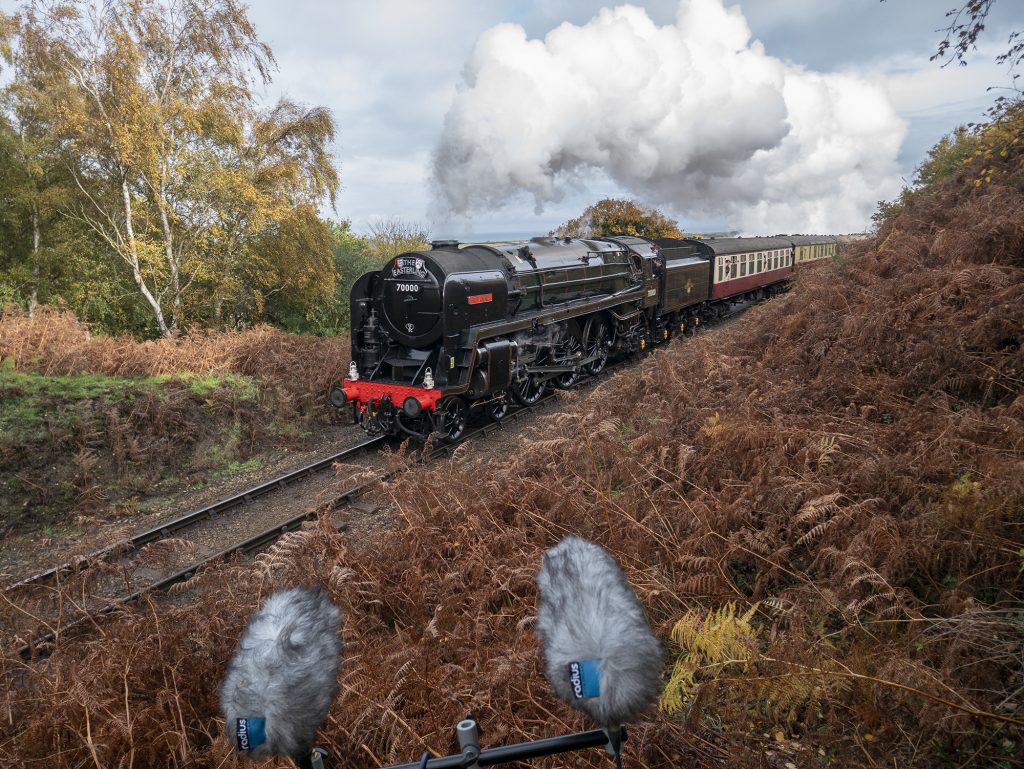
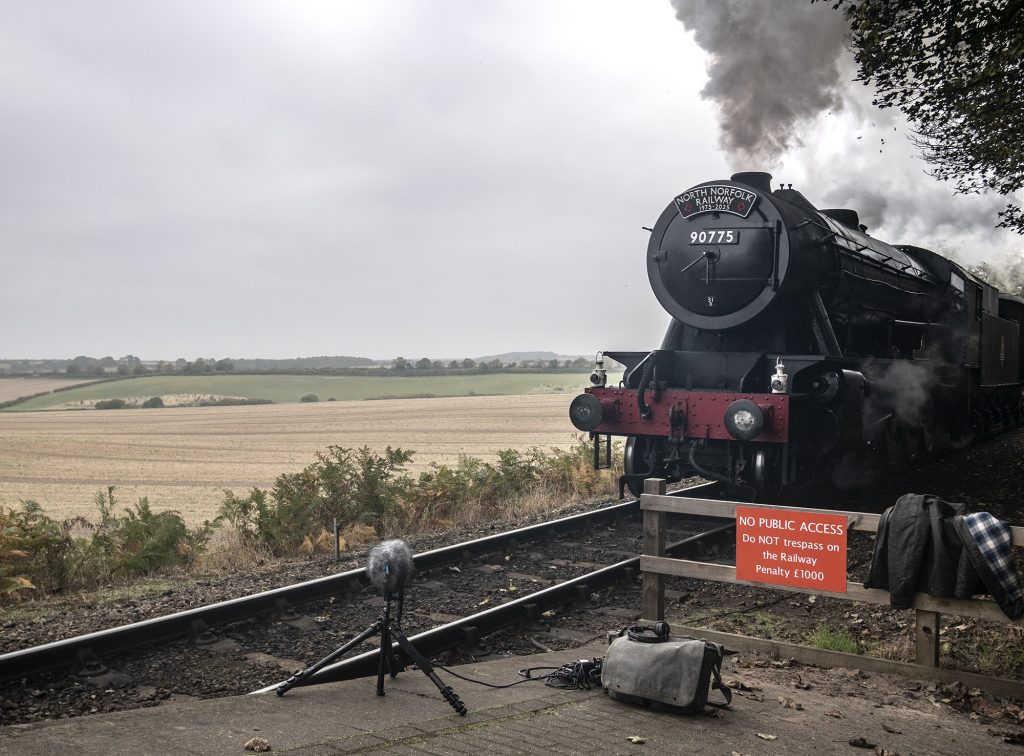
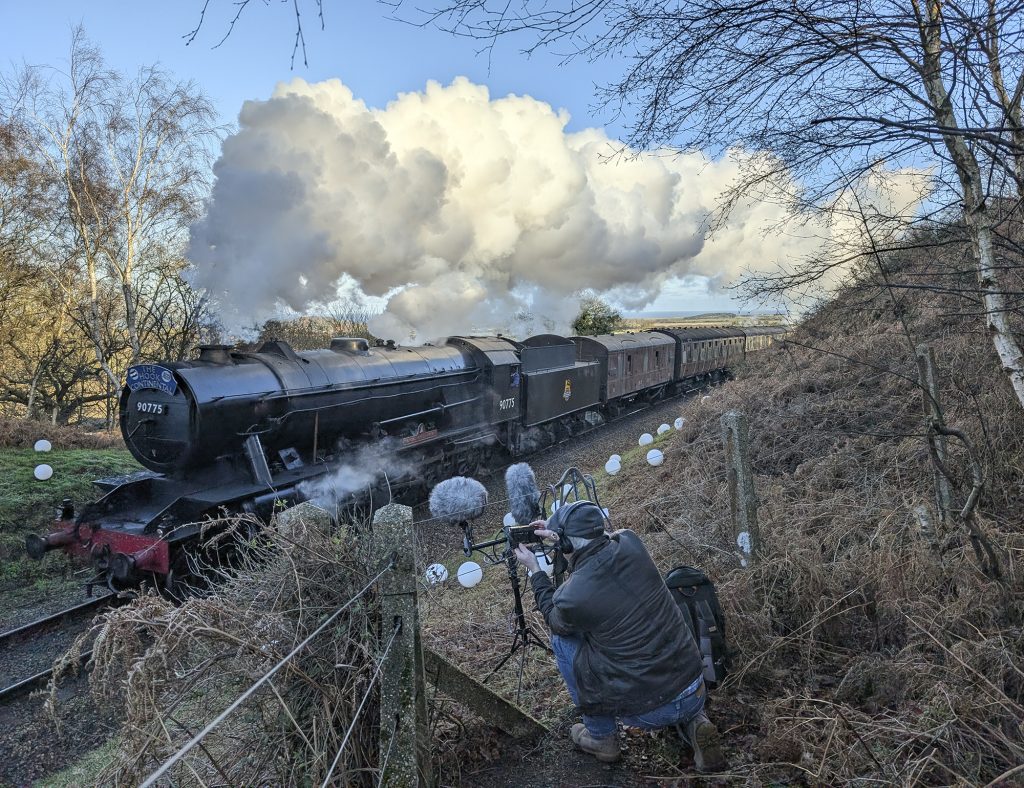
I headed down to a familiar haunt at the nearby steam railway, capturing a passing train with the new DMS in a Mini-ALTO rig. The train was hammering along faster than I expected (I suspect that the Christmas ‘Mince Pie’ special doesn’t stop at stations en route), and it was great that the skies were clear of planes, and the nearby paths free of chatting (or barking) passers-by: in other words, it was a fairly clean recording. For it I used the MC59 Twin and MC59-8 combination alongside a Sennheiser 2 x MKH 8040 and MKH 8030 DMS rig, to give a useful – and familiar – comparison.
First up, we have the individual files for each of the three mics in each array. The files can be downloaded, and have been level-matched to allow for the different mic sensitivities. This means that anyone can play around with MS, MS with different mid-mic polar patterns, or DMS, and, with the latter, output to surround, stereo or binaural formats.
Here we have the recordings from the two DMS rigs rendered to binaural output using Harpex-X:
And, finally, here is a stereo output from Harpex-X for speakers (with output configuration set to coincident cardioids with 90 degree angle):
Listening to the various options, especially using the individual mic tracks in your DAW, provides scope for drawing your own conclusions: as ever, many prefer different mics. My own thoughts is that the Nevatons compare very well to the MKH 8000 mics: indeed, when sending them to a classical recording engineer friend, he too gave a slight edge to the Nevatons in a blind test, despite being wedded to MKH 8000 and MKH 800 Twin mics for his recording work!
A little bit of music
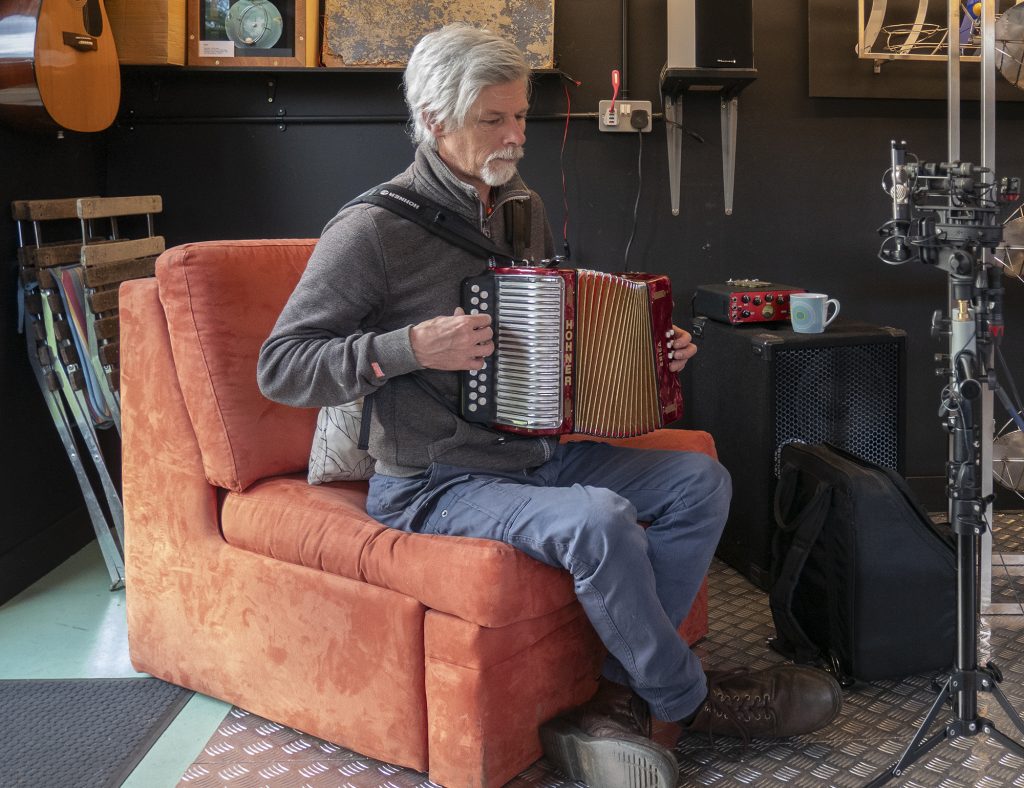
Popping over to my good friend Rob’s workshop (where he makes his amazing kinetic sculptures, as well as welds the odd Mega-Blimp basket) he was happy enough to strap on his melodeon at short notice and give it a quick squeeze for something a bit different to the train recording above. This time it was the same mics in DMS (i.e. MKH 8040 x 2 and MKH 8030, alongside MC59 Twin and MC59-8), albeit with the windshields removed. Now Rob’s workshop is large, warm, unbelievably neat, and even has a pub pool table, but the acoustic, as you might expect, is not fantastic: size and, perhaps, a metal floor and ceiling covering are key factors. But here we go nonetheless, with, first up, the six individual mic tracks:
Here are stereo files derived from using the mics as MS pairs (balanced 50:50), so ignoring the rear-facing cardioids:
Here are the three-channel files rendered to binaural output using Harpex-X:
And, finally, here is a stereo output from Harpex-X for speakers (with output configuration set to cardioids with 110 degree angle and 17cm spacing – i.e. ORTF):
Conclusions
Testing two different mics, even if closely related, in one blog post is a challenge, and the more so when one mic offers two polar patterns and the other an infinite number. There is much I have left out: for example, those wanting to hear the Nevaton mics compared to others (not least the MKH 30 and, for the MC59 Twin, the MKH 800 Twin) on acoustic music in a good room. But I will be revisiting the mics in upcoming tests, which include a classical piano recording, so please do stay tuned. From the above you may have drawn some initial conclusions or, perhaps, I may have piqued your interest enough to test the mics for yourself (ultimately much more satisfactory). Personally, I have found that the mics have lived up to my high hopes and that, in the MC59-8 and MC59 Twin, I have a combination that is particularly suited to DMS for field recording in view of the compact, transparent and unshadowed configuration that the form of the mics allows. I look forward to using the combination more and, along the way, providing more samples for readers here.
Edit (5.3.2026): I understand from Nevaton that they are now taking orders for the first small batch of MC59 Twin mics, which is welcome news!