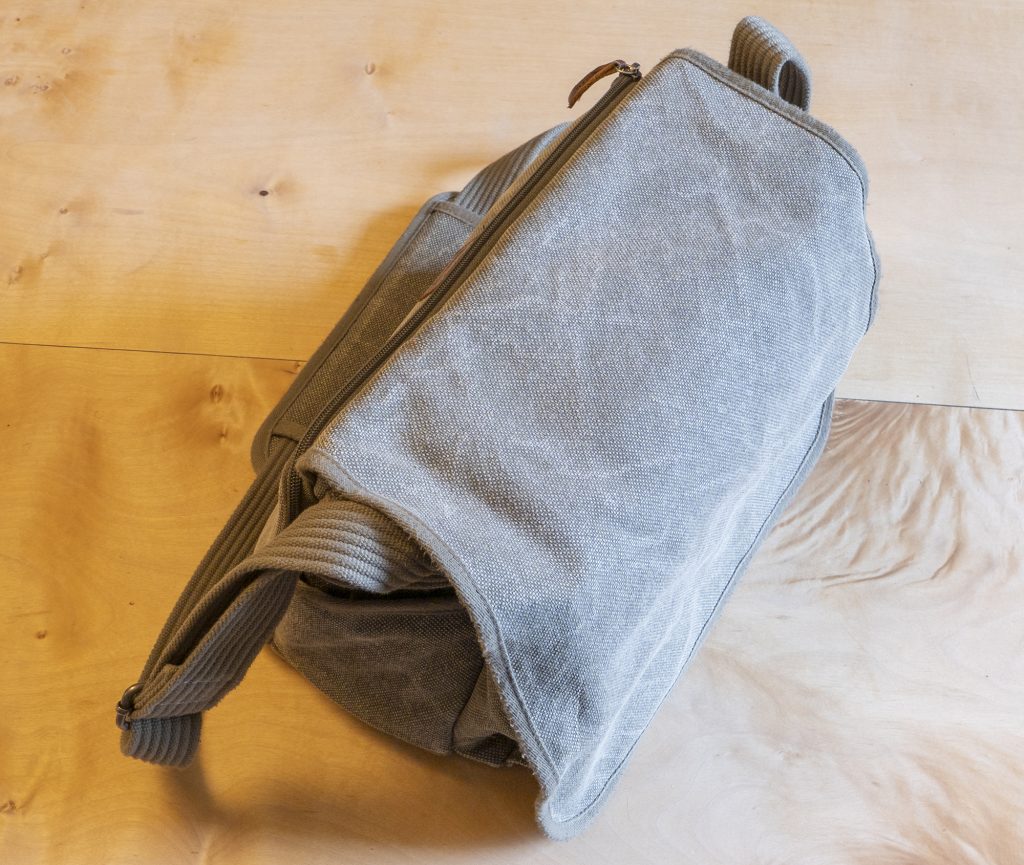
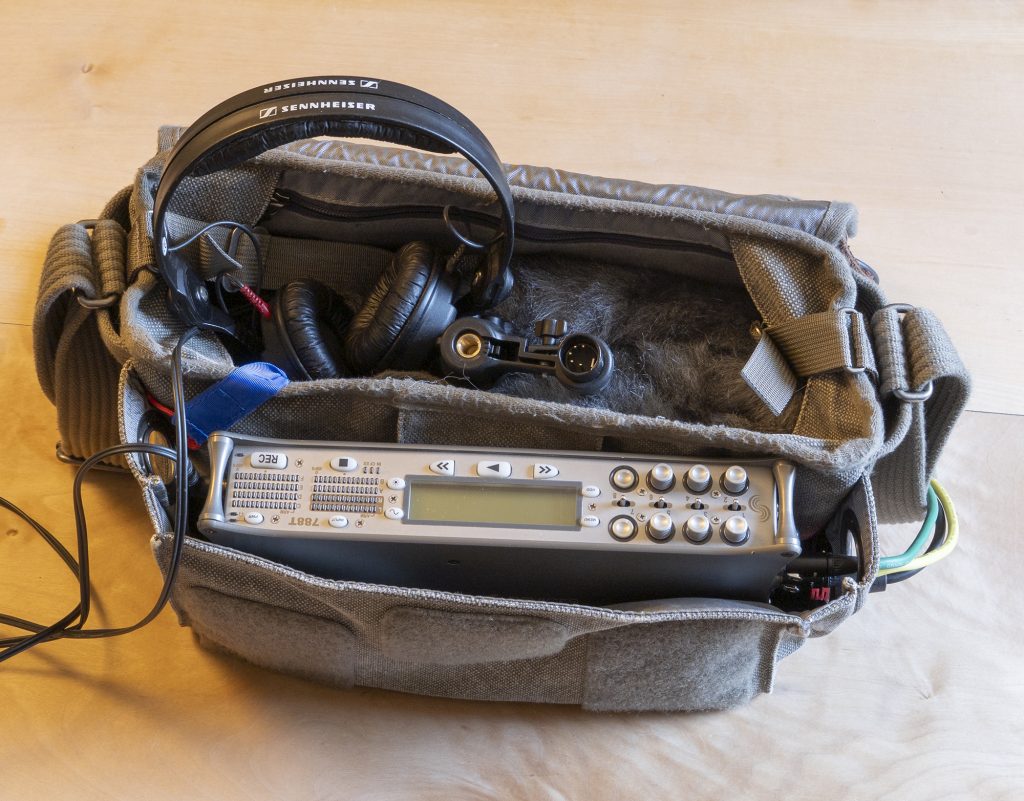
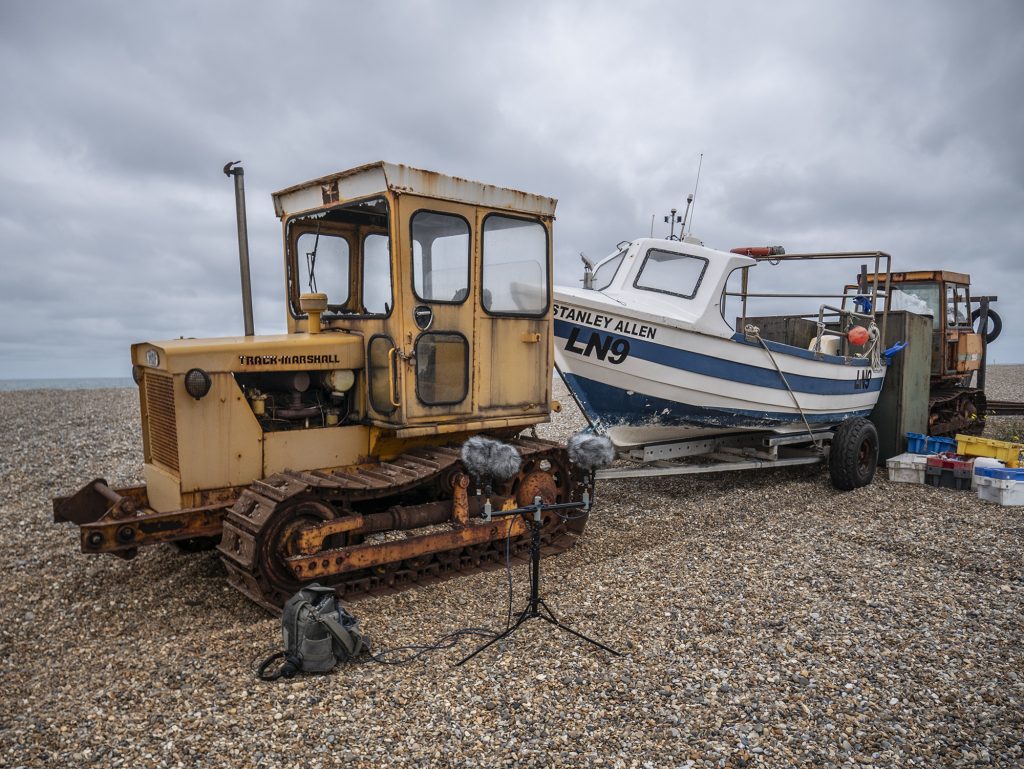
My Think Tank Retrospective 7 (old style) before butchery. Tough as old boots, compact, hold all the bits and bobs I need, and doesn’t yell ‘expensive sound recording kit’.
Bags for audio location recording are made a plenty, for all sorts of sizes of mixer/recorders and ancillary gear. But they have one thing in common: they are all geared for production sound or similar use. I’ve had several over the years, and just have one nowadays for a Sound Devices 788T paired with an CL-8. It’s fine for when I am recording or mixing sound for film/video, but I’ve never got on with such bags for field-recording. For that I’ve found the needs are quite different as, if not hiking and requiring a backpack (and for that I use a Vango Trail 35 or a North Face Borealis), I want a shoulder bag that has several attributes missing from a sound bag: it needs to be discreet, and must have capacity for additional things such as pens, notebooks, cables, a camera, mics and a windshield. Even a bottle of water. More to the point it must be able to carry those things – especially little items – securely: sound bags are so permeable that even if you can fit additional items in them, there is a high risk of them slipping out, which ain’t too good if you are knee-high in nettles, squatting in the salt marsh, or strolling down the Kilburn High Road. Equally, a production sound bag has things I simply don’t need in the field: I don’t need a raft of pockets for wireless receivers; I don’t need a clear plastic lid to allow me to ride the faders for a live mix while standing in the rain; and I don’t need to be able to connect a harness. I’ve seen many persisting with audio bags in the field and have no idea why so many do: being charitable, perhaps they find them perfect in a way that I simply don’t; or, being less charitable, perhaps they think a sound bag must be the right tool even if there’s no boom pole or actor in sight, and just suffer the inconvenience? I suspect a mix of the two. And, of course, while a production sound bag might be the right tool for one day’s field recording, it might be the wrong too for the next day’s session, even in the hands of the same recordist.
Anyway, I can only speak for myself (evidently!) and I’ve long used other bags for most field recording projects. The ones I have used – initially bought for cameras – for many years have been the rather lovely thick canvas Think Tank Retrospective bags. Of these, my favourite for field recording is my smallest one: the Retrospective 7. It’s smaller than my production sound bag, yet is so more space efficient. In short it’s my perfect small rig field-recording bag apart from one slight niggle: it’s a little fiddly routing mic cables from the sides of the mixer/recorder since, of course, the bag lacks the side exits for cables that I have just lambasted in production sound bags. OK I could have low-profile XLR jumpers, but that rather goes against the streamlined minimalism in the field. At the back of my mind for years has been the thought that one day I would find some massive eyelets to make a few neat holes that would help with cables, but which wouldn’t throw out the baby with the bathwater and lose the fact that the bag could hold things safely like…well, like a bag should!
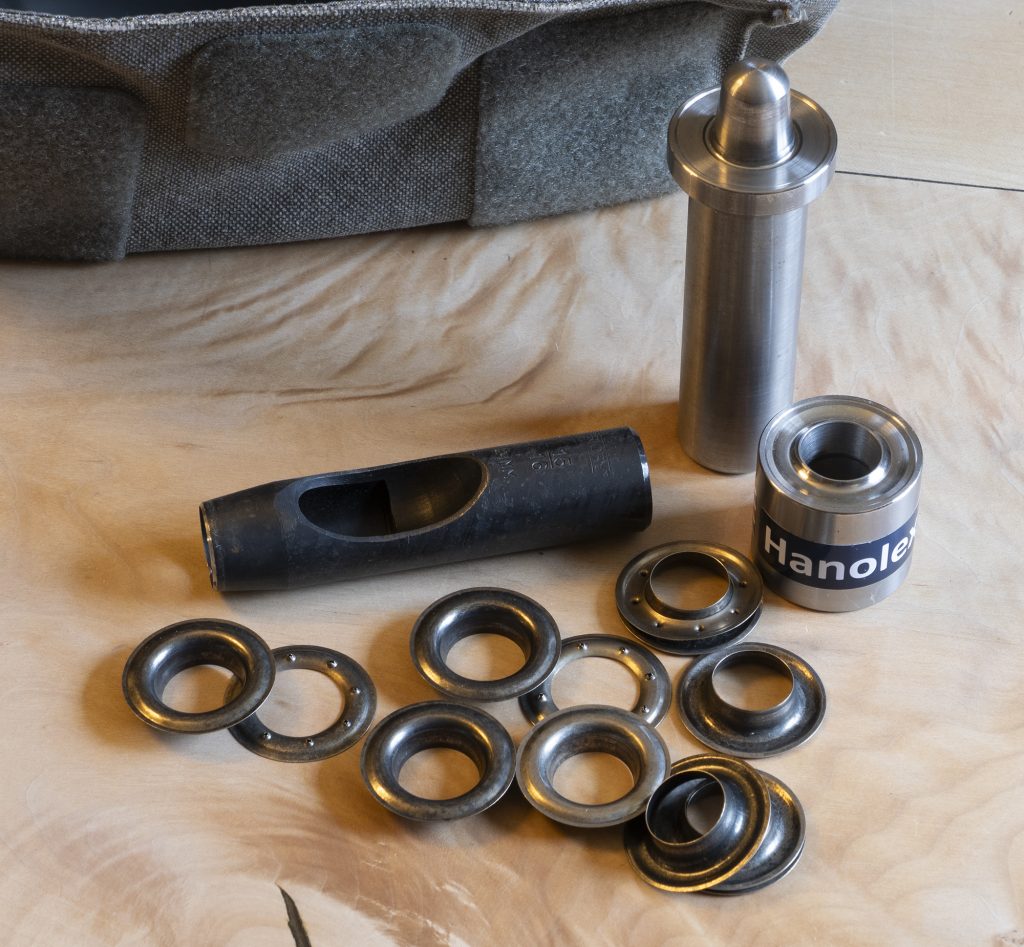
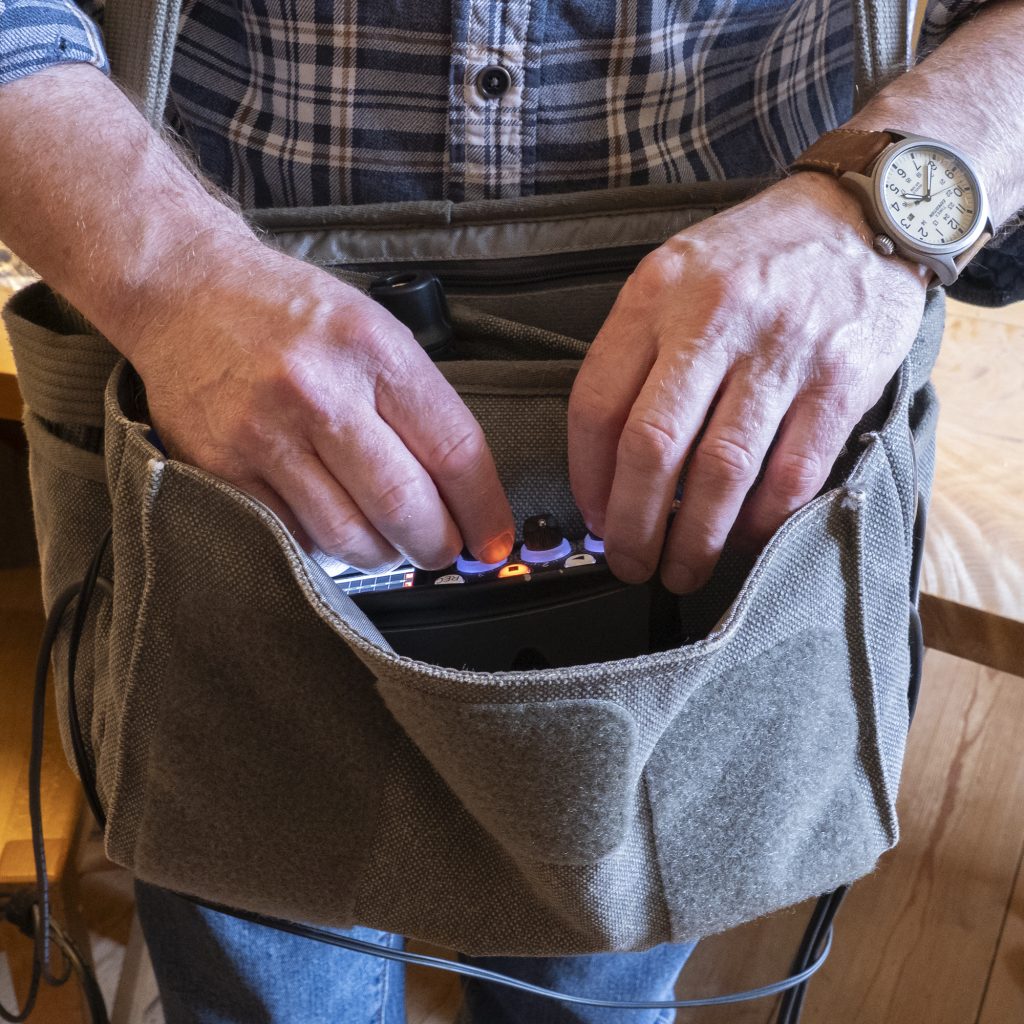
This weekend, I finally got around to it. A little bit of research had showed that what I needed to comfortably fit an XLR plug and, say, another cable through a hole would be 25mm (internal diameter) curtain eyelets. I ended up on the website of specialists Hanolex, in Rochdale, and goodness gracious they were fantastic on the phone when I asked the gormless question: what is the difference between a curtain eyelet and other eyelets (the answer: nothing really, just size and the availability of different finishes). Within a couple of days I had the tools and eyelets (their antique nickel ones were a great match) in hand and set-to, destroying my lovely bag…
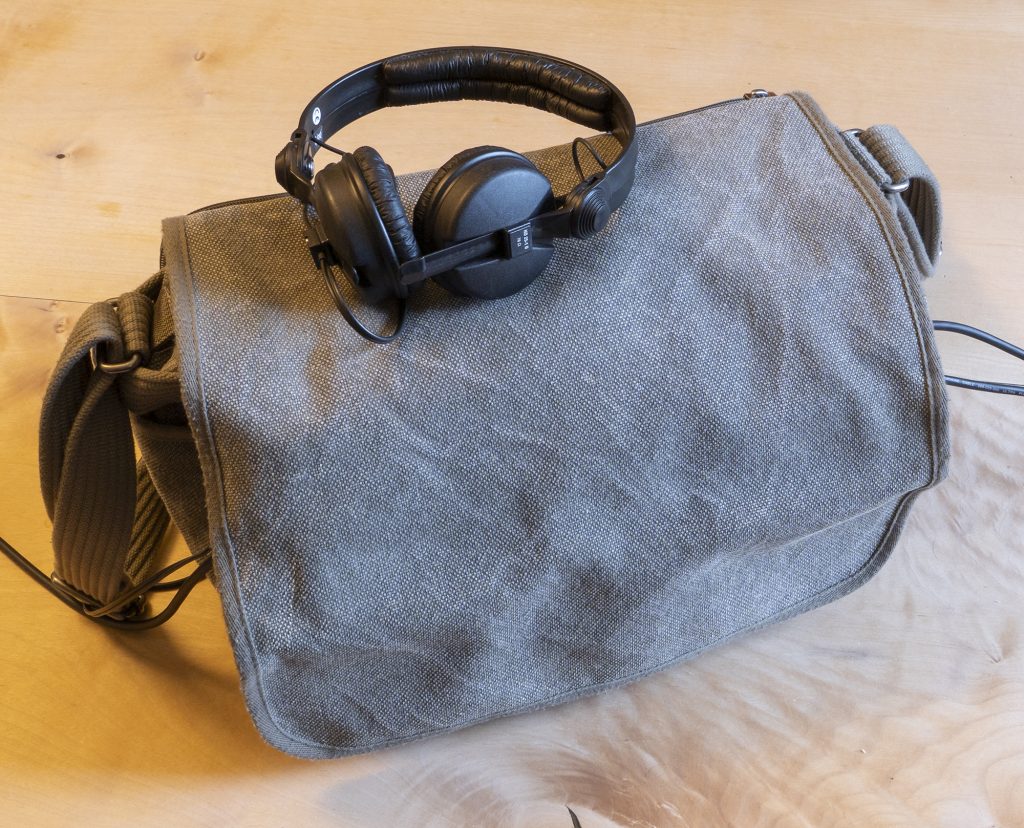
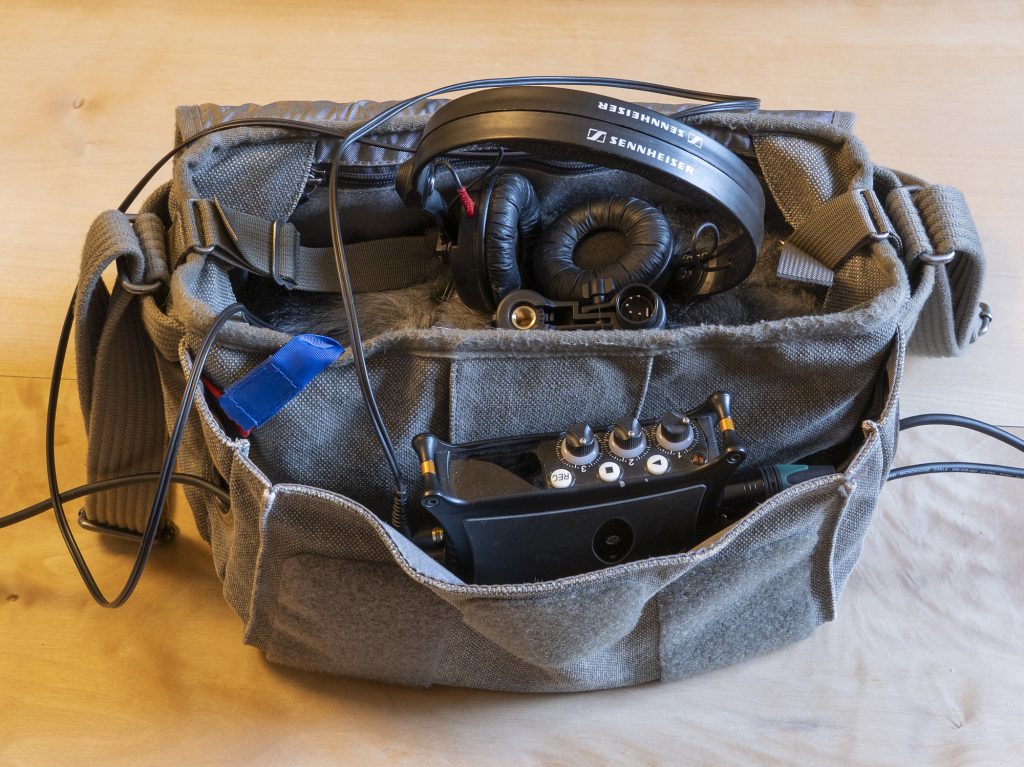
The tools for the job, and some antique nickel eyelets that are a pretty good match for the metalwork on the bag.Oooh: cables now coming out the sides, like a production sound bag…I just went for a couple of eyelets in each side of the front pocket (one of three main pockets), keeping them high enough up so that small things won’t slide out, not that I have many such things in the same pocket as the recorder.It’s a small bag, and I often use it with my little MixPre-3. But as filled here it also has a camera (micro four-thirds) and – you can just about see this – a Mini-ALTO 250 windshield (with an MKH 8018 in it), as well as usual spare batteries, headphones, other cables, and many little items.But, hey, if I fancy it, I can even stick a 788T in the bag.Now it may not be quite as ergonomic as my production sound bag for actual mixing, but it’s perfectly accessible for setting gain etc. and, I don’t know about you, but I don’t ride the faders to mix live to the LR mix tracks for field recording!
Now, it is entirely reasonable to wonder why on earth would anyone write a blog post about making four holes in what was a perfectly nice bag beforehand? On one level it is as silly as posting a photo of a meal you are meant to be eating or, worse for others, a live gig you are meant to be enjoying (yes, I can be a stereotypically grumpy middle-aged bloke), but there may be someone out there who is unthinkingly struggling with a production sound bag, perhaps attracting unwanted attention when not actually recording, and losing items in the long grass. And there may be someone out there who has never come across the Retrospective bags or some other equally useful equivalent, or, if they have, hasn’t got to grips with whatever little niggle that stops it being the perfect field-recording bag for them. If so, this blog post is for you: get hold of an eyelet punch or whatever tool you need, and get butchering your bag. Just don’t blame me when it all goes wrong. And if you find production sound bags perfect for all field recording uses, then that’s fine, of course, though I suspect you won’t have reached the end of this post!
The MKH 418-S stereo shotgun mic was introduced in 2003, creating – by addition of a fig 8 capsule – what was essentially a mid-side (MS) version of the popular mono MKH 416 shotgun mic. The new MKH 8018 does something similar for the MKH 8000 family of mics, although its mid mic is less directional than the MKH 8060 short shotgun and, of course, a lot less so than the longer MKH 8070. While the specs are significantly improved on the MKH 418-S, the MKH 8018 is aimed squarely at a similar market – most obviously outside sports broadcast. A few reviews have begun to appear on the mic and, rather than repeat ground covered in them, the focus on the tests for this blog post is a bit different: as usual I explore the basics (self-noise, handling noise, frequency response, resistance to RFI etc.), but the field tests focus on the performance of the MKH 8018 as a stereo mic. Above all, I am interested in how this latest take on a stereo shotgun compares to a non-shotgun mid-side pair and, for this, it seems most appropriate to test it in parallel to an MS pair of its MKH 8050 (supercardioid) and MKH 8030 (fig 8) siblings. How can the useful side rejection of a mono shotgun be reconciled with the addition of a fig 8 to create a stereo signal? Likewise, the tight focus of a shotgun mic for some sound effects can be useful, but how does a stereo version work for this? Does the inevitably more erratic (lobar) polar pattern of the shotgun mic at higher frequencies render it very much a poor cousin, or is it eminently usable? Is this mic about having that tight mono shotgun perspective, but with instant flexibility (without changing rig, or, even, making the call in the field) to have that stereo image when useful? If any of these or related questions are of interest to you too, then read on!
PS I should add that the good folks at Sennheiser sent me this MKH 8018 gratis for my unfiltered scrutiny. As usual, I play a straight bat and do my best to be objective (and, if anything, my starting point is a little scepticism about MS and, consequently, DMS with shotguns, as readers may have noticed!), and, with plenty of test WAV files to download, you can pore over my tests and draw your own conclusions. Right: onwards!
PPS It’s not the shortest blog post ever, so if you are after sound samples, stick with it: mostly they are further down.
A look at the mic and its specifications
Well, first to the mic itself. There is no great value in repeating the specifications provided on the Sennheiser website, but a few key ones jump out and merit some discussion. First, of course, is the self-noise, for which figures of 12 dBA are given for the mid (shotgun) mic capsule and 14.5 dBA for the side (fig 8) capsule. These are lower than for the MKH 418-S, for which the mid channel is 14 dBA and the side channel 22 dBA. The fig 8 self-noise improvement is very substantial, but, interestingly, the value is not the same as that for the recently introduced MKH 8030 (13 dBA). The polar pattern of the MKH 8018’s fig 8 is also much less regular than that of the MKH 8030 above 4kHz, which, with the self-noise difference, suggests a different capsule, which Sennheiser have confirmed. The shotgun mic capsule appears to be different from the MKH 8060, and, again, I have had this confirmed…
The MKH 8018 is also a lot more sensitive than the MKH 418-S: for the mid (shotgun) capsule -25 dBV vs -32 dBV; and for the fig 8 capsule -32 dBV vs -40dBV. In both cases, in actual use the substantial difference between the sensitivity of the mid and side channels is then amplified by the fact that the side channel usually gets a much lower signal. In practice I have run 7dB more gain on the side channel in the field with the MKH 8018, to get the capsules up to matching sensitivity, but that’s not always easy with some mixer/recorders with MS linking. And while the MKH 8018 shotgun capsule has quite a hot output, it isn’t unusually so: for example, the MKH 8060 is 1 dBV hotter at -24 dBV.
Thinking about the sensititivies of the two channels leads to another key difference between the MKH 8018 and the MKH 418-S: while the latter outputs the M and S signals only, the MKH 8018 can switch between this option, ‘narrow-XY’ and ‘wide-XY’. No information is given as to the ratio of M to S in the two decoded LR stereo outputs and, while I am sure that they will prove useful to some not familiar or unable to work with the M and S outputs, for all my testing and use I have had the mic set in its MS output mode: I like to know what I am doing!
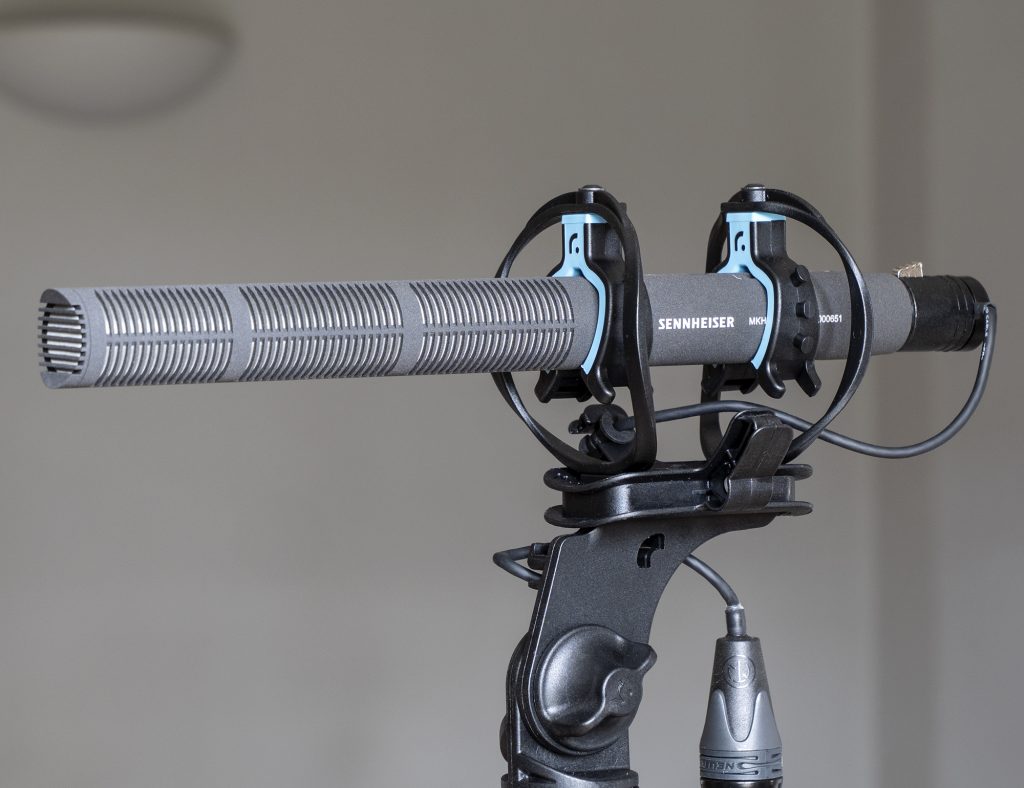
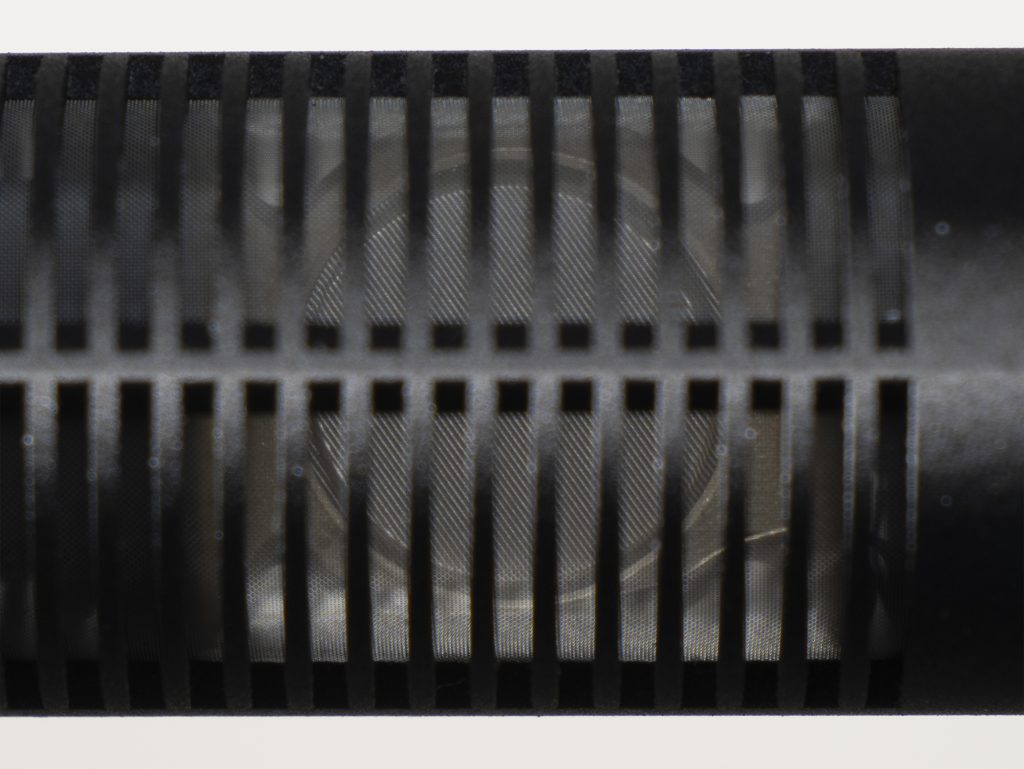
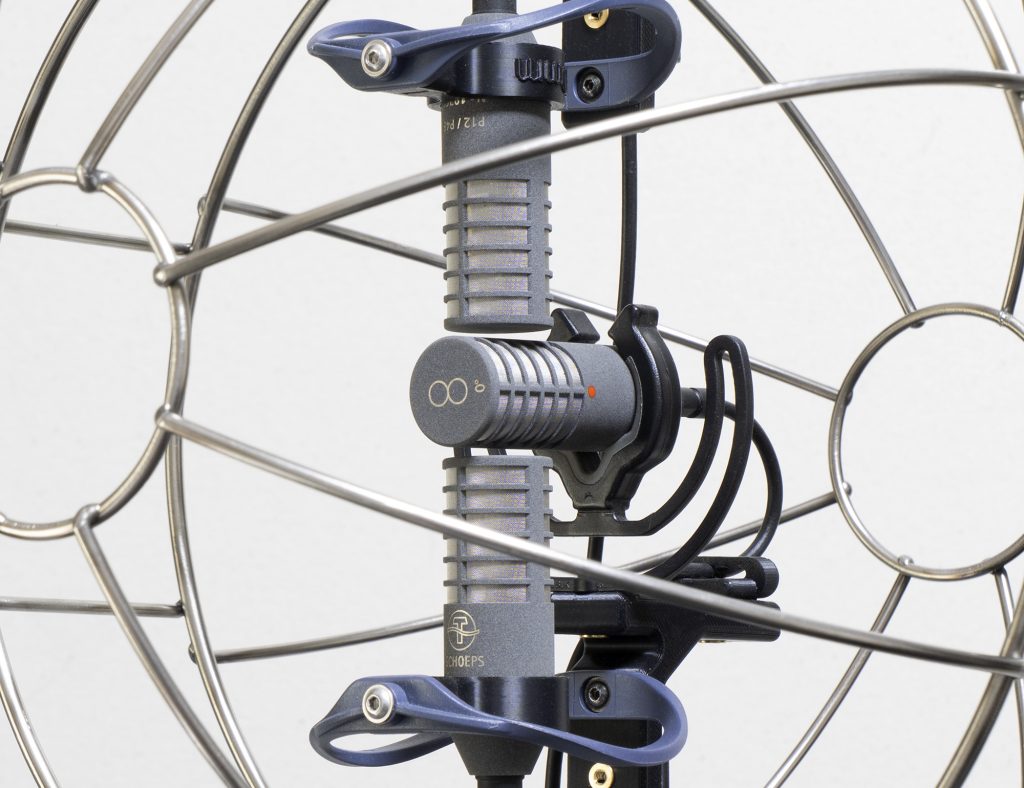
Turning to the physical appearance of the mic itself, all is exactly described and illustrated on the Sennheiser website. The one thing that wasn’t clear from that was the position of the capsules within the mic, so the first thing I did on opening the box was to hold the mic up to the light to try to see what is going on.
Back-lit view of the slotted tube part of the MKH 8018, showing the three sections: that on the right (i.e. rear) contains the fig 8 capsule with the mid mic capsule then adjoining (to its left); and the two left-hand slotted sections are the actual interference tube of the (shotgun) mid mic, which measures 82mm in length. The internal circular openings can be seen – along with the tight mesh – behind the slots.
Capsules and polar patterns
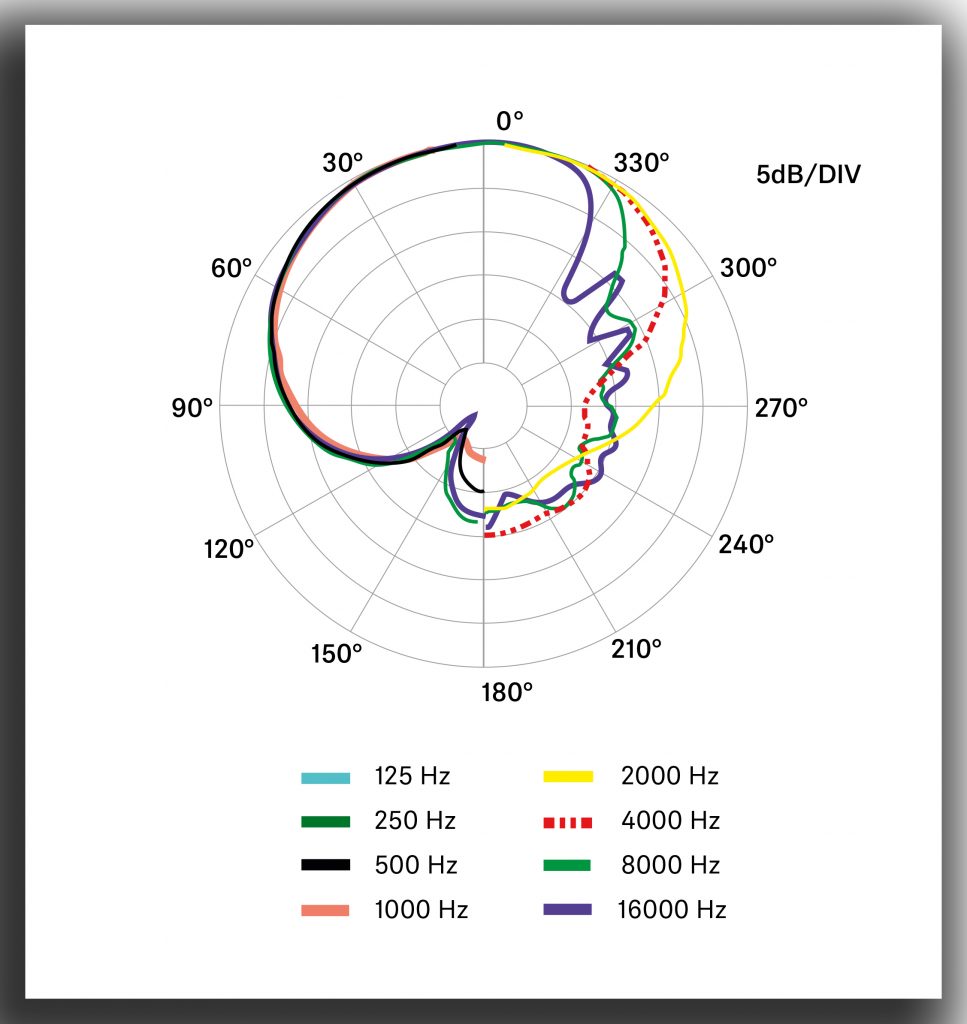
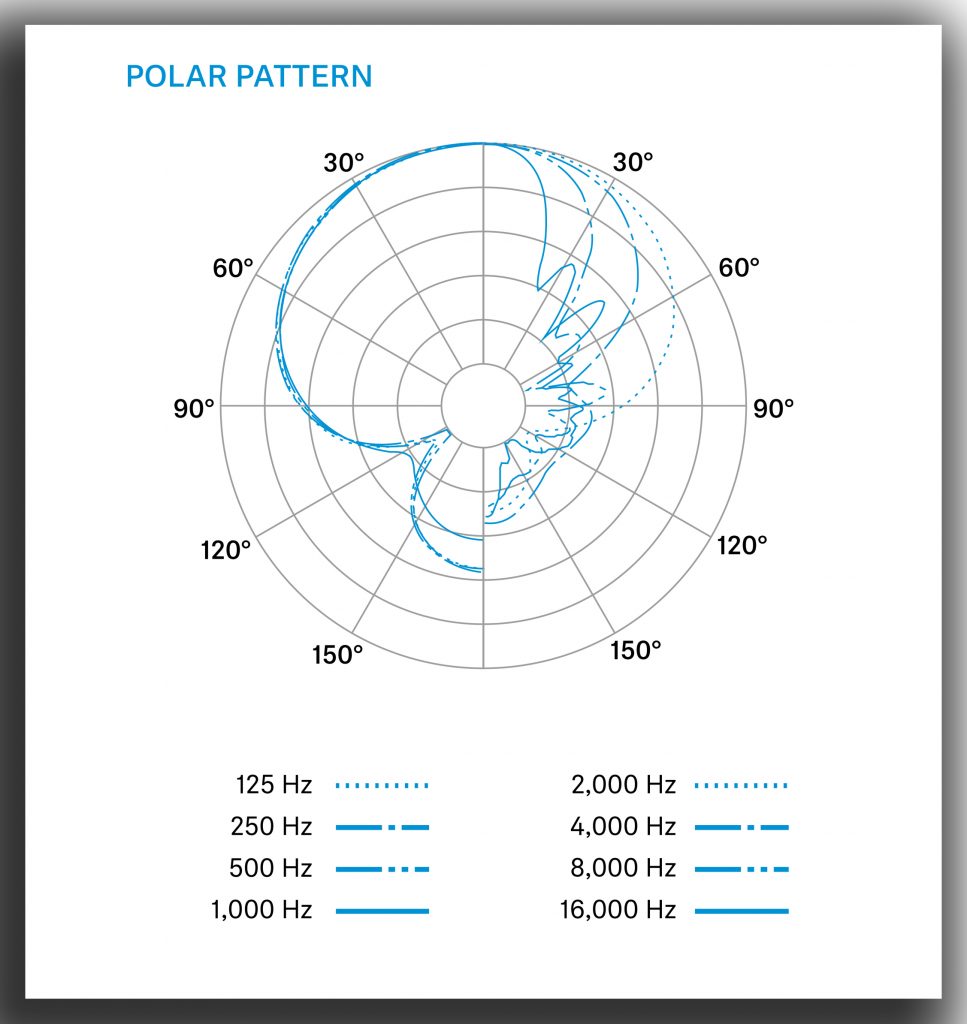
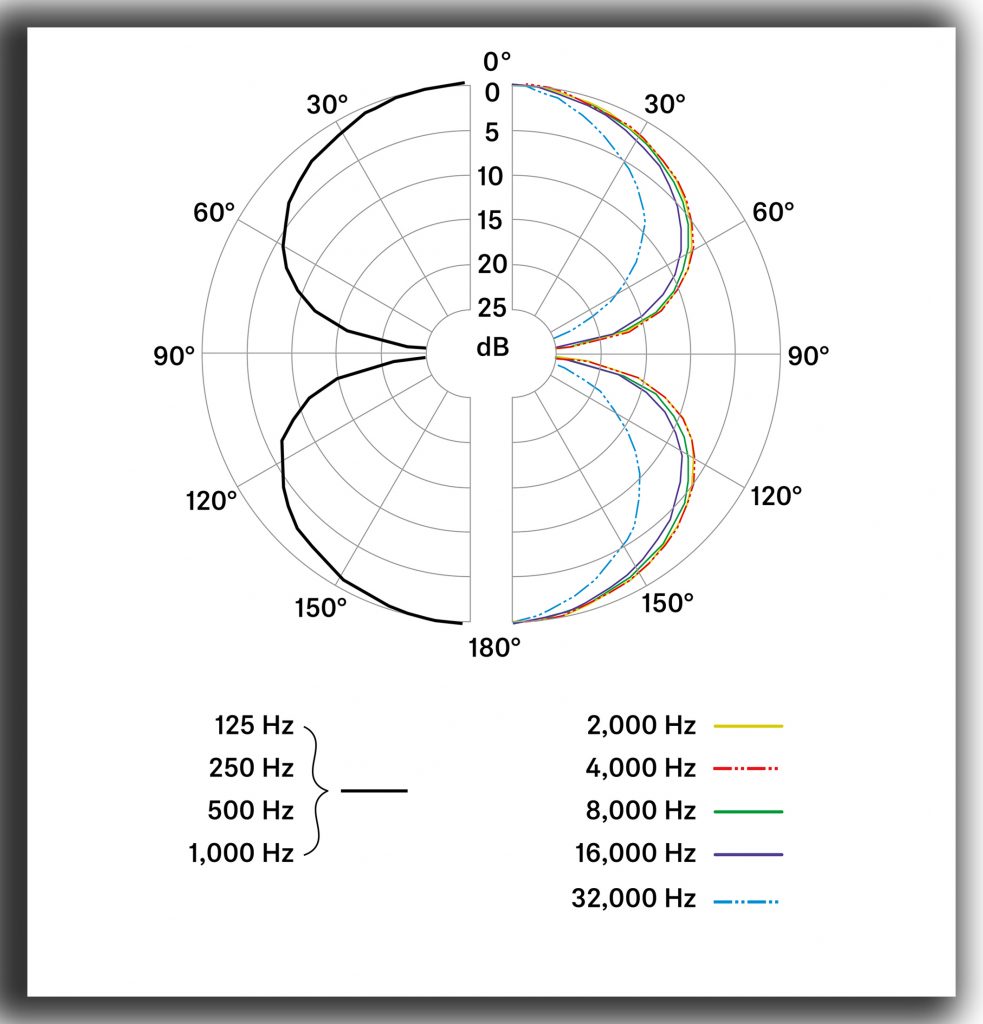
Polar patterns vary much more across the broad category of shotgun mics than across the individual types of first-order mics (omni, cardioid, supercardioid, hypercardioid, fig 8 etc.). Shotgun mics also have a much more variable polar plot at different frequencies than mics with no interference tube. For example, a shotgun mic might have a similar acceptance angle (signal no more than 3dB down on the on-axis signal) as a hypercardioid (i.e. 105°) up until 1-2kHz, before narrowing (i.e. getting more directional) above that to, say, 25° at 16kHz. So the simple distance factor (i.e. the distance at which the mics get the same direct-to-diffuse field ratio) that can be described for omni mics through to fig 8s has no immediate application to shotgun mics: you will read of ‘typical’ distance factors for shotgun mics of 2 to 3 (with an omni being 1.00, a cardioid being 1.73 and a supercardioid being 1.90), but, clearly, this is a crude approximation given the change in directivity with frequency. Adding to the variables in design (inc. length) of the interference tube and capsule, multi-capsule shotguns also change how the mics reject off-axis sound. The polar pattern (with its particular frequency dependent variation), therefore, has a much more significant role in determining which model of shotgun mic a sound recordist will choose for any given type of recording situation. That doesn’t mean, of course, that the published polar patterns are what a recordist uses to make such choices: an experienced sound recordist will usually base that on how they have heard different microphones perform in use in a range of situations.
Nonetheless, a polar plot, especially if not overly smoothed, contains useful information for a shotgun mic, and it certainly gives an immediate insight into the MKH 8018. This shows that at lower frequencies, up to 1kHz, the MKH 8018 mid mic has a very slightly wider pattern than the MKH 8060, and, indeed, fractionally more so than the supercardioid MKH 8050, but with a much smaller rear lobe than either. Above that there is more divergence: by 2kHz the MKH 8060 has a significantly tighter pattern and this increases with frequency, along with a less noticeable rear lobe. The MKH 8018 and MKH 8050 remain very similar up to 4kHz, but, thereafter, the MKH 8018 gets more directional, as you would expect. As with all polar plots for interference tube mics, by 8kHz that for the MKH 8018 shows erratic, or lobar, form, but the response from a sine wave at a specific frequency is very hard to translate to use: this is where listening to the mic is critical. Hopefully the various test files in this blog post will help, but there’s no substitute to testing for yourself, especially when comparing to a mic known to you.
Composite image to show the MKH 8018’s fig 8 capsule behind the fairly opaque fine mesh: it was a little tricky, but some lighting from above and then below, coupled with careful focusing, reveals something of the fig 8 capsule within the mic.
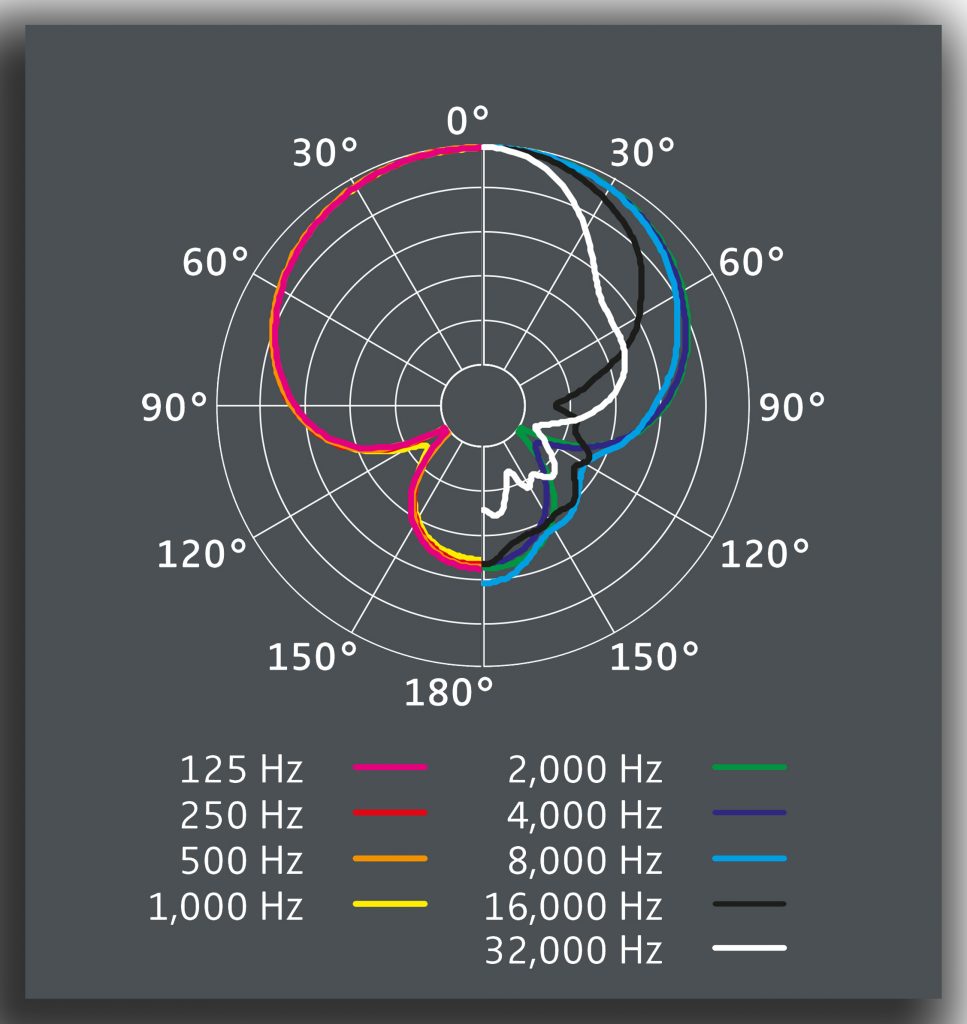
Turning to the fig 8 capsule, as I said in the introduction, its specs are similar but not identical to that of the new MKH 8030. I am loathe to take the new MKH 8018 apart, but, despite the fine mesh of the mic, careful lighting shows the position and appearance of the capsule. It is positioned (to the rear of the shotgun mid mic capsule, obviously) so that it is centred on the seventh slot from the end of the interference tube (so 12.5mm from the solid part of the mic body), and its appearance is very close to that of the MKH 8030, with a similar stainless-steel filter over the usual MKH symmetrical push-pull single diaphragm, and a brass tensioning ring around it that looks identical to that of the MKH 8030 apart from the mount detail, which, in this case, widens for the fixings at both ends (one end joining to the mid mic capsule). Unlike the MKH 418-S the fig 8 capsule (KS-16-3) does not sit in an oblong block, but, rather, has a rounded tension ring. It appears that, like the MKH 8030, the fig 8 in the MKH 8018 has a16mm-diameter diaphragm, but that is based on a visual estimate compared to the overall mic diameter (22mm). It is a little surprising, given the visual similarity of the MKH 8030 and MKH 8018 fig 8 capsules, that they don’t have identical specs, although in the case of the difference in polar patterns it is unclear whether this relates at all to, in the case of the MKH 8018, the mounting between the preamp and the mid mic capsule (given the nulls it is hard to imagine why this should be so), or indeed the less open slotted tube and close mesh that continues across the fig 8 part of the MKH 8018 vs the more open design and open weave mesh of the MKH 8030. Here are the comparative polar patterns:
The different presentation (90-degree rotation and split vs continuous circles) of the two polar patterns doesn’t disguise the fact that they are quite different, with significant irregularities from 2-4kHz upward in the MKH 8018.
Frequency response
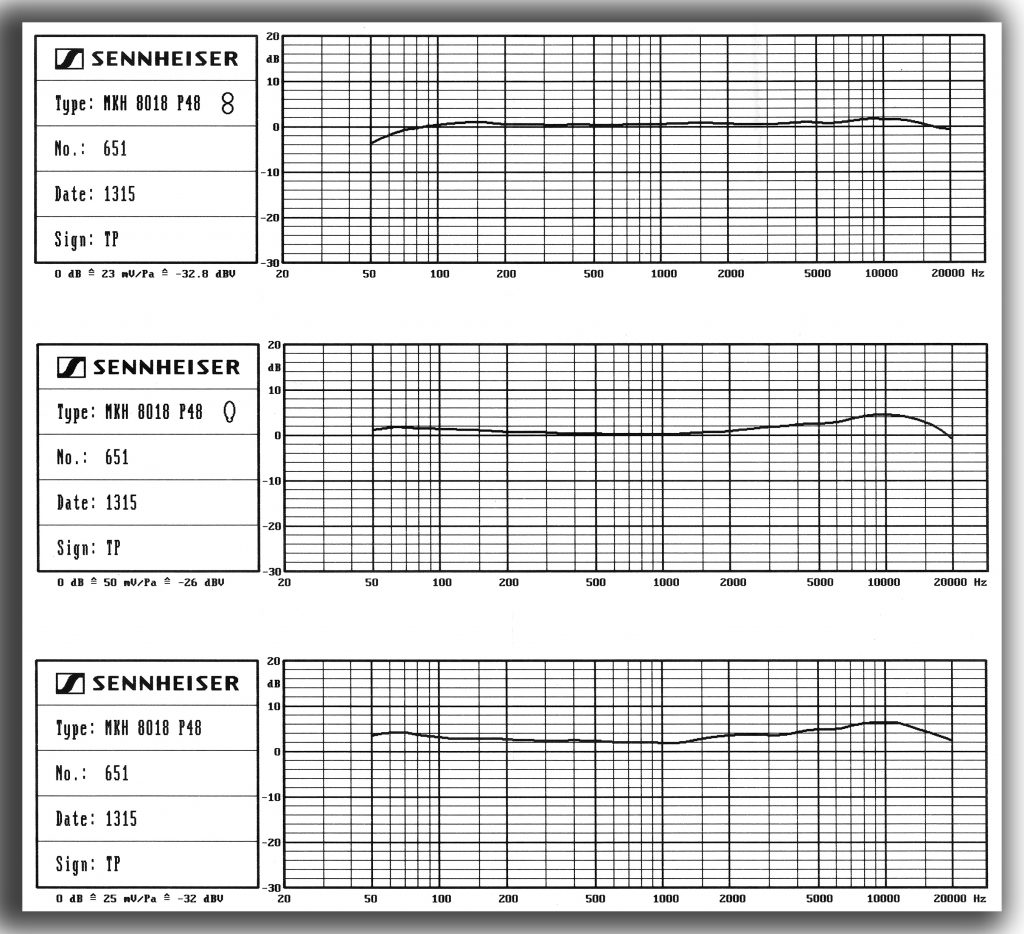
The frequency response curves and sensitivity measurements supplied with (and for) the MKH 8018 example tested here.
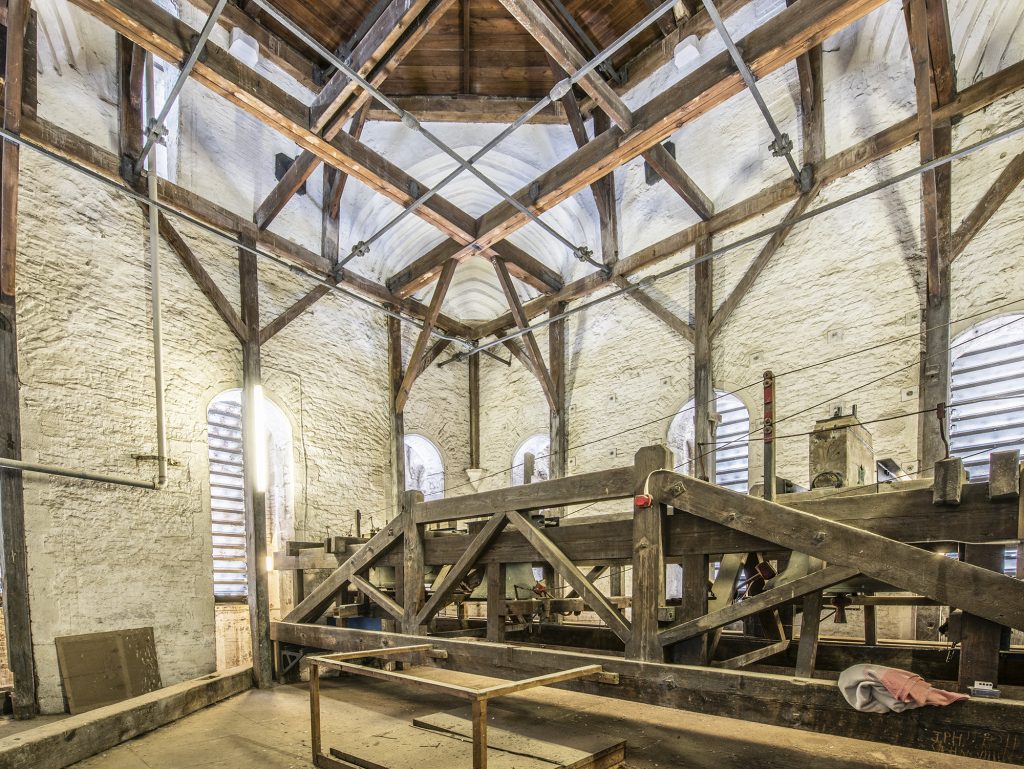
Like the MKH 8060 and MKH 8070 shotgun mics the MKH 8018 also has a more limited frequency range than the rest of the MKH 8000 mics. The published figures for the latter are all 30 Hz to 50 kHz, apart from the omni MKH 8020, which has a published range of 10 Hz to 60 kHz. The frequency range given for the MKH 8018 is 40 Hz to 20 kHz, but looking at the plots above you can see that the fig 8 side mic is shown as having much less low end: fig 8 mics are often a little bass-shy compared to other polar patterns, although this shows a steeper fall-off than with the MKH 8030. As discussed in previous posts, an extended high-frequency response might seem entirely academic outside those recording at high sample rates and pitching down in post (e.g. for bat recordings, or for sound effects), but there are those that argue frequency response over 20kHz is important for high-resolution recording (such as David Blackmer of Earthworks mics in this article). But quoted figures of themselves do not tell the whole story (for example the extended high-frequency capabilities of the first-order MKH 8000 mics comes with a sharp rise in self-noise, which can be problematic for very quiet sounds), so for a field test, I again thought the overtones of some church bells would be an interesting sample, so up I clambered to the belfry at Norwich Cathedral.
Up in the massive early 12th-century cathedral belfry, where the the bells and bell frame seem small by comparison.
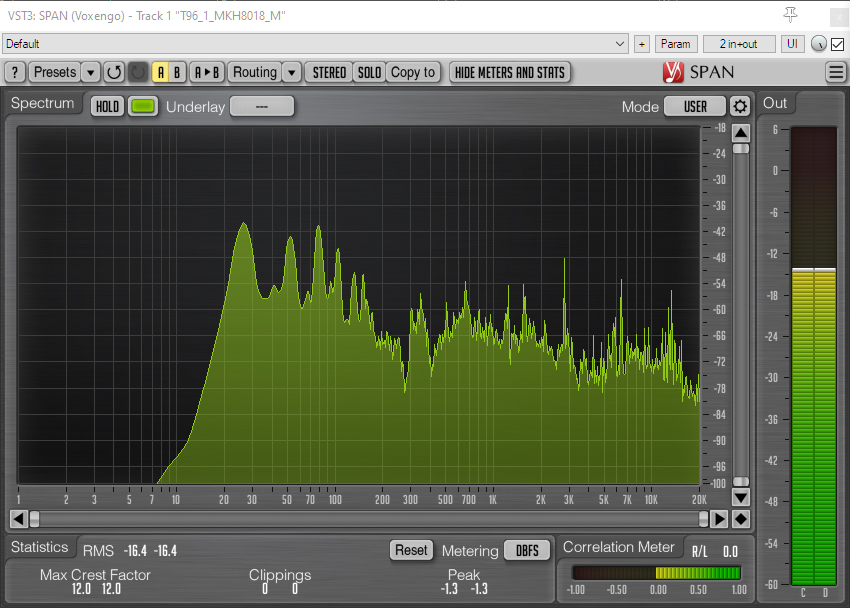
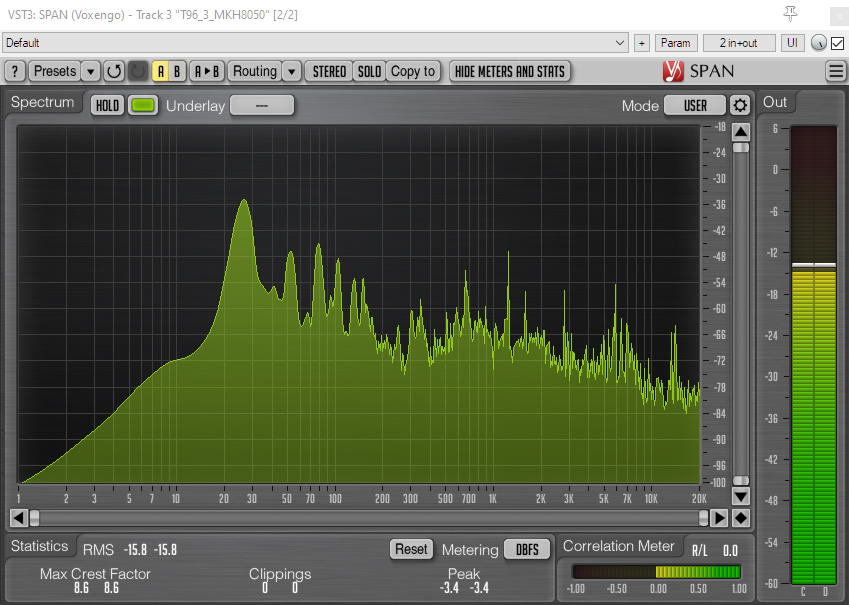
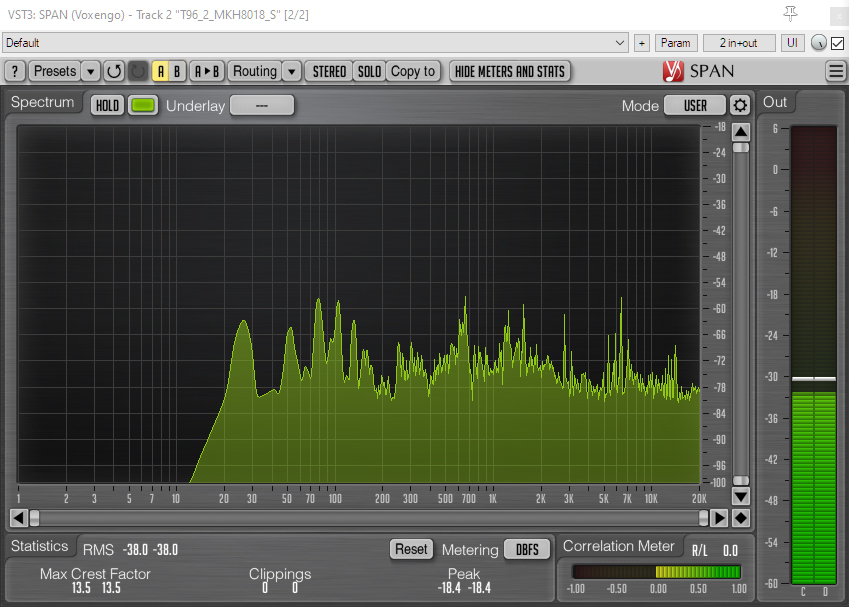
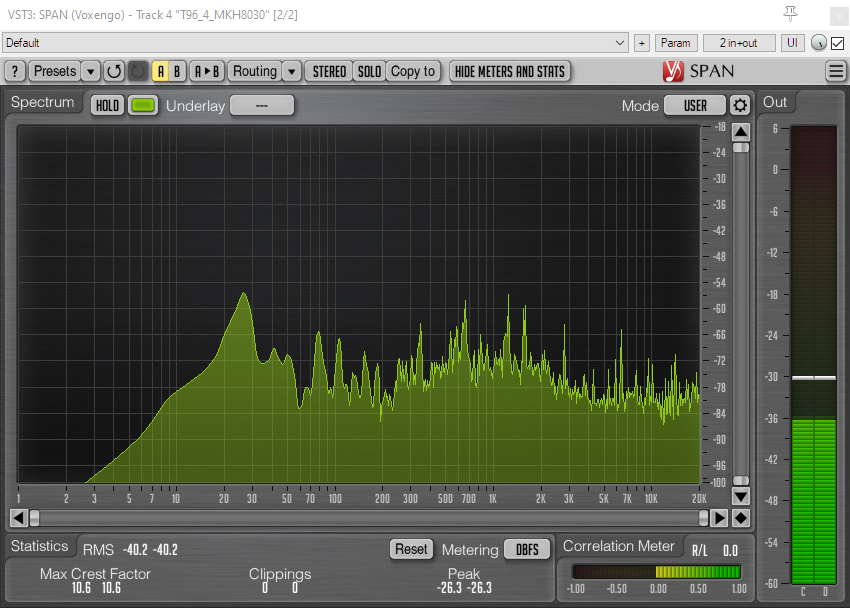
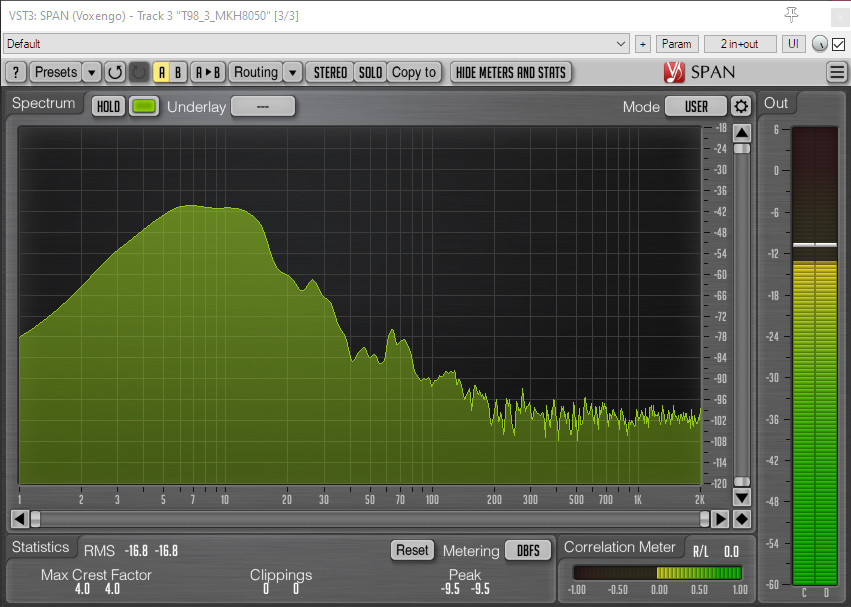
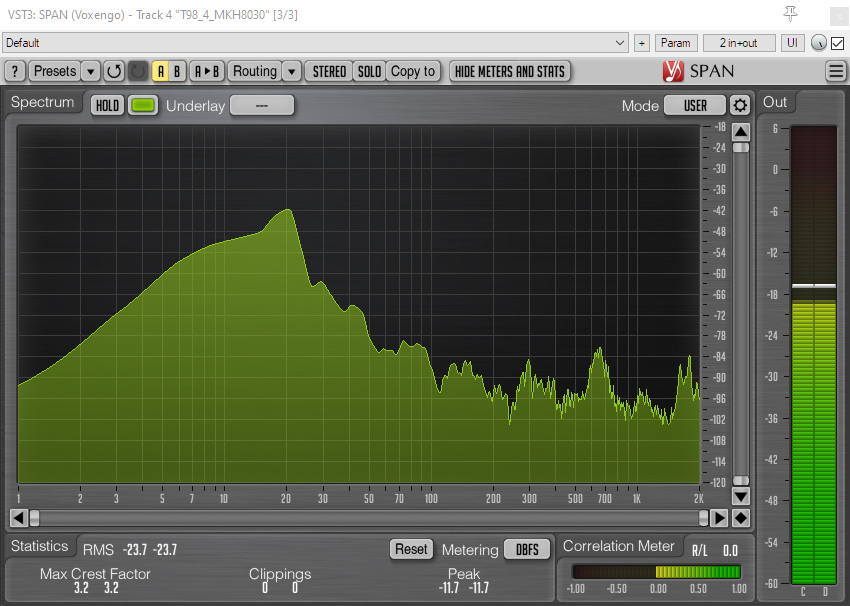
For the recording I set up the MKH 8018 and an MKH 8050 + MKH 8030 MS pair in separate Mini-ALTO windshields (there was a breeze inside the belfry) facing the bell-frame. Such a loud sound really brings home the sensitivity of the mid (shotgun) capsule: 20 dB gain was pushing my luck! Here are the 96 kHz sound files:
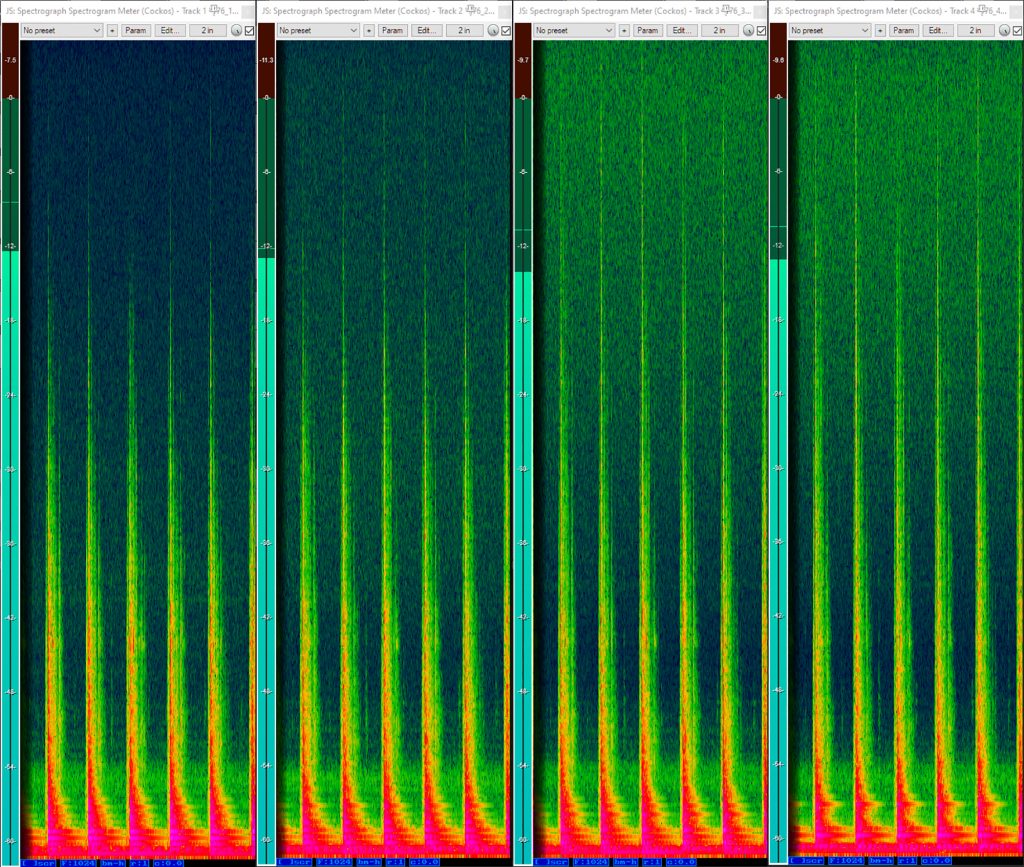
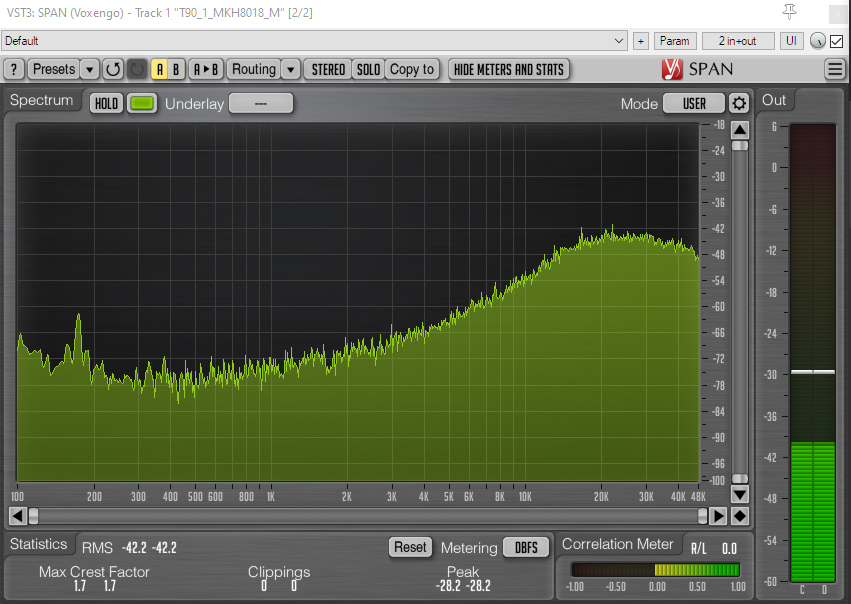
And here is a spectrogram of part of the recording, showing the chimes. The higher-frequency capability of the MKH 8030 and MKH 8050 are evident with much stronger signals up to 48kHz (the limit on this spectrogram), but, equally, so is the much greater self-noise of these mics from just below 20 kHz and upwards compared to the MKH 8018 (see below for more on self-noise). And while the latter might only be quoted as having a frequency-range up to 20 kHz, like many similarly specified mics there is no abrupt cut-off at this point and there is plenty of signal above this frequency.
Spectrogram of the bells tolling midday, from left to right: MKH 8018 mid mic, MKH 8018 side mic, MKH 8050 mid mic, and MKH 8030 side mic. The vertical axis extends to 48kHz.
Turning to the other end of the spectrum, I set up the MKH 8018 and the MKH 8050 + MKH 8030 pair aimed at the exhaust pipe of the rear of a parked car (with the engine running needless to say!). Here are short clips from the recording, which include a little gentle revving:
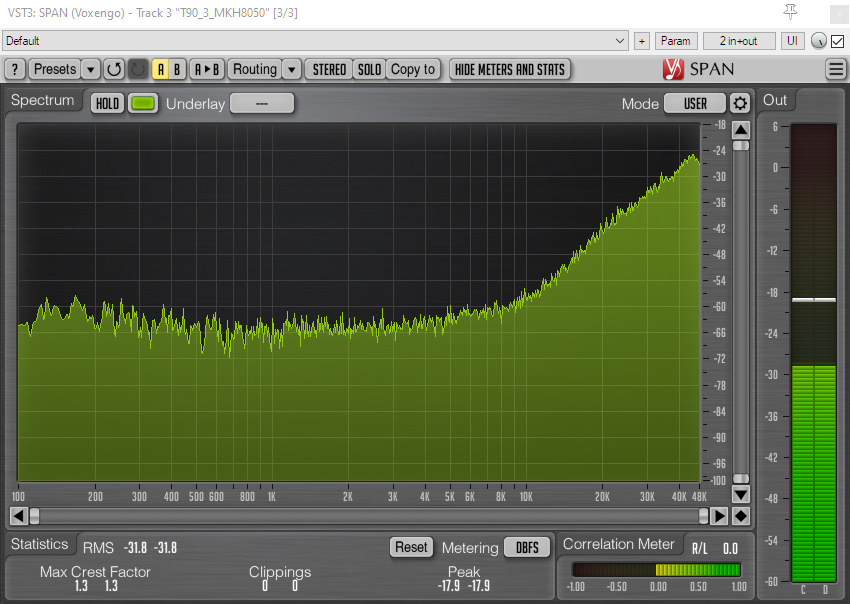
And here are the spectrum analyzer visualizations:
MKH 8018 mid (shotgun) mic capsule.MKH 8050 supercardioid.MKH 8018 side (fig 8) mic capsule.MKH 8030 fig 8.
The tracks show all four capsules capable of rendering the lowest fundamental, which was around 26.5Hz, although, of course, the fig 8s show a lot less of the low-end of the engine: this is partly since the exhaust pipe itself was centred on their nulls and partly since fig 8s inherently have a poorer low-frequency response. What is more interesting is that, compared to their MKH 8050 + MKH 8030 counterparts, both MKH 8018 capsules have a greater low-frequency output down to around 50Hz, but a lower output at the 26.5Hz fundamental and then fall away quickly below that. It is comparable to using an MZF 8000 ii filter module on the modular MKH 8000 mics, with its permanent low-cut filter of –3 dB @ 16 Hz, 18 dB/oct: indeed, the comparison is especially valid (and I assume a design intention) since both the MZF 8000 ii filter module and the MKH 8018 have a switchable low-cut filter of -3 dB @ 70 Hz. So without use of the switchable low-cut filter, the MKH 8018 seems to have a steep roll-off of the very low frequencies likely to arise from handling noise (and the inevitable resonant frequency of a mic suspension); and then the option to roll-off more (often not optional in many shotgun mics) at a higher frequency to reduce wind noise, traffic rumble and, even, higher-frequency handling issues. In short, the design allows the MKH 8018 to be used where many a shotgun mic would struggle for lack of low-frequency response, yet is designed with handling in mind and has the option to roll off more low-end in keeping with many a shotgun mic: and the response of the two capsules is consistent in this regard.
Self-noise
The 12 dB-A self-noise figure for the MKH 8018 shotgun mic capsule is respectable for a shotgun mic and as we have seen it is an improvement on the mid mic in the MKH 418-S stereo shotgun (14 dB-A), and only a little higher than the figure for the MKH 8060 shotgun mic (11 db-A). And, while the side mic capsule of the MKH 8018 might have a little more self -noise than the MKH 8030 fig 8 (14.5 dB-A vs 13 dB-A) that is still very good for an SDC fig 8 and radically better than that in the MKH 418-S. But specs of self-noise are one thing and how they sound can be quite another: a single figure doesn’t tell the whole story. So on to some tests…
First off, I checked that the manufacturer’s sensitivity figures were broadly correct, recording a 1kHz tone and measuring that with a tight band-pass filter applied at 1kHz: all was evidently in order at least in relative terms (I compared the two MKH 8018 capsules to an MKH 8030 and an MKH 8050 [also 13dB-A], getting a maximum deviation of 0.8 dBV from the published specs). So, in the absence of an anechoic chamber, I then did my usual recording the sound of nothing with the mics buried deep in duvets in the airing cupboard, with all doors and windows closed and the mains electricity turned off, recording with each mic at 76dB gain (the max of a Sound Devices 788T). Also as usual, to remove any low-frequency sound still permeating, I applied a 100Hz high-pass filter, and, in my DAW, added further gain to match the three less sensitive capsules with the sensitivity of the MKH 8018’s mid mic (the hottest of the four capsules). Normally, I wouldn’t bother including the sound of madly cranked-up mic hiss in a test/review (total gain for the MKH 8050, for example, being 85 dB), but in this case it is quite interesting to compare the different capsules. And, as I have cautioned in the past, don’t panic: all the mics are very quiet in normal use!
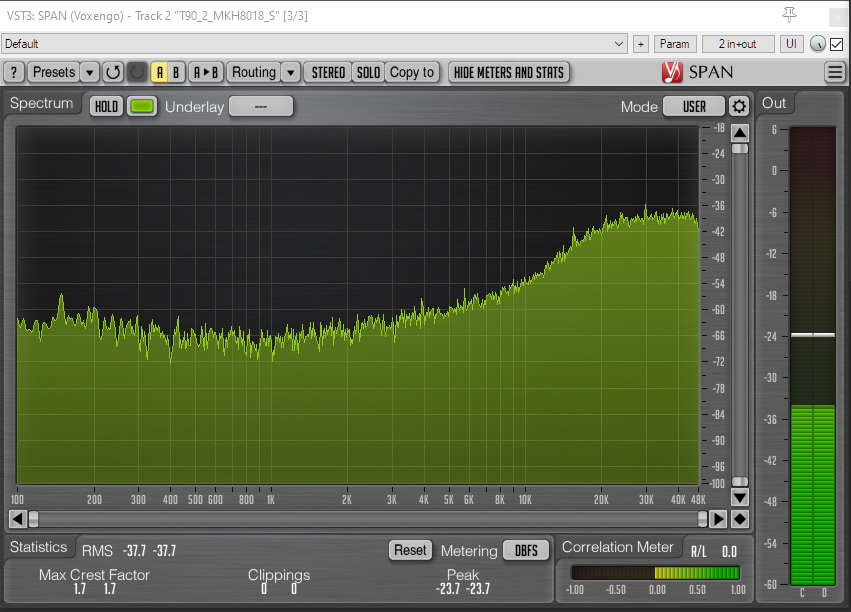
And here are the spectrum analyzer visualizations of the noise:
MKH 8018 mid (shotgun) mic capsule.MKH 8050 supercardioid.MKH 8018 side (fig 8) mic capsule.MKH 8030 fig 8.
The sound files and the spectrum analyzer visualizations show that the two MKH 8018 capsules are quite different in terms of self-noise from the MKH 8050 and MKH 8030. The more limited ultra-sonic capabilities mean that the MKH 8018 is not tuned like its first-order siblings, where steeply rising self-noise towards 20kHz continues to rise to 48kHz. With the MKH 8018, the rise in self-noise in both capsules starts lower and is less steep, and then flattens off after 20kHz. This lower and more gradual rise in self-noise means that the character of the self-noise is quite different in the audible spectrum: self-noise in the MKH 8018 capsules is characterized by more of a high-frequency hiss (say in the 6-12kHz region) very evident to my ageing ears and, obviously, much more so to younger ears. Thinking of younger ears, extreme high-frequency hiss in the MKH 8030 and MKH 8050 will become more discernible to them in the 12-20kHz region as the self-noise in these mics rises to match or exceed that of the MKH 8018 capsules. But, I must reiterate, while interesting to compare and to note for reference, these tests are at extreme gains and so unless recording a watch ticking or other very quiet sound effects, self-noise will not be an issue with any of these mics in most use case. And for an extreme example – relevant to sound design and effects – I slowed down the cathedral bells recording included above to a quarter of its speed, bringing down the pitch accordingly (i.e. by two octaves), and yet no hiss is discernible even in the quiet sections unless gain is cranked up to levels that mean the chimes would destroy your speakers and ears! If interested, do have a play with the downloadable files yourself.
RFI
Looking at radio frequency interference (RFI) on the MKH 8018 is nothing to do with its RF design (which, in the words of the MKH designer Manfred Hibbing in his The MKH Story white paper), means the mic essentially has ‘a transmitter and receiver that are directly wired together’), but is about its resistance to external RFI. As I’ve said in posts on other tests, I am interested in the impact of RFI on mics since, as living in rural Norfolk, much of my life is outside or on the edge of mobile phone reception, where some models of phones transmitting at full power can cause notable interference on mics at up to, say 1m/3ft: not a problem with mics on a stand, but I’ve had this become a real issue with handheld shotgun mics and a phone in my jacket pocket (on those rare occasions when I forget to turn my phone off). And this could be a problem with ENG work too (not least from the phone of an interviewee). So I was glad to find that in testing, as before, with several different phones on the absolute fringe of reception (i.e. working at highest power) the MKH 8018, like its MKH 8000 siblings, showed no sign of RFI even at close distances (100mm): for control I recorded the mic alongside a known problem mic (to check that the intermittent issue was occurring: it was) .
Handling noise
While the MKH 8018 might well see much use mounted on stands (e.g. for line-side recording of sports), it will become a regular fixture in windshields on boom poles or on a pistol grip, whether being used as a mono mic for dialogue or ENG, or in stereo for those times when a bit of ambience is required during production sound recording, or perhaps to get closer to a difficult to access source during field recording. So with that in mind, I put the mic through some boom-pole handling tests, mounting them in Radius Windhsields RAD-2 mounts on a short stereo bar on the end of the boom pole to allow comparison. Gain levels were adjusted for relative sensitivities.
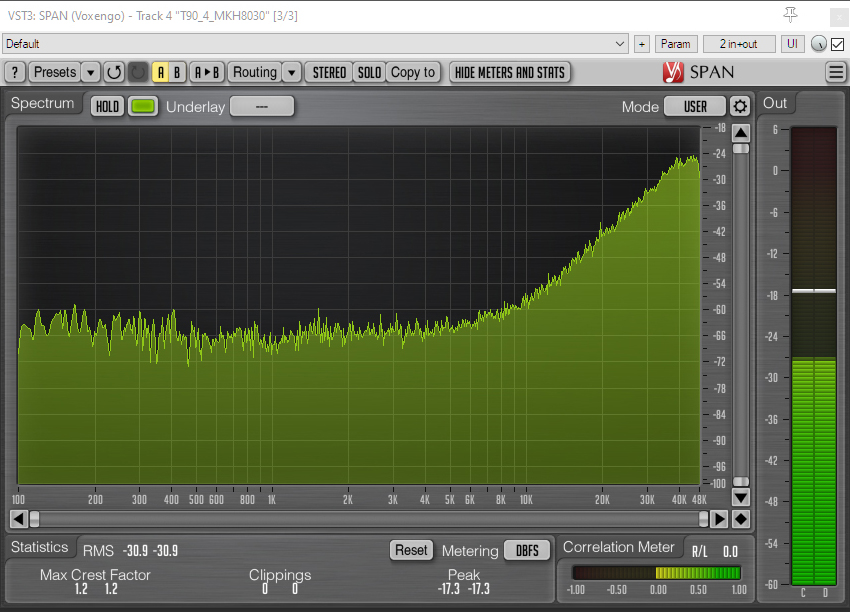
When holding the boom pole statically (extended and horizontally) all four capsules mics showed some handling noise, with the MKH 8050 and MKH 8030 being the most significant, both peaking around 24dB higher than the two MKH 8018 capsules: admittedly the MKH 8050 and MKH 8030 were peaking below 20Hz. This pattern applied across other boom-pole handling tests: rough handling and tapping/thumping the end. To a significant degree – not least given the apparent similarity of the two fig 8 capsule designs – this is doubtless a consequence of the EQ built into the different mics with, as we have seen, the MKH 8018 bass response being very much rolled-off below, say, 50Hz and, especially, below 25Hz. But, equally, there is no denying that the MKH 8018 has handling noise extremely well controlled even without the use of its switchable 70Hz high-pass filter or any such additional, or alternative, filtering in the recorder/mixer or in post.
MKH 8018 mid (shotgun) mic capsule: handling noise test. Note 2kHz upper limit for the spectrum analyzer visualizations showing handling noise.MKH 8018 side (fig 8) mic capsule: handling noise test.MKH 8050 supercardioid: handling noise test.MKH 8030 fig 8: handling noise test.
Wind noise
To get a base line I used a double rig of the MKH 8018 and MKH 8050 + MKH 8030 on a stereo bar and boom pole. Fast boom swings were made to generate wind noise in a controlled fashion. Swinging the bare mics produced overwhelming rumble, as would be expected. The two fig 8s were fairly similar, although the MKH 8030 naturally showed a little more noise at low frequencies (say, below 30Hz). The shotgun mid mic was by far the least susceptible to what was a laminar stream of wind, and the MKH 8050, perhaps surprisingly for some, was by far the most susceptible to wind noise in these conditions. Of course, such use is unrealistic: even with a modest amount of boom movement indoors (or the gentlest air movement around a static mic indoors) at the very least a foam windshield would be used. Matching foams between the mics isn’t that easy, so for the next test I stepped up to bare windshields (i.e. sans fur), using Radius Windshields Mini-ALTOs for both. In tests with the windshields side on and into the wind (again, wide arcs from a boom swing), both capsules in the MKH 8018 performed about 3dB better than their MKH 8050 and MKH 8030 counterparts, and, as expected, lacked the very low-end (sub 30Hz) component: given the testing with a boom, this may well have been as much to do with handling noise as wind. I think another round of spectrum analyzer visualization or even WAV files wouldn’t add anything much to this description, so I will spare you those. Suffice it to say, such limited bare and windshield tests, show that the MKH 8018 is not oddly susceptible to wind (and, goodness, you wouldn’t expect it to be!) and, as you will hear from the samples below, this is further borne out by use in the field.
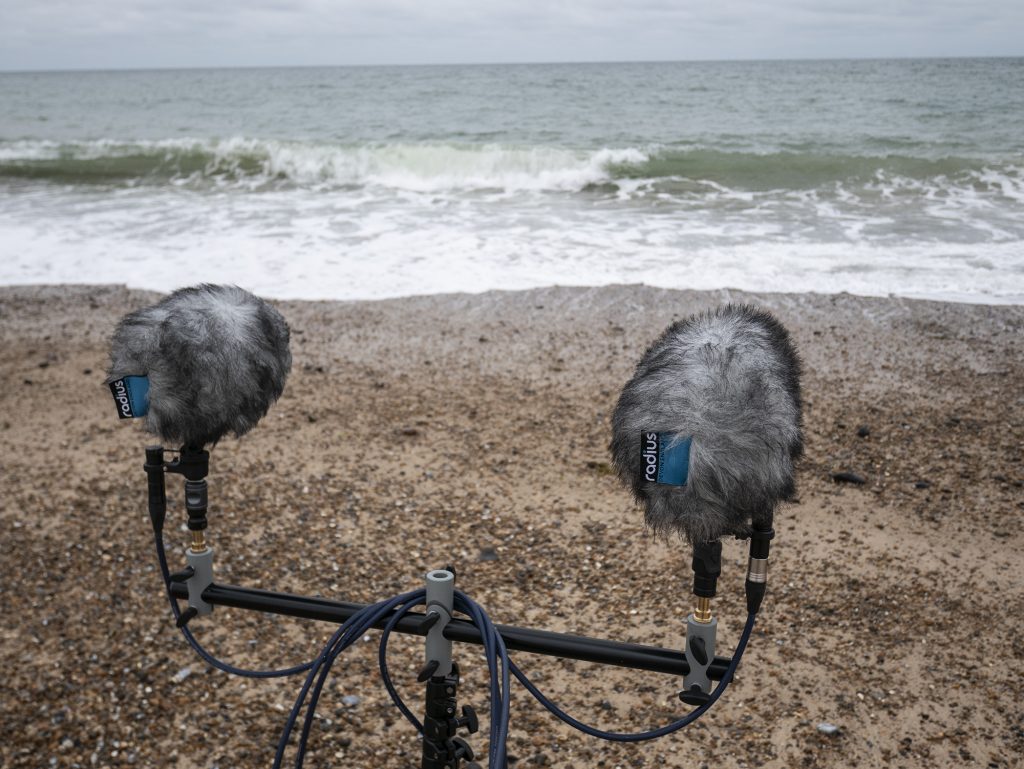
The MKH 8018 and an MKH 8050 + MKH 8030 MS pair on the beach on a grey English summer’s day in a pair of Mini-ALTOs.
Out in the field
A shotgun mic, of course, is primarily designed for outdoor use (OK, for large movie sound stages too), given that reflections are the enemy of interference tube designs. So to test the mic in its natural habitat, I put it through its paces recording a fairly wide range of sources outside. Many of these require it to be compared to something else, naturally, or we have no reference, and for most of the tests I have compared the MKH 8018 to an MKH 8050 and MKH 8030 MS pair: the supercardioid MKH 8050 being the most directional MKH 8000 non-shotgun mic (i.e. without an interference tube). Of course a supercardioid mid mic might well not be ideal for MS either in many situations, but you can refer to my recent tests of the MS pairs with the whole range of MKH 8000 SDC mics (i.e. MKH 8020 omni, MKH 8090 wide cardioid, MKH 8040 cardioid and the MKH 8050) if you are unsure of the differences.
First off, I headed to the beach on what I thought was a calm August day, but which turned out to be a brisk on-shore wind. Here are the two recordings facing straight out to sea:
Retreating a bit from the shoreline and the incoming tide to shelter behind the fishermen’s gear, I recorded myself walking on the shingle in a 360 circle around the mics, starting and finishing directly on axis:
Finally, for the seaside recordings, here’s a closer-up effect, recording the scooping up and dropping of shingle right by the mics:
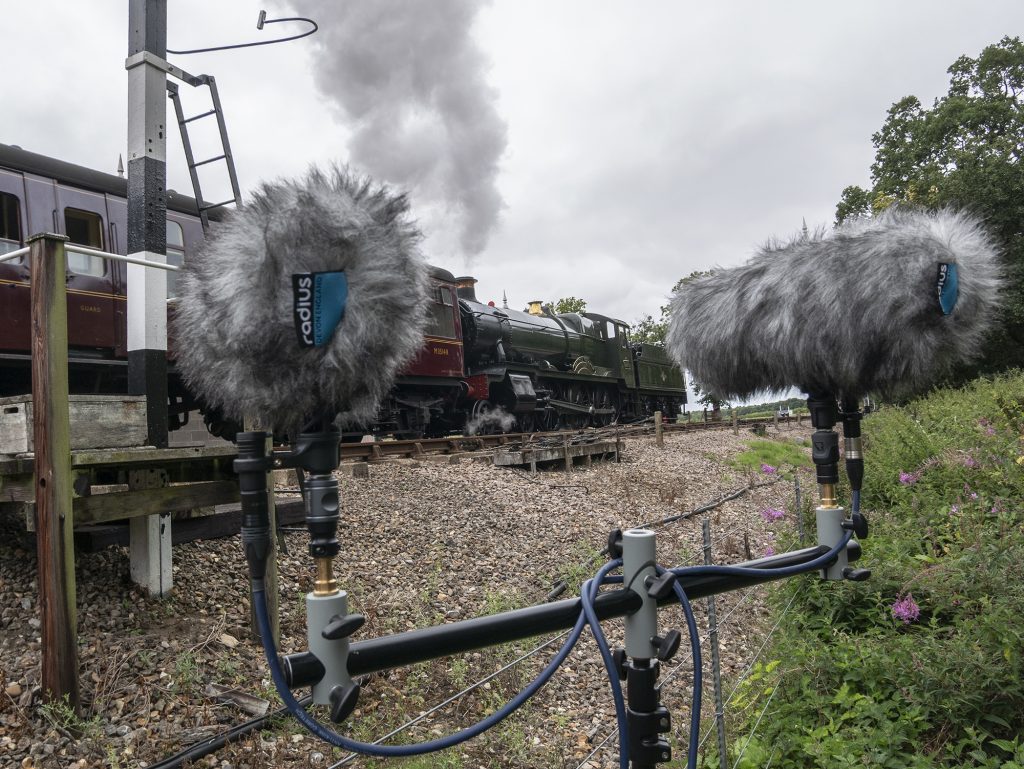
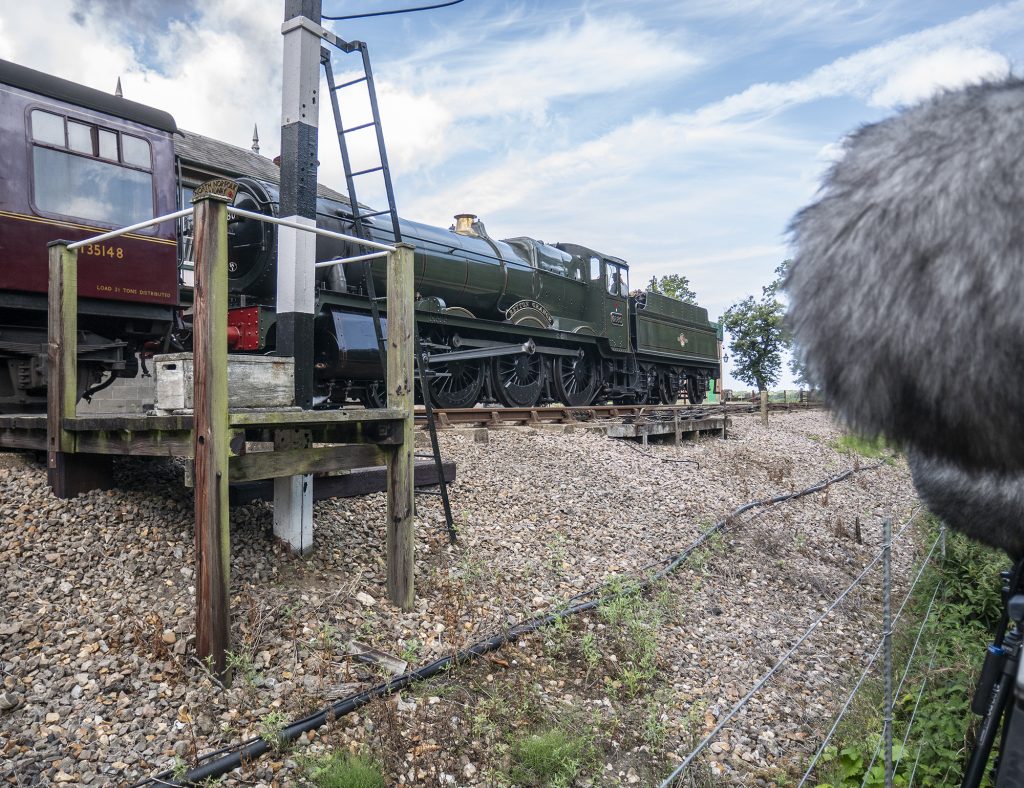
Back to the same spot I have often been for test recordings, lineside at Holt station, as, yet again, a visiting Grange class locomotive pulls the train towards Sheringham.
Moving inland, I headed for one of my old test haunts at the North Norfolk Railway. Sadly, both the stationmaster and the signalmen recognized me so I had to take the assumption that I am an uber trainspotter on the chin: to deny it would have seemed as if I doth protest too much and, besides, testing mics is arguably an even more suspect activity! Next thing I will be calling a drink a ‘beverage’: it’s a slippery slope… Anyway, here is a three-clip recording of a steam train pulling into Holt station, then after a momentary gap, the signal box bell ringing and then, after another brief silence, the train pulling out. No editing other than the obvious cutting to produce the three parts to the recording:
Scything a rather overgrown field. Easier watching the hard work…
Back outside again, I popped over to my friend Rob’s new field (yes. that’s the same Rob who TIG welds the Mega-Blimps!), where he was sycthing or, as he put it, hacking away with a scythe to return the meadow to some order. Doubtless he will crack and get a tractor on it, but in the meantime here’s a pair of recordings of him sharpening the scythe:
And then a bit of scything/hacking at the nettles. I stood rather behind Rob and to the right so as to avoid him slicing through my rather nice and expensive MS cables.
A little bit of music
After all that fresh air I thought I would head inside for an indoor music test, slightly inspired by the well-known use of the Sennheiser MKH 4018-S for the NPR Tiny Desk concerts (although it has been increasingly supplemented by other mics over the years). So I popped down to woodcarver Luke Chapman’s workshop, which I often use: it has a surprisingly good acoustic. Luke obliged yet again (he must be sick of all these tests!) with guitar, working away on a new composition. Here is a video showing the recording with the MKH 8018 compared to an MS pair (again the MKH 8050 and MKH 8030):
Conclusions
This brief introduction to stereo use of the MKH 8018 has covered a bit of ground, from some discussion and tests of the salient aspects of interest from the specs to some tests in use. There are many uses I haven’t included here, partly reflecting my own interests (for example, I’m not in the business of recording sports events, so that’s for someone else to test!) and partly what is practical within a single blog post. One aspect I haven’t addressed is how the MKH 8018 compares to alternatives as a mono shotgun. For some this may well be a determining consideration for buying the mic: in other words, would the MKH 8018 meet their main needs as a mono shotgun mic, whilst providing a stereo option at all times for those occasions where it might prove useful? That is really hard to address, since comparing mono shotguns is not easy, as different sound recordists – especially experienced production sound mixers – will usually need to compare mics directly in use to see whether the nuances of any particular mic means that it suits their use. And, of course, there are many shotgun mics out there. But, that said, I may return to the MKH 8018 to explore the mono shotgun capability in a comparison with its nearest sibling – the MKH 8060: but don’t hold me to it! At the other end of the spectrum, I did think of including results of testing the MKH 8018 as part of a DMS rig here, but haven’t done so for reasons of not wanting to make an overly long post any longer and, also, since the efficacy of any mid mic in a DMS rig is very much apparent from its use in an MS pair. But, again, I may well return to this in a specific post: not least it might be helpful for some to hear the results of using different polar patterns for the rear-facing mid mic (e.g. just what balances a shotgun mic forward facing mid mic best: an MKH 8090 wide cardioid or an MKH 8040 cardioid?).
Anyway, returning to the ground that is covered in this post, drawing conclusions is as much something for the reader as it is for me: my aim was to explore the different in performance between the MKH 8018 in stereo use and an MS pair comprising its most directional non-shotgun sibling – the MKH 8050 supercardioid – and the MKH 8030. Given the better polar pattern and placement (i.e. above, not behind the mid mic capsule) of the fig 8 in the latter, and the more consistent off-axis performance of the supercardioid, its better performance for stereo is entirely expected and is evident in the various recordings. My aim wasn’t to demonstrate this and, as Basil Fawlty would say, get myself on Mastermind with the ‘special subject of the bleedin’ obvious’, but, rather to try and get a sense of the degree of difference. For some users and, indeed, for some uses, it may be vast: for others, and for other uses, the sonic differences may be too subtle and outweighed by other features of the MKH 8018: its usefulness as a mono-shotgun, its simplicity as a single mic vs rigging an MS pair, its ability to be both a shotgun mic and, say, an ambient pair without changing to (let alone buying) a second MS pair, its resilience to handling noise, its inbuilt pad and high-pass filters, and, even, its cost (less than the combined cost of an MKH 8050 supercardioid, or other mid mic, and the MKH 8030). Hopefully this blog post will help some when balancing all these factors. One major obstacle – the significant self-noise of the MKH 418-S – has been removed with Sennheiser’s new stereo mic, and this is hugely welcome. And if you have been humming and hawing about a stereo shotgun mic (including, the slightly noisier and sans RF technology, Sanken CSM 50, Neumann RSM 191, and the Audio Technica BP4027 and BP4029, as well as Sennheiser’s own MKH 418-S), the MKH 8018 is definitely one to get hold of (if you can!) and test for yourself. I’ve been very pleasantly surprised!
Postscript: wind protection for the MKH 8018
There’s nothing difficult in terms of rigging the MKH 8018 for outdoors (the supplied foam, of course, only being suitable for indoor use): it will fit many a windshield from the usual suspects. I note that Cinela have already got a Pianissimo model to fit (and do remember that the Cinela mono models can often be less expensive than you might expect), and a Rycote Modular 4 or a Rode Blimp would work fine. Here, I have tested the mic in a Rycote Cyclone medium, and much of my concern about using the Cyclones for MS rigs is allayed in this instance: the side lobes of the fig 8 capsule do not aim squarely at the thick plastic ring of this windshield, with evident colouration problems, as I have found with MKH 8030-based MS and DMS rigs in the small Cyclone. But the result is far from compact, so for my field tests with the mic I used the new Mini-ALTO 250 from Radius Windshields: they have been expanding their range of Mini-ALTO sizes and this fits perfectly, and I had no problems with wind noise in the admittedly not overly windy conditions of this English summer. And when not lugging two rigs for comparative purposes, I’ve enjoyed the fact that I can fit the MKH 8018 in the Mini-ALTO 250 in its fur, along with a field recorder, headphones, cable, camera etc. all in my little Think Tank Retrospective 7 bag that I like to use for field recording (yes, I know, I know: this is ironic from the creator of the Mega-Blimp!). For the cable I used an excellent low-profile XLR5F to XLR5M stereo cable, made with super-light and flexible Mogami 2739, which really keeps cable-borne noise to a minimum: critical if booming or use the mic on a pistol grip. This was made by Ed at ETK Cables.
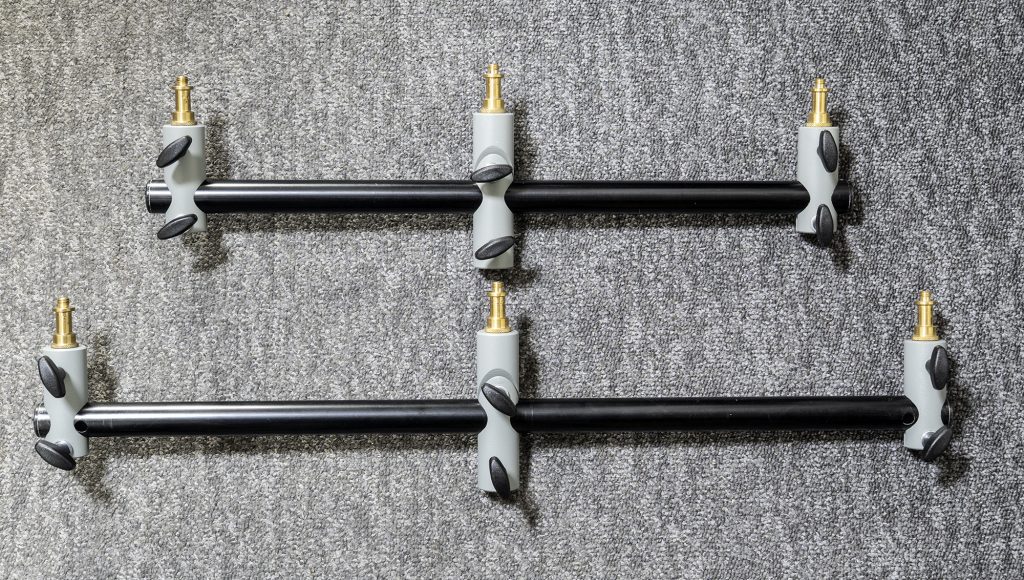
This might be one of my shortest blog posts ever, but that’s doubtless a refreshing change from some of my very long ones, especially if you read them on your phone! Anyway, I was just putting together the gear for a recording tomorrow morning and while grabbing a stereo bar, I thought it perhaps worth highlighting, first, how over the years I have found the Manfrotto 154b to be a great option and, second, how easy it is to modify.
Like many others, I have found the 154b to be an eminently affordable stereo bar, a decent length (spigot centres up to 620mm), really adaptable, quick to set up and adjust, keeps the mics as set, strong, and robust. And if you have a few, like I do, you can add more of the connection clamps that hold each mic when you want, say, four mics on the bar: and it is much cheaper doing that than ordering additional clamps (part R154,01). But, over the years I have noticed that some dismiss it, especially for field recording, for two features: it has an aluminium tube construction that can resonate (not often an issue) and it has two holes near the ends that, if the movable spigots are not over them, can catch the wind when used outdoors. For many uses I deploy the 154b as sold with no issue, but often I don’t want such a long bar so I have a modified version that is 520mm long: this fits neatly in a rucksack I often use when field recording, and is no longer than the (folded) tripods and stands I pack with it. Obviously cutting an aluminium tube to length is no great deal and needs no special gear (care and a junior hacksaw would suffice if you don’t have much of a workshop) and, as long as you cut both ends off, then the two offending holes will be removed. The plastic end caps can then be knocked out easily from inside, so no need to scuff them by prising them off. And, finally, you can do as I did and stuff the inside to damp any resonance: I just used a bit of Rockwool insulation I had spare, but I am sure anything similar would do the trick. So, 10 mins work and, voila, a slightly more compact stereo bar fit for anything in the wilds.
All very obvious, I know, but it might just help someone view the 154b a bit differently!
Double mid side with Schoeps CCM mics (left) and horizontal B-format with Sennheiser MKH 8000 mics (right).
In Part 1 of this three-part series of musings on double mid side (DMS), I went through the three rigging options; in Part 2 I tested the options; but in this final part, as the title says, I do something rather different, which is compare DMS to horizontal B-format (i.e. native B-format with no vertical component).
As we have seen in the previous posts, setting up DMS with side-address mid mics produces an array that looks very similar to a horizontal native B-format, or Nimbus-Halliday, array. In that case, a horizontally-oriented omni mic is flanked by vertically oriented fig 8s, one aimed forwards-backwards and one aimed sideways. In a variation of this, which I have used too, the omni can be set vertically as is one fig 8, with the second fig 8 set horizontally between the two: this variation is designed to address the directionality of the omni mic at higher frequencies in the plane of the mic body (a consequence of the mic body itself). I described and illustrated the two different horizontal B-format arrays in my pipe band recording blog posts last year. The similarity between horizontal B-format and DMS is not just that the two rigs look so alike, but also how they perform since, as Wittek et al (Wittek, H., Haut, C., and Keinath, D., Double M/S – a Surround recording technique put to test (Schoeps paper, 10.03.2010) note:
In principle, Double-M/S signals can also be converted to “horizontal B-format” by addition and subtraction: W = Mfront+ Mrear; X = Mfront- Mrear; Y = S;
In this formula, the W (omni mic) is formed by combining the front and rear cardioids, and the X (forward-rearward facing fig 8) by again using the two cardioids, albeit subtracting one from the other. In that limited sense, deriving B-format from DMS is akin to deriving it from ambisonic (A-format) arrays of cardioids.
So the questions remain: if DMS and horizontal B-format are mathematically equivalent, do they sound the same and, either way, are there pros and cons for selecting either array? This, needless to say, is more complex than you might think, as it rather depends on the use of the array. For example, even if not ideal and demanding care when decoding, DMS can be used with a shotgun microphone, typically when such a narrow polar pattern is required principally as a mono mic (say for dialogue in production sound), but giving scope for flexible stereo or surround sound when needed, without changing the rig. The shotgun can be a mono mic with a fig 8 and a rear-facing cardioid clipped to it, or a stereo shotgun (i.e. with a integrated fig 8 capsule, such as the Sennheiser MKH 8018) with a rear-facing cardioid clipped to it. In this regard DMS has no equivalent in horizontal B-format in any practical sense.
Both arrays can and often are used for stereo recording: both allow mid-side recording with a variable polar pattern for the mid mic, and, indeed, steering of the stereo sound after the event. With DMS the mid mic polar pattern is created by mixing the two back-to-back cardioids, in the same way that a variable-pattern mid mic works: only the cardioid pattern is native to the mid mic. With horizontal B-format the mid mic polar pattern is created by mixing the omni mic and forward-rearward facing fig 8: this also gives you, natively (i.e. without mixing), a fig 8 mid mic and an omni mid mic. I use all three native mid mic polar patterns for MS, so wouldn’t choose between the two approaches on these grounds: besides, you may recall my previous test comparing a cardioid to a virtual cardioid created by my mixing a fig 8 and an omni, which showed little to no difference in the sound other than the more extended bass of the virtual cardioid arising from the use of the pure pressure omni. Well, at least the sound was very similar, but I do wonder, in the light of my DMS and horizontal B-format comparisons (below) whether the polar pattern was quite the same.
Comparing a cardioid MKH 8040 (top) with a virtual cardioid made by mixing a fig 8 MKH 8030 (centre) and omni MKH 8020 (bottom).
It is this extended low-frequency response that is perhaps the most distinctive difference between horizontal B-format and DMS when used for stereo. This difference is acknowledged in the Schoeps DMS plugin, however, which, as the user guide makes clear, ‘normalizes the sensitivity of the CCM 8 to match the CCM 2’s and compensates for the low frequency loss of the figure-of-eight microphone’: the CCM 8 being the fig 8, of course, and the CCM 2 being Schoeps’s flat (free-field) omni in the same CCM range.
Lineside at Holt station (getting some odd looks and banter as usual, not least from the signalmen) for a DMS vs horizontal B-format comparison, as a Grange class locomotive pulls the train towards Sheringham.
Although rigging DMS with side-address cardioids provides the most obvious physical similarity with horizontal B-format, for my test purposes comparing these two rigs isn’t ideal: the Schoeps mics for the DMS rig are quite different from my Sennheiser mics for the horizontal B-format set-up. In my initial tests with these two rigs, I felt I was more demonstrating the difference between the mics than comparing the different configurations. Using end-address cardioids opens up more options, but, without three MKH 8030 fig 8s here (yet!), the best I can manage is DMS with two MKH 8040s and one MKH 30 vs horizontal B-format with two MKH 8030s and one MKH 8020. The MKH 8030 and MKH 30 are not identical, but, as we have seen before, they are fairly close. So with these two rigs in Mega-Blimps, I headed off to the local steam railway, hacking my way through the brambles and bracken to get to a point just beyond the station platform.
First up, we have the individual files for each of the three mics in each array. The files can be downloaded, and have been level-matched using the published sensitivities:
And here we have the files identically processed using the Harpex-X plug-in to stereo files as a coincident pair of hypercardioids at 127 degrees (i.e. equivalent to cardioid MS with a 50:50 balance between mid and side mics):
For some deeper bass, I then compared the two arrays back at home, starting the car to get some nice low-frequency content and, while at it, the usual Foley-like footsteps, gate openings etc. Again, here are the individual files for each of the three mics in each array:
And, again, here we have the files identically processed in Harpex-X to stereo files as a coincident pair of hypercardioids at 127 degrees (i.e. equivalent to cardioid MS with a 50:50 balance between mid and side mics):
The increased bass of the horizontal B-format array is more noticeable with the car engine than the steam locomotive, as you would expect, but both sets of recordings show broader differences between the two techniques. Some of these differences, mainly for the garden recording where there are close sounds, are an inevitable consequence of the spacing of the two rigs (about 1m apart), but there are very obvious differences that go beyond the fact that the two rigs could not be exactly coincidental. The localisation of even distant sounds is quite different. With the uncertainty of what is going on in the various DMS and B-format plug-ins, it is worth looking at a manual MS decode for the two pairs. For the DMS rig, standard MS was simply derived by using the fig 8 MKH 30 and the forward-facing cardioid MKH 8040 (i.e. ignoring the rear-facing cardioid). With the horizontal B-format all three mics were required, first creating a virtual cardioid from a 50:50 mix of the forward-rearward facing fig 8 MKH 8030 and the omni MKH 8020, and then using this as an MS pair with the sidewards-facing fig 8 MKH 8030. Here are the resultant two files for the steam locomotive departing recording:
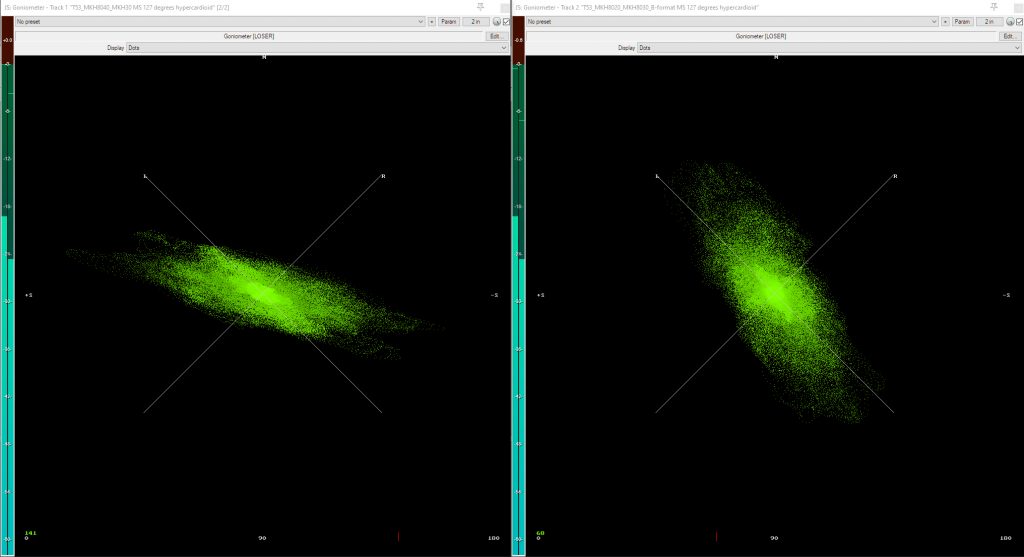
These two MS pairs, decoded to LR, show very similar results to the DMS and horizontal B-format recordings output to stereo. In both cases the stereo field is rather different, with the B-format derived stereo having less stereo spread. You can hear this in the sample files, but, for a visualization, here are the goniometer plots showing the steam locomotive whistle at the beginning of the railway recording for both the DMS/horizontal B-format recordings output to stereo via Harpex-X and for the two MS equivalents that were derived manually. I chose the whistle as a short clear sound located well off to one side (the left).
Goniometer on train whistle for DMS (left) and horizontal B-format (right), both processed in Harpex-X and output to stereo (XY with hypercardioids at 127 degrees).Goniometer on train whistle for MS using MKH 8040 and MKH 30 (left) and MKH 8020+MKH 8030 (creating virtual cardioid) and MKH 8030 – i.e. manually derived from horizontal B-format (right), decoded to stereo.
In both instances the whistle in the B-format example (or MS derived from combining the omni and forward-facing fig 8 in the B-format rig to create a virtual cardioid, then used with the side-facing fig 8) is rendered a little more centrally. Of course, this is very easy to adjust with DMS or B-format recordings, so, in some sense, is not a practical issue, but the point is that there is a difference and it isn’t simply the result of the behind-scenes mechanics of the conversion plug-in. This suggests that the mathematical combination of an omni and fig 8 to make a cardioid and the practical implementation of this don’t quite match, which is not entirely surprising: factoring in the different sensitivities of the two mics is an obvious source of possible error, changing the resultant polar pattern, although the audible differences suggest – at least to my ears – that perhaps there is more to this than that factor only.
Conclusions
If ever there was a misleading subheading, then this is it: ‘conclusions’ suggests something far more, er, conclusive than I can offer. First up among caveats, my end-use of either DMS or horizontal B-format is primarily for stereo output. Testing the different rigs with a decent, say, 5.1 system would be an interesting exercise, but at least the files above for individual mics will allow others to do that and see if they can draw any conclusions: indeed, that is the primary purpose of the blog post. The second significant caveat is the evident difficult in getting parity between rigs: using an all Sennheiser MKH approach helped, rather than the Schoeps to Sennhesier comparison, but the MKH 30 is not absolutely identical to an MKH 8030, and, of course, it meant that I had to use end-address cardioids for the DMS rig. I could have used an all Rycote mic approach (I have enough BD-10 fig 8s to achieve this), but the longer mic bodies would not have worked for horizontal B-format in the Mega-Blimp (even that has limits!). However, the previous tests comparing DMS with end-address vs side-address cardioids made me much more sanguine about such an approach. Hopefully something is left that, at the very least, provides readers with food for thought: perhaps even to compare horizontal B-format with DMS themselves.
From my own perspective, the ground I have covered in the tests, many necessarily not included here for reasons of space, for these three DMS blog-posts, along with the practicalities of rigging, the key conclusions I have drawn are:
i) use of end-address cardioids (or, at least, very small SDCs, such as MKH 8000 mics with MZLs or the diminutive Nevatons) for DMS has negligible impact on sound resulting from shadowing and, even, off-centre cardioids, especially compared to the impact of most windshields (OK, that’s not relevant to much indoor recording);
ii) there is, therefore, little reason in most circumstances to go for the more transparent approach of using side-address cardioids for DMS, although, of course, no reason to not do so if the mics are available (suitable windshield permitting if outdoors);
iii) unless the low-frequency response of an omni is critical, then there seems no advantage – at least with the mics and usage I have – of horizontal B-format over DMS.
So, going forward, although I plan to utilize both three-mic rigs in the future, I suspect that I will be using DMS more than horizontal B-format, not least as it allows a wider range of my mics to be used: most obviously, the Nevatons I have acquired recently. But equally, and with my predominantly stereo-focused approach in mind, I will continue to use MS far more (or, indeed, other stereo pairs). Certainly the flexibility of horizontal B-format or DMS in terms of selecting polar pattern or, less of an issue, steering the array in post, are insufficient grounds to merit their use for most cases where a stereo end-product is required. I’m very happy with knowing which way to point the mics (!) and happy enough, with MS, to select the mid-mic polar pattern that will suit the job best be that an omni, wide-cardioid, cardioid, supercardioid or fig 8. That said, I occasionally need to produce surround sound field recordings (e.g. recently a recording of the sea for the intro to a pipe-organ SACD – Organ Fantasy by Jean-Paul Imbert and his students) so horizontal B-format and DMS will continue to be part of my recording life.
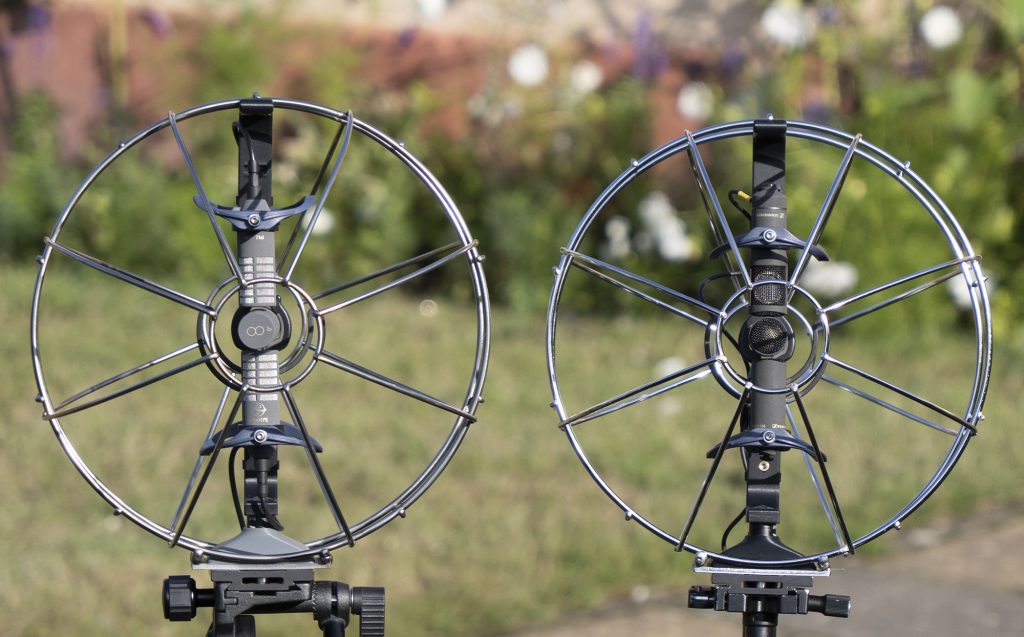
DMS with Schoeps CCM4V side-address cardioids and CCM8 fig 8: the ideal configuration, and in the most transparent mount and windshield I can muster, but does it actually out-perform other setups?
Introduction
In Part 1 of this three-part blog-post on double mid-side I covered the rigging options for DMS using SDC mics. In this second part, I explore the differences between the rigging options, focusing on the option with side-by-side end-address cardiods and the, theoretically, rather better option with side-address cardioids: are there any audible differences? And I also include some clips of recordings to give a sense of the differences between different DMS set ups: that doesn’t just mean how the mics are configured, but, also, different mics.
Shadowing
One of the criticisms thrown at any configuration of coincident mics, but especially at those with multiple mics, is of the impact of shadowing, where elements of the mic shock-mounts or, more substantially, adjacent mics colour the sound. Of the three DMS configurations that with the most obvious shadowing is, of course, the option with side-by-side cardiods: you wouldn’t normally choose to stick something the size of mic immediately adjacent to and projecting forward from a cardioid mic capsule and there is no doubt that, visually, it looks clunky. But does it sound noticeably different?
For those interested, I did some tests on the shadowing effect in such a clustered DMS rig (using MKH 8000 mics), recording pink noise played bay through one of my Vivid S12 monitors to the forward-facing cardioid in the DMS array, and then moved the fig 8 and rear-facing cardioid away (the mics were carefully set up with a separate stand for the forward-facing mic so that it remained exactly in position when the other mics were removed). This was done with the mic on axis and then 45 degrees off axis, so that, in the latter, the body of the rear-facing mic was shadowing the forward mic.
Pink noise recording by forward-facing MKH 8040 cardioid mic on axis to sound source with mic clear (green) and within DMS rig (red).Pink noise recording by forward-facing MKH 8040 cardioid mic at 45 degrees to sound source with mic clear (green) and within DMS rig (red).
You can see from the spectrograms below that there was more of an impact on the high frequencies as expected at 45 degrees. Of itself this doesn’t show whether the differences of the single, unimpeded, cardioid mic vs the identically positioned mic within its DMS cluster are significant, so, by way of comparison we can look at some similar tests exploring the impact of two windshields (which I have shown previously). First we have the MKH 8030 with the Min-ALTO 115 basket turned side-on to the speaker source so that the fig 8 mic is on axis to the sound source:
Pink noise test with Mini-ALTO 115 with MKH8030 fig 8 mic aimed at speaker: green is the bare mic on the shock-mount and the red overlay is the recording with the basket added.
And for another comparison, here is the same fig 8 test repeated with a Rycote Cyclone.
Pink noise test with Cyclone (small) with MKH8030 fig 8 mic aimed at speaker: green is the bare mic on the shock-mount and the red overlay is the recording with the basket added.
In short, the impact of shadowing in the DMS mic array is measurable, but is far less significant than the impact of these two windshields, where the fig 8 (obviously a key element of DMS) is affected by the structure of the windshield baskets, with the particularly noticeable difference in the Cyclone basket doubtless largely due to the substantial plastic ring for its end cap.
And to return to our shadowing tests for the DMS rig, we can listen to how the effect of shadowing actually sounds. I used the same means of removing the fig 8 and rear-facing cardioid without disturbing the forward-facing cardioid’s position as before, and again placed the mics in front of a single speaker (Vivid S12) in my studio and played back a short section of a recent recording of mine of a singer-guitarist (Luke Chapman), angling the mics on axis to the speaker and then at 45 degrees. Here are the resulting mono sound files:
First, here is the pair of recordings of the forward-facing cardioid mic on axis, with no surrounding mics, and then shadowed within the cluster of DMS mics:
Second, here is the pair of recordings of the forward-facing cardioid mic at 45 degrees, with no surrounding mics, and then shadowed within the cluster of DMS mics (the body of the rear-facing cardioid mic shadowing the forward-facing mic in particular):
Obviously, comparisons should not be made between the on-axis and the 45-degree recordings as, by definition, the mic has moved!
I suspect many listening to these examples may be surprised by how little difference there is between the two recordings (clear mic and shadowed mic) in each set up (on axis and at 45 degrees). Certainly, I was reassured that shadowing effects are less than might be feared with this more clustered version of the two options that use end-address cardioids. Obviously use of longer and larger mics (think two MKH 40s and an MKH 30) would have a greater effect, but, conversely, two still shorter cardioids (think of those 23.5mm-long Nevaton MC59uS/C2 mics) would reduce the effect more (subject to the impact of any mounts).
Of course, shadowing is only one potential downside with the clustered DMS rig with two side-by-side cardioids: both cardioids are necessarily offset from the centre of the fig 8 capsule, typically by around 12mm or more. With MS normally the recordist aims to align the mics so that one capsule is precisely directly above the other and as close as possible. Losing that vertical alignment, of course, risks introducing comb filtering to sounds directed at the mics from the horizontal plane (or whatever plane the mics are tilted toward): likewise, increasing the vertical spacing between the mics will introduce more comb filtering and narrow the horizontal band where the effects are minimal or non-existent. The last isn’t an issue with DMS with two side-by-side cardioids (indeed, it can allow the vertical distance between the fig 8 and cardioid capsules to reduce), but the former is: the question, again, is does this matter? I have heard the results of MS recordings of classical music with the mics side-by-side, which sound fine (for example search out the recordings of ex-BBC engineer, Roger Long, who, as ‘Rolo46’, has posted many marvellous MS classical music recordings on Gearspace using side-by-side MS mics, mostly with an MKH 30 pair), but do the theorists, who frown at such setups, have a point? My aim was to test this, simplifying matters by doing so with an MS pair, comparing vertically aligned mics with one with the mid mic offset as if for this DMS configuration, but, try as hard as I could, I simply could not get any method to work convincingly: I tried indoors with a single speaker, but comb filtering for the shifted mid mic was obscured by comb filtering from the room (few studios are entirely free of comb filtering: and evidently mine isn’t!), and I tried outdoors (the poor man’s anechoic chamber!), but just couldn’t get reliable, repeatable or convincing results. Perhaps I will have a moment or revelation and work out what I need to do, but in the meantime I’m sorry to have come up short: you’ll just have to hang your hat on whichever side of the debate convinces you most . And, of course, one can learn something from the comparative field recordings below (or, better, your own), which compare the different rigs in action.
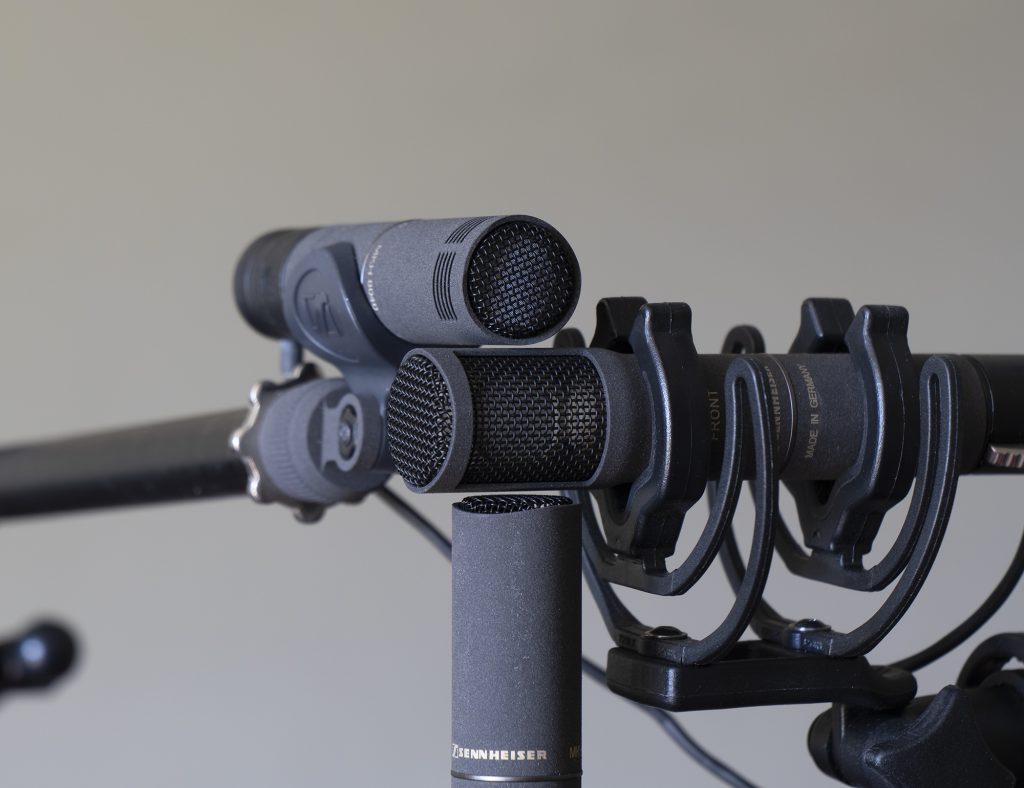
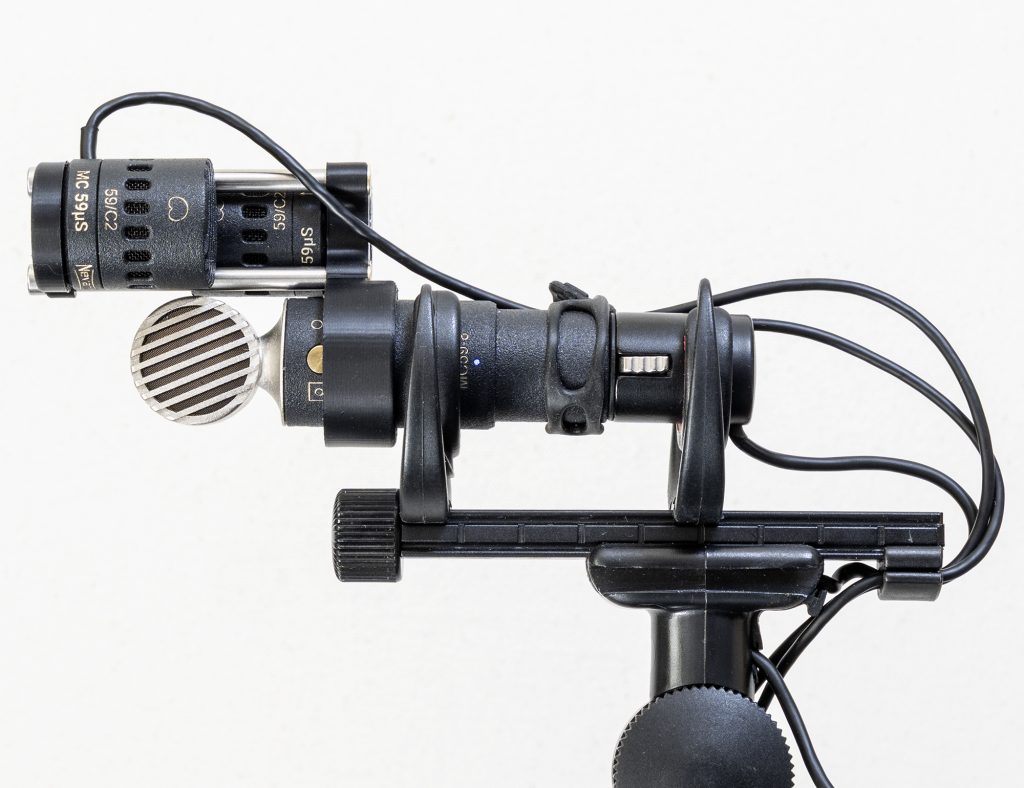
Minimizing the impact of the shadowing of end-address cardioid mics when rigged side-by-side with the ultra-short Nevaton MC59uS/C2 mics.
Field testing the different DMS rigs
On which note, I left behind such tests and took the mics into the field, to compare some real DMS rigs. This looked at a combination of different rigging approaches and, closely related, different microphones. I could have added a third variable of different windshields, but, to make things more fairly comparable, I have stuck with the same windshields in each set of field of tests. Being unadventurous (or just lazy?!), the tests comprise a series of my regular ‘quiet’ village street recordings: birdsong (plenty of swifts screaming overhead this summer), passing cars, and a bit of Foley-esque sound (as I open doors and gates, and stomp around aimlessly) cover quite a few bases. The cocker spaniels even joined in at one point with a bit of snuffling (honest, it wasn’t me!).
First off, I set up two rigs comprising the Schoeps CCM4V side-address cardioids and CCM8 fig 8 trio, and the Sennheiser MKH 8040 cardioids and MKH 8030 fig 8 mics for DMS with the mics side-by-side, recording with a Sound Devices 788T at 24bit/96kHz. In both cases I used Mega-Blimps for the windshields. With such large surround sound rigs two seems a sensible limit: three or more would mean that they are spaced rather too far apart to be comparable. Here is a short clip (1:34) of the resultant recordings, with one mono file for each mic (levels balanced according to mic sensitivity, but with no other processing) so that you can play around with them in, say, the Schoeps DMS or Harpex-X plugins: I use both for DMS processing.
a) Sennheiser:
b) Schoeps:
c) and here are two stereo files, generated in Reaper using Harpex-X (with the Blumlein stereo preset):
Second, here are the mono files for a similar test comparing DMS with the Sennheiser MKH 8040 cardioids and MKH 8030 fig 8 mics vs the Nevaton MC59uS/C2 and MC59/8 mics, again using Mega-Blimps for both rigs:
d) Sennheiser:
e) Nevaton
f) and here are two stereo outputs, generated using Harpex-X (with the Blumlein stereo preset):
And, finally, here are the mono files for another garden test, this time with a bit of wind (but no low-pass filtering applied), comparing DMS with the Schoeps CCM4V side-address cardioids and CCM8 fig 8 vs the Nevaton MC59uS/C2 and MC59/8 mics, again using Mega-Blimps for both rigs:
g) Schoeps:
h) Nevaton:
i) and here are two stereo outputs, generated using Harpex-X (with the Blumlein stereo preset):
Now anyone who downloads all those files and listens to them deserves a medal!
Conclusions
It is extraordinarily difficult to draw conclusions that are relevant to others’ use of DMS (not least since the use of side-address and end-address cardioids inherently means using different mics), but, nonetheless, I will have a stab at this. First off, although generally relaxed about multi-mic coincident pairs and the impacts of shadowing and small offsets, I came into these tests with an expectation that the acoustic problems of side-by-side cardioids in what is doubtless the most popular configuration of DMS would be more noticeable than they have proved to be. In reality, and that is with the caveat that I have not been testing DMS with bulkier SDCs such as the MKH 30 and MKH 40, they are much less significant than the impact of many windshields, especially those that were not designed to offer as much transparency to the sides and rear as to a forward-facing directional mic. So, if the aim is to place a DMS rig in a Radius Windshields Mini-ALTO or a Rycote Cyclone, then the consequences of the mic configuration are nothing compared to the impact of the windshield. However, if using a windshield with much better all round transparency such as the Cinela Pianissimo or, if boom pole use is not needed, one of my Mega-Bimps, then the impact of the different configurations will come into play. But this then gets very complex for several reasons: yes, the Schoeps CCM4V side-address cardioids and CCM8 fig 8 offer good alignment and little no shadowing (both from the other mics and the mounts), so using them in a Cinela Zephyx (for lightness) or Mega-Blimp (for more transparency) would offer the best performance from that perspective. But, at the same time, they have higher self-noise than the MKH 8030 + 2x MKH 8040 setup and lack the more humidity-proof RF technology of the Sennheiser mics. And, of course, the Nevaton MC59/8 + 2x MC59uS/C2 rig offers the most minimal shadowing for DMS with side-by-side cardioids (due to the very short length of the cardioids) as well as the lowest self-noise. As for the sound, well that’s one for individuals. I think the Nevaton DMS rig is the best sounding irrespective of mic configuration, but I may be missing something that more refined ears can pick up. Or perhaps it is just taste: it’s not as if top end classical music recordists all prefer the same mics or the same mics for a specific task.
And, just to add complexity where you don’t need it, I was surprised by the difference between the two plugins I have been using – Schoeps’s own DMS plugin and Harpex-X. In part, at least, this seems a product of the Schoeps plugin having built-in gain and frequency response compensation for its mics (which, evidently, isn’t appropriate for other mics), but the upshot is that it is very easy to get more significant differences by processing the recordings differently than it is from the actual mics or configurations used.
If you have all these mics (or, indeed, other good options) the selection criteria will need to balance all these factors: if you have some of the mics only, then that will simplify the choices; and if you have none of the options, but are thinking of one, then the usefulness of the mics for different purposes are likely to come into play (e.g. would you have use for Schoeps CCM4V side-address cardioids, or would end-address cardioids be more use?).
As for my choices? Well, I don’t own the Schoeps mics, so that does simplify things as the advantages of side-address cardioids wasn’t clear enough for me to buy the mics (especially with no other Schoeps mics in my locker), so DMS for me will be MKH 8000 mics (for tougher conditions) in a Mega-Blimp; otherwise, I will be using the Nevaton MC59/8 + 2x MC59uS/C2 rig in the same windshield for, as I said, to my ears, the best sound and, less subjectively, for even lower self-noise. And for ultra-compact DMS, should I ever need it, I would use either rig in a Nanoshield (the Nevaton DMS won’t fit in a Mini-ALTO, and the Sennheiser rig isn’t suited to the Mini-ALTO due to the fig 8 position in relation to the chunky plastic rings). But, the question I still need to address for my own use is whether DMS is preferable to horizontal B-format: and that, of course, is for Part 3 of my DMS blog-post series!